My New Cookbook is Out! Check Out Now!
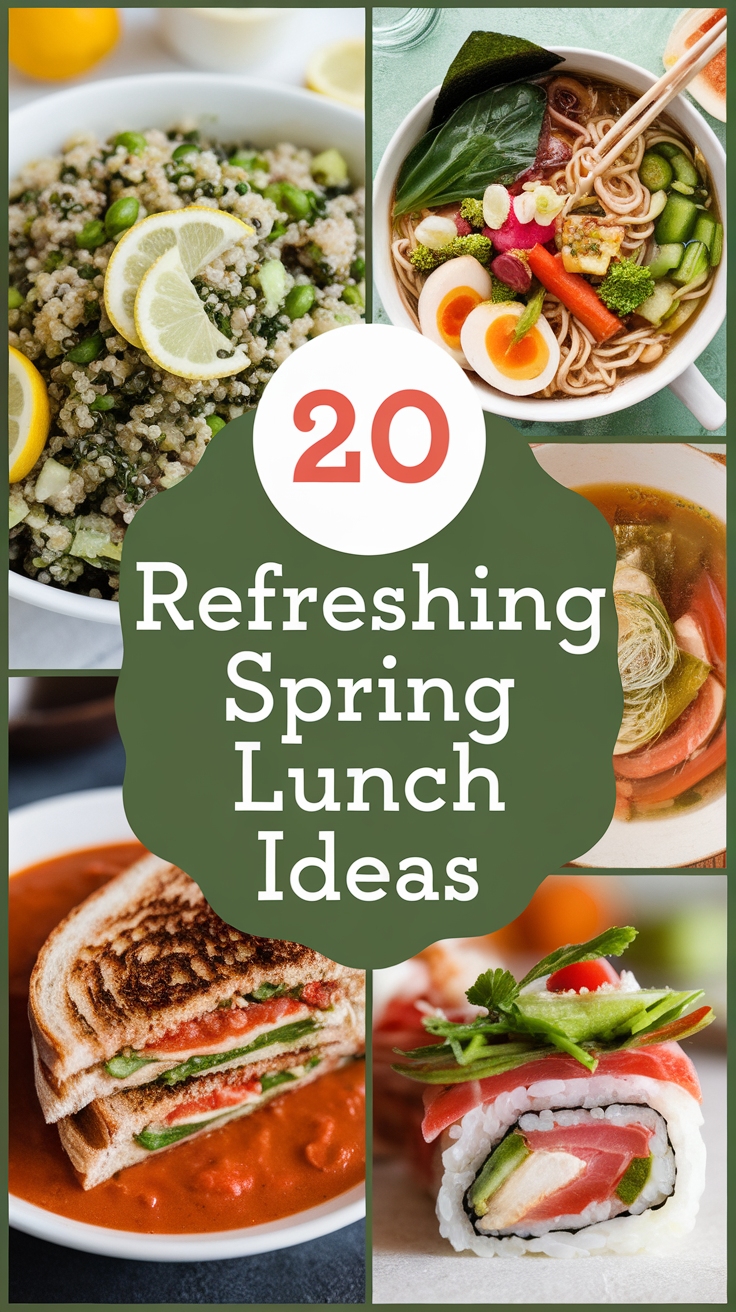
20 Light Spring Lunch Recipes
This page contains affiliate links and I earn a commission if you make a purchase through one of the links, at no cost to you.
Spring is here, and light lunches are calling your name! If you’re tired of heavy meals weighing you down, you’re not alone. Refresh your routine with these 20 delightful dishes that brighten up your table and your mood. Get ready to enjoy vibrant flavors and nourish your body with fresh ingredients this season!
Shop Our Must-Haves

Sale


1 Citrus Avocado Quinoa Salad
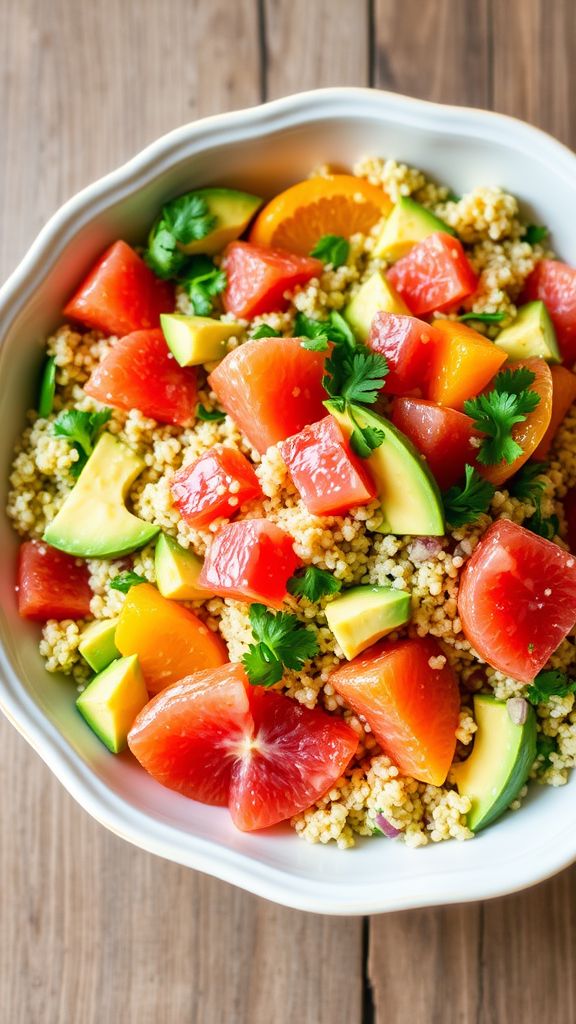
This Citrus Avocado Quinoa Salad is a refreshing and healthy dish that’s perfect for springtime lunches. It’s packed with nutrients and bursting with flavor from fresh citrus and creamy avocado. Easy to make, this salad is sure to brighten your day!
Prep Time: 15 minutes
Total Time: 15 minutes
Servings: 4
Ingredients:
- 1 cup quinoa
- 2 cups water
- 1 large avocado, diced
- 1 cup grapefruit segments
- 1 cup orange segments
- 1/4 cup red onion, finely chopped
- 1/4 cup fresh cilantro, chopped
- 3 tablespoons olive oil
- 2 tablespoons lime juice
- Salt and pepper to taste
Instructions:
First, rinse the quinoa under cold water in a fine mesh strainer. This helps remove any bitterness. In a saucepan, bring 2 cups of water to a boil. Add the rinsed quinoa, cover, and reduce the heat to low. Let it simmer for about 15 minutes until all the water is absorbed.
Once the quinoa is cooked, fluff it with a fork and allow it to cool for a few minutes. While the quinoa is cooling, prepare the other ingredients. In a large bowl, combine the diced avocado, grapefruit segments, orange segments, red onion, and fresh cilantro.
Next, add the cooled quinoa to the bowl and mix everything gently. In a separate small bowl, whisk together the olive oil, lime juice, salt, and pepper. Drizzle this dressing over the salad and toss everything to coat evenly.
Your Citrus Avocado Quinoa Salad is now ready to serve! You can enjoy it right away or chill it in the fridge for later.
Tips:
- For extra flavor, add some chopped jalapeño if you like a little heat.
- Feel free to swap out the citrus fruits for your favorites. Mango or kiwi would taste great too!
- This salad keeps well in the fridge for a couple of days, making it great for meal prep.
Nutrition Facts:
- Calories: 320
- Protein: 8g
- Fat: 18g
- Carbohydrates: 36g
- Fiber: 9g
- Sugar: 2g
2 Asparagus and Pea Pesto Wraps
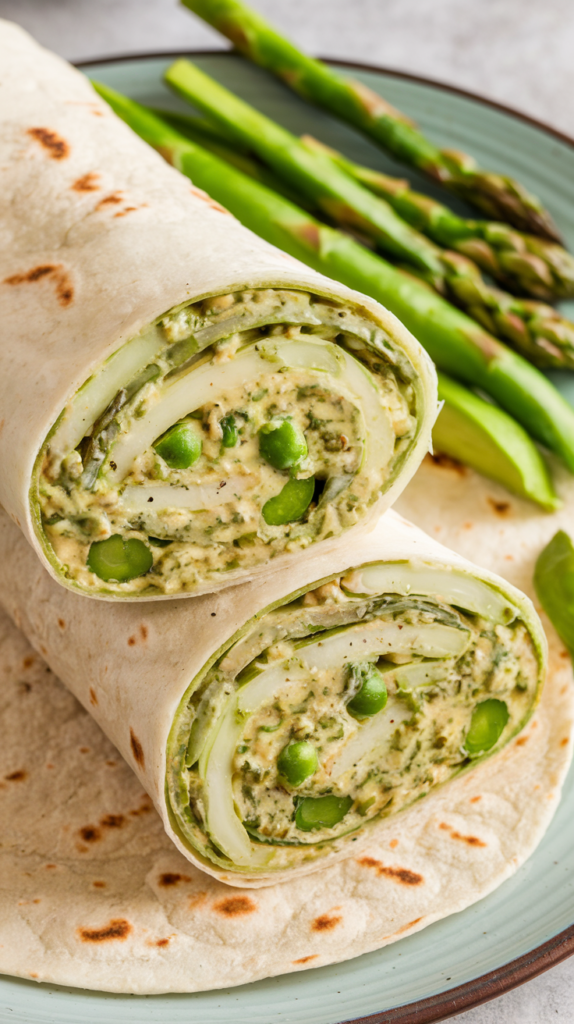
Asparagus and Pea Pesto Wraps are a delicious way to enjoy fresh spring flavors. These wraps are packed with nutrients and taste great as a light lunch or snack. You’ll love the creamy pesto combined with crunchy asparagus and sweet peas!
Prep Time: 15 minutes
Total Time: 15 minutes
Servings: 4 wraps
Ingredients:
- 2 cups fresh asparagus, trimmed and cut into small pieces
- 1 cup frozen peas, thawed
- 1/2 cup fresh basil leaves
- 1/4 cup grated Parmesan cheese
- 1/4 cup olive oil
- 1 tablespoon lemon juice
- 1/4 teaspoon salt
- 1/4 teaspoon black pepper
- 4 large tortillas or wraps
- Optional: extra Parmesan for topping
Instructions:
Start by boiling a small pot of water. Add the asparagus pieces and blanch them for 2 minutes until they are bright green and tender-crisp. Remove the asparagus and immediately place it in a bowl of ice water to stop the cooking. Drain and set aside.
In a food processor, combine the blanched asparagus, peas, basil, Parmesan cheese, olive oil, lemon juice, salt, and black pepper. Pulse until the mixture is smooth and creamy. If it’s too thick, you can add a little more olive oil to reach your desired consistency.
Lay out one tortilla on a clean surface. Spread a generous spoonful of the asparagus and pea pesto over the tortilla. Make sure to cover it evenly, leaving a small border around the edges.
Next, roll the tortilla tightly from the bottom up to create a wrap. Repeat this process for the remaining tortillas. Once done, you can slice them in half for easy eating. If you like, sprinkle some extra Parmesan cheese on top for added flavor.
Tips:
- For extra crunch, add some sliced cucumbers or carrots into the wrap.
- You can swap the tortillas for leafy greens like spinach or romaine lettuce for a low-carb option.
- If you want a creamier pesto, add a tablespoon of Greek yogurt to the mixture.
Nutrition Facts:
- Calories: 250 per wrap
- Protein: 8g
- Carbohydrates: 30g
- Fiber: 5g
- Fat: 12g
3 Grilled Vegetable and Hummus Panini
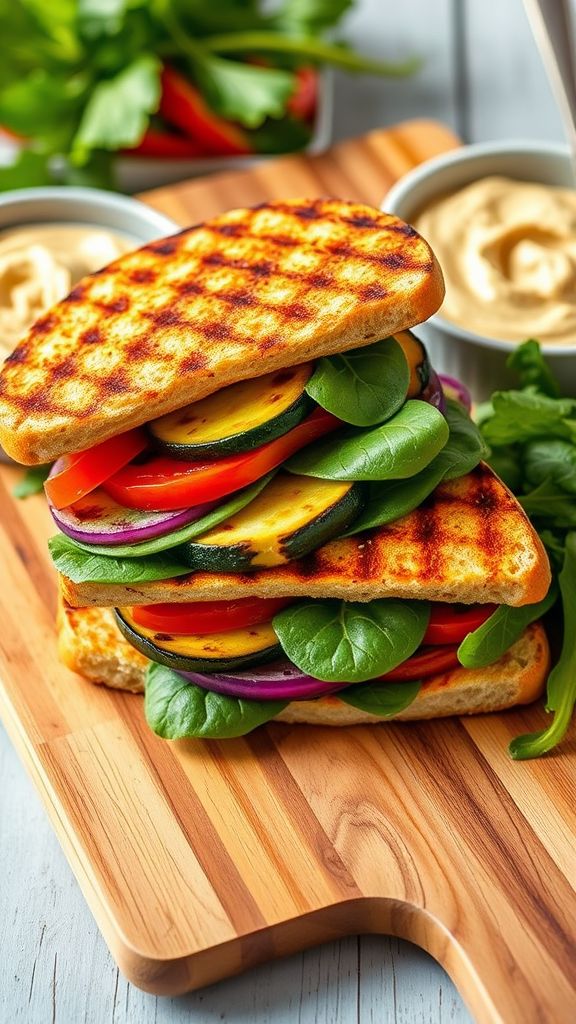
Grilled Vegetable and Hummus Panini is a delightful and healthy choice for a light spring lunch. Loaded with colorful veggies and creamy hummus, this sandwich bursts with flavor. It’s easy to make and perfect for picnics or a quick meal at home.
Prep Time: 10 minutes
Cook Time: 15 minutes
Total Time: 25 minutes
Servings: 2
Ingredients:
- 2 slices of whole grain bread
- 1/2 cup of hummus
- 1 zucchini, sliced
- 1 bell pepper, sliced (any color you like)
- 1 small red onion, sliced
- 1 cup of fresh spinach
- 1 tablespoon of olive oil
- Salt and pepper to taste
- 1 teaspoon of Italian seasoning (optional)
Instructions:
Start by heating a grill pan over medium heat. While it warms up, prepare the vegetables. Toss the sliced zucchini, bell pepper, and red onion in a bowl with olive oil, salt, pepper, and Italian seasoning. Make sure the veggies are well-coated.
Next, place the seasoned vegetables onto the hot grill pan. Cook them until they are tender and have nice grill marks, about 5-7 minutes. Don’t forget to turn them halfway through to cook evenly.
While the veggies are grilling, take out the bread slices. Spread hummus generously on one side of each slice. Once the vegetables are done, layer them on one slice of bread over the hummus. Add a handful of fresh spinach on top of the grilled veggies.
Now, place the other piece of bread on top, hummus side down. Gently press the panini together. If you want, you can brush a little olive oil on the outer sides of the bread for a crispier finish.
Carefully place the assembled panini back onto the grill pan. Cook for about 3-4 minutes on each side, or until the bread is golden brown and crispy. Use a spatula to flip it over gently.
Once cooked, remove the panini from the grill. Let it cool for a minute, then slice it in half. Serve warm and enjoy your tasty Grilled Vegetable and Hummus Panini!
Tips:
- For extra flavor, try adding sliced avocado or feta cheese inside the panini.
- If you don’t have a grill pan, you can use a regular skillet or a panini press.
- You can prepare the vegetables ahead of time and store them in the fridge for quick assembly later.
Nutrition Facts:
- Calories: 380
- Protein: 12g
- Carbohydrates: 50g
- Fat: 15g
- Fiber: 10g
- Sugar: 4g
4 Spinach and Strawberry Salad with Feta
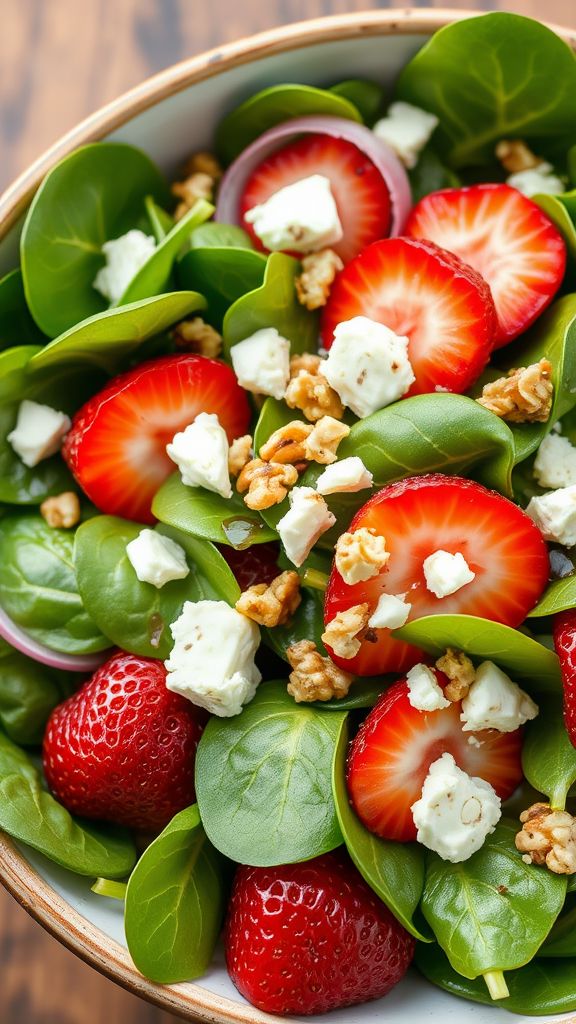
This Spinach and Strawberry Salad with Feta is a delicious and refreshing dish that’s perfect for a light spring lunch. The combination of sweet strawberries, creamy feta, and fresh spinach makes for a lovely mix of flavors and textures that everyone will enjoy.
Prep Time: 10 minutes
Total Time: 10 minutes
Servings: 4
Ingredients:
- 4 cups fresh spinach leaves, washed and dried
- 1 cup strawberries, hulled and sliced
- 1/2 cup feta cheese, crumbled
- 1/4 cup walnuts, toasted (optional)
- 1/4 cup red onion, thinly sliced
- 1/4 cup balsamic vinaigrette dressing
Instructions:
Start by washing and drying the fresh spinach leaves. Place the spinach in a large salad bowl.
Next, hull and slice the strawberries into thin pieces. Add the sliced strawberries on top of the spinach in the bowl.
Now, crumbled the feta cheese over the salad. If you’re using walnuts, toast them lightly in a pan and then add them in for some crunch. Also, add the thinly sliced red onion for a nice kick of flavor.
Finally, drizzle the balsamic vinaigrette dressing over the salad. Gently toss everything together to combine the flavors, making sure not to crush the strawberries or feta.
Serve immediately and enjoy your fresh and tasty salad!
Tips:
- Add grilled chicken to make this salad more filling.
- For extra sweetness, try adding a drizzle of honey to the dressing.
- This salad is best enjoyed the same day it’s made to keep the ingredients fresh.
Nutrition Facts:
- Calories: 200
- Protein: 5g
- Carbohydrates: 14g
- Fat: 15g
- Fiber: 3g
- Sugar: 4g
5 Lemon Garlic Chickpea Tacos

These Lemon Garlic Chickpea Tacos are a quick and easy meal packed with flavor. Perfect for a light spring lunch, they are healthy and satisfying! You’ll love how simple they are to make while still being delicious.
Prep Time: 10 minutes
Cook Time: 10 minutes
Total Time: 20 minutes
Servings: 4
Ingredients:
- 1 can (15 oz) chickpeas, drained and rinsed
- 2 tablespoons olive oil
- 3 cloves garlic, minced
- 1 teaspoon ground cumin
- 1 teaspoon smoked paprika
- Juice of 1 lemon
- Salt and pepper, to taste
- 8 small corn or flour tortillas
- 1 avocado, diced
- Fresh cilantro, chopped (for garnish)
- Salsa or hot sauce (optional, for serving)
Instructions:
Start by heating olive oil in a large skillet over medium heat. Add the minced garlic and sauté for about 1 minute until fragrant.
Next, toss in the drained chickpeas into the skillet. Sprinkle them with ground cumin, smoked paprika, salt, and pepper. Cook for about 5-7 minutes, stirring frequently until they are heated through and slightly crispy.
While the chickpeas cook, warm the tortillas in another pan or directly over the stove flame for a few seconds on each side. This will make them soft and pliable.
Once the chickpeas are ready, squeeze the lemon juice over them and stir to combine. This will add a zesty flavor that brightens everything up.
To assemble your tacos, place a good scoop of the chickpea mixture on each tortilla. Top them with diced avocado and garnish with fresh cilantro. Add salsa or hot sauce if desired.
Serve the tacos warm and enjoy your tasty and healthy meal!
Tips:
- For extra flavor, let the chickpeas marinate in the spices for about 15 minutes before cooking.
- You can add other toppings like chopped tomatoes, shredded lettuce, or cheese if you like.
- Leftover chickpea filling can be stored in the refrigerator for up to three days.
Nutrition Facts:
- Calories: 250
- Protein: 10g
- Carbohydrates: 35g
- Fat: 10g
- Fiber: 8g
6 Coconut Mango Chicken Bowl
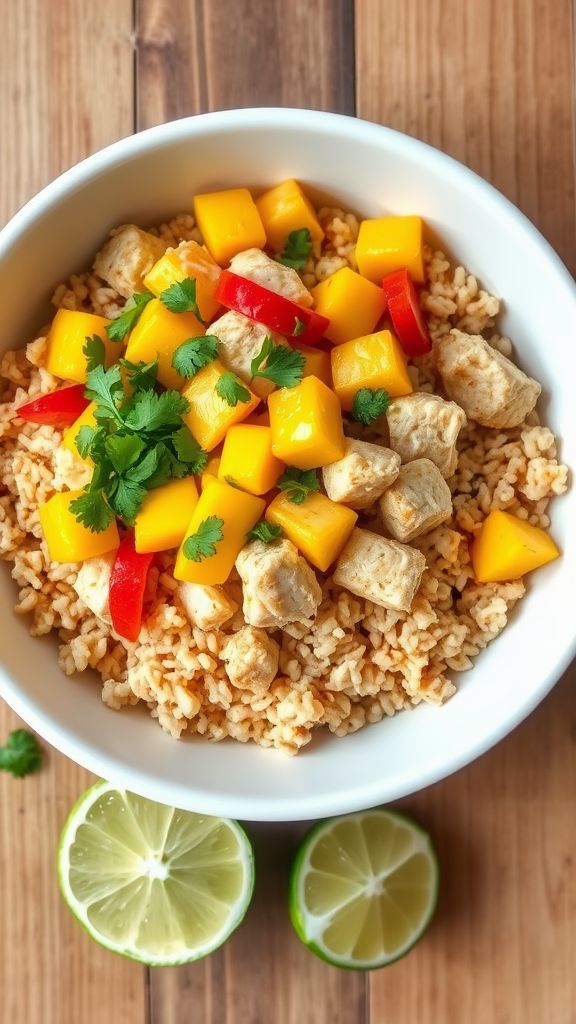
The Coconut Mango Chicken Bowl is a vibrant dish that brings together juicy chicken, creamy coconut, and sweet mango for a refreshing meal. It’s perfect for a light spring lunch that’s both satisfying and nutritious. Let’s get cooking!
Prep Time: 15 minutes
Cook Time: 20 minutes
Total Time: 35 minutes
Servings: 4
Ingredients:
- 2 chicken breasts, diced
- 1 tablespoon coconut oil
- 1/2 teaspoon salt
- 1/4 teaspoon pepper
- 1/2 cup coconut milk
- 1 ripe mango, diced
- 1 bell pepper, diced
- 1 cup cooked brown rice
- 1/4 cup fresh cilantro, chopped
- 1 lime, juiced
Instructions:
Start by heating the coconut oil in a large skillet over medium heat. Once the oil is hot, add the diced chicken breasts to the pan. Season them with salt and pepper. Cook the chicken for about 5-7 minutes, stirring occasionally, until it’s browned and cooked through.
Next, pour the coconut milk into the skillet. Let it simmer for 3-5 minutes to infuse the chicken with that creamy coconut flavor. Stir in the diced mango and bell pepper. Cook for another 2-3 minutes until the bell pepper is slightly soft.
While everything is cooking, prepare a bowl using the cooked brown rice as the base. Once the chicken mixture is ready, spoon it over the rice. Sprinkle with fresh cilantro and squeeze the lime juice on top before serving.
Enjoy your colorful and tasty Coconut Mango Chicken Bowl!
Tips:
- For added crunch, toss in some chopped nuts like cashews or peanuts.
- If you like it spicy, add some chili flakes or sliced jalapeños to the chicken while cooking.
- You can substitute chicken with tofu for a vegetarian option.
Nutrition Facts:
- Calories: 450
- Protein: 30g
- Carbohydrates: 50g
- Fat: 15g
- Fiber: 5g
7 Zucchini Noodles with Cherry Tomatoes
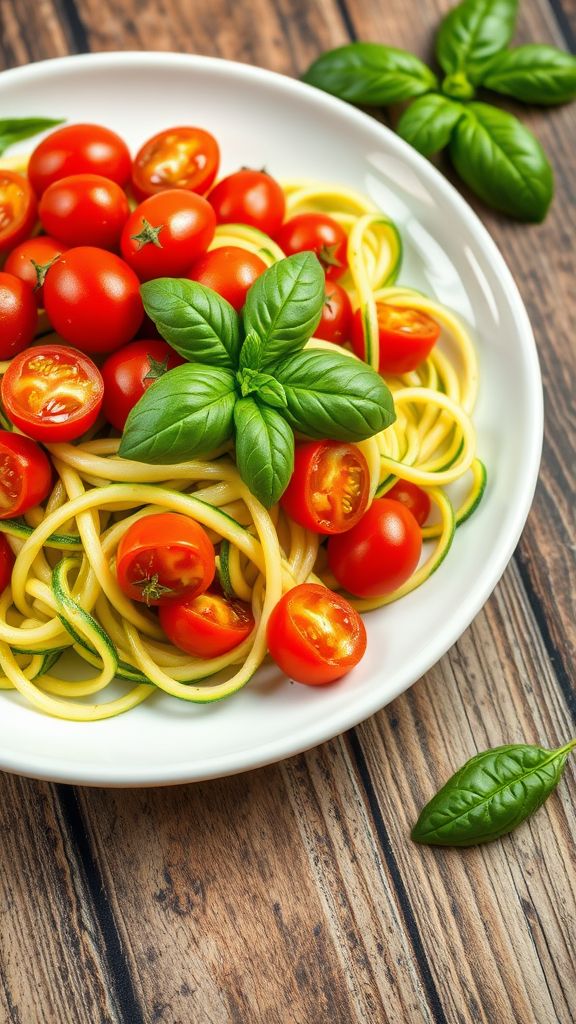
Zucchini Noodles with Cherry Tomatoes is a delicious, healthy dish that’s perfect for a light lunch. With fresh ingredients and a burst of flavor, this meal will brighten up your day. Plus, it’s super easy to make!
Prep Time: 10 minutes
Total Time: 10 minutes
Servings: 2
Ingredients:
- 2 medium zucchinis
- 1 cup cherry tomatoes, halved
- 2 tablespoons olive oil
- 2 cloves garlic, minced
- Salt and pepper, to taste
- Fresh basil leaves, for garnish
Instructions:
Begin by washing the zucchinis thoroughly. Next, you will spiralize the zucchinis to make noodles. If you don’t have a spiralizer, you can use a peeler to create thin strips.
Heat 2 tablespoons of olive oil in a large skillet over medium heat. Add 2 cloves of minced garlic to the skillet and sauté for about 1 minute or until it becomes fragrant. Be careful not to burn the garlic.
Once the garlic is fragrant, toss in the halved cherry tomatoes. Cook them for about 5 minutes until they begin to soften and release their juices. Stir occasionally to mix everything well.
Now add the zucchini noodles to the skillet. Toss everything together and cook for an additional 2-3 minutes. You want the zucchinis to remain slightly crunchy, so don’t overcook them.
Finally, season with salt and pepper to taste. Serve hot, garnishing with fresh basil leaves for an extra touch of flavor.
Tips:
- For a creamier texture, add a splash of heavy cream or a bit of grated cheese.
- You can substitute zucchini with other vegetables like carrots or squash for a different taste.
- Feel free to make this dish ahead of time and store it in the fridge for a quick meal later!
Nutrition Facts:
- Calories: 215 per serving
- Protein: 4g
- Carbohydrates: 12g
- Fat: 18g
- Fiber: 3g
8 Lemon Basil Shrimp Skewers
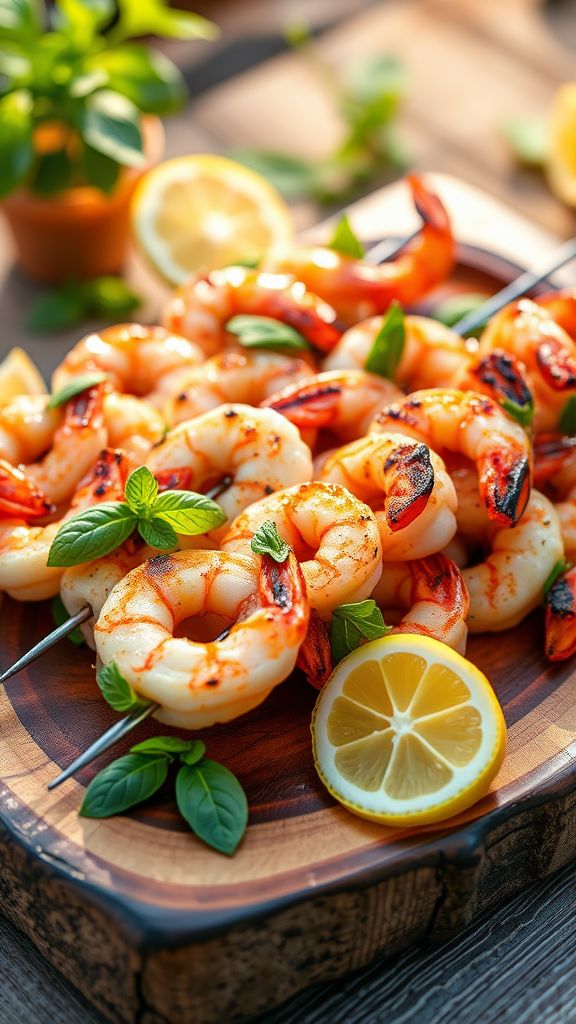
Lemon Basil Shrimp Skewers are a delicious and fresh dish that’s perfect for a spring lunch. The zesty lemon paired with fragrant basil brings a burst of flavor that will make your taste buds dance. These skewers are easy to make and great for grilling or broiling!
Prep Time: 15 minutes
Cook Time: 10 minutes
Total Time: 25 minutes
Servings: 4
Ingredients:
- 1 pound large shrimp, peeled and deveined
- 1/4 cup fresh lemon juice
- 1/4 cup fresh basil, chopped
- 3 cloves garlic, minced
- 2 tablespoons olive oil
- 1 teaspoon salt
- 1/2 teaspoon black pepper
- 1/2 teaspoon red pepper flakes (optional)
- Skewers (metal or soaked wooden skewers)
Instructions:
Start by preparing the marinade. In a bowl, mix together lemon juice, chopped basil, minced garlic, olive oil, salt, black pepper, and red pepper flakes if using. This mixture will give your shrimp lots of flavor.
Next, add the shrimp to the bowl and toss them in the marinade until they are well coated. Cover the bowl and let it marinate for about 15 minutes. This step is essential as it helps the shrimp absorb all that delicious flavor.
While the shrimp marinate, preheat your grill or broiler to medium-high heat. If you are using wooden skewers, make sure they have been soaked in water for at least 30 minutes to prevent burning.
Once the shrimp have marinated, thread them onto the skewers. You can fit about 4-5 shrimp on each skewer, depending on their size.
Now, place the skewers on the grill or under the broiler. Cook for about 2-3 minutes on each side until the shrimp are pink and opaque. Be careful not to overcook them, as they can become tough.
Once done, remove the skewers from the heat and let them rest for a minute before serving. You can serve them on a platter with some extra lemon wedges and basil for garnish.
Tips:
- For extra flavor, you can add cherry tomatoes or bell peppers to the skewers.
- If you don’t want to grill, you can also cook the skewers on a stovetop grill pan.
- Serve these skewers over a bed of rice or a fresh salad for a complete meal.
Nutrition Facts:
- Calories: 220 per serving
- Protein: 23g
- Fat: 10g
- Carbohydrates: 5g
- Fiber: 1g
- Sodium: 600mg
9 Cucumber and Mint Greek Yogurt Soup
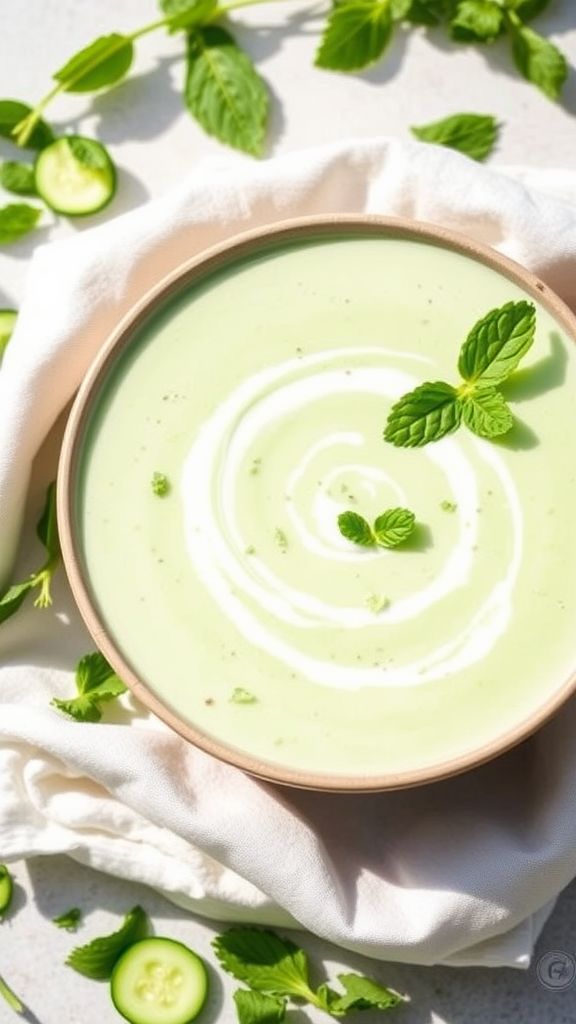
This Cucumber and Mint Greek Yogurt Soup is a refreshing dish perfect for warmer days. It’s light, creamy, and packed with flavors that will make your taste buds dance. Plus, it’s super easy to make and can be served as a starter or a light lunch!
Prep Time: 15 minutes
Total Time: 15 minutes
Servings: 4
Ingredients:
- 2 large cucumbers, peeled and chopped
- 1 cup Greek yogurt
- 1 cup vegetable broth, chilled
- 1/4 cup fresh mint leaves, chopped
- 1 tablespoon olive oil
- 2 cloves garlic, minced
- 1 tablespoon lemon juice
- Salt and pepper, to taste
- Optional: Extra mint leaves for garnish
Instructions:
Start by peeling and chopping the cucumbers into small pieces. This will help them blend well later.
Next, place the chopped cucumbers, Greek yogurt, vegetable broth, chopped mint leaves, olive oil, minced garlic, and lemon juice into a blender.
Blend everything together until the mixture is smooth and creamy. If you like a thinner consistency, feel free to add a bit more vegetable broth.
Once blended, taste the soup and add salt and pepper according to your preference.
Chill the soup in the refrigerator for about 30 minutes to let the flavors meld together.
When ready to serve, pour the soup into bowls, and if desired, garnish with extra mint leaves for a pop of color and flavor.
Tips:
- For a cooler soup, use cold cucumbers and serve on ice.
- You can add a splash of vinegar for an extra zing if you like it tangy.
- This soup can be made a day in advance; just store it in the fridge in an airtight container.
Nutrition Facts:
- Calories: 120
- Protein: 6g
- Fat: 7g
- Carbohydrates: 8g
- Fiber: 1g
- Sugar: 3g
10 Quinoa Stuffed Bell Peppers

Quinoa Stuffed Bell Peppers are a tasty and healthy option for lunch or dinner. They are colorful, filling, and packed with nutrients. Plus, they’re easy to make!
Prep Time: 15 minutes
Cook Time: 30 minutes
Additional Time: 10 minutes
Total Time: 55 minutes
Servings: 4
Ingredients:
- 4 large bell peppers (any color)
- 1 cup cooked quinoa
- 1 can (15 oz) black beans, rinsed and drained
- 1 cup corn (fresh, frozen, or canned)
- 1 cup diced tomatoes (fresh or canned)
- 1 teaspoon cumin
- 1 teaspoon chili powder
- 1 cup shredded cheese (cheddar or your choice)
- Salt and pepper to taste
- Fresh cilantro for garnish (optional)
Instructions:
Begin by preheating your oven to 375°F (190°C). While the oven heats up, prepare the bell peppers. Cut the tops off the peppers and remove the seeds and membranes. Set them aside.
In a large mixing bowl, combine the cooked quinoa, black beans, corn, and diced tomatoes. Sprinkle in the cumin, chili powder, and some salt and pepper to taste. Mix everything together until it’s well combined.
Stuff each bell pepper with the quinoa mixture. Place the stuffed peppers upright in a baking dish. If they don’t stand up on their own, you can slice a small bit off the bottom to help them balance.
Once the peppers are filled, cover the baking dish with aluminum foil. Bake in the preheated oven for about 30 minutes. After 30 minutes, remove the foil and sprinkle the shredded cheese on top of the peppers. Return to the oven and bake for an additional 10 minutes until the cheese is bubbly and slightly golden.
After baking, let the peppers cool for a few minutes. If desired, top with fresh cilantro before serving. Enjoy your delicious and colorful meal!
Tips:
- You can customize the filling by adding other vegetables like chopped onions or zucchini.
- Try using different kinds of cheese for a unique flavor, such as feta or pepper jack.
- These stuffed peppers can be made in advance and reheated for a quick meal.
Nutrition Facts:
- Calories: 250 per serving
- Protein: 10g
- Carbohydrates: 38g
- Dietary Fiber: 9g
- Sugars: 3g
- Fat: 8g
- Saturated Fat: 4g
11 Spring Vegetable Frittata

Spring is the perfect time to enjoy fresh veggies, and a frittata is an easy way to showcase them! This Spring Vegetable Frittata is light, fluffy, and packed with flavor, making it a great dish for lunch or brunch. Plus, it’s quick to make and can be enjoyed warm or cold.
Prep Time: 10 minutes
Cook Time: 20 minutes
Total Time: 30 minutes
Servings: 4
Ingredients:
- 6 large eggs
- 1/4 cup milk
- 1 cup spinach, chopped
- 1 cup asparagus, cut into 1-inch pieces
- 1/2 cup cherry tomatoes, halved
- 1/2 cup bell pepper, diced (any color)
- 1/2 onion, diced
- 1 cup shredded cheese (cheddar, feta, or your choice)
- 2 tablespoons olive oil
- Salt and pepper, to taste
Instructions:
Start by preheating your oven to 375°F (190°C). In a mixing bowl, whisk together the eggs and milk until smooth. Add a pinch of salt and pepper to the mixture for flavor.
In a large oven-safe skillet, heat the olive oil over medium heat. Add the onion and cook for about 2-3 minutes until it starts to soften. Next, add the asparagus and cook for another 2 minutes until they are just tender.
Now, stir in the cherry tomatoes, and bell pepper, and cook the mixture for 2 more minutes. Finally, add the spinach and stir until it wilts. Pour the egg mixture over the veggies, and gently mix everything together. Sprinkle the shredded cheese evenly on top.
Cook the frittata on the stovetop for about 3-4 minutes without stirring, allowing the edges to set. Then, transfer the skillet to the preheated oven and bake for 15-20 minutes, or until the eggs are fully set and the top is lightly golden.
Once it’s done, carefully take the skillet out of the oven. Let it cool for a few minutes before slicing into wedges. Serve warm or at room temperature. Enjoy your delicious frittata!
Tips:
- Feel free to swap in any vegetables you have on hand like zucchini, mushrooms, or broccoli.
- For a bit of extra flavor, add herbs like parsley, chives, or dill to the egg mixture.
- Frittatas can be stored in the refrigerator for up to 3 days, making them perfect for meal prep.
Nutrition Facts:
- Calories: 220 per serving
- Protein: 14g
- Carbohydrates: 5g
- Fat: 17g
- Fiber: 1g
- Sugar: 2g
12 Caprese Salad with Balsamic Reduction
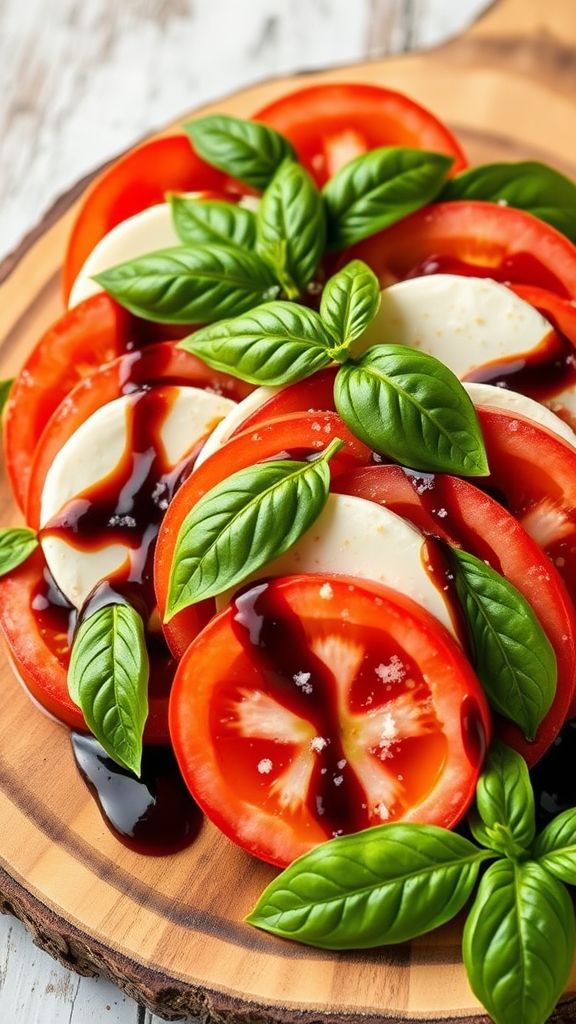
Caprese Salad with Balsamic Reduction is a delicious and refreshing dish perfect for a light spring lunch. The bright flavors of fresh tomatoes, mozzarella, and basil come together beautifully, especially with a sweet and tangy balsamic reduction drizzled on top.
Prep Time: 15 minutes
Additional Time: 20 minutes
Total Time: 35 minutes
Servings: 4
Ingredients:
- 4 medium ripe tomatoes, sliced
- 8 ounces fresh mozzarella, sliced
- 1 cup fresh basil leaves
- 1 cup balsamic vinegar
- 1/4 cup extra-virgin olive oil
- Salt and pepper, to taste
- Optional: Fresh basil leaves for garnish
Instructions:
Start by making the balsamic reduction. Pour 1 cup of balsamic vinegar into a small saucepan and heat it over medium heat. Bring it to a gentle simmer and let it cook for about 15-20 minutes, stirring occasionally, until it reduces by half and thickens.
While the balsamic vinegar is reducing, wash and slice the tomatoes and mozzarella. Arrange the tomato and mozzarella slices on a serving platter, alternating them to create a beautiful pattern.
Next, tuck whole basil leaves between the tomato and mozzarella slices. This will add a lovely freshness to the salad. Once the balsamic reduction is ready, remove it from the heat and let it cool for a few minutes.
Drizzle the balsamic reduction over the assembled salad. Then, drizzle with extra-virgin olive oil. Add a sprinkle of salt and pepper to taste. For an extra touch, garnish with additional fresh basil leaves if desired.
Tips:
- For a thicker balsamic reduction, let it simmer a bit longer. Just be careful not to let it burn!
- Use high-quality fresh mozzarella for the best flavor and texture.
- Serve immediately for the best taste, but the caprese salad can also be chilled in the refrigerator for 10-15 minutes before serving.
Nutrition Facts:
- Calories: 230 per serving
- Protein: 9g
- Fat: 17g
- Carbohydrates: 15g
- Fiber: 2g
- Sugar: 5g
13 Roasted Beet and Goat Cheese Salad
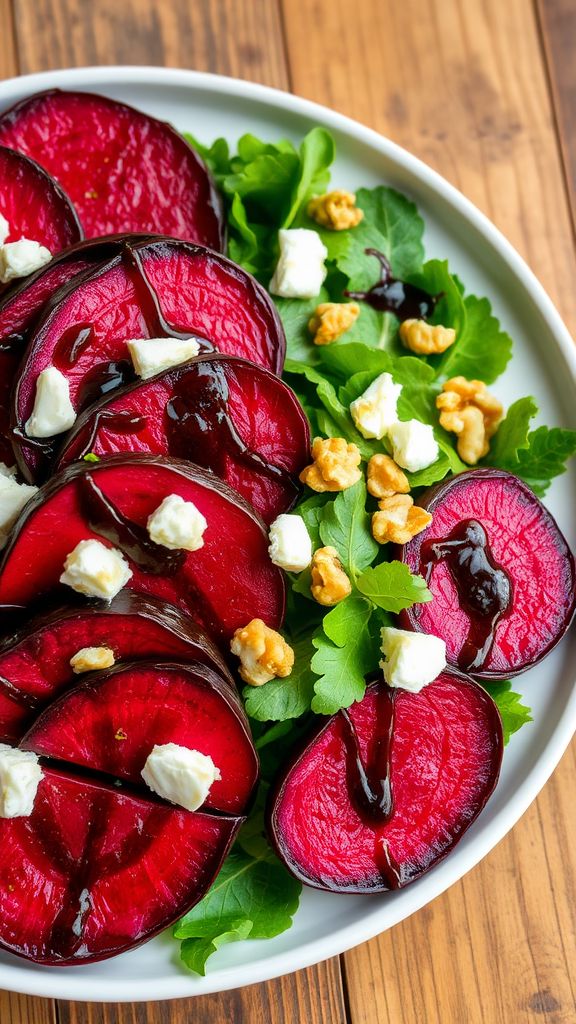
Roasted Beet and Goat Cheese Salad is a colorful and delicious way to brighten up your lunch. With the earthy sweetness of roasted beets and creamy goat cheese, this salad is not just healthy but also packed with flavor. It’s perfect for a light meal or as a side dish.
Prep Time: 15 minutes
Cook Time: 45 minutes
Additional Time: 10 minutes
Total Time: 1 hour 10 minutes
Servings: 4
Ingredients:
- 4 medium-sized beets
- 2 cups mixed salad greens
- 1/2 cup crumbled goat cheese
- 1/4 cup walnuts, chopped
- 1/4 cup olive oil
- 2 tablespoons balsamic vinegar
- 1 teaspoon Dijon mustard
- Salt and pepper to taste
Instructions:
Start by preheating your oven to 400°F (200°C). While the oven heats up, rinse the beets under cold water and trim off the greens and roots. Wrap each beet in aluminum foil and place them on a baking sheet. Roast the beets in the oven for about 45 minutes or until they are tender when pierced with a fork.
After roasting, remove the beets from the oven and let them cool for a few minutes. Once they are cool, peel off the skins using your hands or a paper towel. Cut the beets into wedges and set them aside.
In a small bowl, whisk together the olive oil, balsamic vinegar, Dijon mustard, salt, and pepper to create a dressing. Taste it and adjust the seasoning if needed.
Next, in a large salad bowl, combine the mixed salad greens, roasted beet wedges, and chopped walnuts. Drizzle the dressing over the salad and toss gently to mix everything together.
Finally, sprinkle the crumbled goat cheese on top of the salad. Serve immediately and enjoy the wonderful flavors!
Tips:
- For extra flavor, add fresh herbs like parsley or basil to the salad.
- You can substitute the walnuts with pecans or almonds if you prefer.
- If you want a heartier meal, add grilled chicken or quinoa to the salad.
Nutrition Facts:
- Calories: 250
- Protein: 6g
- Fat: 18g
- Carbohydrates: 23g
- Fiber: 4g
- Sugar: 6g
14 Thai Peanut Veggie Spring Rolls
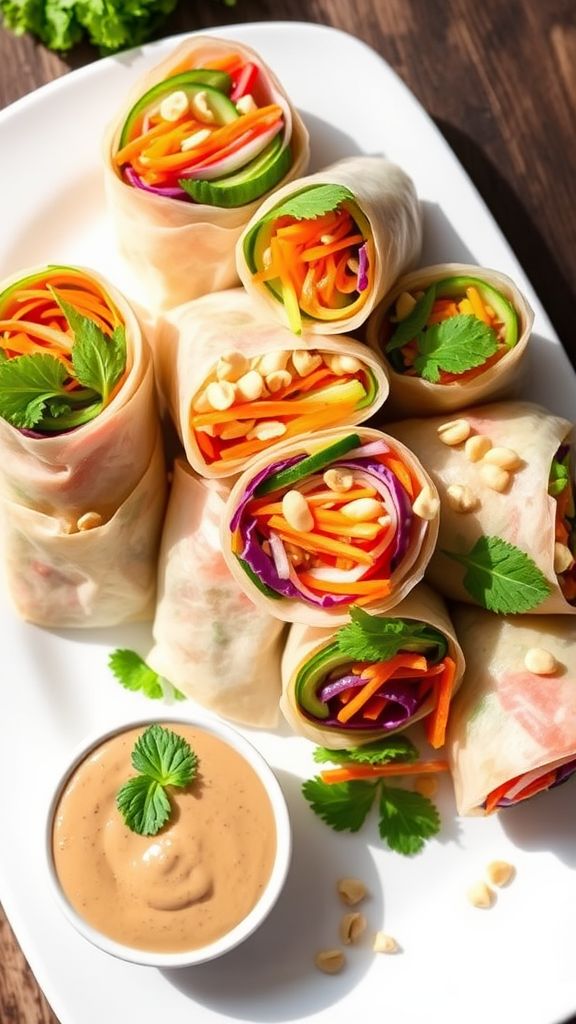
Thai Peanut Veggie Spring Rolls are a delightful and healthy snack that combines fresh veggies with a tasty peanut sauce. They’re perfect for a light lunch or appetizer and are super easy to make. Get ready to impress your friends and family with these colorful rolls!
Prep Time: 20 minutes
Total Time: 20 minutes
Servings: 8 spring rolls
Ingredients:
- 8 rice paper wrappers
- 1 cup julienned carrots
- 1 cup cucumber, cut into thin strips
- 1 cup bell peppers, thinly sliced (any color)
- 1 cup red cabbage, shredded
- 1 cup fresh cilantro leaves
- 1 cup mint leaves
- 1 cup cooked rice noodles (optional for added texture)
For the Peanut Sauce:
- 1/2 cup peanut butter
- 2 tablespoons soy sauce
- 1 tablespoon honey or maple syrup
- 1 tablespoon rice vinegar
- 1-2 tablespoons water (to thin out the sauce)
- 1 teaspoon minced garlic
- 1 teaspoon grated ginger (optional)
Instructions:
Begin by preparing the peanut sauce. In a bowl, whisk together peanut butter, soy sauce, honey, rice vinegar, minced garlic, and ginger. Add water a little at a time to reach your desired consistency, then set aside.
Next, fill a large bowl with warm water. Dip one rice paper wrapper into the water for about 10-15 seconds until it’s soft and pliable. Lay the wrapper flat on a clean surface.
On the lower third of the wrapper, add a small amount of carrots, cucumber, bell peppers, red cabbage, cilantro, and mint leaves. If you’re using rice noodles, you can add a bit of those as well.
Fold the sides of the wrapper inward over the filling. Then, starting from the bottom, roll it up tightly like a burrito. Make sure the filling is secure inside. Repeat this process with the remaining wrappers and fillings.
Once all the spring rolls are ready, serve them with the peanut sauce on the side for dipping. Enjoy your fresh and colorful Thai Peanut Veggie Spring Rolls!
Tips:
- Customize the filling with any veggies or herbs you like, such as lettuce or avocado.
- To keep the wrappers from sticking, you can slightly dampen the surface where you place the rolled spring rolls.
- For extra crunch, add some chopped peanuts or sesame seeds inside the rolls or as a topping.
Nutrition Facts:
- Calories: 150 per spring roll
- Protein: 6g
- Carbohydrates: 20g
- Fat: 7g
- Fiber: 2g
- Sugar: 3g
15 Radish and Herb Butter Toast
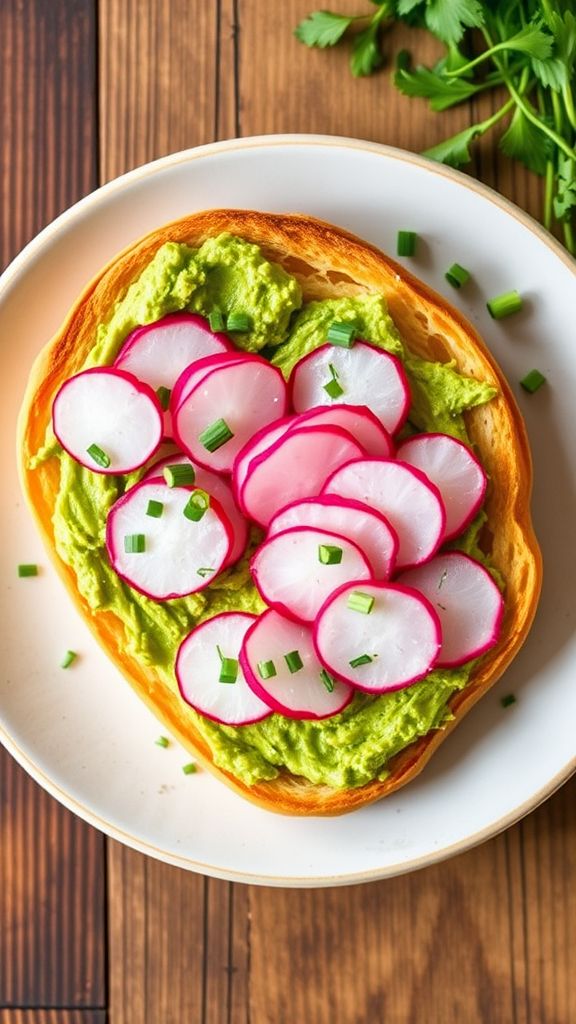
Radish and Herb Butter Toast is a fresh and vibrant dish perfect for a light spring lunch. The crunchy radishes paired with smooth herb butter on crispy toast create a delightful combination. It’s quick to prepare and makes a lovely snack or appetizer.
Prep Time: 10 minutes
Total Time: 10 minutes
Servings: 4
Ingredients:
- 4 slices of your favorite bread (sourdough or whole grain works well)
- 1 cup radishes, thinly sliced
- 1/2 cup unsalted butter, softened
- 2 tablespoons fresh chives, finely chopped
- 2 tablespoons fresh parsley, finely chopped
- 1 teaspoon lemon juice
- Salt and pepper to taste
Instructions:
Start by preheating your oven to 400°F (200°C) if you want your toast to be extra crispy. Place the slices of bread on a baking sheet and toast them for about 5-7 minutes until golden brown.
While the bread is toasting, it’s time to make the herb butter. In a medium bowl, combine the softened butter, chopped chives, chopped parsley, and lemon juice. Mix everything until it’s well combined. Add salt and pepper to taste. You want it to be flavorful!
Now, take the toasted bread out of the oven. Spread a generous layer of the herb butter on each slice. The warmth of the bread will melt the butter slightly, making it even more delicious.
Next, top each slice with the thinly sliced radishes. You can arrange them however you like. Finish with a sprinkle of salt and pepper on top, if desired.
Serve your Radish and Herb Butter Toast immediately for the best taste and texture. Enjoy this fresh dish as a snack, appetizer, or light lunch!
Tips:
- For extra flavor, add some lemon zest to the herb butter.
- Try using different herbs like dill or basil for a unique twist.
- If you like a bit of spice, add some red pepper flakes on top of the radishes.
Nutrition Facts:
- Calories: 220 per serving
- Protein: 3g
- Fat: 18g
- Carbohydrates: 16g
- Fiber: 2g
- Sugars: 1g
16 Grilled Peach and Prosciutto Salad
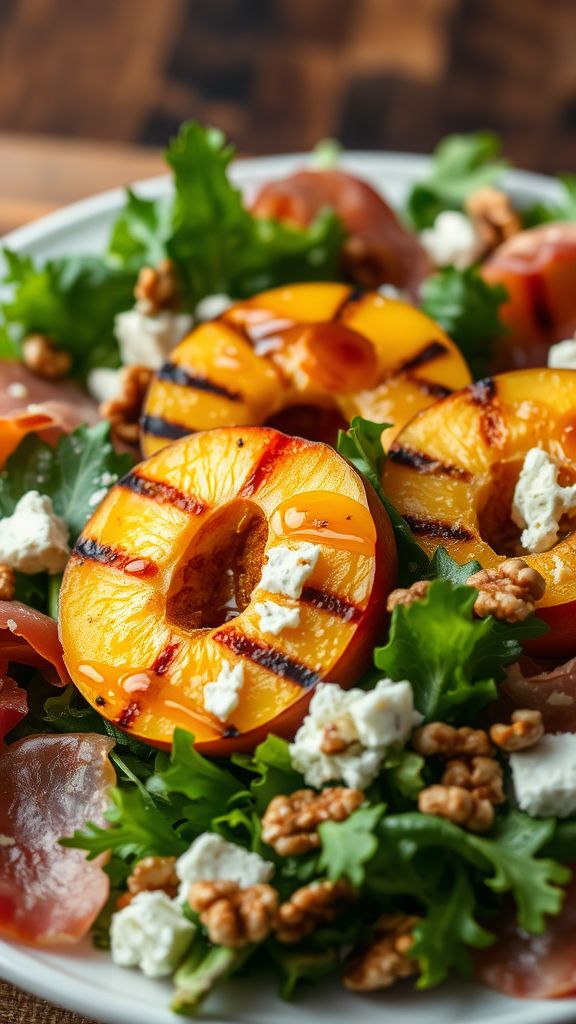
Grilled Peach and Prosciutto Salad is a delicious and refreshing dish perfect for a light spring lunch. The combination of sweet, juicy peaches with salty prosciutto and crunchy greens makes for an exciting flavor explosion. It’s simple to make and full of color!
Prep Time: 10 minutes
Cook Time: 5 minutes
Additional Time: 5 minutes
Total Time: 20 minutes
Servings: 4
Ingredients:
- 4 ripe peaches, halved and pitted
- 4 ounces prosciutto, thinly sliced
- 5 cups mixed greens (such as arugula, spinach, or spring mix)
- 1/4 cup feta cheese, crumbled
- 1/4 cup walnuts, toasted
- 2 tablespoons olive oil
- 1 tablespoon balsamic vinegar
- Salt and pepper, to taste
Instructions:
Start by preheating your grill to medium-high heat. While the grill heats up, prepare the peaches by halving them and removing the pits. Once the grill is hot, place the peach halves cut side down on the grill. Grill the peaches for about 3-4 minutes until grill marks appear and they soften.
While the peaches are grilling, grab a large bowl and toss together the mixed greens, crumbled feta, and toasted walnuts. In a small bowl, whisk together the olive oil, balsamic vinegar, and a pinch of salt and pepper for the dressing.
After grilling, remove the peaches from the grill and let them cool for a minute. Then, slice the grilled peaches into thick wedges. Add the peach slices to the bowl with the salad mixture. Finally, drizzle the dressing over the salad and gently toss to combine all the flavors.
To serve, pile the salad onto plates and arrange the sliced prosciutto on top. Enjoy your Grilled Peach and Prosciutto Salad right away for the best flavor!
Tips:
- For a sweeter taste, drizzle a little honey over the salad just before serving.
- You can also add some chopped fresh basil for an extra burst of flavor.
- If you don’t have a grill, you can use a grill pan or broil the peaches in the oven.
Nutrition Facts:
- Calories: 250
- Protein: 9g
- Carbohydrates: 18g
- Fat: 18g
- Fiber: 3g
- Sugar: 6g
17 Cold Soba Noodle Salad with Edamame
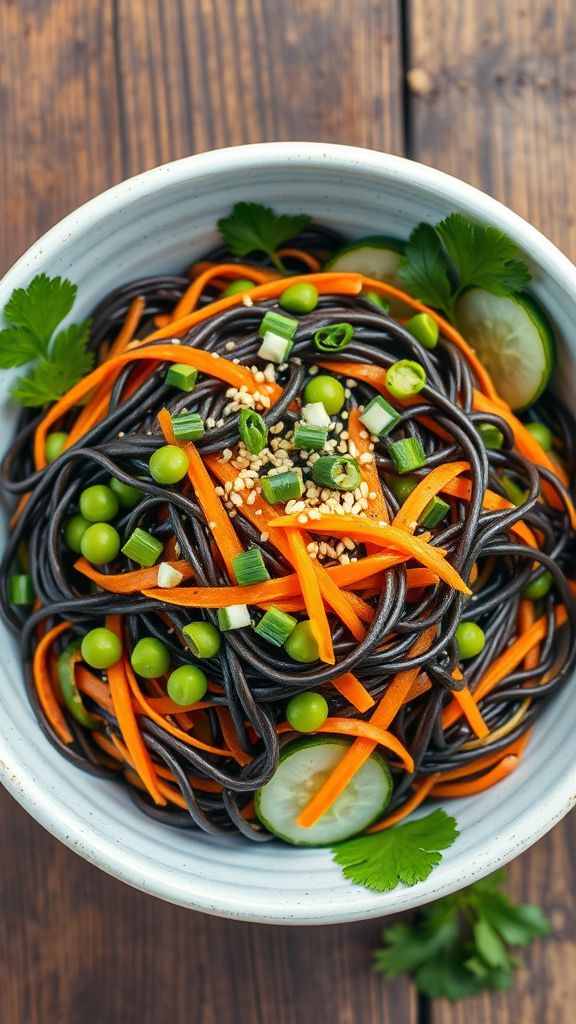
Cold Soba Noodle Salad with Edamame is a refreshing dish perfect for warm days. It’s packed with flavors and nutrients, making it a delightful addition to your spring lunch menu. Plus, it’s quick and easy to throw together!
Prep Time: 15 minutes
Total Time: 15 minutes
Servings: 4
Ingredients:
- 8 ounces soba noodles
- 1 cup shelled edamame (fresh or frozen)
- 1 cup shredded carrots
- 1 cup cucumber, julienned
- 2 green onions, sliced
- 1/4 cup soy sauce
- 2 tablespoons rice vinegar
- 1 tablespoon sesame oil
- 1 teaspoon honey or maple syrup
- 1 tablespoon sesame seeds
- Optional: chopped cilantro or sesame seeds for garnish
Instructions:
First, cook the soba noodles according to the package instructions. Drain them and rinse under cold water to cool them down. This keeps the noodles from getting sticky.
Next, if your edamame is frozen, cook it in boiling water for about 3-5 minutes until tender. Drain and rinse under cold water. This step helps maintain their bright green color.
In a large bowl, combine the cooled soba noodles, edamame, shredded carrots, cucumber, and sliced green onions. Toss everything gently to combine.
In a separate small bowl, whisk together the soy sauce, rice vinegar, sesame oil, and honey or maple syrup. Pour this dressing over the salad and mix well to coat all the ingredients.
Finally, sprinkle the salad with sesame seeds and toss once more. For extra flavor, you can garnish with chopped cilantro if you like. Serve immediately or chill for a bit before serving.
Tips:
- For added texture, you can include other vegetables like bell peppers or radishes.
- You can make this salad ahead of time and keep it in the fridge for up to two days.
- Feel free to adjust the dressing ingredients to suit your taste!
Nutrition Facts:
- Calories: 250 per serving
- Protein: 11g
- Carbohydrates: 36g
- Fat: 8g
- Fiber: 6g
- Sodium: 600mg
18 Garden Gazpacho with Croutons

Garden Gazpacho with Croutons is a refreshing and delicious cold soup that is perfect for warm days. Made with fresh vegetables and bursting with flavor, this dish is as healthy as it is tasty. Top it off with crunchy croutons for an exciting texture!
Prep Time: 20 minutes
Total Time: 20 minutes
Servings: 4
Ingredients:
- 4 ripe tomatoes, roughly chopped
- 1 cucumber, peeled and roughly chopped
- 1 bell pepper (any color), roughly chopped
- 1 small red onion, roughly chopped
- 2 garlic cloves, minced
- 2 cups vegetable broth
- 2 tablespoons olive oil
- 2 tablespoons red wine vinegar
- 1 teaspoon salt
- 1/2 teaspoon black pepper
- 1 cup croutons (store-bought or homemade)
- Fresh herbs (like basil or parsley) for garnish
Instructions:
Start by chopping the tomatoes, cucumber, bell pepper, red onion, and garlic into rough pieces. Place all the chopped vegetables into a blender or food processor. This will help create a smooth base for your gazpacho.
Next, pour in the vegetable broth, olive oil, red wine vinegar, salt, and black pepper into the blender. Blend everything until it’s smooth and well combined. You can adjust the thickness based on your preference by adding a bit more broth if needed.
Once blended, transfer the gazpacho to a large bowl or serving pitcher. Chill it in the refrigerator for about 30 minutes to let the flavors meld and the soup gets nice and cold.
When you’re ready to serve, give the gazpacho a good stir. Pour the cold soup into bowls and top with croutons for a crunchy contrast. Garnish with fresh herbs for an extra pop of flavor.
Tips:
- For added flavor, let the gazpacho sit overnight in the fridge; it gets even better!
- Feel free to customize the vegetables based on what you have in your garden.
- Try grilling the vegetables before blending for a smoky taste.
Nutrition Facts:
- Calories: 150 per serving
- Carbohydrates: 18g
- Protein: 3g
- Fat: 7g
- Fiber: 4g
- Sodium: 600mg
19 Lemon Dill Roasted Salmon Lettuce Wraps
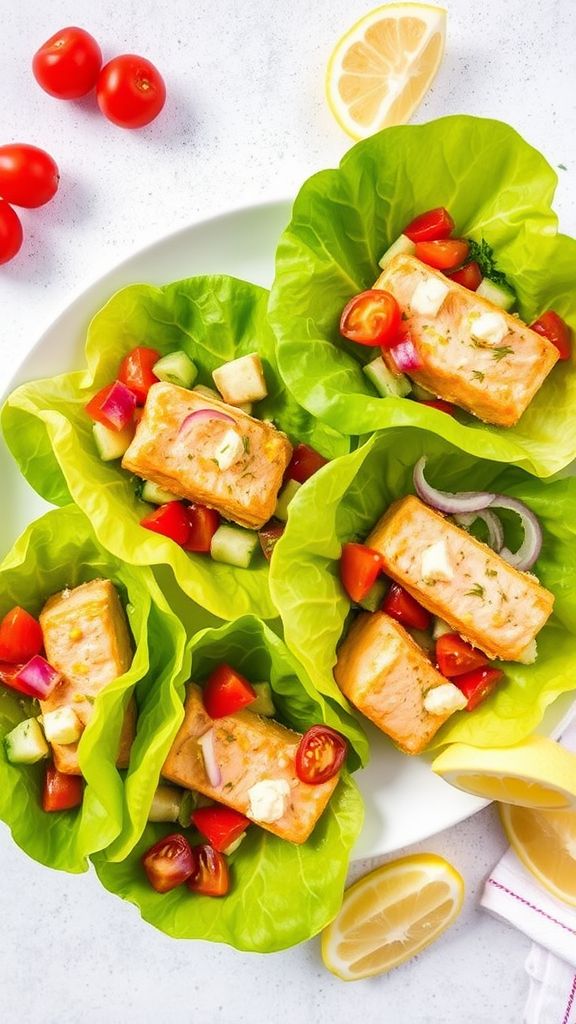
Lemon Dill Roasted Salmon Lettuce Wraps are a fresh and delicious way to enjoy salmon. The bright flavors of lemon and dill pair beautifully with tender salmon, all wrapped up in crisp lettuce. This recipe is perfect for a light lunch or a spring gathering!
Prep Time: 10 minutes
Cook Time: 15 minutes
Total Time: 25 minutes
Servings: 4
Ingredients:
- 4 salmon fillets
- 2 tablespoons olive oil
- 1 lemon, juiced and zested
- 2 tablespoons fresh dill, chopped
- 1 teaspoon garlic powder
- Salt and pepper, to taste
- 8 large lettuce leaves (like romaine or butter lettuce)
- 1/4 cup cherry tomatoes, halved
- 1/4 cup cucumber, diced
- 1/4 cup red onion, thinly sliced
Instructions:
Preheat your oven to 400°F (200°C). While the oven heats, prepare a baking sheet with parchment paper for easy cleanup.
In a small bowl, mix together olive oil, lemon juice, lemon zest, dill, garlic powder, salt, and pepper. This will be your marinade for the salmon.
Place the salmon fillets on the prepared baking sheet. Brush the marinade generously over each fillet, ensuring they are well coated.
Roast the salmon in the preheated oven for about 15 minutes or until it flakes easily with a fork.
While the salmon is cooking, wash and dry the lettuce leaves. They will serve as your wraps, so make sure they are clean and intact.
Once the salmon is done, remove it from the oven and let it cool slightly. Flake the salmon into bite-sized pieces with a fork.
To assemble the wraps, place some salmon on a lettuce leaf. Top with cherry tomatoes, cucumber, and red onion.
Fold the lettuce leaf around the filling and enjoy your Lemon Dill Roasted Salmon Lettuce Wraps!
Tips:
- For added flavor, marinate the salmon for 30 minutes before cooking.
- Experiment with different toppings like avocado or shredded carrots for extra crunch.
- Serve with a side of lemon wedges for a zesty kick!
Nutrition Facts:
- Calories: 250
- Protein: 26g
- Fat: 15g
- Carbohydrates: 5g
- Fiber: 1g
- Sugar: 1g
20 Fresh Herb and Lemon Couscous Salad

This Fresh Herb and Lemon Couscous Salad is a bright and refreshing dish that’s perfect for spring. The zesty lemon and colorful herbs make it a delightful side or a light lunch option. Plus, it’s super easy to whip up in just a few minutes!
Prep Time: 10 minutes
Additional Time: 5 minutes
Total Time: 15 minutes
Servings: 4
Ingredients:
- 1 cup couscous
- 1 cup boiling water
- 1/4 cup olive oil
- 1 large lemon, juiced and zested
- 1/2 teaspoon salt
- 1/4 teaspoon black pepper
- 1 cup cherry tomatoes, halved
- 1/2 cup cucumber, diced
- 1/4 cup red onion, finely chopped
- 1/4 cup fresh parsley, chopped
- 1/4 cup fresh mint, chopped
Instructions:
Start by putting the couscous in a large bowl. Carefully pour the boiling water over the couscous and cover the bowl with a lid or plastic wrap. Let it sit for about 5 minutes until the couscous absorbs all the water.
After five minutes, use a fork to fluff the couscous, making it light and airy. Then, add the olive oil, lemon juice, lemon zest, salt, and black pepper. Mix everything together until it’s well combined.
Next, stir in the cherry tomatoes, cucumber, red onion, parsley, and mint. These fresh ingredients add great color and flavor to your salad.
Give the salad a final toss, ensuring all the ingredients are mixed evenly. Check the seasoning and adjust with more salt or lemon juice if needed. Serve it immediately, or cover and chill until ready to enjoy.
Tips:
- For added protein, consider mixing in cooked chickpeas or grilled chicken.
- You can substitute herbs based on your preference; basil or cilantro work well too.
- This salad can be made ahead of time and is great for meal prep; it tastes even better after a few hours in the fridge!
Nutrition Facts:
- Calories: 210 per serving
- Protein: 4g
- Carbohydrates: 28g
- Fat: 10g
- Fiber: 3g
- Sugar: 2g