My New Cookbook is Out! Check Out Now!
25 Keto Appetizer Ideas to Wow Your Guests
This page contains affiliate links and I earn a commission if you make a purchase through one of the links, at no cost to you.
Did you know that the ketogenic diet has been shown to help boost energy levels and support weight loss while still allowing you to enjoy delicious foods? If you’re looking to impress your guests at your next gathering, we’ve got you covered with 25 mouthwatering keto appetizer ideas that are sure to delight. From crispy bacon-wrapped delights to cheesy bites, this blog will guide you through a variety of tasty options that keep you on track with your keto lifestyle while keeping your taste buds dancing!
Shop Our Must-Haves


Bacon-Wrapped Avocado Bites
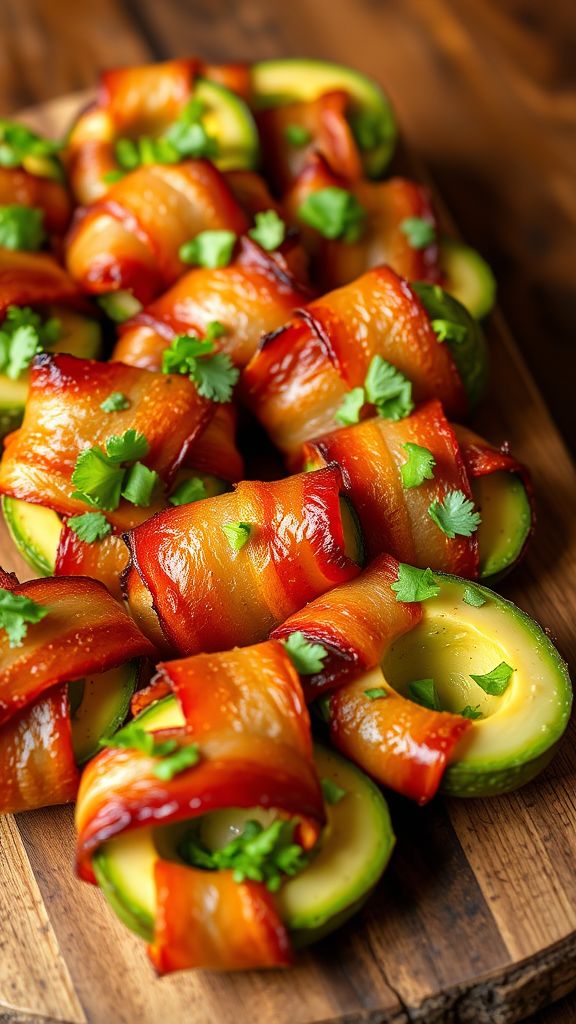
Bacon-Wrapped Avocado Bites are a delightful combination of creamy avocado and crispy bacon, offering a rich and savory flavor experience that’s hard to resist. These bites are perfect as an appetizer for any gathering!
Ingredients:
- 2 ripe avocados
- 8 slices bacon
- 1 teaspoon smoked paprika
- 1 teaspoon garlic powder
- 1/2 teaspoon black pepper
- 1/2 teaspoon salt
- 1 tablespoon olive oil
- 1 tablespoon chopped fresh cilantro (optional)
Preparation Time: 10 minutes
Cooking Time: 20 minutes
Total Time: 30 minutes
Instructions:
1. Preheat your oven to 400°F (200°C) and line a baking sheet with parchment paper.
2. Cut avocados in half, remove the pit, and scoop out some flesh to create a small hollow for the bacon.
3. Cut each bacon slice in half and season the avocado halves with smoked paprika, garlic powder, black pepper, and salt.
4. Wrap each avocado half with a piece of bacon, securing it with a toothpick if needed.
5. Drizzle olive oil over the bacon-wrapped avocados and place them on the prepared baking sheet.
6. Bake in the preheated oven for 15-20 minutes or until the bacon is crispy and golden brown.
7. Remove from the oven and let cool slightly before serving. Garnish with chopped cilantro if desired.
Tips:
- For extra flavor, try adding a sprinkle of cayenne pepper for some heat!
- Serve with a side of your favorite dipping sauce, like ranch or salsa.
- Make sure the bacon is thin enough to wrap easily around the avocado.
Cheesy Cauliflower Breadsticks

Cheesy Cauliflower Breadsticks are a deliciously creative twist on traditional breadsticks, bringing together the savory flavors of cheese and cauliflower into a healthy snack option. Perfect for those looking to satisfy their cheesy cravings without the carbs!
Ingredients:
- 1 small head of cauliflower, riced
- 1 cup shredded mozzarella cheese
- 1/4 cup grated Parmesan cheese
- 1 large egg
- 1 teaspoon garlic powder
- 1 teaspoon dried oregano
- 1/2 teaspoon salt
- 1/2 teaspoon pepper
- 1/4 cup marinara sauce, for dipping
Preparation Time: 10 minutes
Cooking Time: 25 minutes
Total Time: 35 minutes
Instructions:
1. Preheat your oven to 425°F (220°C) and line a baking sheet with parchment paper.
2. Rice the cauliflower by grating it or pulsing it in a food processor until it resembles rice or fine crumbs.
3. Place the riced cauliflower in a microwave-safe bowl and microwave for about 5 minutes, then let it cool slightly.
4. Once cooled, use a clean kitchen towel to squeeze out as much moisture as possible from the cauliflower.
5. In a mixing bowl, combine the riced cauliflower, mozzarella cheese, Parmesan cheese, egg, garlic powder, oregano, salt, and pepper. Mix well until fully combined.
6. Spread the mixture out on the prepared baking sheet, shaping it into a rectangle about 1/2 inch thick.
7. Bake in the preheated oven for 20 minutes, or until the edges are golden and the center is set.
8. Remove from the oven and allow to cool slightly before cutting into sticks. Serve with marinara sauce for dipping.
Tips:
- For extra flavor, add Italian seasoning or crushed red pepper flakes to the mixture.
- Ensure to squeeze out as much moisture as possible from the cauliflower to achieve a crispier texture.
- These breadsticks can be stored in the refrigerator for up to three days and reheated in the oven.
Zucchini Chips with Garlic Dip
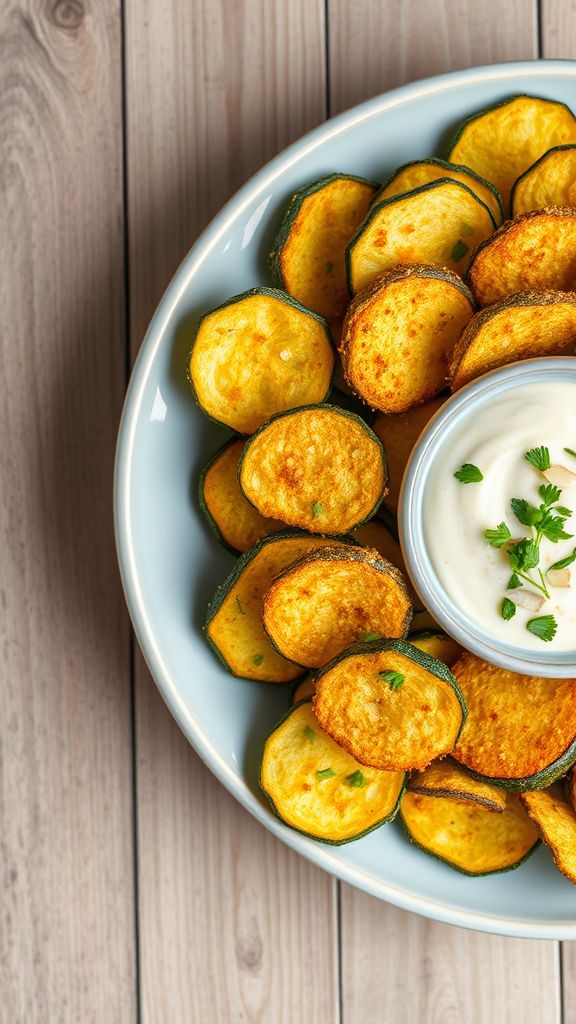
These Zucchini Chips with Garlic Dip are a delightful combination of crispy, seasoned zucchini and a creamy, flavorful dip that elevates their natural taste. The perfect balance of garlic and herbs creates a snack that’s both healthy and satisfying.
Ingredients:
- 2 medium zucchinis
- 1 cup breadcrumbs
- 1/2 cup grated Parmesan cheese
- 1 teaspoon garlic powder
- 1 teaspoon paprika
- 1/2 teaspoon salt
- 1/4 teaspoon black pepper
- 2 tablespoons olive oil
- 1 cup sour cream
- 2 cloves garlic, minced
- 1 tablespoon fresh parsley, chopped
Preparation Time: 15 minutes
Cooking Time: 25 minutes
Total Time: 40 minutes
Instructions:
1. Preheat the oven to 425°F (220°C) and line a baking sheet with parchment paper.
2. Wash and slice the zucchinis into thin rounds, about 1/4 inch thick.
3. In a bowl, mix together the breadcrumbs, Parmesan cheese, garlic powder, paprika, salt, and black pepper.
4. Brush the zucchini slices with olive oil and then coat them with the breadcrumb mixture, pressing to adhere.
5. Place the coated zucchini slices on the prepared baking sheet in a single layer.
6. Bake for about 20-25 minutes, or until golden and crispy, flipping halfway through.
7. While the zucchini chips are baking, prepare the garlic dip by mixing together the sour cream, minced garlic, and chopped parsley in a bowl.
8. Once the chips are done, remove them from the oven and let them cool slightly before serving with the garlic dip.
Tips:
- For extra crunch, let the sliced zucchini sit with salt for 15 minutes before patting them dry.
- Experiment with different seasonings in the breadcrumb mixture to customize flavors.
- Store any leftover chips in an airtight container to maintain crispness for up to two days.
Herbed Cream Cheese Stuffed Mini Peppers
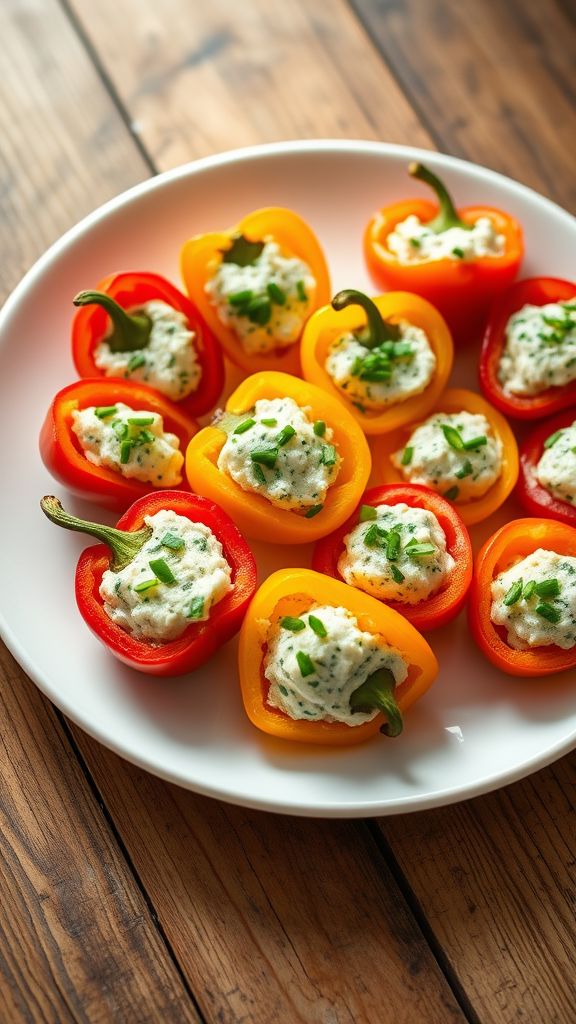
This Herbed Cream Cheese Stuffed Mini Peppers recipe is a delightful combination of creamy, tangy cheese and the fresh taste of herbs nestled in sweet, crunchy peppers. Perfect as an appetizer or a snack, these bites offer a burst of flavor in every mouthful.
Ingredients:
- 12 mini bell peppers
- 8 oz cream cheese, softened
- 1/4 cup fresh chives, chopped
- 1/4 cup fresh parsley, chopped
- 1 teaspoon garlic powder
- 1/2 teaspoon onion powder
- 1/4 teaspoon salt
- 1/4 teaspoon black pepper
- 1 tablespoon lemon juice
Preparation Time: 10 minutes
Cooking Time: 0 minutes
Total Time: 10 minutes
Instructions:
1. Preheat your oven to broil if you prefer your peppers slightly charred.
2. In a mixing bowl, combine the softened cream cheese, chives, parsley, garlic powder, onion powder, salt, black pepper, and lemon juice. Mix until well combined and creamy.
3. Cut the mini bell peppers in half lengthwise and remove the seeds.
4. Using a spoon or a piping bag, fill each pepper half with the herbed cream cheese mixture.
5. If broiling, place the stuffed peppers on a baking sheet and broil for 2-3 minutes until slightly golden and warmed.
6. Serve immediately or chill in the refrigerator for a refreshing cold snack.
Tips:
- For added flavor, try incorporating other herbs like dill or basil.
- These stuffed peppers can be made a day ahead and stored in the fridge.
- If you prefer a spicy kick, add chopped jalapeños to the cream cheese mixture.
Spicy Deviled Eggs with Avocado

These Spicy Deviled Eggs with Avocado offer a delightful twist on the classic recipe, combining creamy avocado and a spicy kick for a unique flavor experience. Perfect for parties or a snack, these deviled eggs are sure to impress!
Ingredients:
- 6 large eggs
- 1 ripe avocado
- 2 tablespoons mayonnaise
- 1 teaspoon Dijon mustard
- 1 teaspoon Sriracha sauce (adjust to taste)
- 1/4 teaspoon garlic powder
- 1/4 teaspoon smoked paprika
- Salt and pepper to taste
- 1 tablespoon freshly chopped cilantro (optional)
- 1 jalapeño, finely chopped (optional, for garnish)
Preparation Time: 15 minutes
Cooking Time: 10 minutes
Total Time: 25 minutes
Instructions:
1. Place the eggs in a pot and cover them with cold water. Bring to a boil over medium-high heat.
2. Once boiling, cover the pot and remove it from heat. Let the eggs sit for about 10-12 minutes.
3. Transfer the eggs to an ice bath for 5 minutes to cool them down quickly.
4. Peel the cooled eggs and cut them in half lengthwise.
5. In a bowl, scoop out the yolks and combine them with avocado, mayonnaise, Dijon mustard, Sriracha, garlic powder, smoked paprika, salt, and pepper. Mash until smooth and creamy.
6. Spoon or pipe the mixture back into the egg whites.
7. Garnish with fresh cilantro and jalapeño if desired. Serve chilled.
Tips:
- Use ripe avocados for the best creamy texture.
- Adjust the level of heat by varying the amount of Sriracha and jalapeño.
- For an extra touch, sprinkle with additional smoked paprika before serving.
Caprese Skewers with Balsamic Drizzle
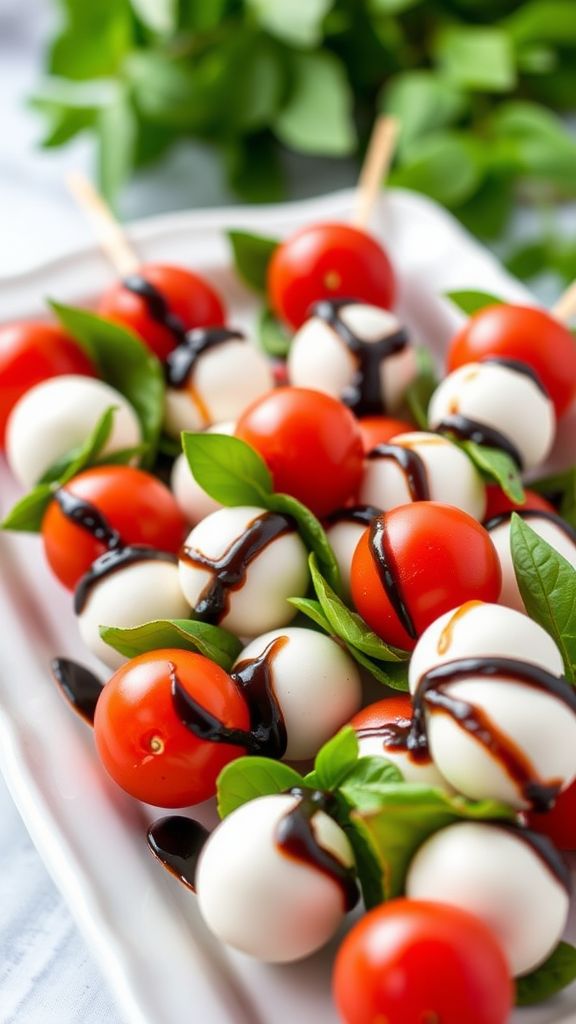
Caprese Skewers with Balsamic Drizzle are a delightful combination of fresh mozzarella, ripe tomatoes, and fragrant basil, all drizzled with a rich balsamic reduction. This refreshing appetizer bursts with flavors that are sure to please any palate.
Ingredients:
- 1 cup cherry tomatoes
- 1 cup fresh mozzarella balls
- 1 cup fresh basil leaves
- 1/2 cup balsamic vinegar
- 2 tablespoons olive oil
- 1/2 teaspoon salt
- 1/4 teaspoon black pepper
- 12 skewers
Preparation Time: 10 minutes
Cooking Time: 10 minutes
Total Time: 20 minutes
Instructions:
1. In a small saucepan, bring the balsamic vinegar to a boil over medium heat, then reduce to a simmer. Cook until it thickens and reduces to about half, approximately 10 minutes. Set aside to cool.
2. While the balsamic is reducing, prepare the skewers by threading a cherry tomato, a basil leaf, and a mozzarella ball onto each skewer. Repeat until all ingredients are used.
3. Drizzle the assembled skewers with olive oil and season with salt and black pepper.
4. Once the balsamic drizzle has cooled, generously drizzle it over the skewers.
5. Serve immediately and enjoy!
Tips:
- For added flavor, let the balsamic reduction cool longer to achieve a thicker consistency.
- Feel free to marinate the mozzarella balls in herbs or olive oil for extra taste.
- These skewers are best served fresh but can be prepared ahead of time; just add the balsamic drizzle right before serving.
Coconut Shrimp with Spicy Mayo
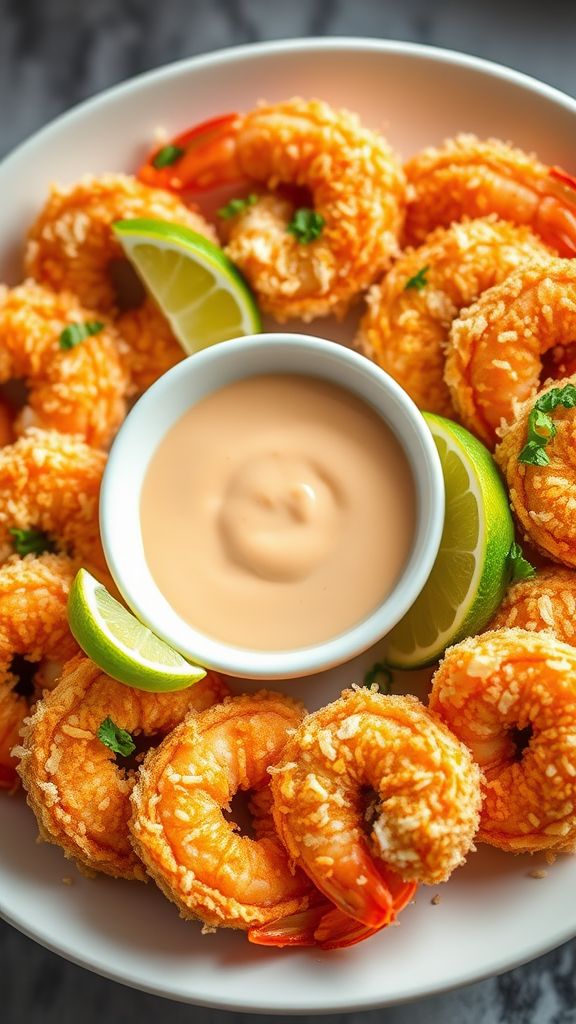
This Coconut Shrimp with Spicy Mayo recipe offers a delightful combination of crunchy coconut, tender shrimp, and a creamy, spicy dipping sauce that elevates every bite. The tropical flavors paired with a kick from the spicy mayo make this dish an irresistible appetizer or main course.
Ingredients:
- 1 pound large shrimp, peeled and deveined
- 3/4 cup shredded coconut
- 1/2 cup Panko breadcrumbs
- 1/2 cup all-purpose flour
- 2 large eggs
- 1/2 teaspoon salt
- 1/4 teaspoon black pepper
- 1/2 teaspoon garlic powder
- 1/4 teaspoon cayenne pepper
- 1/2 cup mayonnaise
- 1 tablespoon sriracha sauce (adjust to taste)
- 2 teaspoons lime juice
- Vegetable oil for frying
Preparation Time: 20 minutes
Cooking Time: 10 minutes
Total Time: 30 minutes
Instructions:
1. In a shallow dish, combine the flour, salt, pepper, garlic powder, and cayenne pepper.
2. In another bowl, whisk the eggs until well beaten.
3. In a third bowl, mix together the shredded coconut and Panko breadcrumbs.
4. Dip each shrimp into the flour mixture, then into the beaten eggs, and finally coat with the coconut-Panko mixture.
5. In a large skillet, heat vegetable oil over medium-high heat for frying.
6. Once the oil is hot, add the coated shrimp in batches, ensuring not to overcrowd the pan.
7. Fry the shrimp for about 2-3 minutes on each side or until golden brown and cooked through.
8. Remove the shrimp and place them on a paper towel-lined plate to drain excess oil.
9. In a small bowl, mix together the mayonnaise, sriracha, and lime juice to create the spicy mayo.
10. Serve the coconut shrimp warm, accompanied by the spicy mayo for dipping.
Tips:
- For extra flavor, marinate the shrimp in lime juice and garlic before the coating process.
- Adjust the amount of sriracha in the mayo to suit your desired level of spiciness.
- Ensure the oil is hot enough before adding the shrimp to achieve a crispy texture.
- Serve with a side of tropical fruit salsa for a refreshing complement.
Jalapeño Popper Fat Bombs

Jalapeño Popper Fat Bombs are the perfect low-carb snack packed with creamy cheese, spicy jalapeños, and crispy bacon. These flavorful bites deliver a satisfying crunch and a kick of heat, making them a delicious treat for any keto fan.
Ingredients:
- 8 oz cream cheese, softened
- 1 cup shredded cheddar cheese
- 1/2 cup cooked bacon, chopped
- 2 jalapeños, finely diced
- 1/2 tsp garlic powder
- 1/2 tsp onion powder
- 1/4 tsp salt
- 1/4 tsp black pepper
- 1/4 cup almond flour
Preparation Time: 10 minutes
Cooking Time: 0 minutes
Total Time: 10 minutes
Instructions:
1. In a mixing bowl, combine the softened cream cheese, shredded cheddar cheese, chopped bacon, diced jalapeños, garlic powder, onion powder, salt, and black pepper. Mix until fully incorporated.
2. Gradually add almond flour to the mixture and stir until the mixture is well combined and holds its shape.
3. Using your hands, form the mixture into small balls, about 1 inch in diameter.
4. Place the fat bombs on a parchment-lined baking sheet and refrigerate for at least 30 minutes to firm up.
5. Once firm, transfer the Jalapeño Popper Fat Bombs to an airtight container and store them in the refrigerator for up to one week.
Tips:
- For added flavor, try mixing in some smoked paprika or cayenne pepper.
- These fat bombs can be frozen for longer storage; just thaw them in the refrigerator before eating.
- If you want less heat, remove the seeds from the jalapeños before dicing.
Walnut-Crusted Goat Cheese Ball
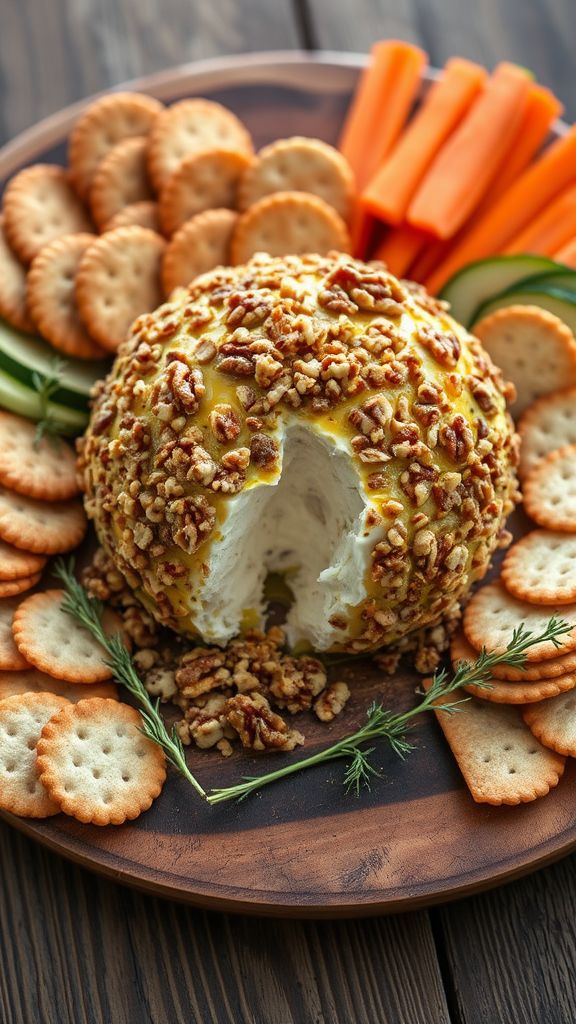
This Walnut-Crusted Goat Cheese Ball is a delightful combination of creamy goat cheese and crunchy walnuts, making it perfect for any gathering. The rich, tangy flavor of the cheese pairs beautifully with the nutty crust, creating an irresistible appetizer.
Ingredients:
- 8 ounces goat cheese
- 1 tablespoon honey
- 1 teaspoon fresh thyme, chopped
- 1 teaspoon lemon juice
- 1 cup walnuts, finely chopped
- 1 tablespoon olive oil
Preparation Time: 15 minutes
Cooking Time: 0 minutes
Total Time: 15 minutes
Instructions:
1. In a bowl, combine goat cheese, honey, thyme, and lemon juice. Mix well until smooth and creamy.
2. Shape the goat cheese mixture into a ball using your hands.
3. Place the chopped walnuts on a plate and roll the cheese ball in the walnuts until fully coated.
4. Drizzle the olive oil over the walnut-crusted cheese ball.
5. Serve immediately or refrigerate until ready to serve.
Tips:
- For added flavor, consider mixing in some chopped dried fruit or herbs.
- Pair the cheese ball with a selection of crackers and fresh vegetables for a beautiful presentation.
- You can prepare the cheese ball ahead of time; just keep it covered in the refrigerator until serving.
Shrimp Cocktail with Avocado Salsa

This Shrimp Cocktail with Avocado Salsa is a refreshing twist on a classic appetizer, featuring succulent shrimp paired with zesty avocado salsa. The vibrant flavors of lime, cilantro, and ripe avocados create a delightful, mouthwatering experience.
Ingredients:
- 1 pound large shrimp, peeled and deveined
- 1 tablespoon olive oil
- 1 teaspoon garlic powder
- 1 teaspoon paprika
- 1/2 teaspoon salt
- 1/4 teaspoon black pepper
- 1 ripe avocado, diced
- 1/2 cup diced tomatoes
- 1/4 cup red onion, finely chopped
- 1/4 cup fresh cilantro, chopped
- 1 lime, juiced
- 1/2 teaspoon chili powder
Preparation Time: 15 minutes
Cooking Time: 5 minutes
Total Time: 20 minutes
Instructions:
1. In a bowl, combine the shrimp with olive oil, garlic powder, paprika, salt, and black pepper. Mix well to coat the shrimp evenly.
2. Preheat a grill or skillet over medium-high heat. Cook the shrimp for about 2-3 minutes on each side until pink and opaque.
3. While the shrimp cook, prepare the avocado salsa by combining diced avocado, tomatoes, red onion, cilantro, lime juice, and chili powder in a bowl. Stir gently to combine.
4. Once the shrimp are cooked, remove them from heat and let them cool slightly.
5. Serve the shrimp chilled or at room temperature with the avocado salsa on the side.
Tips:
- For extra flavor, marinate the shrimp in the spices for 30 minutes before cooking.
- Make sure the avocado is ripe for the best flavor and texture.
- This dish is best served fresh, but leftovers can be refrigerated for up to a day.
Spinach and Artichoke Dip with Veggie Sticks
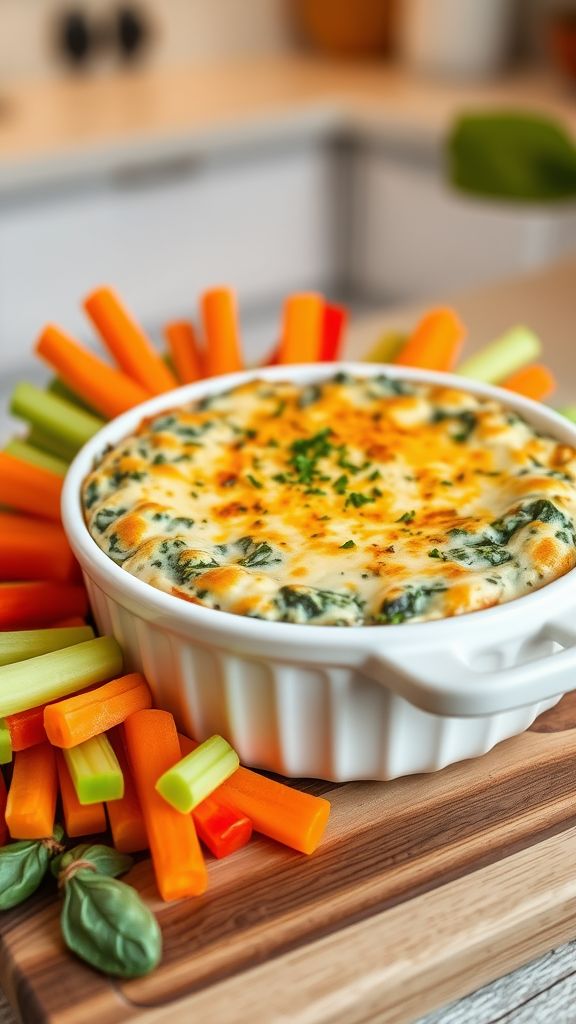
This delicious Spinach and Artichoke Dip is a creamy, cheesy delight that perfectly combines savory artichokes with fresh spinach. Paired with crunchy veggie sticks, it’s the ultimate party appetizer that everyone will love!
Ingredients:
- 1 cup frozen spinach, thawed and drained
- 1 cup canned artichoke hearts, drained and chopped
- 1 cup cream cheese, softened
- 1/2 cup sour cream
- 1/2 cup mayonnaise
- 1 cup shredded mozzarella cheese
- 1/2 cup grated Parmesan cheese
- 2 cloves garlic, minced
- 1/2 teaspoon salt
- 1/4 teaspoon black pepper
- 1/4 teaspoon red pepper flakes (optional)
- Vegetable sticks (carrots, celery, bell peppers) for serving
Preparation Time: 10 minutes
Cooking Time: 25 minutes
Total Time: 35 minutes
Instructions:
1. Preheat your oven to 350°F (175°C).
2. In a large mixing bowl, combine the softened cream cheese, sour cream, and mayonnaise until smooth.
3. Add the chopped spinach, artichoke hearts, mozzarella cheese, Parmesan cheese, minced garlic, salt, black pepper, and red pepper flakes (if using). Mix until well combined.
4. Transfer the mixture to a baking dish and spread it out evenly.
5. Bake in the preheated oven for about 25 minutes, or until the dip is bubbly and golden on top.
6. Allow to cool slightly before serving with fresh vegetable sticks.
Tips:
- For an extra cheesy dip, sprinkle more mozzarella on top before baking.
- Serve with a variety of veggies, such as carrots, celery, and bell peppers for added color and crunch.
- You can prepare the dip ahead of time and refrigerate it before baking.
Mini Meatballs with Sugar-Free BBQ Sauce
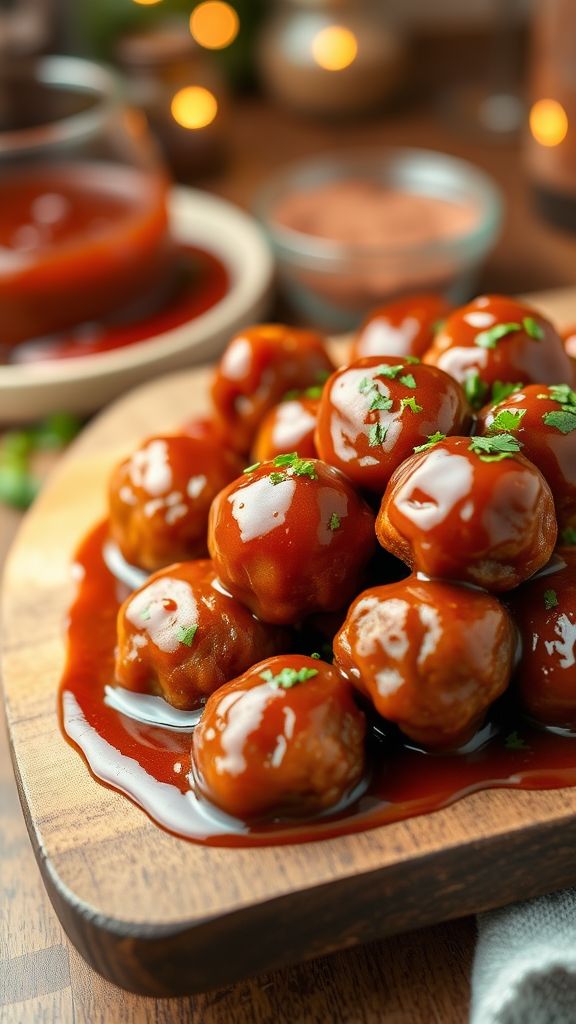
These Mini Meatballs with Sugar-Free BBQ Sauce are packed with flavor and perfect for any gathering. The combination of savory meatballs and a tangy sauce makes this dish a crowd-pleaser.
Ingredients:
- 1 pound ground beef
- 1/2 cup breadcrumbs
- 1/4 cup grated Parmesan cheese
- 1 large egg
- 2 cloves garlic, minced
- 1 teaspoon dried oregano
- 1 teaspoon onion powder
- 1/2 teaspoon salt
- 1/4 teaspoon black pepper
- 1 cup sugar-free BBQ sauce
Preparation Time: 15 minutes
Cooking Time: 20 minutes
Total Time: 35 minutes
Instructions:
1. Preheat the oven to 400°F (200°C) and line a baking sheet with parchment paper.
2. In a large bowl, combine the ground beef, breadcrumbs, Parmesan cheese, egg, garlic, oregano, onion powder, salt, and black pepper. Mix until well combined.
3. Form the mixture into small meatballs, about 1 inch in diameter, and place them on the prepared baking sheet.
4. Bake the meatballs in the preheated oven for 15 minutes, until cooked through and lightly browned.
5. In a small saucepan, heat the sugar-free BBQ sauce over medium heat until warm.
6. Once the meatballs are done baking, remove them from the oven and toss them in the warm BBQ sauce before serving.
Tips:
- For extra flavor, add chopped fresh herbs like parsley or basil to the meatball mixture.
- These meatballs can be made ahead of time and frozen for later use.
- Serve with toothpicks for easy appetizers at parties or gatherings.
Crab-Stuffed Mushrooms
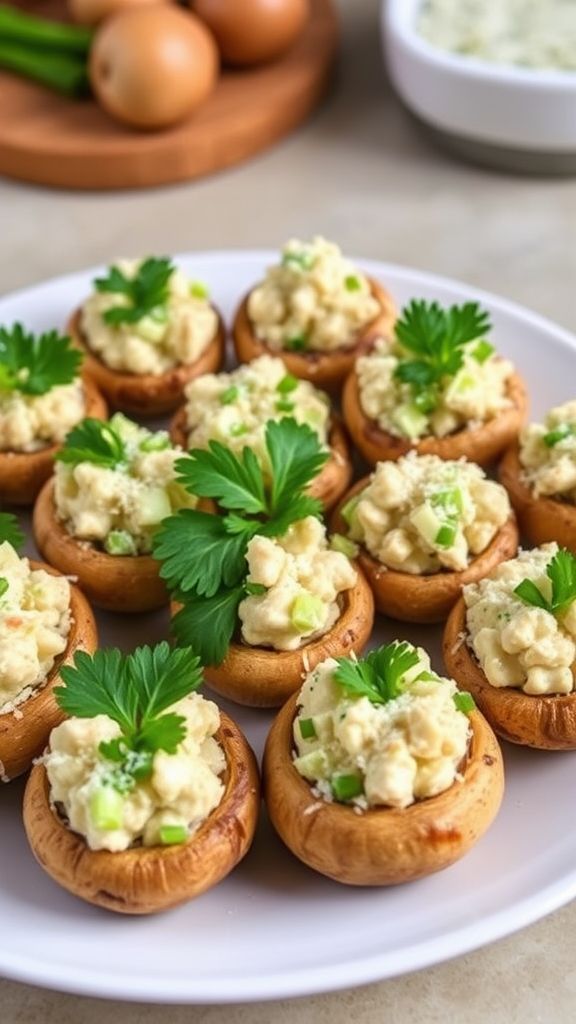
Crab-Stuffed Mushrooms are a delightful appetizer that combines the savory flavors of crab meat with the earthy richness of mushrooms. This dish stands out with its creamy filling and hints of garlic, making it an irresistible treat for any gathering.
Ingredients:
- 20 large cremini or button mushrooms
- 8 oz cream cheese, softened
- 1 cup crab meat, cooked and shredded
- 1/4 cup breadcrumbs
- 2 tbsp mayonnaise
- 1 tsp Worcestershire sauce
- 2 cloves garlic, minced
- 1/4 cup green onions, chopped
- 1/2 tsp Old Bay seasoning
- 1/4 tsp black pepper
- 1/4 cup grated Parmesan cheese
- 2 tbsp fresh parsley, chopped (for garnish)
Preparation Time: 20 minutes
Cooking Time: 25 minutes
Total Time: 45 minutes
Instructions:
1. Preheat your oven to 350°F (175°C).
2. Clean the mushrooms and carefully remove the stems, setting the caps aside.
3. Finely chop the mushroom stems and sauté them in a skillet over medium heat for about 5 minutes until soft.
4. In a mixing bowl, combine the sautéed mushroom stems, cream cheese, crab meat, breadcrumbs, mayonnaise, Worcestershire sauce, garlic, green onions, Old Bay seasoning, and black pepper. Mix until well combined.
5. Stuff each mushroom cap generously with the crab mixture.
6. Place the stuffed mushrooms on a baking sheet and sprinkle grated Parmesan cheese on top.
7. Bake in the preheated oven for 20-25 minutes, or until the mushrooms are tender and the tops are golden brown.
8. Remove from the oven and garnish with fresh parsley before serving.
Tips:
- For extra flavor, try adding a dash of hot sauce to the crab mixture.
- These mushrooms can be assembled ahead of time and stored in the refrigerator until you’re ready to bake them.
- Serve with a lemon wedge on the side to add a refreshing zest.
Cucumber Bites with Tuna Salad
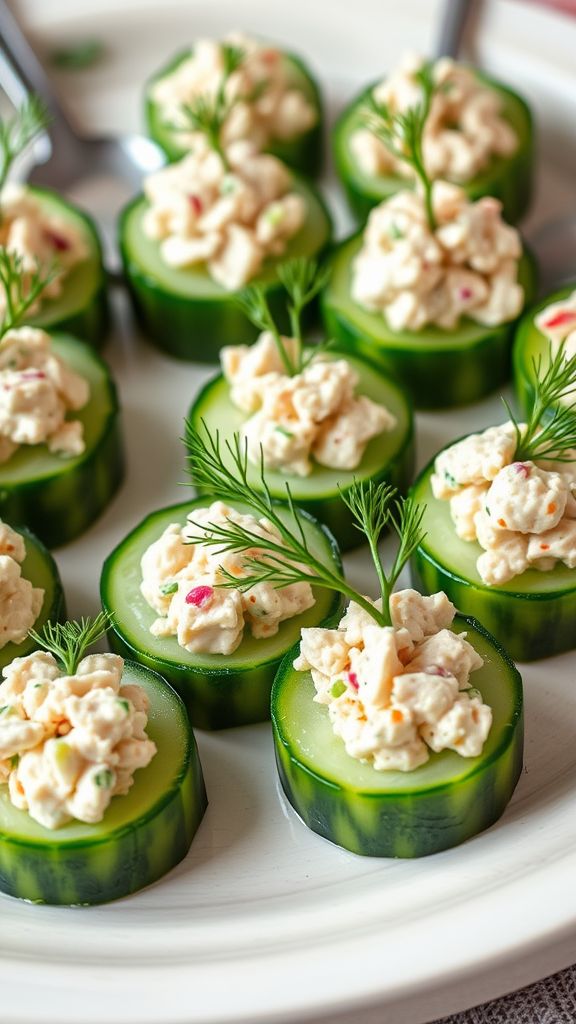
Cucumber Bites with Tuna Salad are a refreshing and delightful appetizer that combines the crunch of fresh cucumbers with the savory flavors of tuna salad. This dish is not only easy to prepare but also offers a perfect blend of texture and taste that appeals to seafood lovers.
Ingredients:
- 1 large cucumber
- 1 can (5 oz) tuna, drained
- 2 tablespoons mayonnaise
- 1 tablespoon Dijon mustard
- 1 tablespoon chopped red onion
- 1 tablespoon chopped celery
- 1 teaspoon lemon juice
- Salt and pepper to taste
- Fresh dill for garnish
Preparation Time: 10 minutes
Cooking Time: 0 minutes
Total Time: 10 minutes
Instructions:
1. Wash the cucumber and slice it into 1-inch thick rounds.
2. In a medium bowl, combine the drained tuna, mayonnaise, Dijon mustard, chopped red onion, chopped celery, lemon juice, salt, and pepper.
3. Mix everything until well incorporated and the tuna is evenly coated.
4. Spoon a generous amount of the tuna salad mixture onto each cucumber slice.
5. Garnish each cucumber bite with a small sprig of fresh dill.
Tips:
- For added flavor, consider mixing in chopped pickles or capers to the tuna salad.
- You can use Greek yogurt instead of mayonnaise for a lighter version.
- Prepare the tuna salad a few hours in advance and store it in the fridge for a more developed flavor.
Cheese Crisps with Marinara Sauce

These Cheese Crisps with Marinara Sauce are a deliciously crunchy snack with a savory cheesy flavor that pairs perfectly with the rich, tangy marinara. Ideal for parties or a satisfying treat, they’re incredibly easy to make!
Ingredients:
- 2 cups shredded cheese (cheddar, Parmesan, or a blend)
- 1 teaspoon Italian seasoning
- 1/2 teaspoon garlic powder
- 1/4 teaspoon red pepper flakes (optional)
- 1 cup marinara sauce for dipping
Preparation Time: 10 minutes
Cooking Time: 15 minutes
Total Time: 25 minutes
Instructions:
1. Preheat your oven to 400°F (200°C) and line a baking sheet with parchment paper.
2. In a bowl, combine the shredded cheese, Italian seasoning, garlic powder, and red pepper flakes, mixing well.
3. Drop tablespoon-sized mounds of the cheese mixture onto the prepared baking sheet, spacing them about 2 inches apart.
4. Bake in the preheated oven for 10-12 minutes, or until the edges are golden and the cheese has melted and spread out.
5. Remove the baking sheet from the oven and let the cheese crisps cool for a few minutes before carefully removing them with a spatula.
6. Serve warm with marinara sauce for dipping.
Tips:
- Experiment with different cheese combinations for varied flavors.
- For extra crunch, allow the crisps to cool completely before serving.
- Store any leftovers in an airtight container for up to a week.
Antipasto Skewers with Olives and Salami

Antipasto Skewers with Olives and Salami offer a delightful combination of savory salami, briny olives, and fresh vegetables, making them a perfect appetizer for any gathering. The vibrant colors and bold flavors are sure to impress your guests.
Ingredients:
- 12 wooden skewers
- 1 cup cherry tomatoes
- 1 cup pimiento-stuffed green olives
- 1 cup mozzarella balls
- 8 ounces salami, cut into quarters
- 1/2 cup sliced pepperoncini peppers
- 1 tablespoon Italian seasoning
- 1/4 cup balsamic glaze (optional)
Preparation Time: 10 minutes
Cooking Time: 0 minutes
Total Time: 10 minutes
Instructions:
1. Begin by preparing your skewers and gathering all ingredients.
2. Take a wooden skewer and start by threading a cherry tomato onto it.
3. Follow with a quarter of salami, a mozzarella ball, and an olive.
4. Add a slice of pepperoncini, and repeat the process until the skewer is filled, leaving some space at each end.
5. Continue this process for all skewers until all ingredients are used.
6. If desired, drizzle balsamic glaze on top before serving or serve it on the side for dipping.
Tips:
- You can refrigerate the skewers for 30 minutes before serving for a refreshing touch.
- Feel free to substitute ingredients based on personal preference, such as using different cheeses or vegetables.
- Make extra skewers for larger gatherings, as they tend to disappear quickly!
Buffalo Cauliflower Wings
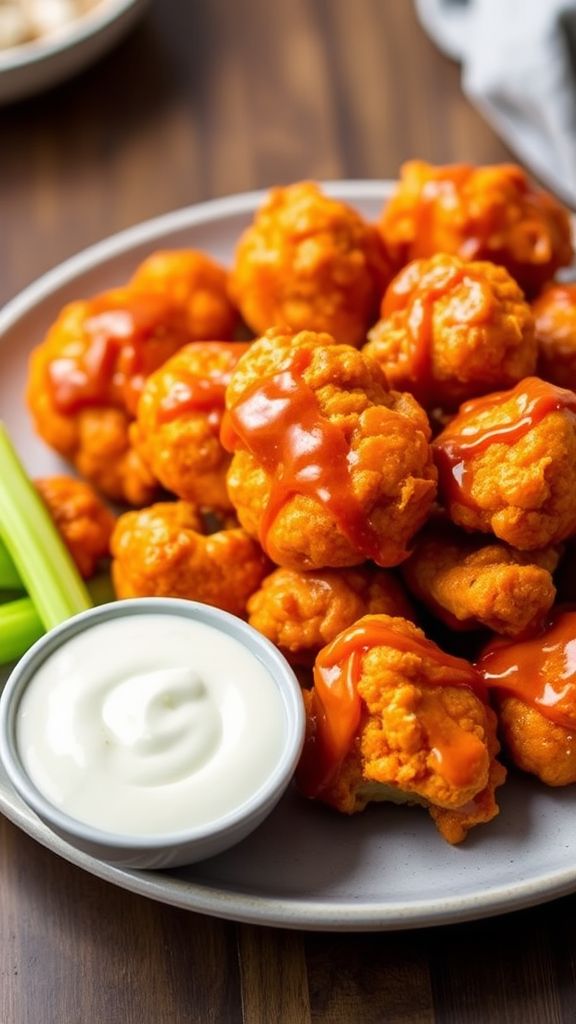
These Buffalo Cauliflower Wings offer a spicy and flavorful twist on a classic favorite, making them a perfect appetizer or snack. Coated in a tangy buffalo sauce, they are sure to please both vegetarians and meat-lovers alike!
Ingredients:
- 1 medium head of cauliflower
- 3/4 cup all-purpose flour
- 1/2 cup water
- 1 teaspoon garlic powder
- 1 teaspoon paprika
- 1/2 teaspoon salt
- 1/2 teaspoon black pepper
- 1 cup buffalo sauce
- 2 tablespoons olive oil
- Optional celery sticks and blue cheese dressing for serving
Preparation Time: 15 minutes
Cooking Time: 25 minutes
Total Time: 40 minutes
Instructions:
1. Preheat your oven to 450°F (230°C) and line a baking sheet with parchment paper.
2. Cut the cauliflower into bite-sized florets and set aside.
3. In a bowl, whisk together the flour, water, garlic powder, paprika, salt, and black pepper until smooth.
4. Dip each cauliflower piece into the batter, making sure it is evenly coated and place them on the baking sheet.
5. Bake the cauliflower for 20 minutes, flipping halfway through until they become golden and crispy.
6. Once baked, remove the cauliflower from the oven and toss them in a bowl with the buffalo sauce until fully coated.
7. Return the sauced cauliflower to the baking sheet and bake for an additional 5 minutes to set the sauce.
8. Serve hot with celery sticks and blue cheese dressing if desired.
Tips:
- For extra crunch, you can add breadcrumbs to the batter before coating the cauliflower.
- Feel free to adjust the spice level of the buffalo sauce by mixing in a little honey or using a milder sauce.
- These wings can be made ahead of time and reheated in the oven for a quick snack!
Prosciutto-Wrapped Asparagus
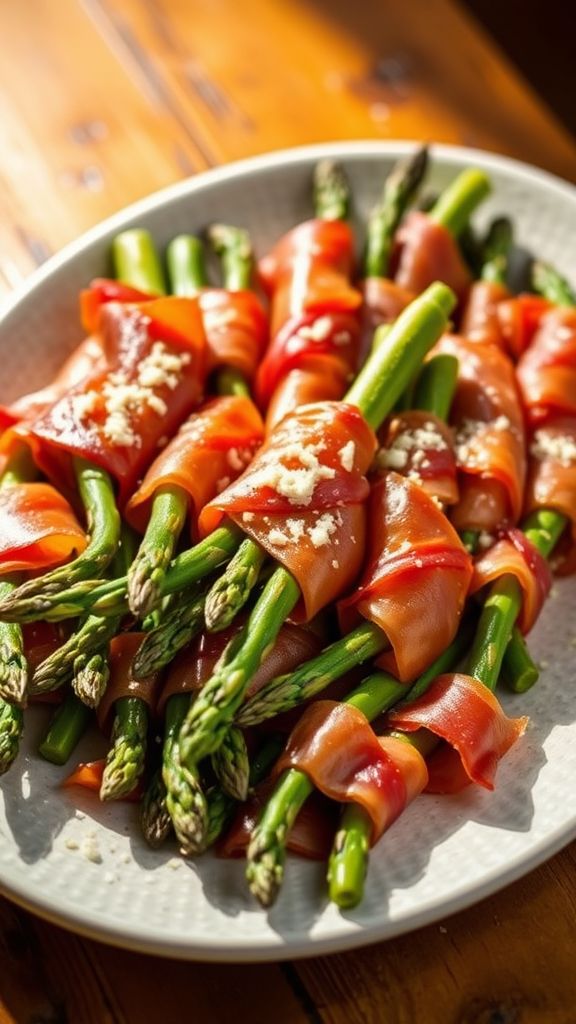
This Prosciutto-Wrapped Asparagus recipe is a delightful appetizer that combines the savory richness of prosciutto with the fresh, earthy flavor of asparagus. The interplay of crispy, salty, and tender textures elevates any gathering or meal.
Ingredients:
- 1 pound asparagus spears
- 8 ounces prosciutto, thinly sliced
- 2 tablespoons olive oil
- 1/2 teaspoon garlic powder
- 1/4 teaspoon black pepper
- 1/4 teaspoon sea salt
- 1 tablespoon lemon juice
- 1/4 cup grated Parmesan cheese (optional)
Preparation Time: 10 minutes
Cooking Time: 15 minutes
Total Time: 25 minutes
Instructions:
1. Preheat your oven to 400°F (200°C).
2. Rinse and trim the tough ends off the asparagus spears.
3. In a bowl, combine olive oil, garlic powder, black pepper, sea salt, and lemon juice.
4. Toss the asparagus in the oil mixture until evenly coated.
5. Take a slice of prosciutto and wrap it around each asparagus spear, starting from the bottom and spiraling upwards.
6. Place the wrapped asparagus on a baking sheet lined with parchment paper.
7. Bake in the preheated oven for 12-15 minutes, or until the prosciutto is crispy and the asparagus is tender.
8. If using, sprinkle grated Parmesan cheese on top of the asparagus while still hot.
9. Serve warm as an appetizer or side dish.
Tips:
- Choose asparagus that is firm and bright green for the best flavor.
- If the prosciutto is too thick, it can be sliced in half lengthwise for easier wrapping.
- Feel free to experiment with different seasonings or add a drizzle of balsamic glaze before serving.
Greek Salad Bites on Skewers

These Greek Salad Bites on Skewers are a delightful combination of fresh ingredients, offering a burst of Mediterranean flavors in every bite. Perfect as an appetizer or party snack, they are as visually appealing as they are delicious.
Ingredients:
- 1 cup cherry tomatoes
- 1 cup cucumber, diced
- 1 cup feta cheese, cubed
- 1 cup pitted Kalamata olives
- 1 tablespoon olive oil
- 1 teaspoon dried oregano
- Salt and pepper to taste
- Wooden skewers (8-10 inches long)
Preparation Time: 10 minutes
Cooking Time: 0 minutes
Total Time: 10 minutes
Instructions:
1. Begin by washing the cherry tomatoes and cucumbers thoroughly.
2. Cut the cucumbers into small, bite-sized pieces.
3. Cube the feta cheese into small squares.
4. Take a wooden skewer and thread one cherry tomato, followed by a cucumber piece, a cube of feta cheese, and a Kalamata olive. Repeat until the skewer is filled, leaving space at the ends for handling.
5. In a small bowl, mix the olive oil, oregano, salt, and pepper to create a dressing.
6. Drizzle the dressing over the assembled skewers before serving.
Tips:
- For added flavor, marinate the skewers in the dressing for 30 minutes before serving.
- Feel free to customize the ingredients by adding bell peppers or red onions.
- These skewers can be made ahead of time and served chilled.
Avocado and Bacon Deviled Eggs
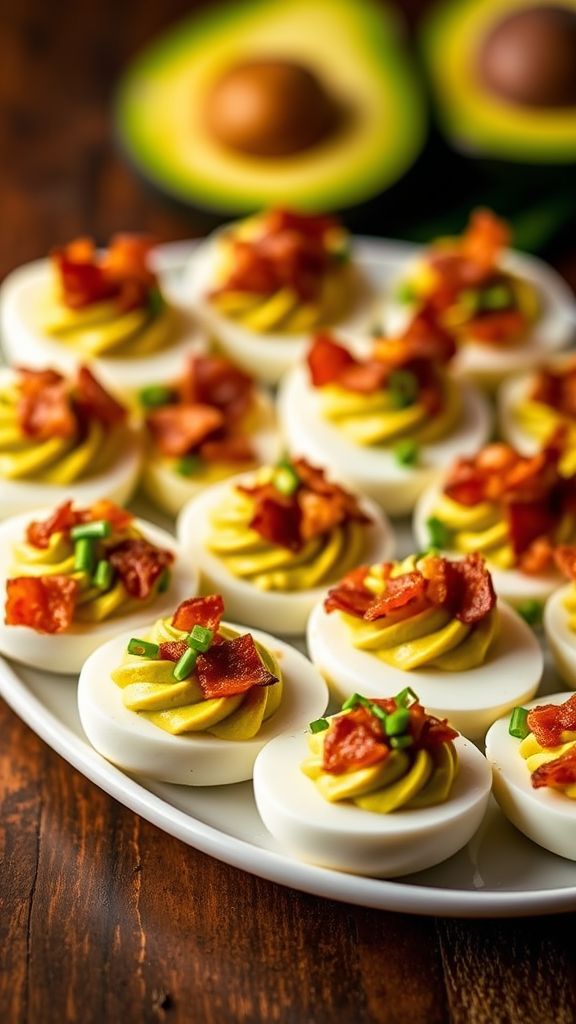
These Avocado and Bacon Deviled Eggs are a delightful twist on a classic favorite, blending the rich creaminess of avocado with the savory crunch of bacon. The combination of flavors makes them perfect for parties or a tasty appetizer.
Ingredients:
- 6 large eggs
- 1 ripe avocado
- 2 strips bacon, cooked and crumbled
- 1 tablespoon mayonnaise
- 1 teaspoon Dijon mustard
- 1 tablespoon lime juice
- 1/4 teaspoon salt
- 1/4 teaspoon black pepper
- 1 tablespoon fresh chives, chopped
Preparation Time: 15 minutes
Cooking Time: 10 minutes
Total Time: 25 minutes
Instructions:
1. Hard boil the eggs by placing them in a saucepan and covering with water. Bring to a boil, then cover and remove from heat. Let sit for 10 minutes.
2. Once the eggs are done, transfer them to an ice bath to cool for 5 minutes before peeling.
3. Slice the peeled eggs in half lengthwise and remove the yolks, placing them in a mixing bowl.
4. Mash the yolks with the avocado, mayonnaise, Dijon mustard, lime juice, salt, and black pepper until smooth and creamy.
5. Carefully spoon or pipe the avocado mixture back into the egg whites.
6. Top each deviled egg with crumbled bacon and sprinkle with chopped chives for garnish.
Tips:
- For extra flavor, consider adding a dash of hot sauce to the avocado mixture.
- Make ahead by preparing the filling and storing it in the fridge; assemble just before serving.
- Feel free to experiment with different herbs like cilantro or parsley for a unique twist.
Pesto and Cheese Stuffed Mushrooms
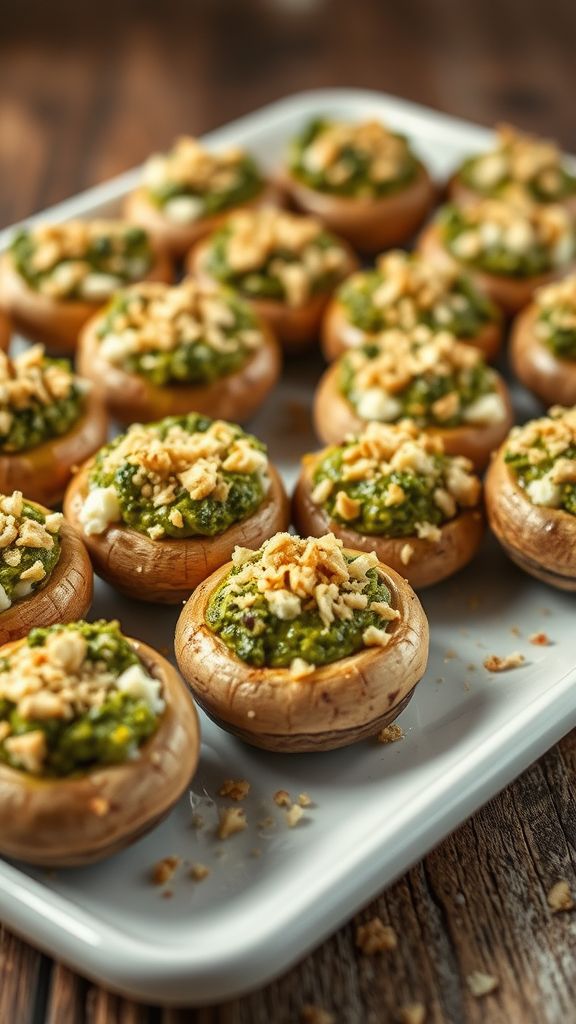
Pesto and Cheese Stuffed Mushrooms are a delightful appetizer that combines the earthy flavor of mushrooms with the fresh and vibrant notes of pesto and creamy cheese. This dish is not only visually appealing but also bursts with key flavors that will leave your guests craving more.
Ingredients:
- 12 large white mushrooms
- 1 cup pesto sauce
- 1 cup cream cheese, softened
- 1/2 cup grated Parmesan cheese
- 1/2 cup breadcrumbs
- 2 cloves garlic, minced
- 1 tablespoon olive oil
- 1/4 teaspoon salt
- 1/4 teaspoon black pepper
Preparation Time: 15 minutes
Cooking Time: 20 minutes
Total Time: 35 minutes
Instructions:
1. Preheat your oven to 375°F (190°C).
2. Clean the mushrooms and remove the stems carefully, setting them aside.
3. In a mixing bowl, combine the pesto sauce, cream cheese, Parmesan cheese, minced garlic, salt, and black pepper until well mixed.
4. Finely chop the reserved mushroom stems and stir them into the cheese mixture.
5. Stuff each mushroom cap generously with the cheese mixture.
6. Place the stuffed mushrooms on a baking sheet and drizzle with olive oil.
7. Sprinkle breadcrumbs over the top of each stuffed mushroom.
8. Bake in the preheated oven for 20 minutes or until the mushrooms are tender and the tops are golden brown.
Tips:
- Use fresh pesto for the best flavor.
- Feel free to add chopped sun-dried tomatoes or olives to the filling for extra flavor.
- These stuffed mushrooms can be made ahead of time and popped in the oven before serving.
Smoked Salmon and Cream Cheese Roll-Ups

These Smoked Salmon and Cream Cheese Roll-Ups are a delightful combination of savory flavors and creamy textures, making them a perfect appetizer or snack for any occasion.
Ingredients:
- 4 ounces smoked salmon
- 8 ounces cream cheese, softened
- 1 tablespoon fresh dill, chopped
- 1 teaspoon lemon juice
- 4 large whole wheat tortillas
- 1 cup arugula or spinach
- Freshly ground black pepper to taste
Preparation Time: 10 minutes
Cooking Time: 0 minutes
Total Time: 10 minutes
Instructions:
1. In a medium bowl, combine the softened cream cheese, fresh dill, lemon juice, and a pinch of black pepper. Mix until smooth and well combined.
2. Lay a tortilla on a clean surface and spread a generous layer of the cream cheese mixture evenly over the entire tortilla.
3. Place a few slices of smoked salmon on top of the cream cheese layer, followed by a handful of arugula or spinach.
4. Starting from one edge, carefully roll the tortilla tightly into a cylinder shape.
5. Once rolled, slice the tortilla into bite-sized pieces and arrange on a serving platter.
Tips:
- For extra flavor, feel free to add capers or sliced cucumbers inside the roll-ups.
- These roll-ups can be made ahead of time; just keep them covered in the refrigerator until serving.
- Experiment with different types of tortillas, such as spinach or sun-dried tomato, for a colorful twist.
Roasted Red Pepper Hummus with Celery
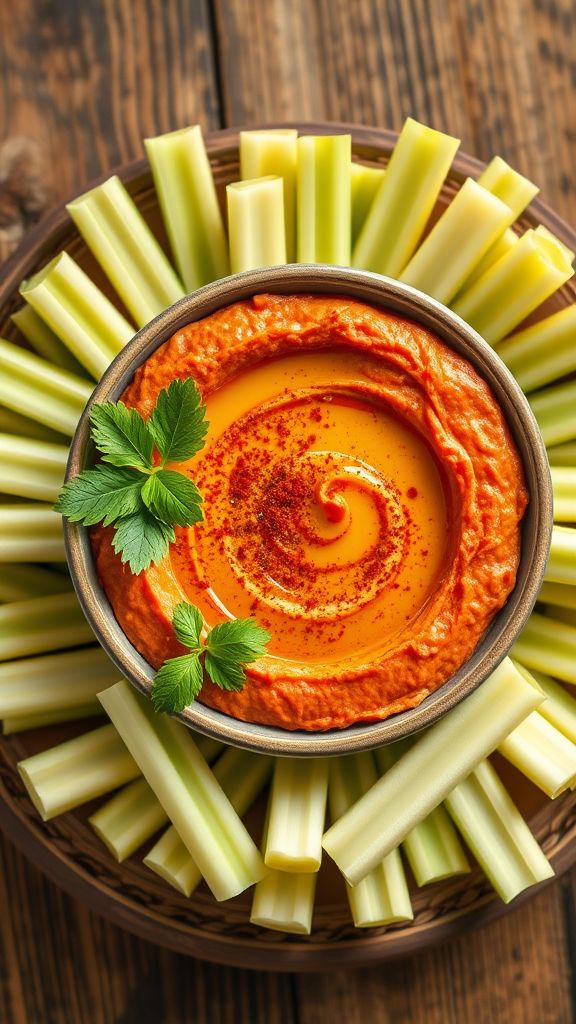
This Roasted Red Pepper Hummus with Celery combines creamy chickpeas with the sweet, smoky flavor of roasted red peppers, creating a dip that is not only delicious but also healthy. Perfect for snacking or as an appetizer, this vibrant hummus will elevate any gathering!
Ingredients:
- 1 can (15 ounces) chickpeas, drained and rinsed
- 1 cup roasted red peppers, jarred and drained
- 1/4 cup tahini
- 2 tablespoons olive oil
- 1 clove garlic, minced
- 2 tablespoons lemon juice
- 1/2 teaspoon ground cumin
- Salt and pepper to taste
- 1 bunch celery, cut into sticks for serving
Preparation Time: 10 minutes
Cooking Time: 0 minutes
Total Time: 10 minutes
Instructions:
1. In a food processor, combine the chickpeas, roasted red peppers, tahini, olive oil, garlic, lemon juice, and ground cumin.
2. Process until smooth, scraping down the sides as necessary.
3. Taste the hummus and season with salt and pepper as desired.
4. Transfer the hummus to a serving bowl and drizzle with additional olive oil if desired.
5. Serve with celery sticks for dipping.
Tips:
- For a smoother texture, remove the skins from the chickpeas before blending.
- Feel free to add more roasted red peppers for extra flavor.
- Store leftover hummus in an airtight container in the refrigerator for up to 5 days.
- Add a sprinkle of paprika or chopped parsley as a garnish for a pop of color.
Keto Nachos with Cheese and Jalapeños

Indulge in the rich and savory world of Keto Nachos with Cheese and Jalapeños, where crispy cheese chips are perfectly complemented by the heat of jalapeños and melted cheese. This recipe beautifully combines satisfying textures and flavors, making it a must-try for any low-carb enthusiast.
Ingredients:
- 2 cups shredded cheddar cheese
- 1 cup sliced jalapeños (fresh or pickled)
- 1 cup sour cream
- 1 teaspoon garlic powder
- 1 teaspoon onion powder
- 1/2 teaspoon chili powder
- 1/2 teaspoon cumin
- 1/4 teaspoon salt
- 1/4 teaspoon black pepper
- 1 tablespoon olive oil
- 1/2 cup diced tomatoes (optional)
- 1/4 cup chopped green onions (optional)
Preparation Time: 10 minutes
Cooking Time: 15 minutes
Total Time: 25 minutes
Instructions:
1. Preheat your oven to 400°F (200°C).
2. In a bowl, mix the shredded cheddar cheese, garlic powder, onion powder, chili powder, cumin, salt, and black pepper until well combined.
3. Line a baking sheet with parchment paper and spread the cheese mixture into a single layer, shaping them into nacho chip sizes.
4. Bake in the preheated oven for about 10 minutes, or until the cheese is melted and starting to turn golden and crispy.
5. Remove the baking sheet from the oven and immediately sprinkle the sliced jalapeños over the melted cheese chips.
6. Return to the oven for an additional 5 minutes to ensure the jalapeños are heated through.
7. Once done, let the nachos cool for a minute, then top with sour cream, diced tomatoes, and chopped green onions if desired.
Tips:
- For extra flavor, try adding cooked ground beef or turkey on top.
- Adjust the amount of jalapeños based on your spice tolerance.
- Serve immediately for the best texture and flavor.
- Store any leftovers in an airtight container, but note that the chips may lose their crispiness.
Stuffed Cherry Tomatoes with Feta and Basil
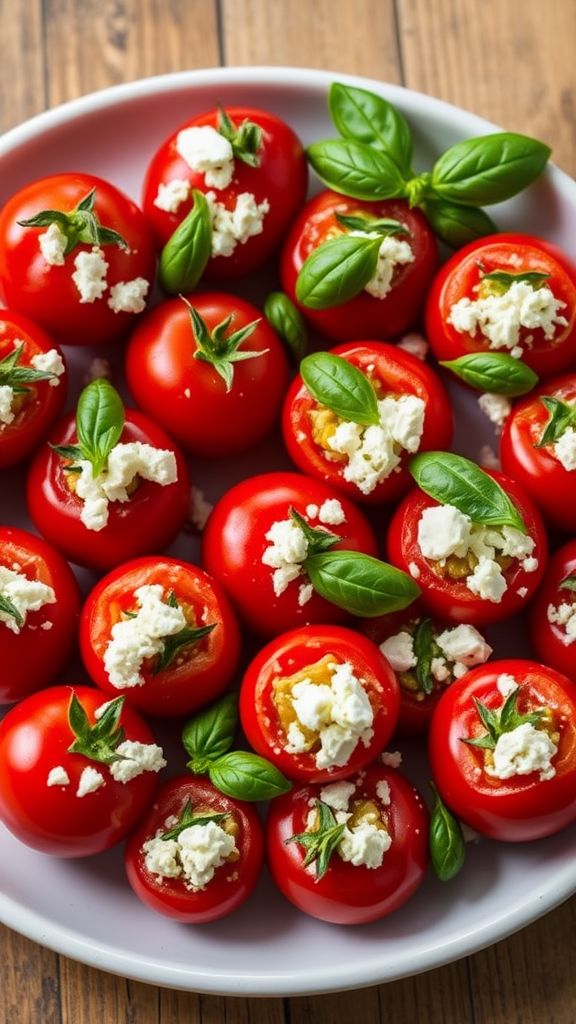
These Stuffed Cherry Tomatoes with Feta and Basil are a delightful burst of flavor, combining the sweetness of ripe tomatoes with the creamy tang of feta and the freshness of basil. Perfect as a light appetizer or a healthy snack, they are sure to impress at any gathering!
Ingredients:
- 20 cherry tomatoes
- 1 cup feta cheese, crumbled
- 1/4 cup fresh basil, chopped
- 2 tablespoons olive oil
- 1 teaspoon garlic, minced
- Salt and pepper to taste
Preparation Time: 10 minutes
Cooking Time: 0 minutes
Total Time: 10 minutes
Instructions:
1. Start by preheating your oven to 375°F (190°C).
2. Cut the tops off the cherry tomatoes and scoop out the insides using a small spoon or a melon baller.
3. In a mixing bowl, combine the crumbled feta cheese, chopped basil, olive oil, minced garlic, salt, and pepper.
4. Carefully fill each hollowed cherry tomato with the feta mixture, packing it in gently.
5. Arrange the stuffed tomatoes on a baking sheet and bake for about 5 minutes, until slightly warmed.
Tips:
- For added flavor, drizzle balsamic glaze over the stuffed tomatoes before serving.
- You can prepare the filling a few hours in advance and store it in the refrigerator until you are ready to stuff the tomatoes.
- Feel free to experiment with additional herbs like oregano or parsley for variation.