My New Cookbook is Out! Check Out Now!
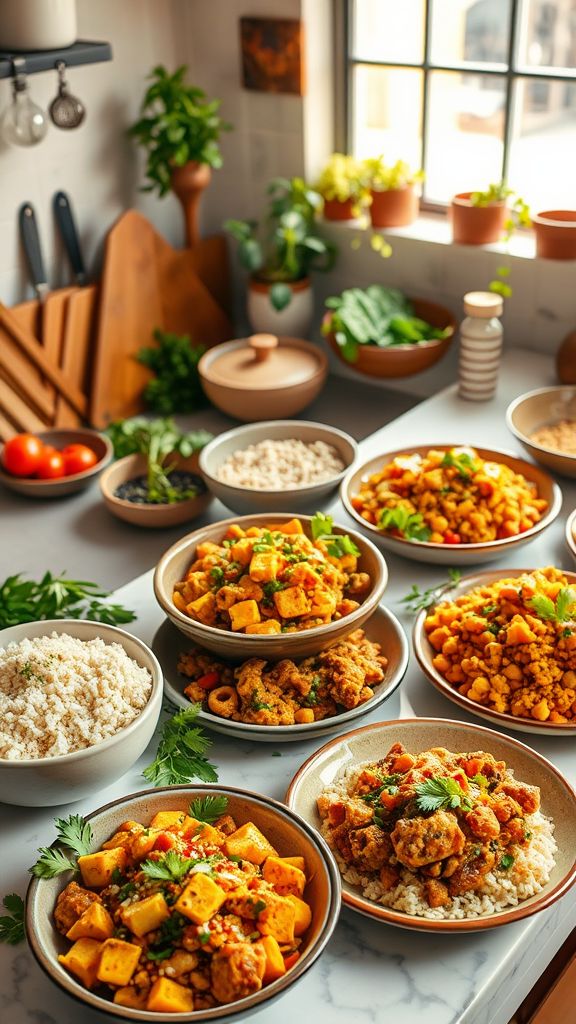
15 High-Protein Lunchbox Ideas for Kids
This page contains affiliate links and I earn a commission if you make a purchase through one of the links, at no cost to you.
Did you know that children need about 25-35% of their daily calories from protein to support healthy growth and development? Finding creative and delicious ways to pack protein into your kids’ lunchboxes can be a fun challenge! In this blog, we’ll share 15 high-protein lunchbox ideas that are not only nutritious but also packed with flavor, ensuring your little ones stay energized and satisfied throughout the school day. Get ready to explore tasty options like Quinoa & Black Bean Power Bowls and Mini Chicken Meatballs!
Shop Our Must-Haves


Quinoa & Black Bean Power Bowl
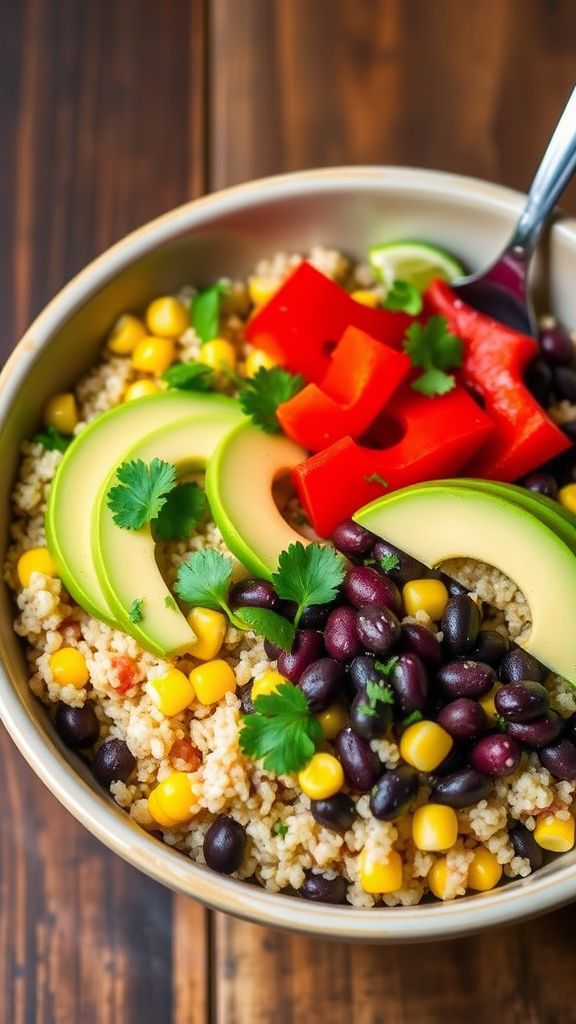
This Quinoa & Black Bean Power Bowl is a nutrient-packed dish that balances earthy flavors with a zesty kick. It’s not only delicious but also incredibly versatile, making it perfect for meal prep or a quick dinner.
Ingredients:
- 1 cup quinoa
- 2 cups vegetable broth
- 1 can (15 oz) black beans, drained and rinsed
- 1 cup corn, frozen or canned
- 1 red bell pepper, diced
- 1 avocado, diced
- 1/4 cup fresh cilantro, chopped
- 1 lime, juiced
- 1 teaspoon cumin
- 1/2 teaspoon chili powder
- Salt and pepper to taste
- Optional toppings: feta cheese, salsa, hot sauce
Preparation Time: 10 minutes
Cooking Time: 20 minutes
Total Time: 30 minutes
Instructions:
1. Rinse the quinoa under cold water to remove any bitterness.
2. In a medium saucepan, combine the rinsed quinoa and vegetable broth. Bring to a boil, then reduce heat to low and cover. Cook for about 15 minutes, or until the quinoa is fluffy and all the liquid is absorbed.
3. In a large mixing bowl, combine the black beans, corn, diced red bell pepper, cilantro, lime juice, cumin, chili powder, salt, and pepper. Mix well.
4. Once the quinoa is done cooking, fluff it with a fork and add it to the mixing bowl. Stir everything together until well combined.
5. Serve the power bowl topped with diced avocado and any optional toppings of your choice.
Tips:
- For added protein, consider mixing in grilled chicken or tofu.
- Store leftovers in an airtight container for up to 4 days.
- Feel free to switch up the veggies based on what’s in season or your preferences.
Turkey and Cheese Roll-Ups

This Turkey and Cheese Roll-Ups recipe is a delightful blend of savory turkey and creamy cheese, perfect for a quick snack or a light meal. The combination of flavors wrapped in a soft tortilla makes it an irresistible treat for all ages.
Ingredients:
- 4 large tortillas
- 8 slices turkey breast
- 4 slices cheese (your choice)
- 2 tablespoons mustard
- 1 cup baby spinach leaves
- 1/2 cup shredded carrots
Preparation Time: 10 minutes
Cooking Time: 0 minutes
Total Time: 10 minutes
Instructions:
1. Lay a tortilla flat on a clean surface.
2. Spread 1 tablespoon of mustard evenly over the tortilla.
3. Place 2 slices of turkey breast on top of the mustard.
4. Add 1 slice of cheese over the turkey.
5. Top with a handful of baby spinach leaves and a sprinkle of shredded carrots.
6. Carefully roll the tortilla tightly from one end to the other.
7. Cut the rolled tortilla into smaller pieces for easy serving.
Tips:
- You can customize the filling with your favorite ingredients, such as avocado or bell peppers.
- Serve with a side of ranch or hummus for dipping.
- These roll-ups can be made ahead of time and stored in the refrigerator for a quick snack.
Greek Yogurt Parfait with Nuts and Berries
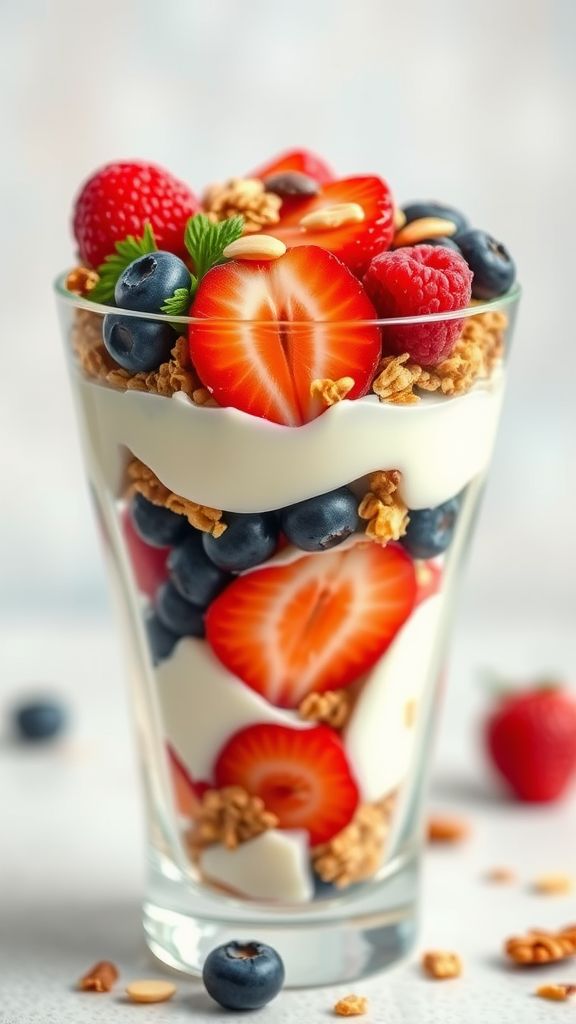
This Greek Yogurt Parfait with Nuts and Berries is a delightful blend of creamy, tangy yogurt, crunchy nuts, and sweet, juicy berries that creates a nutritious and satisfying snack or breakfast option.
Ingredients:
- 2 cups Greek yogurt
- 1 cup mixed berries (such as strawberries, blueberries, and raspberries)
- 1/2 cup granola
- 1/4 cup mixed nuts (such as almonds and walnuts)
- 2 tablespoons honey or maple syrup
- 1 teaspoon vanilla extract
Preparation Time: 10 minutes
Cooking Time: 0 minutes
Total Time: 10 minutes
Instructions:
1. In a bowl, mix the Greek yogurt with honey or maple syrup and vanilla extract until smooth.
2. In serving glasses or bowls, layer the yogurt mixture, followed by a layer of mixed berries.
3. Add a layer of granola over the berries, followed by a sprinkle of mixed nuts.
4. Repeat the layering process until the glasses are filled, finishing with a final layer of berries and nuts on top.
5. Serve immediately for the best texture and flavor, or refrigerate for up to 30 minutes before serving.
Tips:
- Choose seasonal berries for the best flavor and freshness.
- You can substitute Greek yogurt with plant-based yogurt for a dairy-free option.
- For added sweetness, feel free to drizzle more honey or maple syrup on top before serving.
- Experiment with different types of nuts and seeds for varied textures and flavors.
Mini Chicken Meatballs with Dipping Sauce
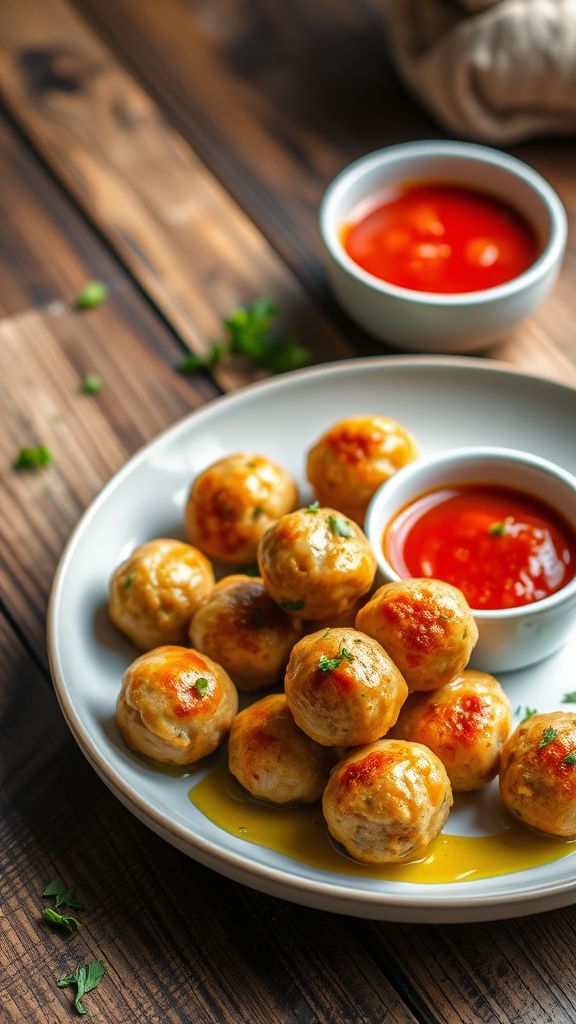
These Mini Chicken Meatballs with Dipping Sauce are a delightful bite-sized treat that combine savory chicken, herbs, and spices for a burst of flavor. Perfect for parties or as a family meal, they are juicy and dip-able!
Ingredients:
- 1 pound ground chicken
- 1/2 cup breadcrumbs
- 1/4 cup grated Parmesan cheese
- 1 egg
- 2 cloves garlic, minced
- 1 teaspoon dried Italian herbs
- 1/2 teaspoon salt
- 1/4 teaspoon black pepper
- 2 tablespoons olive oil
- 1 cup marinara sauce (for dipping)
Preparation Time: 15 minutes
Cooking Time: 20 minutes
Total Time: 35 minutes
Instructions:
1. Preheat your oven to 400°F (200°C) and line a baking sheet with parchment paper.
2. In a large mixing bowl, combine the ground chicken, breadcrumbs, Parmesan cheese, egg, minced garlic, dried herbs, salt, and pepper.
3. Mix the ingredients until well combined, but do not overwork the mixture.
4. With your hands, form the mixture into small meatballs, about the size of a golf ball, and place them on the prepared baking sheet.
5. Drizzle the olive oil over the meatballs and bake in the preheated oven for 20 minutes, or until golden and cooked through.
6. While the meatballs bake, warm the marinara sauce in a small saucepan over medium heat.
7. Once the meatballs are done, remove them from the oven and serve hot with the warm marinara sauce for dipping.
Tips:
- Use fresh herbs for an extra burst of flavor.
- Adjust the seasoning or add some red pepper flakes for a spicy kick.
- These meatballs can also be cooked in a skillet for a quicker option.
- Store any leftovers in an airtight container in the refrigerator for up to 3 days.
Hummus and Veggie Snack Cups
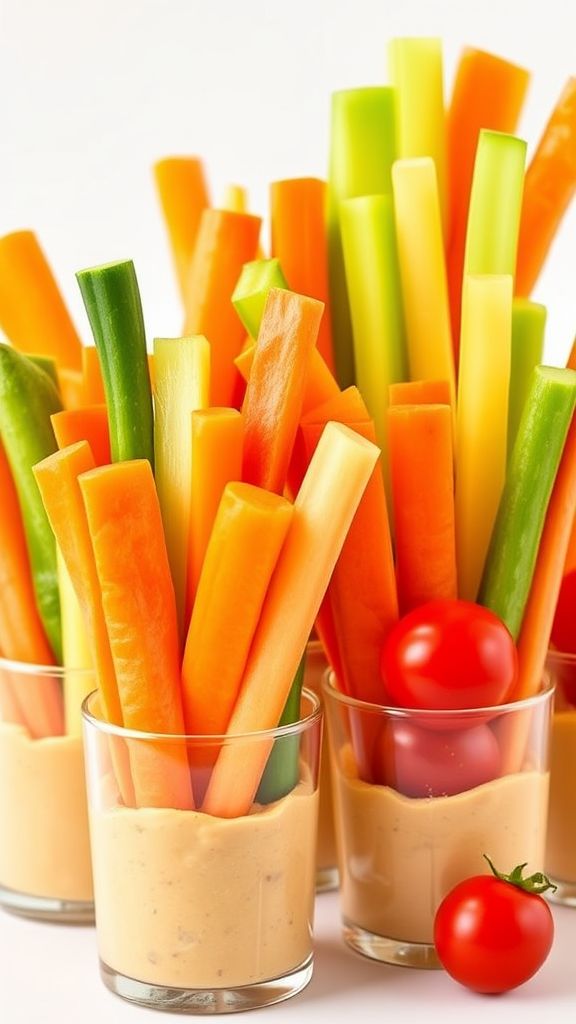
This Hummus and Veggie Snack Cups recipe is a perfect blend of creamy, flavorful hummus paired with crunchy, fresh vegetables, making it a delightful and healthy snack option. Enjoy the vibrant colors and textures that appeal to both kids and adults alike!
Ingredients:
- 1 cup hummus
- 1 cup carrot sticks
- 1 cup cucumber sticks
- 1 cup bell pepper strips
- 1 cup cherry tomatoes
- 1 cup celery sticks
- 1 tablespoon olive oil (optional)
- 1 teaspoon paprika (optional)
Preparation Time: 10 minutes
Cooking Time: 0 minutes
Total Time: 10 minutes
Instructions:
1. Begin by preparing your vegetables by washing and cutting them into sticks or bite-sized pieces.
2. Arrange the vegetable sticks in small snack cups or containers, placing them upright for easy access.
3. Spoon hummus into the bottom of each cup or container, leaving enough room for the veggies to stand up.
4. If desired, drizzle a little olive oil over the hummus and sprinkle paprika for added flavor.
5. Serve immediately or refrigerate until ready to enjoy.
Tips:
- Feel free to mix and match your favorite veggies for variety.
- For an added protein boost, consider adding some chickpea salad on top of the hummus.
- These cups can be made a day in advance, making them perfect for meal prep.
Peanut Butter Banana Energy Bites

These Peanut Butter Banana Energy Bites are a delightful and nutritious snack, combining the rich flavors of peanut butter and the natural sweetness of banana. Perfect for a quick energy boost or a healthy treat!
Ingredients:
- 1 cup rolled oats
- 1/2 cup peanut butter
- 1/2 cup mashed ripe banana
- 1/4 cup honey
- 1/4 cup chocolate chips
- 1/4 cup chopped nuts (optional)
- 1/2 teaspoon vanilla extract
Preparation Time: 10 minutes
Cooking Time: 0 minutes
Total Time: 10 minutes
Instructions:
1. In a large mixing bowl, combine the rolled oats, peanut butter, mashed banana, honey, chocolate chips, chopped nuts, and vanilla extract.
2. Mix all the ingredients together until well combined and a sticky dough forms.
3. Use your hands to roll the mixture into small balls, about 1 inch in diameter.
4. Place the energy bites onto a baking tray lined with parchment paper.
5. Refrigerate the energy bites for at least 30 minutes to firm up.
6. Once set, enjoy your Peanut Butter Banana Energy Bites as a quick snack or energy booster!
Tips:
- For added flavor, consider mixing in a pinch of cinnamon or a tablespoon of chia seeds.
- Store any leftovers in an airtight container in the refrigerator for up to a week.
- These bites can also be frozen for longer storage – just make sure to separate them with parchment paper.
Egg and Spinach Breakfast Muffins
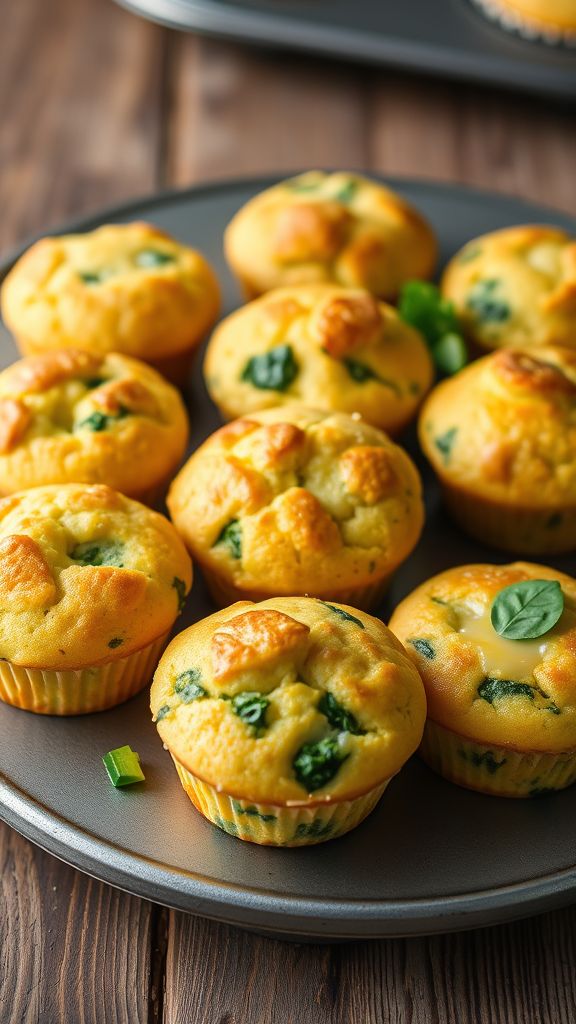
These Egg and Spinach Breakfast Muffins are a delicious and nutritious way to kickstart your day, blending the wholesome taste of eggs with the vibrant flavor of fresh spinach. Perfect for meal prep, they’re both hearty and satisfying!
Ingredients:
- 6 large eggs
- 2 cups fresh spinach, chopped
- 1 cup shredded cheese (cheddar or your choice)
- 1/2 cup milk
- 1/2 teaspoon salt
- 1/4 teaspoon black pepper
- 1/4 teaspoon garlic powder
- 1/4 teaspoon onion powder
- 1/4 cup diced bell pepper (optional)
Preparation Time: 10 minutes
Cooking Time: 20 minutes
Total Time: 30 minutes
Instructions:
1. Preheat your oven to 350°F (175°C) and grease a muffin tin.
2. In a large bowl, whisk together the eggs, milk, salt, black pepper, garlic powder, and onion powder until well combined.
3. Stir in the chopped spinach, shredded cheese, and bell pepper (if using) until evenly distributed.
4. Pour the egg mixture evenly into the prepared muffin tin, filling each cup about 3/4 full.
5. Bake for 18-20 minutes, or until the muffins are set and lightly golden on top.
6. Allow to cool for a few minutes before removing from the tin. Serve warm or store for later.
Tips:
- Feel free to customize your muffins with other veggies or proteins like diced ham or mushrooms.
- These muffins freeze well, making them a great option for meal prep – just reheat in the microwave when ready to eat.
- Experiment with different cheeses for added flavor; feta or mozzarella also work well!
Tuna Salad Lettuce Wraps
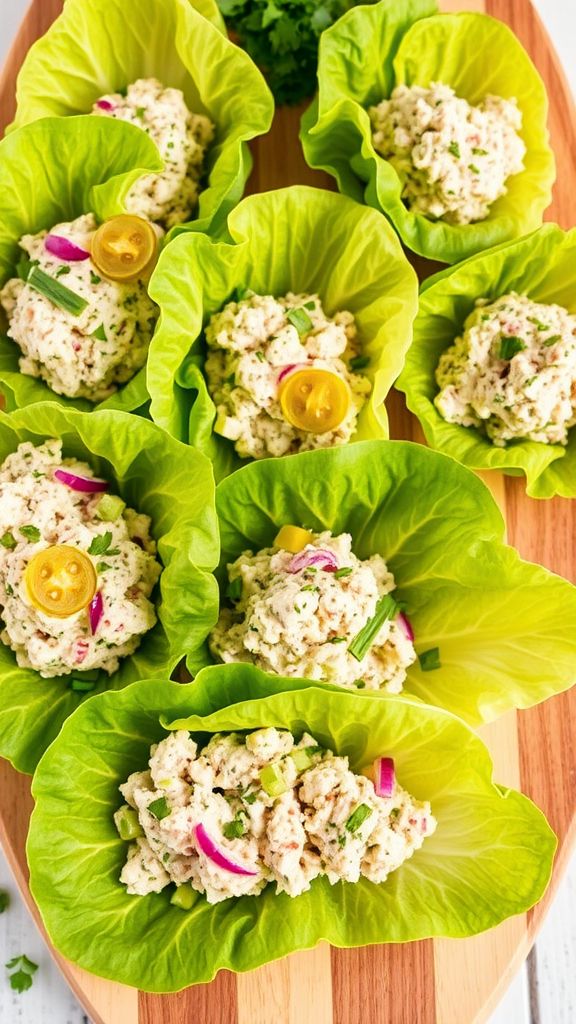
Tuna Salad Lettuce Wraps are a light and refreshing meal that packs a flavorful punch with crispy lettuce, tender tuna, and zesty dressing. Perfect for a quick lunch or a healthy snack!
Ingredients:
- 2 cups canned tuna, drained
- 1/4 cup mayonnaise
- 1 tablespoon Dijon mustard
- 1/4 cup celery, diced
- 1/4 cup red onion, diced
- 1 teaspoon lemon juice
- 1/2 teaspoon salt
- 1/4 teaspoon black pepper
- 8-10 leaves romaine lettuce or butter lettuce
- 1/4 cup pickles, chopped (optional)
Preparation Time: 10 minutes
Cooking Time: 0 minutes
Total Time: 10 minutes
Instructions:
1. In a mixing bowl, combine the drained tuna, mayonnaise, Dijon mustard, celery, red onion, lemon juice, salt, and black pepper. Mix well until all ingredients are well blended.
2. Taste the tuna salad and adjust seasoning if necessary, adding more salt, pepper, or lemon juice to your preference.
3. Take a lettuce leaf and spoon a generous amount of the tuna salad onto the leaf.
4. If using pickles, sprinkle them on top of the tuna salad for an extra crunch.
5. Fold the lettuce leaf around the tuna salad and enjoy your wrap!
Tips:
- For added flavor, try incorporating chopped herbs like dill or parsley into the tuna salad.
- This recipe can be made in advance; store the tuna salad in an airtight container in the refrigerator for up to 3 days.
- Experiment with different types of lettuce for a variety of textures and flavors!
Cottage Cheese and Fruit Cups

This Cottage Cheese and Fruit Cup recipe combines creamy cottage cheese with a vibrant mix of fresh fruits for a delightful and nutritious snack. The blend of sweet and tangy flavors makes it a perfect treat for any time of the day.
Ingredients:
- 2 cups cottage cheese
- 1 cup diced pineapple
- 1 cup sliced strawberries
- 1 cup diced peaches
- 1 tablespoon honey (optional)
- 1 teaspoon vanilla extract
- 1/4 cup chopped mint (for garnish)
Preparation Time: 10 minutes
Cooking Time: 0 minutes
Total Time: 10 minutes
Instructions:
1. In a large mixing bowl, combine the cottage cheese, honey, and vanilla extract. Stir until well combined.
2. Gently fold in the diced pineapple, sliced strawberries, and diced peaches until the fruits are evenly distributed.
3. Spoon the mixture into individual cups or bowls for serving.
4. Garnish each cup with chopped mint before serving.
Tips:
- For added crunch, consider sprinkling some granola on top just before serving.
- Feel free to substitute with your favorite fruits based on what’s in season.
- You can prepare the cottage cheese mixture in advance and refrigerate it for up to 2 days.
Lentil Soup in a Thermos

This Lentil Soup in a Thermos is a delightful blend of earthy lentils and rich spices that warms the soul. Packed with nutrients and flavor, this cozy soup is perfect for enjoying on the go.
Ingredients:
- 1 cup dry lentils
- 1 medium onion, diced
- 2 cloves garlic, minced
- 2 medium carrots, diced
- 2 stalks celery, diced
- 1 teaspoon ground cumin
- 1 teaspoon smoked paprika
- 6 cups vegetable broth
- 1 bay leaf
- Salt and pepper to taste
- 2 tablespoons olive oil
Preparation Time: 10 minutes
Cooking Time: 30 minutes
Total Time: 40 minutes
Instructions:
1. Rinse the lentils under cold water and set aside.
2. In a large pot, heat 2 tablespoons of olive oil over medium heat.
3. Add the diced onion, carrots, and celery, and sauté for about 5 minutes until the vegetables soften.
4. Stir in the minced garlic, ground cumin, and smoked paprika, and cook for an additional 1 minute.
5. Add the rinsed lentils, vegetable broth, and bay leaf to the pot. Bring the mixture to a boil.
6. Reduce heat to low, cover, and simmer for 25 minutes or until the lentils are tender.
7. Remove the bay leaf, season with salt and pepper to taste, and stir well.
8. To serve, ladle the soup into a Thermos for a hot and satisfying meal on the go.
Tips:
- For a creamier texture, blend a portion of the soup and mix it back in.
- Feel free to add other vegetables like spinach or kale for extra nutrition.
- Make a larger batch and freeze portions for future lunches.
Pita Pockets with Chicken and Veggies
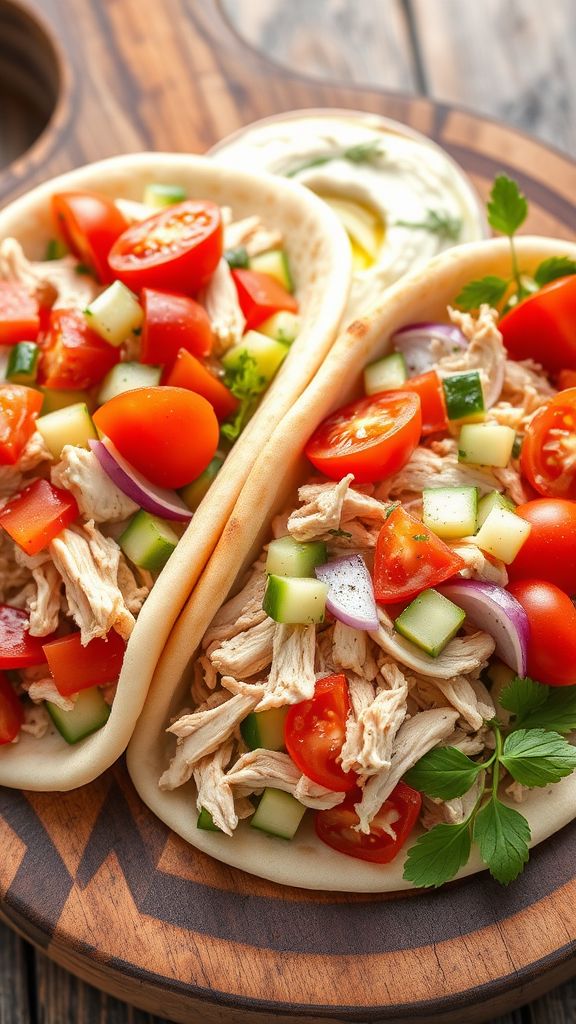
Pita Pockets with Chicken and Veggies is a delightful, healthy meal that combines tender chicken with fresh, vibrant vegetables creating a burst of flavors in every bite. This recipe is perfect for a quick lunch or a satisfying dinner!
Ingredients:
- 2 pita pockets
- 1 cup cooked chicken breast, shredded
- 1/2 cup cherry tomatoes, halved
- 1/2 cup cucumbers, diced
- 1/4 cup red onion, finely chopped
- 1/2 cup lettuce, shredded
- 1/4 cup hummus
- 2 tablespoons olive oil
- 1 tablespoon lemon juice
- Salt and pepper to taste
Preparation Time: 10 minutes
Cooking Time: 5 minutes
Total Time: 15 minutes
Instructions:
1. In a bowl, combine the shredded chicken, cherry tomatoes, cucumbers, red onion, and lettuce.
2. Drizzle the olive oil and lemon juice over the mixture, then season with salt and pepper to taste. Toss gently to combine.
3. Spread hummus inside each pita pocket.
4. Fill each pita pocket with the chicken and veggie mixture.
5. Serve immediately and enjoy your delicious pita pockets!
Tips:
- For added flavor, consider marinating the chicken in your favorite spices before cooking.
- Feel free to customize the veggies based on your preferences or seasonal availability.
- These pita pockets can be wrapped in foil for an easy on-the-go lunch!
Shrimp and Avocado Rice Paper Rolls
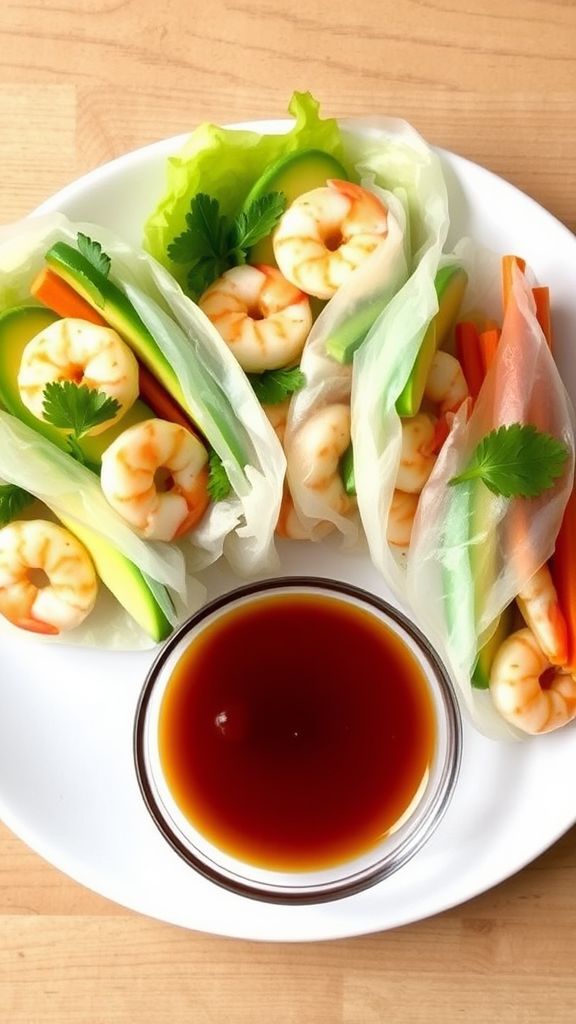
These Shrimp and Avocado Rice Paper Rolls are a refreshing and healthy snack that perfectly combine the sweet taste of shrimp with the creamy texture of avocado. With a burst of fresh herbs and a zesty dipping sauce, they are an irresistible treat!
Ingredients:
- 12 rice paper wrappers
- 1 lb cooked shrimp, peeled and deveined
- 2 ripe avocados, sliced
- 1 cup cucumber, julienned
- 1 cup carrots, julienned
- 1 cup fresh mint leaves
- 1 cup fresh cilantro leaves
- 1/4 cup soy sauce
- 2 tbsp lime juice
- 1 tbsp honey
- 1 tbsp sesame oil
Preparation Time: 15 minutes
Cooking Time: 0 minutes
Total Time: 15 minutes
Instructions:
1. Prepare a large bowl of warm water for dipping the rice paper wrappers.
2. Dip one rice paper wrapper into the warm water for about 10-15 seconds until soft.
3. Lay the softened rice paper wrapper on a flat surface.
4. In the center of the wrapper, layer a few shrimp, avocado slices, cucumber, carrots, mint, and cilantro.
5. Fold the bottom of the wrapper over the filling, then fold in the sides, and roll tightly to secure the filling.
6. Repeat the process with the remaining wrappers and filling ingredients.
7. In a small bowl, mix soy sauce, lime juice, honey, and sesame oil for the dipping sauce.
8. Serve the rice paper rolls with the dipping sauce on the side.
Tips:
- Make sure the shrimp are fully cooked and chilled for the best texture.
- Feel free to add other vegetables like bell peppers or lettuce for extra crunch.
- These rolls can be prepared ahead of time; just store them in an airtight container with a damp cloth to keep them moist.
Chia Seed Pudding with Almond Milk
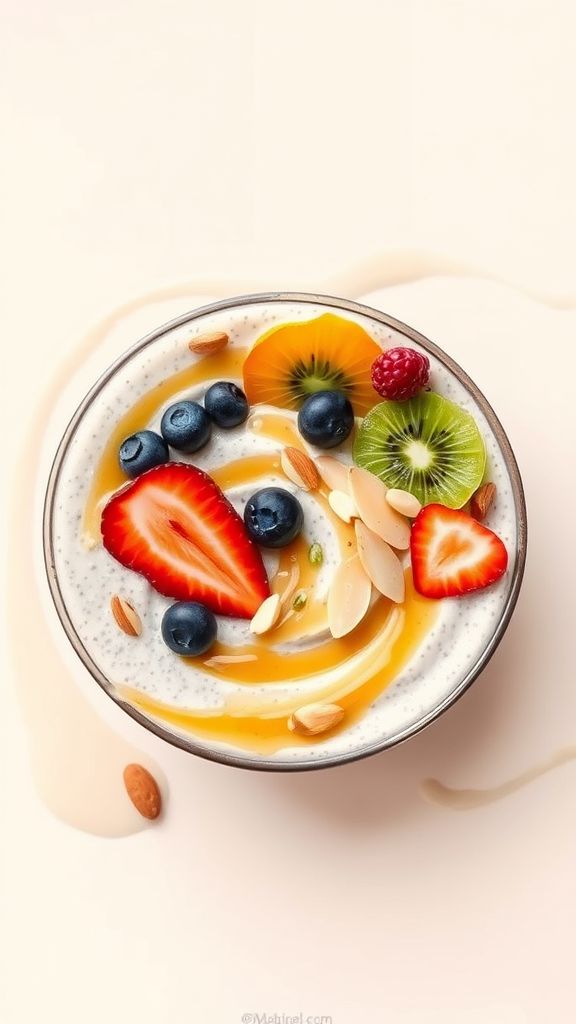
This Chia Seed Pudding with Almond Milk is a delightful, nutritious treat that combines the creamy texture of almond milk with the superfood benefits of chia seeds. With a hint of vanilla and a touch of sweetness, it’s perfect for a healthy breakfast or a satisfying snack.
Ingredients:
- 1/2 cup chia seeds
- 2 cups almond milk
- 1 tablespoon maple syrup (or honey)
- 1 teaspoon vanilla extract
- pinch of salt
- fresh fruit for topping (optional)
- nuts or seeds for topping (optional)
Preparation Time: 10 minutes
Cooking Time: 0 minutes
Total Time: 2 hours (including chilling time)
Instructions:
1. In a mixing bowl, combine the chia seeds, almond milk, maple syrup, vanilla extract, and salt. Stir well to mix.
2. Let the mixture sit for about 5 minutes, then stir again to prevent clumping.
3. Cover the bowl and refrigerate for at least 2 hours, or overnight for best results.
4. Once the pudding has thickened to your desired consistency, give it one last stir before serving.
5. Serve in bowls or jars, and top with fresh fruit and nuts or seeds as desired.
Tips:
- Experiment with different types of milk for varied flavors.
- Add cocoa powder for a chocolate version of chia pudding.
- Adjust the sweetness to your preference by changing the amount of sweetener.
- Chia pudding can last in the refrigerator for up to 5 days.
Edamame and Brown Rice Sushi
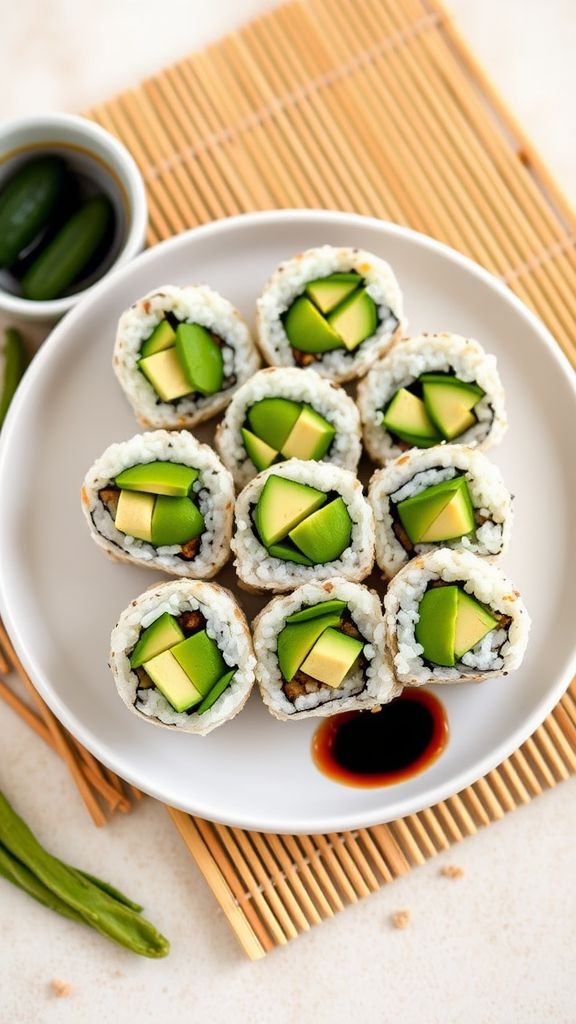
This Edamame and Brown Rice Sushi is a delightful twist on traditional sushi, combining the nutty texture of brown rice with the vibrant flavor of edamame. Perfect for a healthy meal or snack, it caters to both sushi lovers and those looking for a nutritious option.
Ingredients:
- 1 cup brown rice
- 2 cups water
- 1 cup shelled edamame
- 4 nori sheets
- 1/4 cup rice vinegar
- 1 tablespoon sugar
- 1/2 teaspoon salt
- 1/2 avocado, sliced
- 1/2 cucumber, julienned
- Soy sauce, for serving
Preparation Time: 15 minutes
Cooking Time: 45 minutes
Total Time: 60 minutes
Instructions:
1. Rinse the brown rice under cold water until the water runs clear.
2. In a pot, combine the rinsed brown rice and water; bring to a boil.
3. Once boiling, reduce the heat to low, cover, and simmer for about 40 minutes or until the rice is tender and water is absorbed.
4. While the rice is cooking, boil the edamame for about 5 minutes until tender. Drain and set aside.
5. In a small bowl, mix the rice vinegar, sugar, and salt until dissolved to make the sushi vinegar.
6. Once the rice is cooked, stir in the sushi vinegar and let it cool to room temperature.
7. Lay a nori sheet on a bamboo sushi mat, and spread a layer of brown rice over it, leaving about an inch at the top edge.
8. Place a line of edamame, avocado slices, and cucumber strips across the rice.
9. Roll the sushi tightly from the bottom up, using the mat to help shape it.
10. Slice the sushi roll into bite-sized pieces and serve with soy sauce.
Tips:
- Ensure the rice is completely cooled before rolling to avoid steaming the nori.
- Experiment with different fillings, like carrots or bell peppers, for added flavor.
- Use a sharp knife to slice the sushi for clean edges.
Cheese-Stuffed Bell Peppers
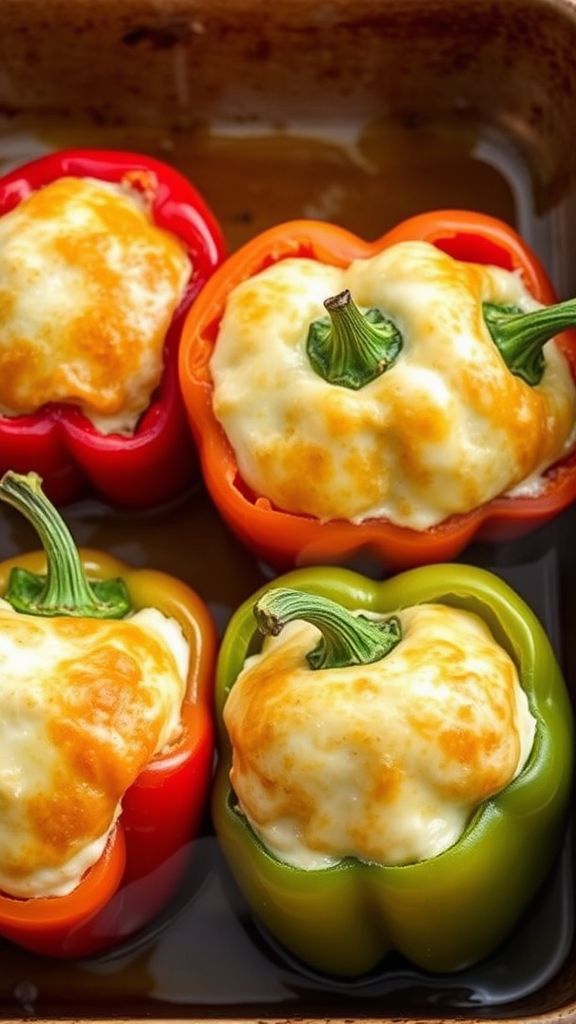
Cheese-Stuffed Bell Peppers are a delightful combination of vibrant peppers filled with creamy, gooey cheese that create a comforting yet healthy dish. The blend of spices and the natural sweetness of the peppers enhance the flavors that make this meal a favorite for any occasion.
Ingredients:
- 4 large bell peppers (any color)
- 1 cup cooked rice
- 1 cup shredded mozzarella cheese
- 1 cup ricotta cheese
- 1/2 cup grated Parmesan cheese
- 1 teaspoon Italian seasoning
- 1 tablespoon olive oil
- 1/2 teaspoon garlic powder
- Salt to taste
- Pepper to taste
Preparation Time: 15 minutes
Cooking Time: 30 minutes
Total Time: 45 minutes
Instructions:
1. Preheat your oven to 375°F (190°C).
2. Cut the tops off the bell peppers and remove the seeds and membranes.
3. In a large bowl, combine the cooked rice, mozzarella cheese, ricotta cheese, Parmesan cheese, Italian seasoning, olive oil, garlic powder, salt, and pepper. Mix well until everything is evenly combined.
4. Stuff each bell pepper with the cheese mixture, pressing gently to pack it in.
5. Place the stuffed peppers upright in a baking dish. Add a splash of water to the bottom of the dish to help steam the peppers.
6. Cover the dish with aluminum foil and bake in the preheated oven for 25 minutes.
7. Remove the foil and bake for an additional 5 minutes, or until the cheese is bubbly and golden.
8. Remove from the oven and let cool for a few minutes before serving.
Tips:
- For added flavor, mix in some cooked ground meat or sautéed vegetables to the cheese filling.
- You can use leftovers by mixing them into the filling for a twist.
- Feel free to customize the seasonings according to your taste preferences.
- Garnish with fresh herbs like basil or parsley before serving for a pop of color.