My New Cookbook is Out! Check Out Now!
25 Easter Dessert Recipes That Are Almost Too Cute to Eat
This page contains affiliate links and I earn a commission if you make a purchase through one of the links, at no cost to you.
Are you ready to bring some hoppin’ fun to your Easter celebrations? This collection of 25 adorable Easter dessert recipes is not only a feast for the eyes, but also for your taste buds! Get ready to learn how to whip up some of the cutest confections including Bunny Button Cupcakes and Chocolate Bunny Surprise Cake, ensuring your holiday gatherings will be sprinkled with joy and sweetness.
Shop Our Must-Haves


1. Bunny Button Cupcakes

Looking for a delightful treat to celebrate Easter? These Bunny Button Cupcakes are not only adorable but also bursting with flavor. With fluffy frosting, playful decorations, and a moist cupcake base, they make for a perfect dessert for all ages!
Prep Time: 20 minutes
Total Time: 1 hour
Servings: 12 cupcakes
Ingredients:
- 1 ½ cups all-purpose flour
- 1 cup granulated sugar
- ½ cup unsalted butter, softened
- 2 large eggs
- 1 tsp vanilla extract
- ½ cup milk
- 1 ½ tsp baking powder
- ½ tsp salt
- 2 cups vanilla frosting
- Colored candy buttons for decoration
- Chocolate chips for the eyes
Instructions:
- Preheat your oven to 350°F (175°C) and line a cupcake pan with paper liners.
- In a mixing bowl, cream together the butter and sugar until light and fluffy.
- Add the eggs and vanilla extract to the butter mixture, mixing until well combined.
- In another bowl, whisk together the flour, baking powder, and salt.
- Gradually add the dry ingredients to the wet ingredients, alternating with the milk, mixing until just combined.
- Fill the cupcake liners about two-thirds full with the batter.
- Bake for 18-20 minutes or until a toothpick inserted in the center comes out clean.
- Once baked, allow the cupcakes to cool in the pan for 5 minutes, then transfer them to a wire rack to cool completely.
- Once cool, generously frost each cupcake with the vanilla frosting.
- Decorate each cupcake with colored candy buttons to resemble bunny buttons and add chocolate chips for the eyes.
Tips:
Experiment with different flavors of frosting, like cream cheese or chocolate, to enhance the taste. Adding a splash of almond extract to the batter can also give a delightful twist to the classic flavor.
Nutrition Facts:
- Calories: 250 per cupcake
- Total Fat: 12g
- Saturated Fat: 7g
- Cholesterol: 40mg
- Sodium: 150mg
- Total Carbohydrates: 35g
- Dietary Fiber: 1g
- Sugars: 18g
- Protein: 2g
2. Chickadee Macarons

Chickadee Macarons are delightful bite-sized treats that are perfect for spring celebrations, especially Easter. These sweet almond meringue cookies are filled with a luscious buttercream and decorated to resemble the cheerful chickadee.
Prep Time: 30 minutes
Additional Time: 1 hour
Total Time: 1 hour 30 minutes
Servings: 12 macarons
Ingredients:
- 100g almond flour
- 200g powdered sugar
- 75g egg whites (about 2 large eggs)
- 50g granulated sugar
- 1 tsp vanilla extract
- Yellow food coloring
- Pink food coloring
- 150g unsalted butter (softened)
- 150g powdered sugar (for filling)
- 1-2 tbsp milk (for consistency)
- Chocolate chips (for decorating)
Instructions:
- Preheat the oven to 300°F (150°C) and line a baking sheet with parchment paper.
- In a bowl, sift together the almond flour and powdered sugar to remove any lumps.
- In a separate bowl, beat the egg whites until frothy, then gradually add the granulated sugar until stiff peaks form.
- Add the vanilla extract and a few drops of yellow food coloring to the meringue, gently folding to combine.
- Gradually fold the almond flour mixture into the meringue until well incorporated and the batter has a ‘lava-like’ consistency.
- Transfer the batter to a piping bag fitted with a round nozzle and pipe small circles onto the prepared baking sheet.
- Tap the baking sheet gently to remove air bubbles and let the macarons sit at room temperature for 30-60 minutes until they form a skin.
- Bake in the preheated oven for 15-20 minutes until the macarons have risen and developed feet. Let them cool completely.
- In a mixing bowl, beat the unsalted butter until creamy. Gradually add the powdered sugar and milk until the desired consistency is achieved.
- Pipe the buttercream filling onto half of the cooled macarons and top with the remaining halves.
- Use pink food coloring to create blush on the cheeks and chocolate chips to create eyes and a beak for a cute chickadee effect.
Tips:
To enhance the flavor, consider adding a splash of lemon extract to the buttercream for a citrus twist. Experiment with different food colors to create a vibrant assortment of chickadees. Ensure that your baking tools are free of grease for perfect macarons.
Nutrition Facts:
- Calories: 202 per macaron
- Total Fat: 10g
- Saturated Fat: 6g
- Cholesterol: 30mg
- Sodium: 25mg
- Total Carbohydrates: 29g
- Dietary Fiber: 0g
- Sugars: 20g
- Protein: 2g
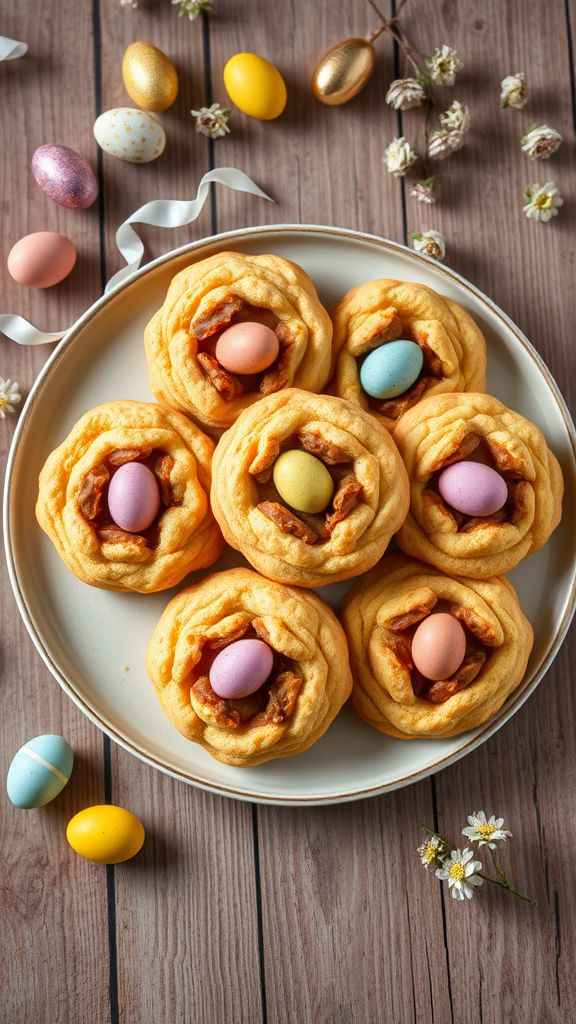
3. Easter Egg Nest Cookies

Easter Egg Nest Cookies are a fun and delightful treat that are perfect for celebrating the spring season. These adorable cookies are not only easy to make but also a hit with kids and adults alike during Easter festivities.
Prep Time: 15 minutes
Additional Time: 30 minutes
Total Time: 45 minutes
Servings: 24 cookies
Ingredients:
- 1 cup unsalted butter, softened
- 1 cup granulated sugar
- 1 cup brown sugar, packed
- 2 large eggs
- 2 teaspoons vanilla extract
- 3 cups all-purpose flour
- 1 teaspoon baking soda
- 1/2 teaspoon salt
- 2 cups shredded coconut
- 1 1/2 cups chocolate chips
- Candy-coated chocolate eggs for decoration
Instructions:
- Preheat your oven to 350°F (175°C) and line two baking sheets with parchment paper.
- In a large mixing bowl, beat together the butter, granulated sugar, and brown sugar until creamy.
- Add the eggs and vanilla extract, and mix until well combined.
- In a separate bowl, whisk together the flour, baking soda, and salt. Gradually add this dry mixture to the wet ingredients, mixing until combined.
- Fold in the shredded coconut and chocolate chips until evenly distributed.
- Using a spoon or cookie scoop, drop dollops of the cookie dough onto the prepared baking sheets, spacing them about 2 inches apart.
- Bake in the preheated oven for 10-12 minutes, or until the edges are golden brown. Remove from the oven.
- While the cookies are still warm, use the back of a spoon to create a small indentation in the center of each cookie to resemble a nest.
- Allow the cookies to cool completely on the baking sheet before decorating them with candy-coated chocolate eggs in the center of each nest.
Tips:
For an extra layer of flavor, consider adding 1/2 teaspoon of almond extract to the cookie dough. You can also use dark chocolate chips for a richer taste. For a festive touch, drizzle some melted white chocolate on top of the cooled cookies.
Nutrition Facts:
- Calories: 150
- Total Fat: 8g
- Saturated Fat: 5g
- Cholesterol: 25mg
- Sodium: 90mg
- Total Carbohydrates: 19g
- Dietary Fiber: 1g
- Sugars: 10g
- Protein: 2g
4. Petal-Pretty Spring Parfait
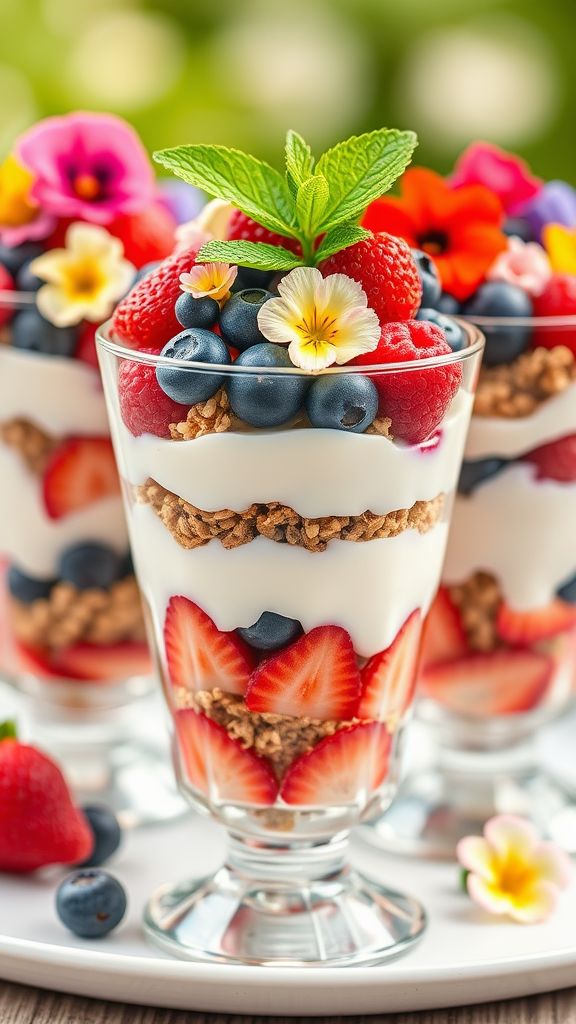
Spring is in the air, and there’s no better way to celebrate than with this delightful Petal-Pretty Spring Parfait. Layered with creamy yogurt, vibrant fruits, and topped with edible flowers, this parfait not only looks stunning but tastes divine!
Prep Time: 15 minutes
Additional Time: 30 minutes
Total Time: 45 minutes
Servings: 4
Ingredients:
- 2 cups Greek yogurt
- 2 tablespoons honey or to taste
- 1 teaspoon vanilla extract
- 1 cup mixed berries (strawberries, blueberries, raspberries)
- 1 cup granola
- 1/4 cup edible flowers (like pansies or nasturtiums)
- Fresh mint leaves for garnish (optional)
Instructions:
- In a mixing bowl, combine the Greek yogurt, honey, and vanilla extract. Stir until well combined and smooth.
- In serving glasses or bowls, start layering the yogurt mixture at the bottom.
- Next, add a layer of mixed berries on top of the yogurt.
- Follow with a layer of granola for crunch.
- Repeat the layers until the glasses are filled, finishing with a layer of berries on top.
- Finally, garnish the parfaits with edible flowers and fresh mint leaves if desired.
- Place the parfaits in the refrigerator for at least 30 minutes before serving to allow the flavors to meld.
Tips:
For an extra burst of flavor, consider adding a drizzle of fruit puree between the layers. You can also experiment with different fruits according to the season. Adding a sprinkle of cinnamon on the yogurt can elevate its taste further!
Nutrition Facts:
- Calories: 250 per serving
- Protein: 15g
- Total Fat: 6g
- Carbohydrates: 36g
- Fiber: 5g
- Sugars: 12g
5. Chocolate Bunny Surprise Cake

Indulge in this delightful Chocolate Bunny Surprise Cake that’s perfect for any Easter celebration! With its rich chocolate layers hiding a sweet surprise, it’s sure to impress your family and friends.
Prep Time: 30 minutes
Total Time: 1 hour
Servings: 10
Ingredients:
- 1 box of chocolate cake mix
- 3 large eggs
- 1 cup of water
- 1/2 cup of vegetable oil
- 1 can (16 oz) of chocolate frosting
- 1 large chocolate bunny (hollow)
- 1 cup of mini marshmallows
- 1/2 cup of chocolate chips
- Sprinkles for decoration
Instructions:
- Preheat your oven to 350°F (175°C) and grease two 9-inch round cake pans.
- In a mixing bowl, combine the cake mix, eggs, water, and vegetable oil. Beat on medium speed until fully combined.
- Divide the batter evenly between the two prepared cake pans and bake in the preheated oven for 25-30 minutes, or until a toothpick inserted in the center comes out clean.
- Let the cakes cool in the pans for 10 minutes, then transfer them to a wire rack to cool completely.
- Once the cakes are cooled, level the tops with a serrated knife if necessary.
- Place one layer of cake on a serving plate. Carefully cut a hole in the center of the cake, making sure not to go all the way through the bottom.
- Fill the hole with mini marshmallows and chocolate chips, then place the hollow chocolate bunny upside down over the filled hole.
- Place the second layer of cake on top and frost the entire cake with the chocolate frosting.
- Decorate with sprinkles on top for a festive touch.
Tips:
- For an extra flavor boost, consider adding 1 tsp of vanilla extract to the cake batter.
- Swap mini marshmallows for peanut butter cups for a richer surprise inside!
Nutrition Facts:
- Calories: 350 per serving
- Total Fat: 15g
- Saturated Fat: 4g
- Cholesterol: 40mg
- Sodium: 400mg
- Total Carbohydrates: 50g
- Dietary Fiber: 2g
- Sugars: 30g
- Protein: 4g
6. Carrot Patch Pudding Cups
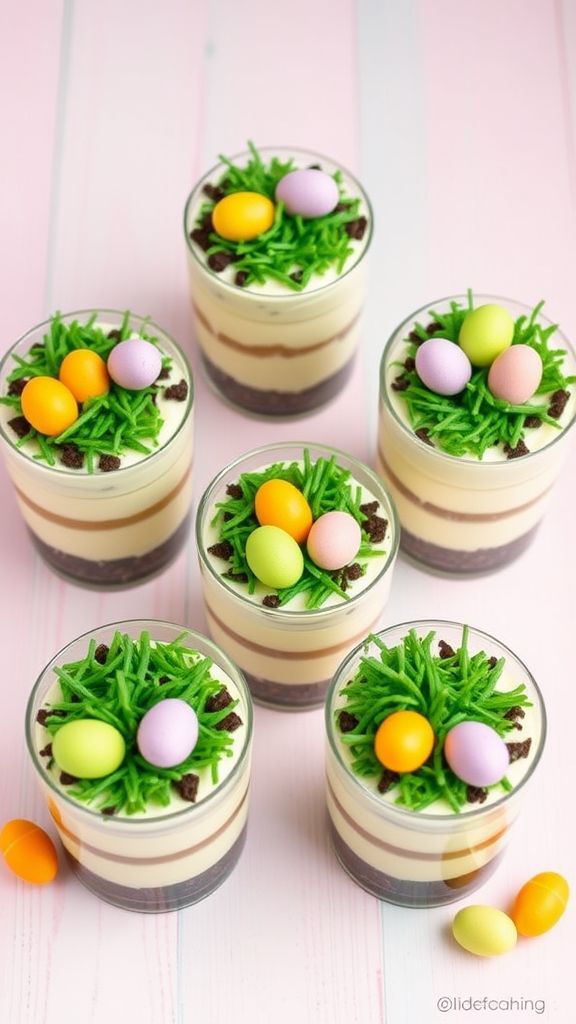
Indulge in a whimsical treat perfect for Easter celebrations with these Carrot Patch Pudding Cups! These delightful cups layer creamy pudding and crumbly cookies, topped off with chocolate eggs to create an adorable carrot patch effect.
Prep Time: 15 minutes
Additional Time: 2 hours
Total Time: 2 hours 15 minutes
Servings: 6
Ingredients:
- 2 cups milk
- 1 package (3.4 oz) instant vanilla pudding mix
- 1 cup whipped topping
- 1 cup crushed chocolate sandwich cookies
- Green candy grass (or coconut dyed green)
- Mini chocolate eggs (for decoration)
- Fresh carrots (optional, for garnish)
Instructions:
- In a medium bowl, whisk together the milk and vanilla pudding mix until it begins to thicken, about 2 minutes.
- Gently fold in the whipped topping until fully incorporated.
- In serving cups, layer the chocolate cookie crumbs at the bottom.
- Add a layer of the pudding mixture on top of the cookie crumbs.
- Repeat the layering process until the cups are filled, finishing with a layer of cookie crumbs on top.
- Sprinkle the green candy grass or dyed coconut over the top layer.
- Decorate with mini chocolate eggs to resemble a carrot patch.
- Chill in the refrigerator for at least 2 hours before serving.
Tips:
For extra flavor, consider adding a teaspoon of vanilla extract to the pudding mixture. You can also sprinkle some toasted coconut on top for added texture and flavor.
Nutrition Facts:
- Calories: 260 per serving
- Total Fat: 12g
- Saturated Fat: 7g
- Cholesterol: 20mg
- Sodium: 220mg
- Total Carbohydrates: 36g
- Dietary Fiber: 1g
- Sugars: 22g
- Protein: 3g
7. Flower Power Sugar Cookies

Flower Power Sugar Cookies are a delightful treat, perfect for celebrating spring and the Easter season. These whimsical cookies are not only visually appealing but also taste amazing with their perfectly sweet flavor.
Prep Time: 20 minutes
Cook Time: 10 minutes
Additional Time: 30 minutes (for chilling)
Total Time: 1 hour
Servings: 24 cookies
Ingredients:
- 2 ¾ cups all-purpose flour
- 1 teaspoon baking soda
- ½ teaspoon baking powder
- 1 cup unsalted butter, softened
- 1 ½ cups white sugar
- 1 egg
- 1 teaspoon vanilla extract
- 1 teaspoon almond extract
- ½ teaspoon salt
- 2 to 3 tablespoons colored sugar or sprinkles (for decoration)
Instructions:
- Preheat your oven to 375°F (190°C).
- In a small bowl, mix together the flour, baking soda, and baking powder. Set aside.
- In a large bowl, cream together the butter and sugar until smooth.
- Beat in the egg, vanilla extract, almond extract, and salt.
- Gradually blend in the dry ingredients until just mixed.
- Chill the dough in the refrigerator for about 30 minutes for easier handling.
- Roll rounded teaspoonfuls of dough into balls, and place them on ungreased cookie sheets.
- Flatten each ball slightly with the bottom of a glass or your palm.
- Sprinkle colored sugar or sprinkles on top of each cookie.
- Bake for 8 to 10 minutes, or until lightly golden.
- Allow cookies to cool on the baking sheet for a few minutes before transferring to wire racks to cool completely.
Tips:
For added flavor, consider using lemon zest or orange zest in the dough. If you want to make the cookies even more vibrant, try using different colors of icing to create fun flower designs on top of the cooled cookies!
Nutrition Facts:
- Calories: 120
- Total Fat: 6g
- Saturated Fat: 4g
- Cholesterol: 15mg
- Sodium: 60mg
- Total Carbohydrates: 16g
- Dietary Fiber: 0g
- Sugars: 8g
- Protein: 1g
8. Raspberry Ripple Nest Cake
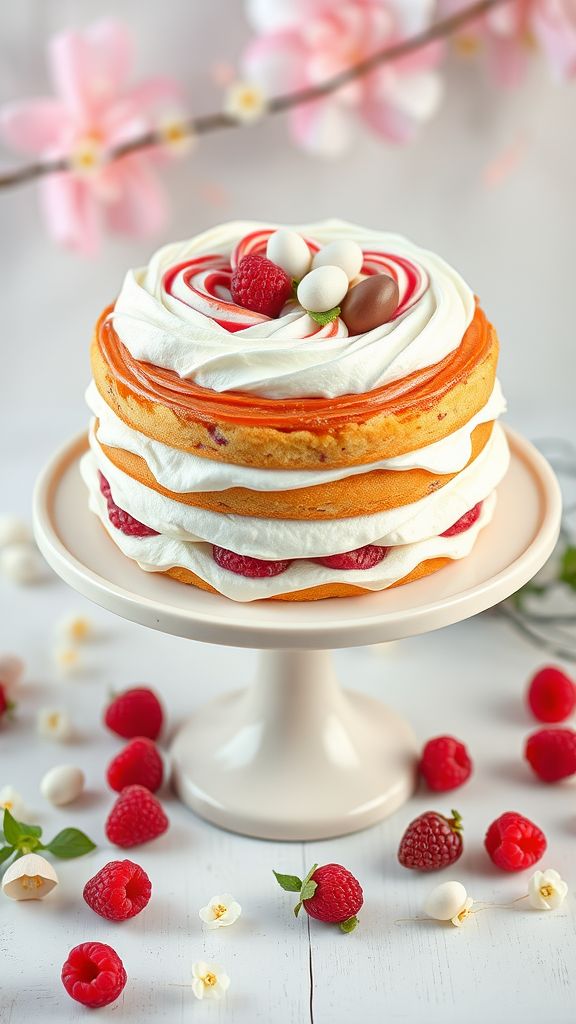
Indulge in the delightful flavor of spring with this Raspberry Ripple Nest Cake. Perfect for any celebration, this cake features a scrumptious raspberry swirl that creates a beautiful ripple effect, making it a stunning centerpiece for your dessert table.
Prep Time: 20 minutes
Cook Time: 30 minutes
Additional Time: 1 hour
Total Time: 1 hour 50 minutes
Servings: 8
Ingredients:
- 1 ½ cups all-purpose flour
- 1 ½ tsp baking powder
- ½ tsp salt
- ½ cup unsalted butter, softened
- 1 cup granulated sugar
- 2 large eggs
- 1 tsp vanilla extract
- ½ cup milk
- 1 cup fresh raspberries
- ½ cup raspberry jam
- 1 cup heavy whipping cream
- 2 tbsp powdered sugar
- Chocolate eggs or mini eggs for decoration
Instructions:
- Preheat your oven to 350°F (175°C). Grease and flour an 8-inch round cake pan.
- In a mixing bowl, combine the flour, baking powder, and salt. Set aside.
- In a large bowl, cream together the butter and sugar until light and fluffy.
- Add the eggs one at a time, mixing well after each addition. Stir in the vanilla extract.
- Gradually add the dry ingredients to the creamed mixture, alternating with the milk, and mix until smooth.
- Gently fold in the raspberries and raspberry jam, creating a ripple effect in the batter. Do not overmix.
- Pour the batter into the prepared cake pan and bake for 25-30 minutes, or until a toothpick inserted into the center comes out clean.
- Allow the cake to cool in the pan for about 10 minutes, then transfer it to a wire rack to cool completely.
- In a separate bowl, whip the heavy cream with the powdered sugar until stiff peaks form.
- Once the cake has cooled, spread the whipped cream over the top and decorate with chocolate eggs or mini eggs.
Tips:
For an extra burst of flavor, consider adding a splash of lemon juice to the batter. If you prefer a more vibrant color, you can enhance the raspberry jam with a few drops of food coloring.
Nutrition Facts:
- Calories: 320
- Total Fat: 15g
- Saturated Fat: 9g
- Cholesterol: 70mg
- Sodium: 150mg
- Total Carbohydrates: 42g
- Dietary Fiber: 1g
- Sugars: 26g
- Protein: 4g
9. Little Lamb Cheese Cake
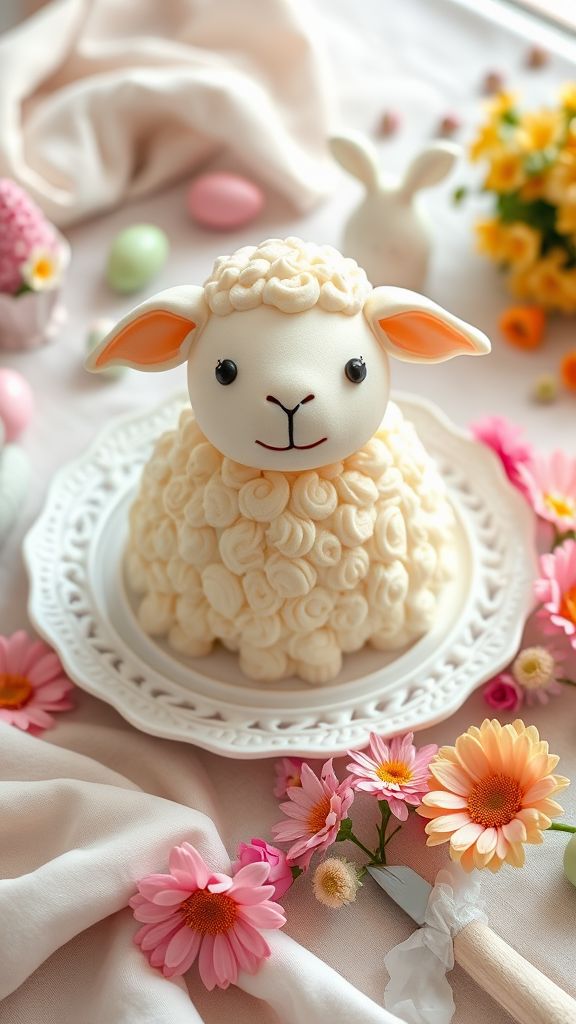
Indulge in this delightful Little Lamb Cheese Cake, perfect for celebrating Easter! Its creamy texture and charming lamb shape make it a fun and beautiful centerpiece for any festive table.
Prep Time: 30 minutes
Additional Time: 4 hours
Total Time: 4 hours 30 minutes
Servings: 12
Ingredients:
- 2 cups graham cracker crumbs
- 1/2 cup butter, melted
- 1 cup **gran
10. Pastel Polka Dot Cake Pops

Delight in these adorable Pastel Polka Dot Cake Pops, perfect for festive occasions like Easter! These vibrant treats are not only fun to make but also deliciously satisfying, captivating everyone with their colorful design and sweet flavor.
Prep Time: 30 minutes
Additional Time: 1 hour
Total Time: 1 hour 30 minutes
Servings: 24 cake pops
Ingredients:
- 1 box of vanilla cake mix
- Ingredients needed per cake mix instructions (usually eggs, oil, and water)
- 1 cup of buttercream frosting
- White chocolate melts or candy coating, for coating
- Pastel food coloring (pink, blue, yellow, and green)
- Lollipop sticks
- Nonpareils or sprinkles for decoration
Instructions:
- Prepare the vanilla cake according to the package instructions, and allow it to cool completely.
- Once cooled, crumble the cake into a large bowl until it resembles fine crumbs.
- Add the buttercream frosting to the crumbled cake and mix until fully combined and a dough-like consistency is achieved.
- Scoop out small portions of the mixture and roll them into 1-inch balls. Place the cake balls on a baking sheet lined with parchment paper.
- Melt the white chocolate according to package instructions.
- Dip the end of each lollipop stick into the melted chocolate, then insert it into the center of each cake ball.
- Freeze the cake pops for about 30 minutes until they are firm.
- Once firm, divide the melted chocolate into small bowls and tint each with different pastel food coloring.
- Dip each cake pop into the colored chocolate, ensuring it is well coated.
- Before the chocolate sets, sprinkle with nonpareils or sprinkles for added decoration.
- Place the finished cake pops upright in a cake pop stand or a styrofoam block to set completely.
Tips:
For an extra touch of flavor, consider using flavored extracts like almond or vanilla in the cake batter. You can also experiment with different cake flavors to suit your taste. Adding a dash of sea salt to the frosting can enhance the overall sweetness of the cake pops.
Nutrition Facts:
- Serving Size: 1 cake pop
- Calories: 130
- Total Fat: 5g
- Saturated Fat: 3g
- Cholesterol: 15mg
- Sodium: 50mg
- Total Carbohydrates: 20g
- Dietary Fiber: 0g
- Sugars: 10g
- Protein: 2g
11. Honey Bunny Cheesecake

Get ready to hop into the sweetest springtime treat with this Honey Bunny Cheesecake! This delightful cheesecake is creamy, rich, and combines the sweetness of honey with a fluffy texture that melts in your mouth. Perfect for Easter celebrations or any time you want to impress with a spectacular dessert!
Prep Time: 30 minutes
Total Time: 4 hours 30 minutes
Servings: 12
Ingredients:
- 2 cups graham cracker crumbs
- 1/2 cup unsalted butter, melted
- 1 cup cream cheese, softened
- 1 cup sour cream
- 1 cup honey
- 3 large eggs
- 1 teaspoon vanilla extract
- 1 tablespoon lemon juice
- Zest of 1 lemon
- Decorative toppings (bunny-shaped chocolates, edible flowers, or whipped cream)
Instructions:
- Preheat your oven to 325°F (160°C).
- In a mixing bowl, combine graham cracker crumbs and melted butter until well combined. Press the mixture firmly into the bottom of a 9-inch springform pan to form the crust.
- In a separate bowl, beat together cream cheese and sour cream until smooth and creamy.
- Gradually add honey, mixing until well incorporated.
- Add the eggs, one at a time, beating well after each addition. Stir in vanilla extract, lemon juice, and lemon zest until smooth.
- Pour the cheesecake mixture over the crust in the springform pan, smoothing the top with a spatula.
- Bake in the preheated oven for 50-60 minutes, or until the edges are set but the center is still slightly jiggly.
- Turn off the oven and leave the cheesecake inside for an additional hour to cool gradually.
- Remove the cheesecake from the oven and allow it to cool to room temperature before refrigerating for at least 3 hours or until fully chilled.
- Once chilled, remove the cheesecake from the springform pan and decorate with your choice of bunny-shaped chocolates, edible flowers, or whipped cream before serving.
Tips:
For an extra layer of flavor, consider adding a hint of cinnamon to the crust. You can also drizzle some extra honey on top of the cheesecake for a beautiful presentation and a sweeter taste. Enjoy your Honey Bunny Cheesecake at room temperature for the best texture!
Nutrition Facts:
- Calories: 320 per serving
- Total Fat: 22g
- Saturated Fat: 12g
- Cholesterol: 80mg
- Sodium: 200mg
- Total Carbohydrates: 30g
- Dietary Fiber: 1g
- Sugars: 15g
- Protein: 5g
12. Mini Carrot Cake Bites
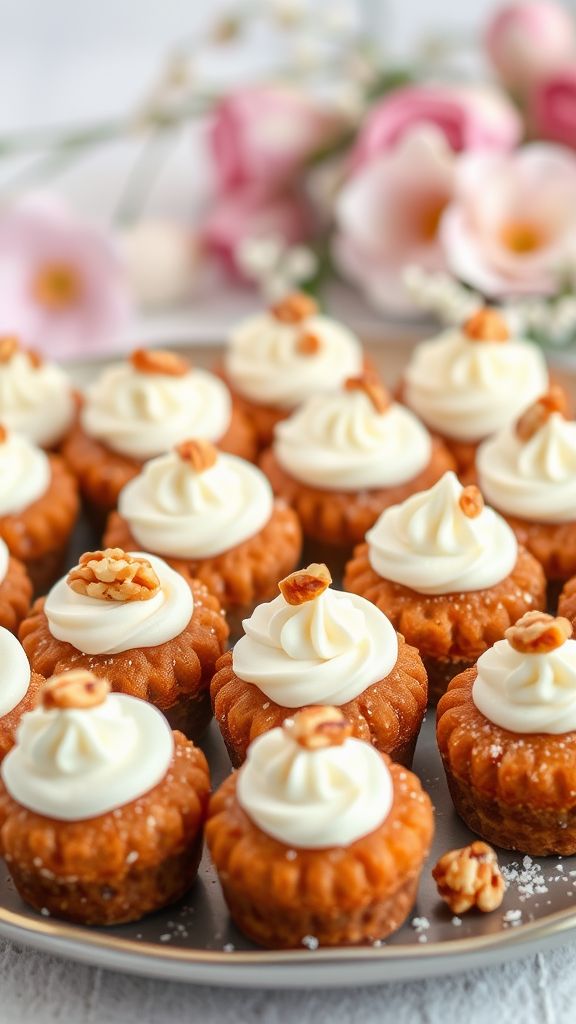
Mini Carrot Cake Bites are the perfect bite-sized treat to celebrate any occasion, especially during Easter! These little cakes are moist, flavorful, and topped with cream cheese frosting, making them irresistible.
Prep Time: 20 minutes
Total Time: 20 minutes
Servings: 24 mini bites
Ingredients:
- 1 cup grated carrots
- 1 cup all-purpose flour
- 1/2 cup granulated sugar
- 1/2 cup brown sugar, packed
- 1/2 cup vegetable oil
- 2 large eggs
- 1 tsp vanilla extract
- 1 tsp baking powder
- 1/2 tsp baking soda
- 1/2 tsp ground cinnamon
- 1/4 tsp ground nutmeg
- 1/4 tsp salt
- 1/2 cup chopped walnuts (optional)
- 1/2 cup raisins (optional)
- 1/2 cup cream cheese, softened
- 1/4 cup powdered sugar
- 1/2 tsp vanilla extract (for frosting)
Instructions:
- Preheat your oven to 350°F (175°C) and line a mini muffin tin with paper liners.
- In a large mixing bowl, combine grated carrots, flour, granulated sugar, brown sugar, vegetable oil, eggs, and vanilla extract. Mix well until the batter is smooth.
- Add in baking powder, baking soda, ground cinnamon, ground nutmeg, and salt, and stir until just combined.
- If using, fold in chopped walnuts and raisins into the batter.
- Fill each muffin cup approximately 2/3 full with the batter.
- Bake for 12-15 minutes, or until a toothpick inserted comes out clean.
- Allow the mini cakes to cool in the pan for 5 minutes before transferring them to a wire rack to cool completely.
- In a separate bowl, beat together cream cheese, powdered sugar, and vanilla extract until smooth and creamy.
- Once the mini cakes are completely cool, pipe or spread the cream cheese frosting on top of each bite.
Tips:
For an extra burst of flavor, add a pinch of cinnamon or nutmeg to the frosting. To make these bites even more festive, sprinkle some colored coconut flakes on top of the frosting for a fun Easter touch.
Nutrition Facts:
- Calories: 70 per bite
- Total Fat: 4g
- Saturated Fat: 1g
- Cholesterol: 30mg
- Sodium: 50mg
- Total Carbohydrates: 8g
- Dietary Fiber: 0.5g
- Sugars: 4g
- Protein: 1g
13. Jelly Bean Trifle Delight
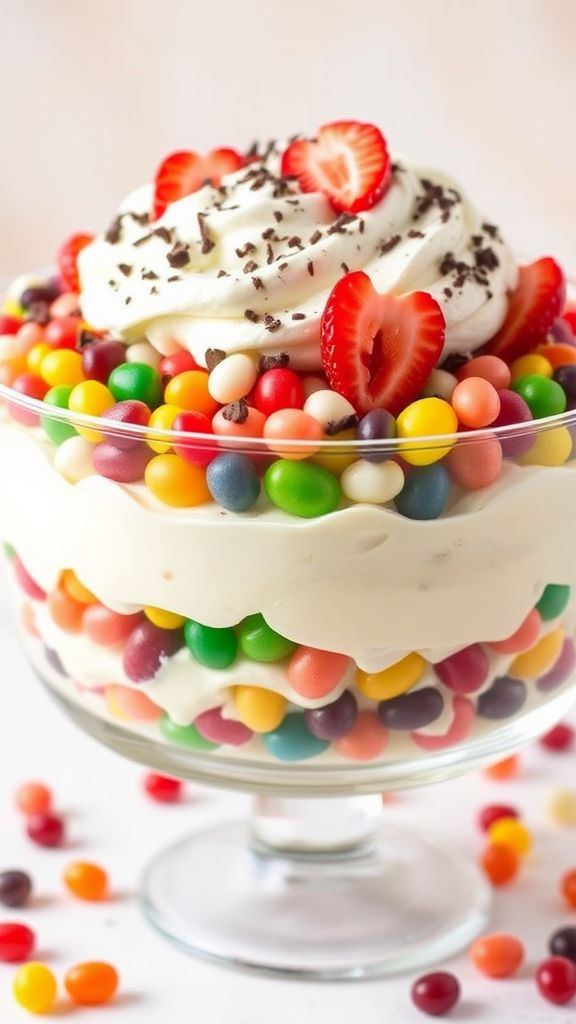
Indulge in the colorful layers of Jelly Bean Trifle Delight, a whimsical dessert perfect for any festive occasion! This trifle combines fluffy whipped cream, creamy pudding, and, of course, vibrant jelly beans to create a visually stunning and deliciously sweet treat that everyone will adore.
Prep Time: 20 minutes
Additional Time: 2 hours (for chilling)
Total Time: 2 hours 20 minutes
Servings: 8-10
Ingredients:
- 1 cup vanilla pudding mix
- 2 cups milk
- 2 cups whipped cream (or whipped topping)
- 2 cups jelly beans (assorted flavors and colors)
- 1 cup crushed graham crackers
- 1/2 cup strawberries, sliced (optional for garnish)
- 1/2 cup chocolate shavings (optional for garnish)
Instructions:
- In a mixing bowl, combine vanilla pudding mix and milk. Whisk together until smooth and let it sit for about 5 minutes to thicken.
- Gently fold in 1 cup of the whipped cream into the pudding mixture until well combined.
- In a large trifle dish or individual glasses, start by layering 1/4 cup of the crushed graham crackers on the bottom.
- Add a layer of the vanilla pudding mixture over the crushed graham crackers.
- Sprinkle a generous layer of jelly beans on top of the pudding.
- Repeat the layers: crushed graham crackers, vanilla pudding, and jelly beans until you reach the top of the dish, finishing with a layer of pudding.
- Top the last layer of pudding with the remaining whipped cream and garnish with sliced strawberries and chocolate shavings, if desired.
- Cover and refrigerate for at least 2 hours before serving to let the flavors meld.
Tips:
For an extra flavor boost, try adding a splash of vanilla extract to the pudding mix. You can also layer different flavors of pudding or whipped cream for a unique twist! Choose jelly beans with a variety of flavors to make each bite exciting.
Nutrition Facts:
- Calories: 250 per serving
- Total Fat: 12g
- Saturated Fat: 7g
- Cholesterol: 30mg
- Sodium: 150mg
- Total Carbohydrates: 35g
- Dietary Fiber: <1g
- Sugars: 18g
- Protein: 3g
14. Cloud Nine Meringues
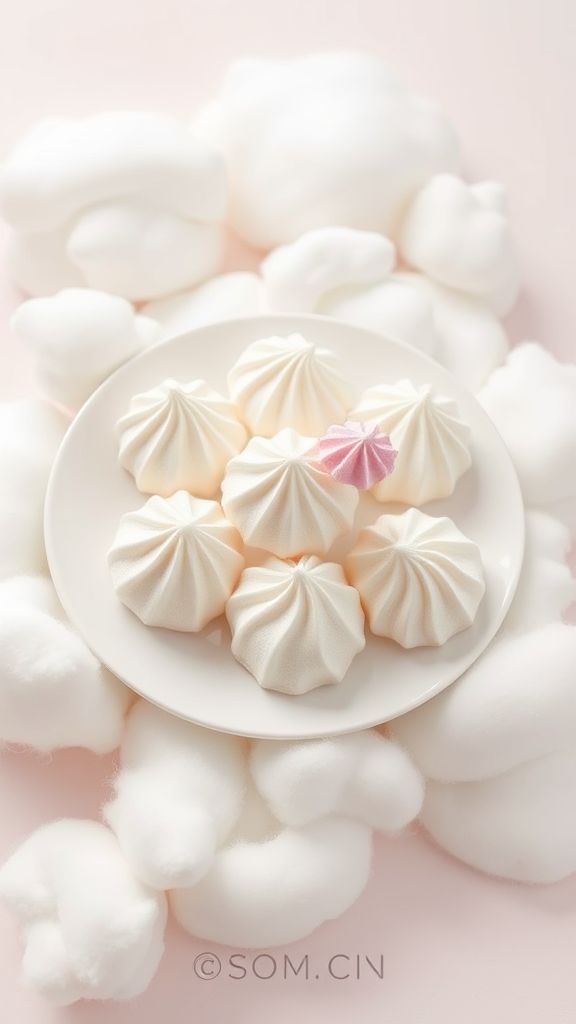
Indulge in the ethereal delight of Cloud Nine Meringues! These delicate, melt-in-your-mouth treats are perfect for any occasion, but especially stunning as a light Easter dessert. With just a few simple ingredients, you can create a spectacular confection that will leave everyone dreaming of clouds.
Prep Time: 15 minutes
Cook Time: 1 hour
Additional Time: 1 hour (cooling)
Total Time: 2 hours 15 minutes
Servings: 12 meringues
Ingredients:
- 4 large egg whites
- 1 cup granulated sugar
- 1/4 teaspoon cream of tartar
- 1 teaspoon vanilla extract
- 1/4 teaspoon almond extract
- Pinch of salt
Instructions:
- Preheat your oven to 200°F (93°C) and line a baking sheet with parchment paper.
- In a large mixing bowl, beat the egg whites on medium speed until foamy.
- Add the cream of tartar and salt; continue to beat until soft peaks form.
- Gradually add the granulated sugar, a tablespoon at a time, while beating on high speed until the mixture becomes glossy and stiff peaks form.
- Gently fold in the vanilla and almond extracts.
- Spoon or pipe the meringue mixture onto the prepared baking sheet, creating small swirls or peaks.
- Bake for 1 hour, then turn off the oven and leave the meringues inside to cool completely for an additional 1 hour.
Tips:
For a pop of color, consider adding a few drops of food coloring to the meringue mixture before piping. You can also drizzle melted chocolate or add finely crushed nuts for extra flavor and texture. Store in an airtight container to keep them crisp!
Nutrition Facts:
- Calories: 25 per meringue
- Total Fat: 0g
- Saturated Fat: 0g
- Cholesterol: 0mg
- Sodium: 5mg
- Carbohydrates: 6g
- Fiber: 0g
- Sugar: 6g
- Protein: 0g
15. Sweet Peep Rice Krispie Treats

Delightfully festive and incredibly easy to make, Sweet Peep Rice Krispie Treats are the perfect treat for your Easter celebrations. With a fun twist featuring colorful marshmallow Peeps, these treats will have everyone hopping for joy!
Prep Time: 10 minutes
Additional Time: 30 minutes
Total Time: 40 minutes
Servings: 12 treats
Ingredients:
- 3 tablespoons unsalted butter
- 1 package (10 oz) mini marshmallows
- 6 cups Rice Krispies cereal
- 1 package (8 ct) marshmallow Peeps
- 1 cup white chocolate chips (optional for drizzling)
- Sprinkles (optional for decoration)
Instructions:
- In a large saucepan, melt the butter over low heat.
- Once the butter is melted, add themini marshmallows and stir until completely melted and smooth.
- Remove the saucepan from heat and add the Rice Krispies cereal. Stir until well combined.
- Gently fold in half of the Peeps, breaking them apart if desired for distribution.
- Press the mixture into a greased 9×13 inch baking dish, making sure it’s evenly spread.
- Top with the remaining Peeps, pressing them down slightly.
- If using, melt the white chocolate chips in a microwave-safe bowl and drizzle over the top.
- Allow the treats to cool for about 30 minutes before cutting into squares.
- Optionally, sprinkle with sprinkles for extra flair before serving.
Tips:
For a fun flavor twist, consider adding a splash of vanilla extract to the marshmallow mixture. You can also mix in chopped chocolate eggs or bunny gummies for additional texture and sweetness.
Nutrition Facts:
- Calories: 120
- Total Fat: 4g
- Saturated Fat: 2.5g
- Cholesterol: 10mg
- Sodium: 50mg
- Total Carbohydrates: 20g
- Dietary Fiber: 0g
- Sugars: 8g
- Protein: 1g
16. Egg-Cited Fruit Tart
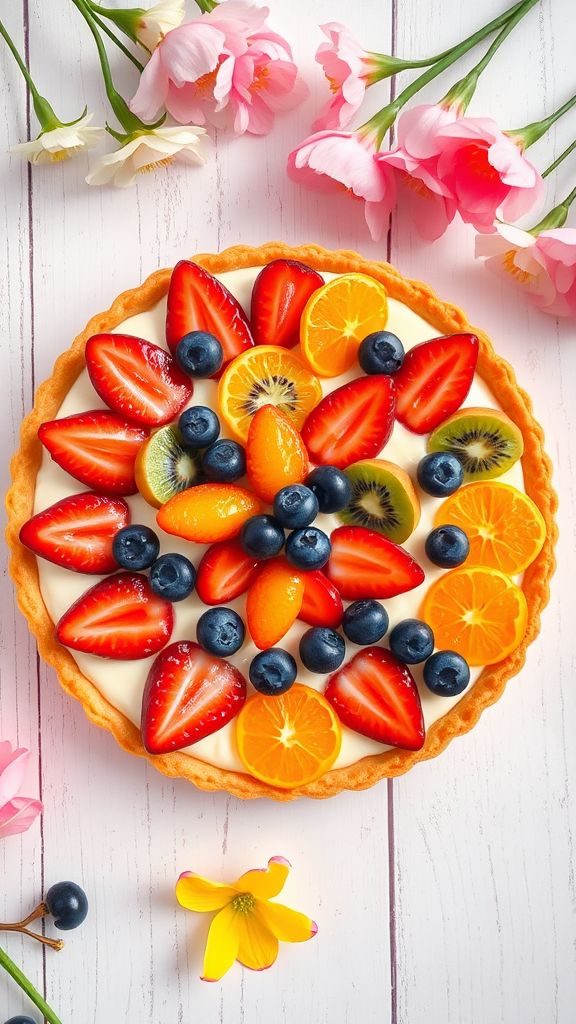
A delightful and vibrant dessert, the Egg-Cited Fruit Tart is perfect for Easter celebrations! This tart features a creamy filling topped with colorful fruits that will make your table shine and everyone’s taste buds sing.
Prep Time: 20 minutes
Additional Time: 2 hours (for chilling)
Total Time: 2 hours 20 minutes
Servings: 8
Ingredients:
- 1 pre-made tart crust
- 1 cup heavy cream
- 1/2 cup powdered sugar
- 1 teaspoon vanilla extract
- 8 oz cream cheese, softened
- 1/2 cup Greek yogurt
- 1 cup mixed fresh fruits (strawberries, blueberries, kiwi, and mandarin oranges)
- 2 tablespoons fruit glaze (optional)
Instructions:
- In a medium bowl, whip the heavy cream, powdered sugar, and vanilla extract until soft peaks form.
- In another bowl, beat the softened cream cheese and Greek yogurt together until smooth.
- Gently fold the whipped cream into the cream cheese mixture until fully combined.
- Spread the cream cheese filling evenly over the pre-made tart crust.
- Arrange the mixed fresh fruits on top of the filling in a colorful, decorative pattern.
- If desired, brush the fruits with fruit glaze for a shiny finish.
- Chill the tart in the refrigerator for at least 2 hours before serving for the best flavor and set consistency.
Tips:
For an extra flavor kick, add a splash of lemon juice or zest to the filling. Consider using seasonal fruits to keep your tart fresh and appealing. Pair it with a dollop of whipped cream or a scoop of vanilla ice cream for a delightful treat!
Nutrition Facts:
- Calories: 250 per serving
- Total Fat: 15g
- Saturated Fat: 9g
- Cholesterol: 45mg
- Sodium: 100mg
- Total Carbohydrates: 28g
- Dietary Fiber: 1g
- Sugars: 15g
- Protein: 4g
17. Tulip Cupcakes with Whipped Cream

Delightful and vibrant, Tulip Cupcakes are perfect for Easter celebrations or any spring gathering. Topped with light and fluffy whipped cream, these cupcakes are as beautiful as they are delicious.
Prep Time: 20 minutes
Total Time: 20 minutes
Servings: 12 cupcakes
Ingredients:
- 1 ½ cups all-purpose flour
- 1 cup granulated sugar
- ½ cup unsalted butter, soft
- 2 large eggs
- 1 teaspoon vanilla extract
- 1 ½ teaspoons baking powder
- ½ teaspoon salt
- ½ cup milk
- 2 cups heavy whipping cream
- ¼ cup powdered sugar
- 1 teaspoon vanilla extract (for whipped cream)
- Edible flowers or candy tulips (for decoration)
Instructions:
- Preheat your oven to 350°F (175°C) and line a cupcake pan with tulip-style paper liners.
- In a large mixing bowl, cream together butter and granulated sugar until light and fluffy.
- Add eggs one at a time, mixing well after each addition. Stir in 1 teaspoon vanilla extract.
- In another bowl, whisk together flour, baking powder, and salt. Gradually add to the butter mixture, alternating with milk. Mix until just combined.
- Fill each cupcake liner about 2/3 full with the batter.
- Bake in the preheated oven for 15-20 minutes, or until a toothpick inserted into the center comes out clean.
- While the cupcakes cool, prepare the whipped cream. In a chilled bowl, combine heavy whipping cream, powdered sugar, and 1 teaspoon vanilla extract.
- Beat on high speed until stiff peaks form.
- Once cupcakes are completely cool, pipe or dollop whipped cream on top.
- Decorate with edible flowers or candy tulips to give the finishing touch.
Tips:
- For an extra flavor twist, add zest from a lemon or orange to the batter for a citrusy kick.
- Experiment with different flavors by incorporating almond extract instead of vanilla.
Nutrition Facts:
- Calories: 250 per cupcake
- Total Fat: 15g
- Saturated Fat: 9g
- Cholesterol: 70mg
- Sodium: 150mg
- Total Carbohydrates: 27g
- Dietary Fiber: 0g
- Sugars: 15g
- Protein: 3g
18. Peeps S’mores Bars
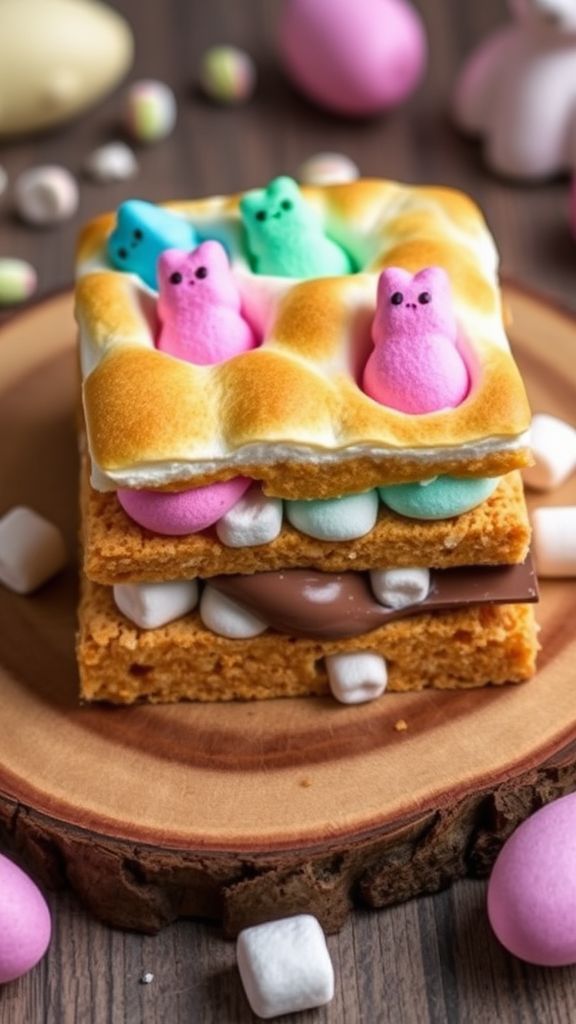
Indulge in a sweet twist on a classic treat with these Peeps S’mores Bars! Perfect for Easter, these bars combine the nostalgia of s’mores with adorable, colorful peeps for a fun and festive dessert.
Prep Time: 15 minutes
Total Time: 15 minutes
Servings: 12
Ingredients:
- 1 cup graham cracker crumbs
- 1/2 cup unsalted butter, melted
- 1 cup chocolate chips
- 2 cups mini marshmallows
- 12 Peeps (any color)
Instructions:
- Preheat your oven to 350°F (175°C).
- In a medium bowl, combine graham cracker crumbs and melted butter, mixing until well combined.
- Press the graham cracker mixture firmly into the bottom of a greased 9×9 inch baking dish to form a crust.
- Sprinkle chocolate chips evenly over the crust, followed by a layer of mini marshmallows.
- Place the baking dish in the oven and bake for 5-7 minutes, until the marshmallows are slightly golden and the chocolate chips are melted.
- Remove from the oven and immediately place the Peeps on top of the melted marshmallows, pressing gently to secure them.
- Allow the bars to cool completely before cutting into squares to serve.
Tips:
For an extra flavor boost, drizzle some chocolate sauce over the top before serving! You can also experiment with different flavored Peeps for a unique twist on this recipe!
Nutrition Facts:
- Calories: 200 per serving
- Total Fat: 10g
- Saturated Fat: 5g
- Cholesterol: 15mg
- Sodium: 120mg
- Total Carbohydrates: 28g
- Dietary Fiber: 1g
- Sugars: 15g
- Protein: 2g
19. Springtime Lemon Tart
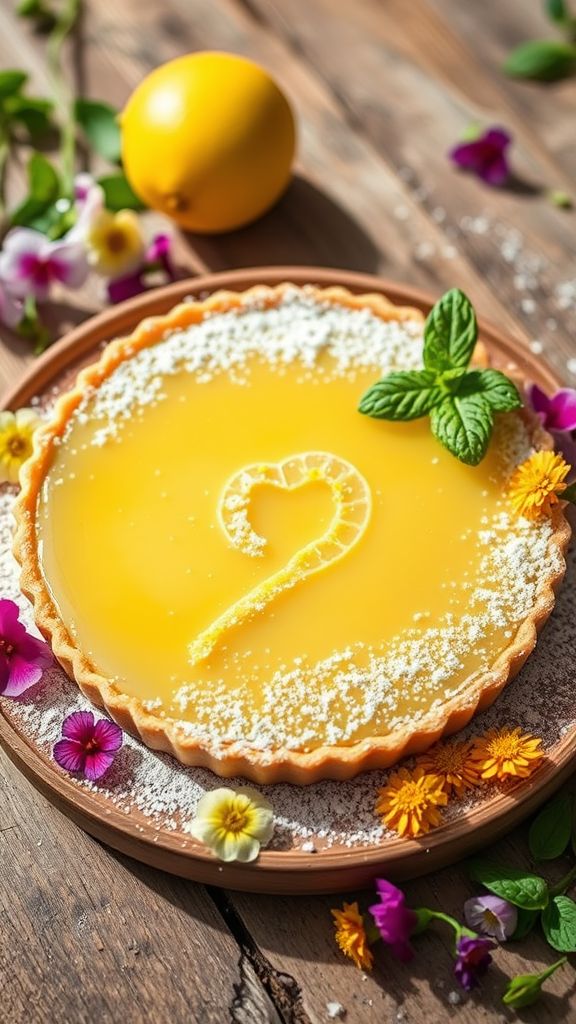
Springtime Lemon Tart is a delightful dessert that brings the bright flavors of spring to your table. With its zesty lemon filling and buttery crust, it’s the perfect treat for Easter gatherings or any spring celebration.
Prep Time: 20 minutes
Cook Time: 25 minutes
Additional Time: 2 hours (chill time)
Total Time: 2 hours 45 minutes
Servings: 8
Ingredients:
- 1 cup all-purpose flour
- 1/4 cup powdered sugar
- 1/2 cup unsalted butter, chilled and cubed
- 1 large egg yolk
- 1/4 cup fresh lemon juice
- 1 cup granulated sugar
- 2 large eggs
- 1 teaspoon lemon zest
- 1/4 teaspoon salt
- Powdered sugar for dusting (optional)
Instructions:
- Preheat your oven to 350°F (175°C) and grease a tart pan.
- In a mixing bowl, combine the flour and powdered sugar. Add the chilled butter and mix until crumbly.
- Add the egg yolk and mix until the dough forms. Press the dough into the tart pan evenly.
- Prick the bottom with a fork and bake for 15 minutes or until it’s lightly golden.
- In another bowl, whisk together the lemon juice, granulated sugar, eggs, lemon zest, and salt until smooth.
- Pour the lemon mixture into the baked crust.
- Bake for an additional 10-15 minutes until the filling is set but still slightly jiggly.
- Remove from the oven and let it cool to room temperature before chilling for at least 2 hours in the refrigerator.
- Before serving, dust with powdered sugar if desired.
Tips:
For an extra burst of flavor, consider adding a splash of vanilla extract to the lemon filling. Pair the tart with fresh berries or a dollop of whipped cream for a delightful complement to the citrusy tartness.
Nutrition Facts:
- Serving Size: 1 slice
- Calories: 210
- Total Fat: 12g
- Saturated Fat: 7g
- Cholesterol: 70mg
- Sodium: 50mg
- Total Carbohydrates: 25g
- Dietary Fiber: 0g
- Sugars: 15g
- Protein: 2g
20. Chocolate Covered Strawberry Bunnies

Chocolate Covered Strawberry Bunnies are a delightful and festive treat perfect for Easter celebrations! These adorable little bunnies will not only impress your guests but also satisfy your sweet tooth with a perfect blend of strawberries and chocolate.
Prep Time: 20 minutes
Additional Time: 30 minutes
Total Time: 50 minutes
Servings: 12 bunnies
Ingredients:
- 12 large strawberries
- 1 cup dark chocolate chips
- 1 cup white chocolate chips
- 1 tablespoon coconut oil
- Mini chocolate chips for eyes
- Pink candy melts or sprinkles for the nose
- Parchment paper
Instructions:
- Rinse the strawberries gently and pat them dry with a paper towel. Make sure they are completely dry for the chocolate to adhere properly.
- Melt the dark chocolate chips in a microwave-safe bowl in 30-second intervals until smooth, stirring in between.
- Dip each strawberry into the melted dark chocolate, coating it about two-thirds of the way up. Allow any excess chocolate to drip off and place it on a baking sheet lined with parchment paper.
- Refrigerate the coated strawberries for about 15-20 minutes until the chocolate has set.
- Meanwhile, melt the white chocolate chips with coconut oil in a separate bowl, again using the microwave in 30-second intervals.
- Once the dark chocolate is set, dip the top third of each strawberry into the melted white chocolate for a bunny tail effect. Place them back on the parchment paper.
- Immediately press mini chocolate chips into the white chocolate for the eyes and add a small piece of pink candy melt or sprinkle for the nose.
- Return the bunnies to the refrigerator for another 10-15 minutes to fully set.
- Serve these adorable Chocolate Covered Strawberry Bunnies chilled and enjoy!
Tips:
For an extra flavor kick, consider adding a teaspoon of vanilla extract when melting the chocolate. You can also drizzle a bit of extra melted chocolate over the bunnies for added decoration and flair.
Nutrition Facts:
- Calories: 80 per bunny
- Total Fat: 4g
- Saturated Fat: 2g
- Cholesterol: 0mg
- Sodium: 2mg
- Total Carbohydrates: 10g
- Dietary Fiber: 1g
- Sugars: 7g
- Protein: 1g
21. Lemony Palm Leaf Brownies
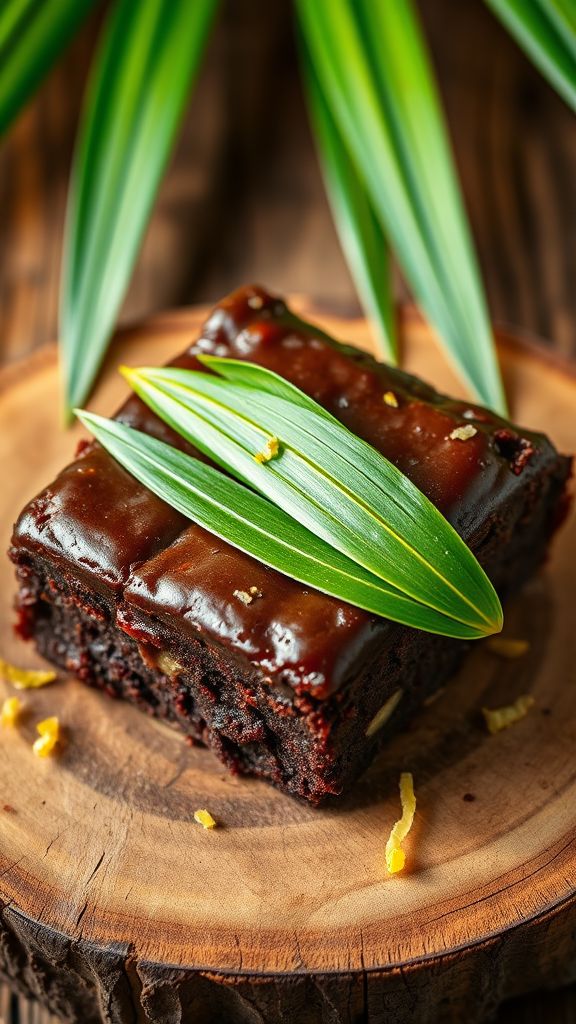
Indulge in these delightful Lemony Palm Leaf Brownies that offer a unique twist on a classic treat. The fresh zing of lemon combined with the subtle hints of palm leaf creates a brownie experience like never before!
Prep Time: 15 minutes
Cook Time: 25 minutes
Additional Time: 10 minutes
Total Time: 50 minutes
Servings: 12
Ingredients:
- 1 cup all-purpose flour
- 1/2 cup unsweetened cocoa powder
- 1 tsp baking powder
- 1/4 tsp salt
- 1/2 cup unsalted butter, melted
- 1 cup granulated sugar
- 2 large eggs
- 1 tsp pure vanilla extract
- 1 tbsp lemon zest
- 1/4 cup lemon juice
- 2-3 palm leaves (clean and dry)
Instructions:
- Preheat your oven to 350°F (175°C) and line a 9×9 inch baking pan with parchment paper, allowing some overhang.
- In a medium bowl, whisk together flour, cocoa powder, baking powder, and salt.
- In a large bowl, mix melted butter and sugar until well combined, then add the eggs, vanilla extract, lemon zest, and lemon juice. Stir until smooth.
- Gradually add the dry ingredients into the wet mixture, mixing until just combined.
- Pour the batter into the prepared baking pan, spreading it evenly.
- Gently lay the cleaned palm leaves across the top of the batter.
- Bake in the preheated oven for about 25 minutes or until a toothpick inserted in the center comes out with a few moist crumbs.
- Allow the brownies to cool in the pan for 10 minutes before lifting them out using the parchment paper. Cut into squares.
Tips:
For an extra burst of flavor, consider adding white chocolate chips or chopped nuts to the batter. A drizzle of lemon glaze on top before serving can also elevate the dessert’s sweetness and tanginess!
Nutrition Facts:
- Calories: 180 per serving
- Total Fat: 8g
- Saturated Fat: 5g
- Cholesterol: 55mg
- Sodium: 90mg
- Total Carbohydrates: 26g
- Dietary Fiber: 2g
- Sugars: 14g
- Protein: 3g
22. Honeycomb Nest Cookies
These delightful Honeycomb Nest Cookies are a charming addition to any Easter celebration! With a crispy base and a sweet, sticky topping that mimics a honeycomb, they’re sure to be a hit with kids and adults alike.
Prep Time: 15 minutes
Cook Time: 10 minutes
Additional Time: 30 minutes
Total Time: 55 minutes
Servings: 24 cookies
Ingredients:
- 1 cup unsalted butter, softened
- 1 cup granulated sugar
- 1 cup brown sugar, packed
- 2 large eggs
- 2 teaspoons vanilla extract
- 3 cups all-purpose flour
- 1 teaspoon baking soda
- 1/2 teaspoon salt
- 1 cup honeycomb cereal
- 1 cup mini chocolate eggs or candies (for decoration)
Instructions:
- Preheat your oven to 350°F (175°C) and line a baking sheet with parchment paper.
- In a large mixing bowl, cream together the butter, granulated sugar, and brown sugar until light and fluffy.
- Add the eggs one at a time, mixing well after each addition, then stir in the vanilla extract.
- In a separate bowl, combine the flour, baking soda, and salt. Gradually add this mixture to the cream mixture, blending until well combined.
- Gently fold in the honeycomb cereal until evenly distributed.
- Using a spoon or cookie scoop, drop the dough onto the prepared baking sheet, spacing them about 2 inches apart.
- Bake in the preheated oven for 10-12 minutes, or until the edges are lightly golden.
- Remove from the oven and let the cookies cool on the baking sheet for about 5 minutes, then transfer them to a wire rack to cool completely.
- Once cooled, decorate each cookie with the mini chocolate eggs or candies, pressing them lightly into the center of each cookie.
- Allow the cookies to set for 30 minutes before serving.
Tips:
For an extra flavor boost, consider adding 1/2 teaspoon of cinnamon or cocoa powder to the dough. You can also drizzle melted chocolate over the cookies for a more decadent touch!
Nutrition Facts:
- Serving Size: 1 cookie
- Calories: 150
- Total Fat: 7g
- Saturated Fat: 4g
- Cholesterol: 25mg
- Sodium: 50mg
- Total Carbohydrates: 20g
- Dietary Fiber: 0g
- Sugars: 10g
- Protein: 1g
23. Marshmallow Fluff Nest Cake

Indulge in the whimsical delight of Marshmallow Fluff Nest Cake! This enchanting dessert is perfect for Easter celebrations, with its fluffy layers and delightful nest topping that’s sure to impress your guests.
Prep Time: 20 minutes
Total Time: 20 minutes
Servings: 10
Ingredients:
- 1 box of vanilla cake mix
- 3 large eggs
- 1/2 cup of vegetable oil
- 1 cup of water
- 1 jar (7 oz) of marshmallow fluff
- 1 cup of heavy whipping cream
- 1/2 cup of powdered sugar
- 3 cups of chocolate mini eggs (for the nest)
- Chocolate curls or sprinkles (for decoration)
Instructions:
- Preheat your oven and prepare your cake pans according to the package instructions for the vanilla cake mix.
- In a mixing bowl, combine the cake mix, eggs, oil, and water, mixing until smooth.
- Divide the batter evenly between the prepared cake pans and bake according to package instructions until a toothpick inserted comes out clean.
- Allow the cakes to cool completely in the pans before removing them from the pans and placing them on a wire rack.
- In a separate bowl, whip the heavy cream and powdered sugar together until stiff peaks form, then gently fold in the marshmallow fluff until combined.
- Place one cake layer on a serving plate and spread a generous layer of the fluff mixture on top.
- Carefully place the second cake layer on top and decorate the top with the remaining fluff mixture, creating a nest shape in the center.
- Scatter the chocolate mini eggs around the nest and sprinkle with chocolate curls or sprinkles for a beautiful finish.
Tips:
Add a splash of vanilla extract to the whipping cream for an extra flavor boost. You can also use colorful jelly beans instead of chocolate mini eggs to create a vibrant nest. For a unique twist, try drizzling some chocolate syrup over the top before serving!
Nutrition Facts:
- Serving Size: 1 slice
- Calories: 320
- Total Fat: 15g
- Saturated Fat: 7g
- Cholesterol: 60mg
- Sodium: 200mg
- Total Carbohydrate: 45g
- Dietary Fiber: 1g
- Sugars: 24g
24. Easter Basket Brownies
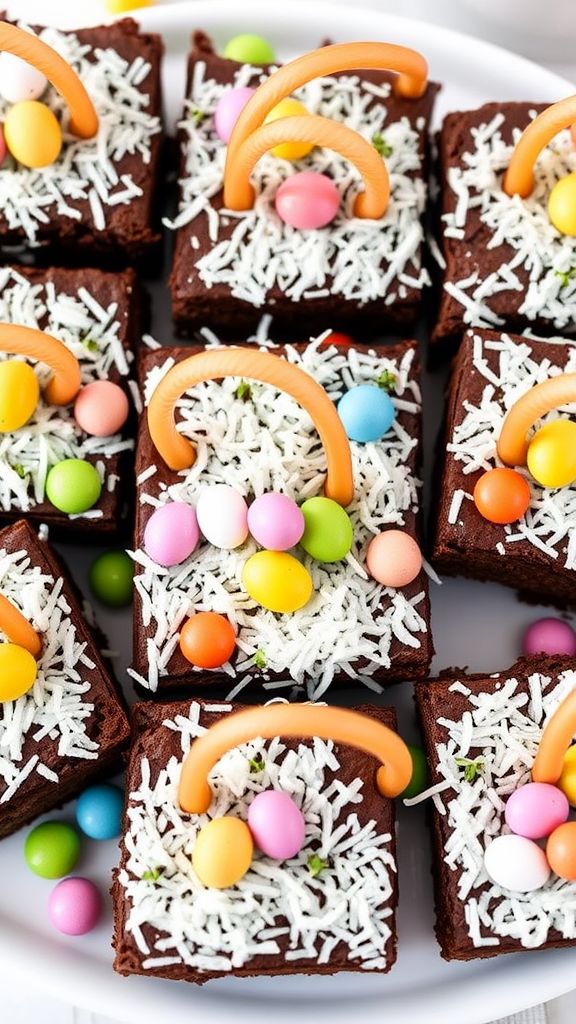
Indulge in the festive spirit with these delightful Easter Basket Brownies! They are not only rich and fudgy but also decorated to resemble a charming Easter basket, making them the perfect treat for your spring celebrations.
Prep Time: 15 minutes
Cook Time: 30 minutes
Additional Time: 30 minutes
Total Time: 1 hour 15 minutes
Servings: 12
Ingredients:
- 1 cup unsalted butter, melted
- 2 cups granulated sugar
- 4 large eggs
- 1 teaspoon vanilla extract
- 1 cup all-purpose flour
- 1 cup unsweetened cocoa powder
- 1/2 teaspoon salt
- 1/4 teaspoon baking powder
- 1 cup chocolate chips
- 1 cup coconut flakes (for the grass)
- Assorted Easter candies (for decoration)
- Licorice ropes (for basket handle)
Instructions:
- Preheat your oven to 350°F (175°C) and grease a 9×13 inch baking pan.
- In a large mixing bowl, combine the melted butter and granulated sugar until fully mixed.
- Add the eggs one at a time, mixing well after each addition, and then stir in the vanilla extract.
- In another bowl, whisk together the flour, cocoa powder, salt, and baking powder.
- Gradually add the dry ingredients to the wet mixture, stirring until just combined.
- Fold in the chocolate chips until evenly distributed.
- Pour the brownie batter into the prepared baking pan and spread it out evenly.
- Bake in the preheated oven for 30 minutes or until a toothpick comes out with small crumbs.
- Allow brownies to cool in the pan for 30 minutes before transferring to a wire rack to cool completely.
- Once cooled, cut the brownies into squares and transfer to a serving platter.
- Cover the top of each brownie with coconut flakes to resemble Easter grass.
- Decorate with assorted Easter candies and place licorice ropes on each brownie to form a basket handle.
Tips:
For an extra flavor boost, add 1 teaspoon of espresso powder to the brownie batter. You can also use different colored coconut flakes to make your grass more vibrant. Experiment with various candies for a personalized touch!
Nutrition Facts:
- Calories: 250 per brownie
- Fat: 14g
- Carbohydrates: 30g
- Protein: 3g
- Sugar: 20g
25. Stackable Fruit and Yogurt Cups
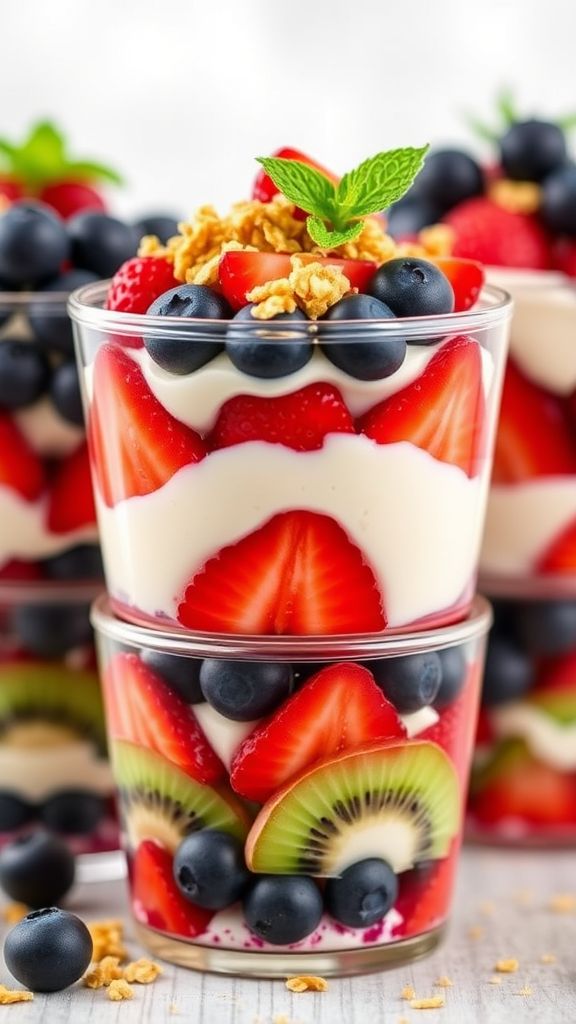
Delightfully colorful and bursting with flavor, these Stackable Fruit and Yogurt Cups are not only beautiful but also a healthy option for any occasion. Perfect for brunch or a refreshing snack, these cups are easy to prepare and will impress your guests.
Prep Time: 15 minutes
Additional Time: 30 minutes
Total Time: 45 minutes
Servings: 4
Ingredients:
- 2 cups of plain Greek yogurt
- 2 tablespoons of honey (or maple syrup for vegan)
- 1 teaspoon of vanilla extract
- 1 cup of strawberries, sliced
- 1 cup of blueberries
- 1 cup of kiwi, peeled and diced
- 1 cup of granola or crushed nuts for topping
- Fresh mint leaves for garnish (optional)
Instructions:
- In a bowl, mix the Greek yogurt, honey, and vanilla extract until well combined.
- Prepare your cups or jars by layering the fruit and yogurt starting with a layer of yogurt at the bottom.
- Add a layer of sliced strawberries on top of the yogurt, followed by another layer of yogurt.
- Repeat the layering process with blueberries, yogurt, and then kiwi.
- Finish with a final layer of yogurt on top and sprinkle with granola or crushed nuts.
- Chill the cups in the refrigerator for at least 30 minutes to allow flavors to meld.
- Serve cold, garnishing with fresh mint leaves if desired.
Tips:
For an extra flavor twist, try adding a dash of cinnamon or a scoop of your favorite protein powder to the yogurt mixture. You can also diversify the fruits based on seasonal availability or personal preference for more colorful layers!
Nutrition Facts:
- Calories: 220
- Protein: 10g
- Carbohydrates: 34g
- Fat: 5g
- Fiber: 4g
- Sugars: 15g