My New Cookbook is Out! Check Out Now!
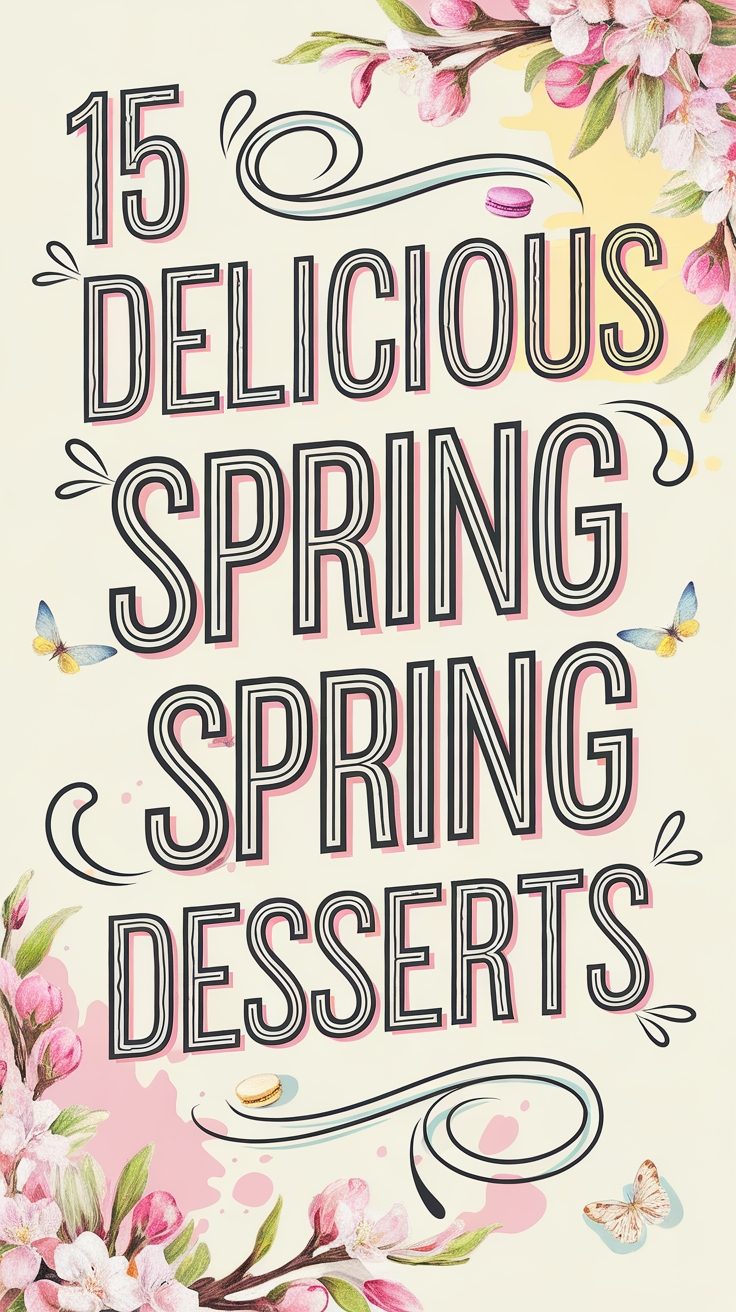
15 Tasty Spring Desserts for Every Sweet Tooth
This page contains affiliate links and I earn a commission if you make a purchase through one of the links, at no cost to you.
Ready to satisfy your sweet tooth this spring? With the arrival of warmer days, it’s the perfect time to indulge in fresh, vibrant flavors! You deserve delicious desserts that will brighten your table and your mood.
In this collection, you’ll discover 15 tasty spring desserts that not only taste amazing but are also easy to make. Let’s bring some sunshine into your kitchen together!
Shop Our Must-Haves


1 Lemon Blueberry Tart
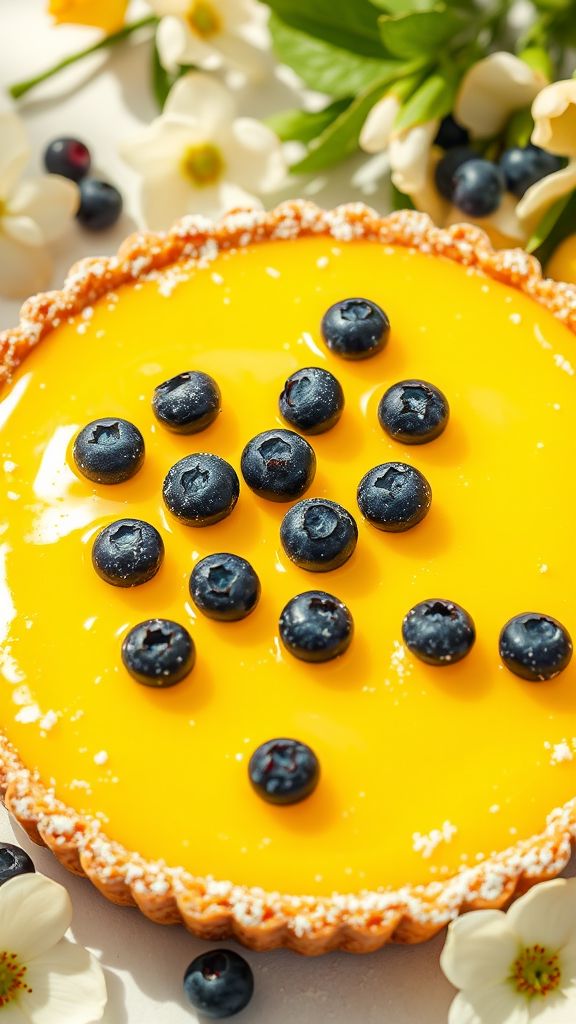
This Lemon Blueberry Tart is a delicious treat that perfectly combines the zesty flavor of lemons with sweet, juicy blueberries. It’s a refreshing dessert that’s perfect for spring gatherings or just a sunny afternoon. You’ll love how easy it is to make!
Prep Time: 20 minutes
Total Time: 1 hour
Servings: 8 slices
Ingredients:
- 1 pre-made tart shell
- 1 cup fresh blueberries
- 1/2 cup granulated sugar
- 2 large eggs
- 1/4 cup fresh lemon juice
- 1 tbsp lemon zest
- 1/4 cup heavy cream
- 1 tbsp cornstarch
- 1/2 tsp vanilla extract
- Powdered sugar for dusting (optional)
Instructions:
Start by preheating your oven to 350°F (175°C). While the oven warms up, take the pre-made tart shell and place it in a tart pan. This will form the base of the tart.
In a bowl, combine the sugar, cornstarch, and lemon zest. Mix them together well. Then, add in the eggs, one by one, and whisk until the mixture is smooth. Next, pour in the fresh lemon juice and heavy cream. Stir everything until well blended.
Now, gently fold in the fresh blueberries. Make sure they are evenly mixed in without squashing them. Pour this vibrant mixture into the prepared tart shell.
Carefully place the tart in the preheated oven. Bake for about 25-30 minutes, or until the filling is set and slightly golden on top. Once it’s done, remove the tart and let it cool for about 15 minutes.
After the tart has cooled, dust the top with some powdered sugar for a sweet finish, if you like. Slice into pieces and enjoy your refreshing dessert!
Tips:
- Make sure to use fresh blueberries for the best flavor. Frozen blueberries can be used; just thaw and drain them first.
- For an extra zesty kick, add more lemon zest to the filling.
- If you don’t have a tart shell, you can use a pie crust instead!
Nutrition Facts:
- Calories: 180
- Total Fat: 8g
- Saturated Fat: 4g
- Cholesterol: 60mg
- Sodium: 55mg
- Total Carbohydrates: 25g
- Dietary Fiber: 1g
- Sugars: 12g
- Protein: 2g
2 Strawberry Rhubarb Crisp
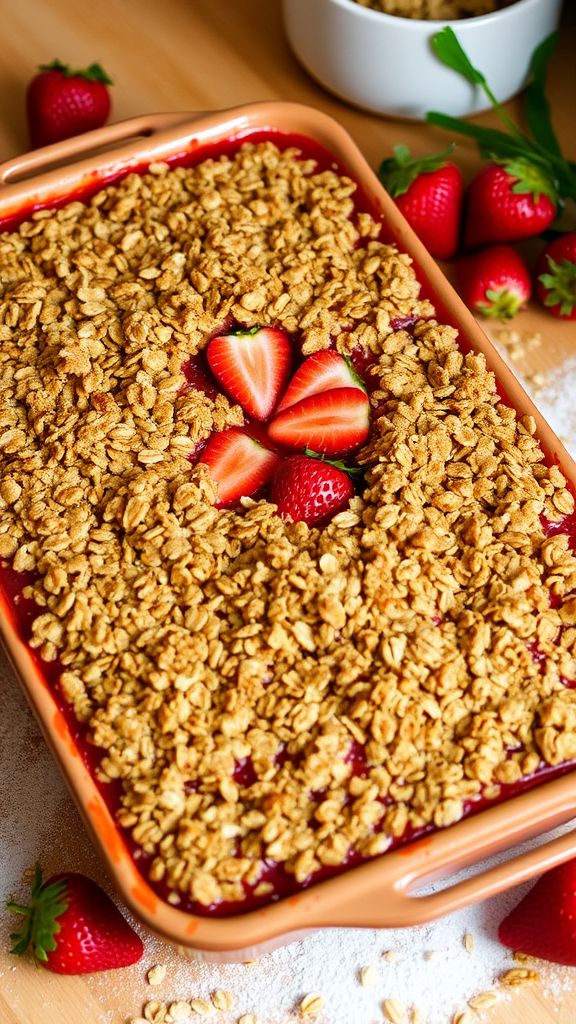
Sweet strawberries and tangy rhubarb come together in this delightful Strawberry Rhubarb Crisp. This dessert is easy to make and perfect for spring gatherings. With its crispy topping and juicy filling, it’s sure to please everyone!
Prep Time: 15 minutes
Cook Time: 30 minutes
Total Time: 45 minutes
Servings: 8
Ingredients:
- 2 cups fresh strawberries, hulled and sliced
- 2 cups rhubarb, chopped
- ¾ cup granulated sugar
- 1 tablespoon cornstarch
- 1 teaspoon vanilla extract
- 1 teaspoon ground cinnamon
- 1 cup rolled oats
- ½ cup all-purpose flour
- ½ cup brown sugar
- ½ cup cold butter, cubed
Instructions:
First, preheat your oven to 350°F (175°C). This will help your crisp bake evenly.
In a large bowl, combine the strawberries and rhubarb. Mix in ¾ cup of granulated sugar, 1 tablespoon of cornstarch, 1 teaspoon of vanilla extract, and 1 teaspoon of ground cinnamon. Stir everything together until the fruit is evenly coated.
Transfer the fruit mixture into a greased 9×13 inch baking dish. This dish will make sure the crisp has enough room to bake.
In another bowl, mix 1 cup of rolled oats, ½ cup of all-purpose flour, ½ cup of brown sugar, and ½ cup of cold butter. Use a fork or your fingers to crumble the butter into the dry ingredients until the mixture looks like coarse crumbs.
Spread the oat mixture over the top of the fruit in the baking dish. This crispy topping will become golden-brown while baking.
Bake the crisp in the preheated oven for about 30 minutes. You want the top to be nice and crispy, and the fruit should be bubbly.
Once it’s done baking, let the crisp cool for about 10 minutes before serving. This waiting time helps the flavors blend together.
Tips:
- Serve your Strawberry Rhubarb Crisp with a scoop of vanilla ice cream for an extra treat.
- You can use frozen strawberries and rhubarb if fresh ones aren’t available.
- To add some crunch, sprinkle chopped nuts on top of the oat mixture before baking.
Nutrition Facts:
- Calories: 300 per serving
- Fat: 14g
- Carbohydrates: 46g
- Protein: 3g
- Sugar: 20g
- Fiber: 3g
3 Honey Lavender Panna Cotta

This Honey Lavender Panna Cotta is a delightful spring dessert that combines luxurious cream, fresh honey, and the floral notes of lavender. It’s smooth, creamy, and simply elegant, perfect for impressing guests or treating yourself.
Prep Time: 15 minutes
Additional Time: 4 hours
Total Time: 4 hours 15 minutes
Servings: 4
Ingredients:
- 1 cup heavy cream
- 1/2 cup milk
- 1/4 cup honey
- 1 teaspoon dried culinary lavender
- 1 packet (about 2 1/4 teaspoons) unflavored gelatin
- 1/4 cup cold water
- 1/2 teaspoon vanilla extract
- Pinch of salt
Instructions:
Start by soaking the gelatin. In a small bowl, sprinkle the gelatin over cold water. Allow this to sit for about 5 minutes or until the gelatin has softened.
In a medium saucepan, combine the heavy cream, milk, honey, and salt. Place the saucepan over medium heat and stir gently. Cook until the mixture begins to steam but does not boil.
Next, add the dried lavender to the cream mixture. Remove the saucepan from heat and let it steep for about 10 minutes. This will help infuse the lavender flavor into the cream.
After steeping, strain the cream mixture through a fine mesh sieve into a large bowl. This removes the lavender pieces while keeping the lovely flavor.
Now, return the strained mixture to the saucepan. Heat it gently again and add the softened gelatin. Stir until the gelatin is completely dissolved. Finally, stir in the vanilla extract.
Pour the panna cotta mixture into 4 small cups or ramekins. Cover them with plastic wrap and refrigerate for at least 4 hours, or until set.
When the panna cotta is set, you can serve it directly in the cups or carefully unmold them onto plates. Drizzle a little extra honey over each serving for added sweetness.
Tips:
- Use culinary-grade lavender for the best flavor.
- If you don’t have honey, you can substitute it with maple syrup.
- Garnish with fresh lavender flowers or berries for a beautiful presentation.
Nutrition Facts:
- Calories: 230 per serving
- Total Fat: 14g
- Saturated Fat: 8g
- Cholesterol: 50mg
- Sodium: 70mg
- Total Carbohydrates: 23g
- Dietary Fiber: 0g
- Sugars: 15g
- Protein: 3g
4 Cherry Blossom Cupcakes

These Cherry Blossom Cupcakes are the perfect way to celebrate the beauty of spring. They are light, fluffy, and topped with a delicious cherry blossom-flavored frosting. Get ready to impress your friends and family with these delightful treats!
Prep Time: 20 minutes
Cook Time: 15 minutes
Additional Time: 30 minutes
Total Time: 1 hour 5 minutes
Servings: 12 cupcakes
Ingredients:
- 1 ½ cups all-purpose flour
- 1 cup granulated sugar
- ½ cup unsalted butter, softened
- 2 large eggs
- 1 teaspoon vanilla extract
- ½ cup milk
- 1 ½ teaspoons baking powder
- ¼ teaspoon salt
- 2 tablespoons cherry blossom extract
- 1 cup powdered sugar (for frosting)
- 2 tablespoons cherry blossom extract (for frosting)
- 1-2 tablespoons milk (for frosting)
- Cherry blossoms or edible flowers for decoration (optional)
Instructions:
Preheat your oven to 350°F (175°C) and line a muffin tin with cupcake liners. This will help your cupcakes come out easily and look pretty.
In a large bowl, cream together the softened butter and granulated sugar until it’s light and fluffy. This may take about 2-3 minutes. Make sure to scrape down the sides of the bowl.
Next, add the eggs one at a time, mixing well after each addition. Stir in the vanilla extract and cherry blossom extract for that delightful flavor.
In another bowl, whisk together the flour, baking powder, and salt. Gradually add this dry mixture to the wet ingredients, alternating with milk. Start and end with the flour mixture. This will keep your batter nice and smooth.
Once everything is mixed well, carefully pour the batter into the prepared cupcake liners, filling each about 2/3 full. Bake in the preheated oven for 15 minutes, or until a toothpick inserted in the center comes out clean.
After baking, let the cupcakes cool in the tin for about 5 minutes, then transfer them to a wire rack to cool completely.
While the cupcakes are cooling, make the frosting. In a medium bowl, mix the powdered sugar, cherry blossom extract, and milk until you reach a smooth consistency. If it’s too thick, add a little more milk.
Once the cupcakes are completely cool, frost them using a piping bag or a knife. For an extra touch, top each cupcake with a cherry blossom or edible flower.
Tips:
- Make sure to use pure cherry blossom extract for the best flavor.
- If you cannot find cherry blossom extract, you can use almond or vanilla extract instead.
- Store any leftover cupcakes in an airtight container to keep them fresh.
Nutrition Facts:
- Calories: 210 per cupcake
- Total Fat: 9g
- Saturated Fat: 5g
- Cholesterol: 40mg
- Sodium: 120mg
- Total Carbohydrates: 31g
- Dietary Fiber: 0g
- Sugars: 19g
- Protein: 2g
5 Pistachio and Rose Water Mousse
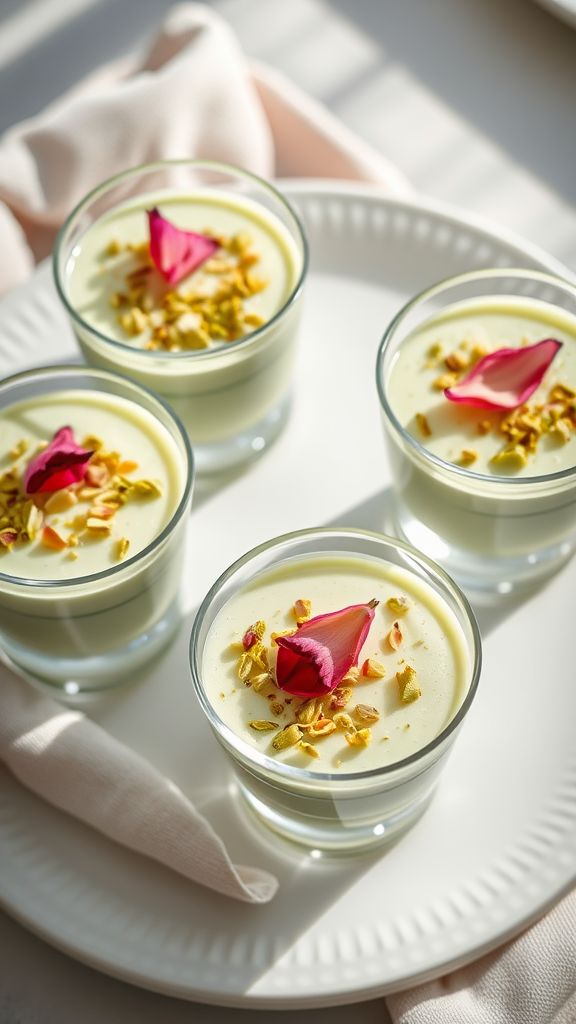
Indulge in the delicate flavors of Pistachio and Rose Water Mousse. This light and creamy dessert is perfect for special occasions or a sweet treat at home. The combination of pistachios and the fragrant essence of rose water makes every bite heavenly.
Prep Time: 15 minutes
Additional Time: 2 hours
Total Time: 2 hours 15 minutes
Servings: 4
Ingredients:
- 1 cup heavy cream
- 1/2 cup pistachios, shelled and unsalted
- 1/4 cup sugar
- 1 teaspoon rose water
- 2 large egg whites
- 1 tablespoon lemon juice
- A pinch of salt
- Chopped pistachios for garnish
- Rose petals for garnish (optional)
Instructions:
Start by placing the pistachios in a food processor. Process them until they turn into a fine powder. Make sure not to over-process or they will become a paste. Set this aside for now.
In a medium bowl, pour in the heavy cream. Using a hand mixer, whip the cream until it forms soft peaks. This will give the mousse a light and airy texture. Be careful not to overwhip it.
In another bowl, whisk together the sugar, rose water, and reserved pistachio powder until combined.
Now, in a separate bowl, add the egg whites and lemon juice along with a pinch of salt. Beat these with a hand mixer until soft peaks form. This adds volume to your mousse for an amazing texture.
Next, gently fold the whipped cream into the pistachio mixture. Take your time to keep it light and fluffy. After that, fold in the beaten egg whites. Make sure everything is combined but be gentle to maintain the airiness.
Once everything is mixed, pour the mousse into serving cups or bowls. Cover them with plastic wrap and refrigerate for at least 2 hours. This will help the mousse set nicely and enhance the flavors.
Before serving, you can garnish the mousse with chopped pistachios and a few rose petals for an extra touch of elegance. Your Pistachio and Rose Water Mousse is now ready to be enjoyed!
Tips:
- For a richer flavor, toast the pistachios lightly before grinding them.
- Be sure to use pure rose water as it gives the best flavor to your mousse.
- This mousse can be made a day in advance and stored in the fridge until you’re ready to serve.
Nutrition Facts:
- Calories: 300 per serving
- Protein: 5g
- Fat: 25g
- Carbohydrates: 20g
- Sugar: 15g
6 Grapefruit Sorbet
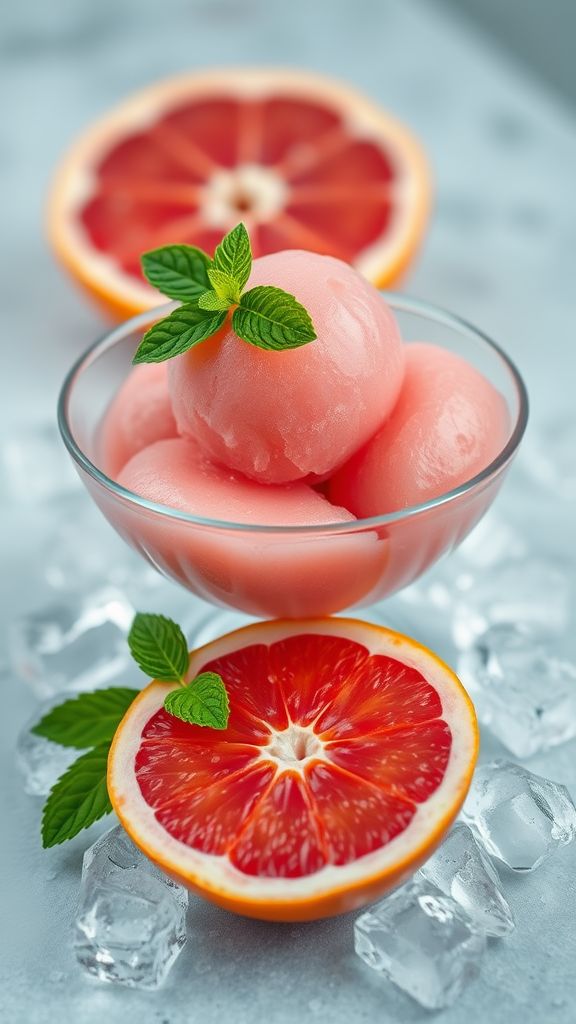
Grapefruit Sorbet is a refreshing and tangy treat that’s perfect for warm days. This simple sorbet can be whipped up in no time and is a delightful way to enjoy the vibrant flavor of grapefruit. With just a few ingredients, you can create a sweet and zesty dessert that will impress everyone!
Prep Time: 10 minutes
Additional Time: 4 hours
Total Time: 4 hours 10 minutes
Servings: 4
Ingredients:
- 2 large grapefruits
- 1 cup granulated sugar
- 1 cup water
- 1 tablespoon lemon juice
- Pinch of salt
Instructions:
Begin by juicing the grapefruits. You should have about 1 cup of fresh grapefruit juice. Strain it through a fine mesh sieve to remove any pulp if desired. Set the juice aside.
Next, combine the water and sugar in a small saucepan over medium heat. Stir until the sugar is completely dissolved to create a simple syrup. This should take about 2 to 3 minutes. Once the syrup is done, remove it from heat and let it cool.
In a large bowl, mix the cooled simple syrup with the grapefruit juice, lemon juice, and a pinch of salt. Stir until well combined. This mixture will give your sorbet a lovely balance of sweetness and tartness.
Pour the mixture into a shallow dish and place it in the freezer. After about 1 hour, take it out and stir it with a fork, breaking up any icy bits. Repeat this step every 30 minutes for about 3 hours until the sorbet is firm and fluffy.
Once your sorbet is ready, scoop it into bowls and enjoy the refreshing taste of homemade grapefruit sorbet!
Tips:
- For a smoother texture, use an ice cream maker if you have one. Just follow the manufacturer’s instructions.
- Try adding a splash of vodka to the mixture before freezing for a more adult version!
- Grapefruit sorbet can be stored in an airtight container in the freezer for up to one week.
Nutrition Facts:
- Calories: 130
- Total Fat: 0g
- Sodium: 10mg
- Total Carbohydrates: 32g
- Sugars: 30g
- Protein: 0g
7 Coconut Lime Cake
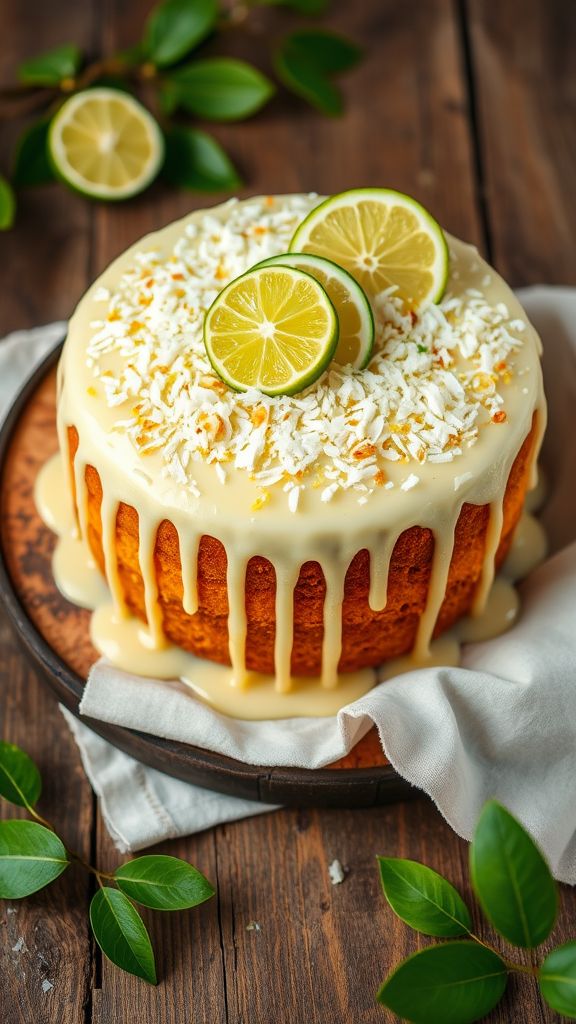
This Coconut Lime Cake is the perfect dessert to brighten up any spring day. Its sweet and tangy flavors create a delightful combination that’s hard to resist. With a tender cake and a zesty lime glaze, this cake is sure to impress your friends and family!
Prep Time: 20 minutes
Cook Time: 30 minutes
Additional Time: 1 hour (to cool)
Total Time: 1 hour 50 minutes
Servings: 12
Ingredients:
- 2 cups all-purpose flour
- 1 ½ cups granulated sugar
- 1 cup unsweetened shredded coconut
- ½ cup unsalted butter, softened
- 1 cup coconut milk
- 2 large eggs
- 2 teaspoons baking powder
- 1 teaspoon vanilla extract
- Zest of 2 limes
- Juice of 2 limes
- ¼ teaspoon salt
Instructions:
Preheat your oven to 350°F (175°C). Grease and flour a 9×13 inch baking pan to prepare for the batter.
In a large mixing bowl, combine the flour, sugar, baking powder, and salt. Stir until well mixed. Then, add in the butter, coconut milk, and eggs. Beat these together until the mixture is smooth and creamy.
Next, fold in the shredded coconut, lime zest, and vanilla extract. Be careful not to over mix; you want a light, airy cake.
Pour the batter into the prepared baking pan and spread it evenly. Bake in the preheated oven for 30 minutes, or until a toothpick inserted in the center comes out clean. Once done, let the cake cool in the pan for about 10 minutes before transferring it to a wire rack to cool completely.
While the cake is cooling, make the lime glaze. In a small bowl, mix the lime juice with powdered sugar until smooth. When the cake is completely cooled, drizzle the glaze over the top for a delicious finish.
Let the glaze set for about an hour before slicing. Enjoy your delicious Coconut Lime Cake!
Tips:
- For an extra tropical flair, consider adding toasted coconut on top of the glaze.
- You can replace coconut milk with regular milk if desired, but the flavor will be different.
- Ensure your butter is at room temperature for easier mixing.
Nutrition Facts:
- Calories: 290 per slice
- Total Fat: 12g
- Saturated Fat: 8g
- Cholesterol: 40mg
- Sodium: 150mg
- Total Carbohydrates: 45g
- Dietary Fiber: 1g
- Sugars: 24g
- Protein: 3g
8 Garden Pea and Mint Sorbet
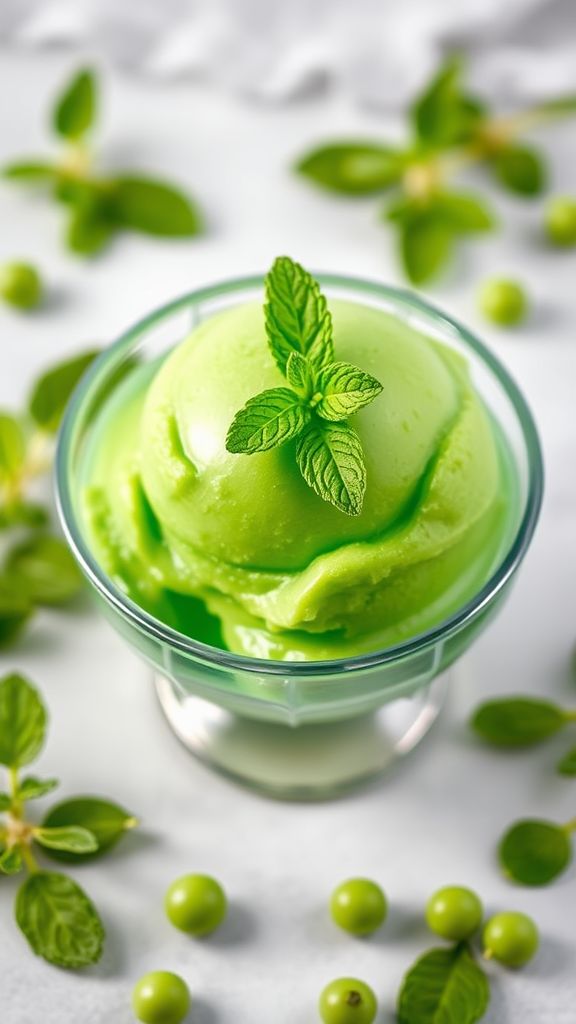
Garden Pea and Mint Sorbet is a refreshing treat that captures the essence of spring in every scoop. The sweetness of garden peas combined with the coolness of mint makes for a vibrant and unique dessert. Perfect for warm weather, this sorbet is a delightful way to impress your friends and family.
Prep Time: 15 minutes
Additional Time: 2 hours
Total Time: 2 hours 15 minutes
Servings: 4
Ingredients:
- 2 cups fresh garden peas (or frozen, thawed)
- 1 cup water
- 1/2 cup granulated sugar
- 1/4 cup fresh mint leaves, packed
- 1 tablespoon lemon juice
- Pinch of salt
Instructions:
Start by combining the water and sugar in a small saucepan over medium heat. Stir the mixture until the sugar completely dissolves, then bring it to a gentle boil. Remove from heat and add the mint leaves, letting them steep for about 10 minutes to infuse their flavor.
Next, in a blender, combine the peas, mint syrup (after straining out the mint), lemon juice, and a pinch of salt. Blend until the mixture is smooth and creamy. If you find it too thick, you can add a little more water to help it blend.
Once you have a smooth mixture, pour it into a shallow dish and spread it evenly. Cover the dish and place it in the freezer for about 2 hours or until it becomes firm.
After the sorbet has set, take it out and let it sit for a few minutes to soften slightly. Use an ice cream scoop to serve, and enjoy your vibrant Garden Pea and Mint Sorbet!
Tips:
- For a sweeter sorbet, you can adjust the sugar according to your taste.
- Serve with a sprig of fresh mint on top for a fancy presentation.
- This sorbet pairs nicely with cookies or light cakes for a complete dessert.
Nutrition Facts:
- Calories: 90 kcal per serving
- Fat: 0g
- Carbohydrates: 22g
- Sugar: 19g
- Protein: 3g
- Fiber: 4g
9 Peach Melba Parfaits
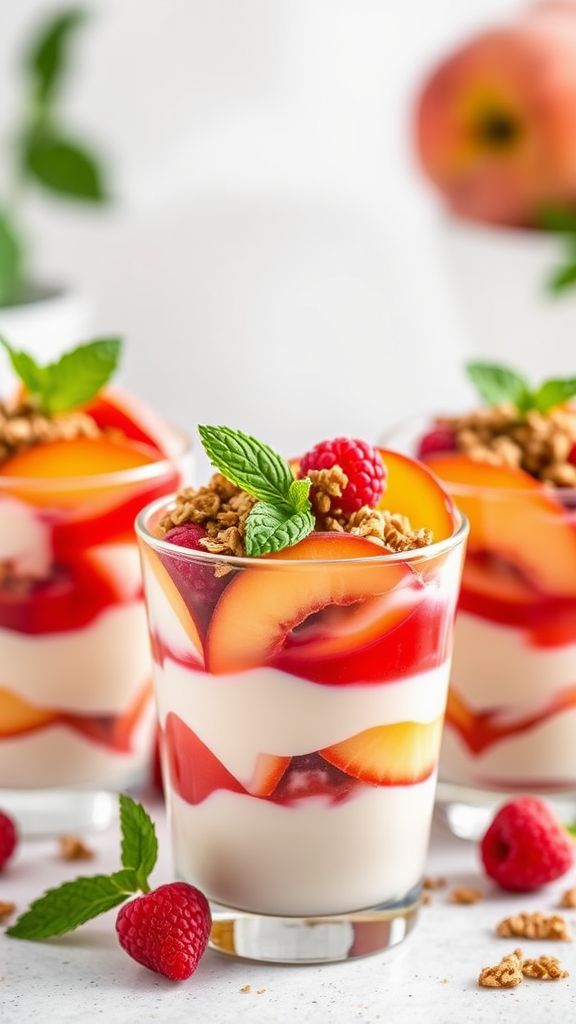
Peach Melba Parfaits are a delightful way to enjoy fresh peaches combined with creamy vanilla yogurt and tangy raspberry sauce. They’re perfect for a light dessert or a refreshing snack. Let’s dive into this simple and delicious recipe!
Prep Time: 15 minutes
Additional Time: 30 minutes
Total Time: 45 minutes
Servings: 4
Ingredients:
- 2 large ripe peaches, sliced
- 1 cup fresh or frozen raspberries
- 2 tablespoons sugar (adjust as needed)
- 1 teaspoon lemon juice
- 2 cups vanilla yogurt
- 1 cup granola (for layering)
- Fresh mint leaves (optional for garnish)
Instructions:
Start by washing the peaches and raspberries. Carefully slice the peaches into thin wedges. In a small saucepan, combine the raspberries, 2 tablespoons of sugar, and 1 teaspoon of lemon juice. Cook over medium heat, stirring until the raspberries break down and form a sauce. This should take about 5-7 minutes. Remove the saucepan from heat and let the raspberry sauce cool.
Next, prepare your parfait glasses or bowls. Begin by adding a layer of vanilla yogurt at the bottom of each glass. Follow this with a layer of the raspberry sauce, drizzling it over the yogurt. Then, add a layer of sliced peaches on top of the sauce.
After that, sprinkle a layer of granola over the peaches for crunch. Repeat the layers until the glasses are filled, finishing with yogurt on top. Drizzle any remaining raspberry sauce over the final layer of yogurt.
If you like, you can garnish each parfait with a sprig of fresh mint for a pop of color and flavor. Place the parfaits in the refrigerator for about 30 minutes to chill before serving. Enjoy your refreshing Peach Melba Parfaits!
Tips:
- You can substitute fresh peaches with canned peaches if they’re out of season.
- For added richness, consider using Greek yogurt instead of regular yogurt.
- Feel free to mix in other berries like strawberries or blueberries for added flavor and color.
Nutrition Facts:
- Calories: 220
- Total Fat: 6g
- Saturated Fat: 2g
- Cholesterol: 10mg
- Sodium: 45mg
- Total Carbohydrates: 36g
- Dietary Fiber: 4g
- Sugars: 18g
- Protein: 7g
10 Raspberry Lemonade Bars
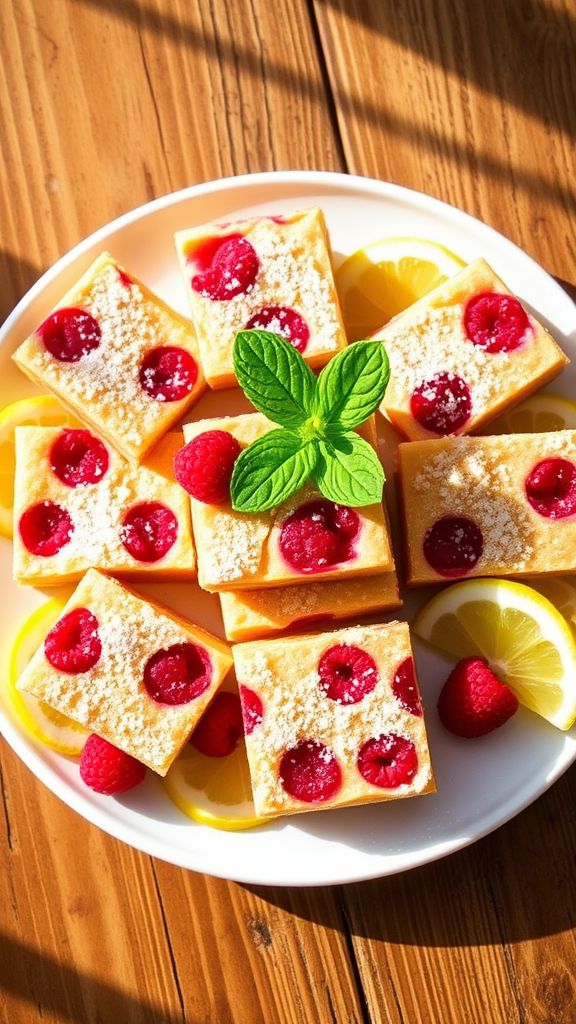
These Raspberry Lemonade Bars are the perfect sweet treat for a sunny day. With a deliciously tart lemon flavor and a burst of fresh raspberries, they are sure to impress your family and friends. Enjoy these bars as a refreshing dessert or snack during the warm months!
Prep Time: 20 minutes
Additional Time: 1 hour
Total Time: 1 hour 20 minutes
Servings: 12 bars
Ingredients:
- 1 cup all-purpose flour
- 1/2 cup powdered sugar
- 1/2 cup unsalted butter, melted
- 2 large eggs
- 1 cup granulated sugar
- 1/4 cup fresh lemon juice (about 2 lemons)
- Zest of 1 lemon
- 1/2 teaspoon baking powder
- 1 cup fresh raspberries (can use frozen)
- Additional powdered sugar for dusting (optional)
Instructions:
First, preheat your oven to 350°F (175°C). Grease an 8×8 inch baking dish or line it with parchment paper for easy removal.
In a mixing bowl, combine flour, powdered sugar, and melted butter. Mix until it resembles wet sand. Press this mixture into the bottom of the prepared baking dish to form the crust. Bake for about 15 minutes, or until lightly golden on the edges.
While the crust is baking, prepare the filling. In another bowl, whisk together the eggs, granulated sugar, lemon juice, lemon zest, and baking powder until smooth. Gently fold in the fresh raspberries.
Once the crust is done, take it out of the oven and pour the raspberry-lemon mixture evenly over the hot crust. Return to the oven and bake for an additional 20-25 minutes, or until the filling is set and no longer jiggles.
After removing from the oven, let the bars cool at room temperature for a bit. Then, chill them in the refrigerator for at least 1 hour to set completely. When ready to serve, dust with powdered sugar if desired, cut into bars, and enjoy!
Tips:
- Use fresh raspberries for the best flavor, but you can substitute frozen ones if needed.
- For an extra lemony taste, add more lemon zest to the filling.
- Store any leftovers in an airtight container in the refrigerator for up to 3 days.
Nutrition Facts:
- Calories: 160
- Fat: 7g
- Carbohydrates: 24g
- Fiber: 1g
- Sugar: 12g
- Protein: 2g
11 Apricot Almond Galette
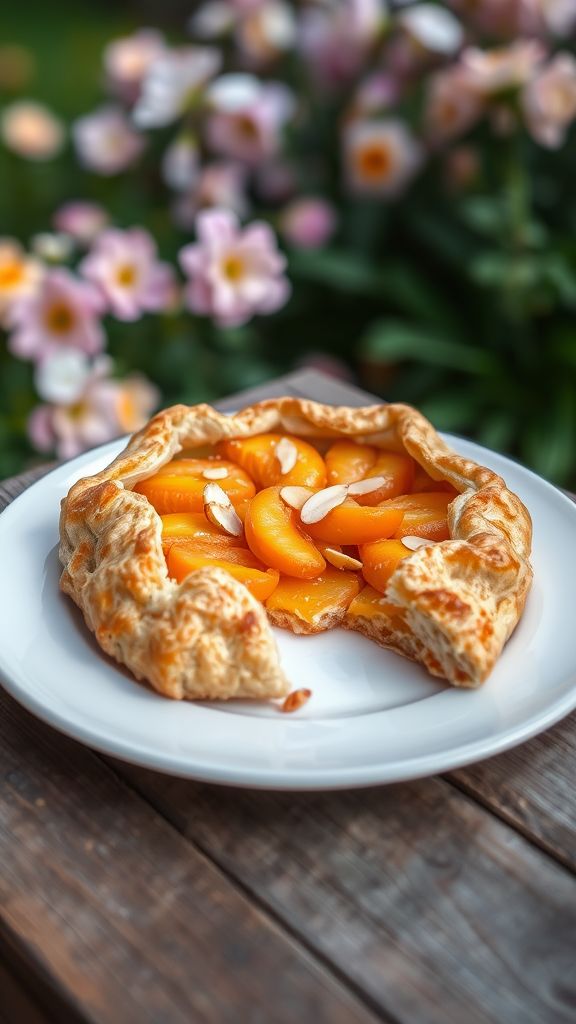
This Apricot Almond Galette is a delightful dessert that brings a burst of spring flavors to your table. The flaky crust and sweet apricots, combined with a hint of almond, make it an irresistible treat. Perfect for gatherings or a simple evening dessert.
Prep Time: 20 minutes
Cook Time: 35 minutes
Total Time: 55 minutes
Servings: 8
Ingredients:
- 1 pie crust (store-bought or homemade)
- 4 ripe apricots, halved and pitted
- 1/4 cup granulated sugar
- 1 tablespoon lemon juice
- 1/4 cup almond flour
- 1/2 teaspoon vanilla extract
- 1/4 teaspoon ground cinnamon
- 1 egg (for egg wash)
- 1 teaspoon sliced almonds (for topping)
Instructions:
Begin by preheating your oven to 400°F (200°C). This will make sure your galette bakes evenly and gets a lovely golden color.
Next, in a mixing bowl, toss the apricot halves with granulated sugar, lemon juice, and ground cinnamon. Make sure to coat the fruit well to enhance the sweetness!
Now, roll out your pastry crust on a floured surface. Aim for a round shape about 12 inches in diameter. When you’re happy with the shape, transfer it onto a baking sheet lined with parchment paper.
Sprinkle the almond flour in the center of the crust, leaving about 2 inches of space around the edges. This will help absorb the juices from the apricots.
Place the apricot mixture on top of the almond flour, arranging the apricots in a circle. Next, fold the edges of the crust over the apricots, creating a rustic look. It’s okay if some fruit is exposed!
In a small bowl, beat the egg and brush it over the folded edges of the crust. This will give it a beautiful golden shine in the oven. Scatter the sliced almonds on top for extra crunch.
Finally, bake your galette in the preheated oven for 30-35 minutes or until the crust is golden brown and the apricots are bubbly. Once done, let it cool for a bit before slicing.
Tips:
- Serve your galette warm with a scoop of vanilla ice cream for extra deliciousness.
- For an extra almond flavor, try adding a splash of almond extract to the apricot filling.
- Feel free to use other fruits like peaches or plums if apricots are not in season.
Nutrition Facts:
- Calories: 210 per serving
- Total Fat: 10g
- Saturated Fat: 2g
- Cholesterol: 40mg
- Sodium: 130mg
- Total Carbohydrates: 31g
- Dietary Fiber: 2g
- Sugars: 10g
- Protein: 3g
12 Vanilla Bean and Elderflower Cheesecake
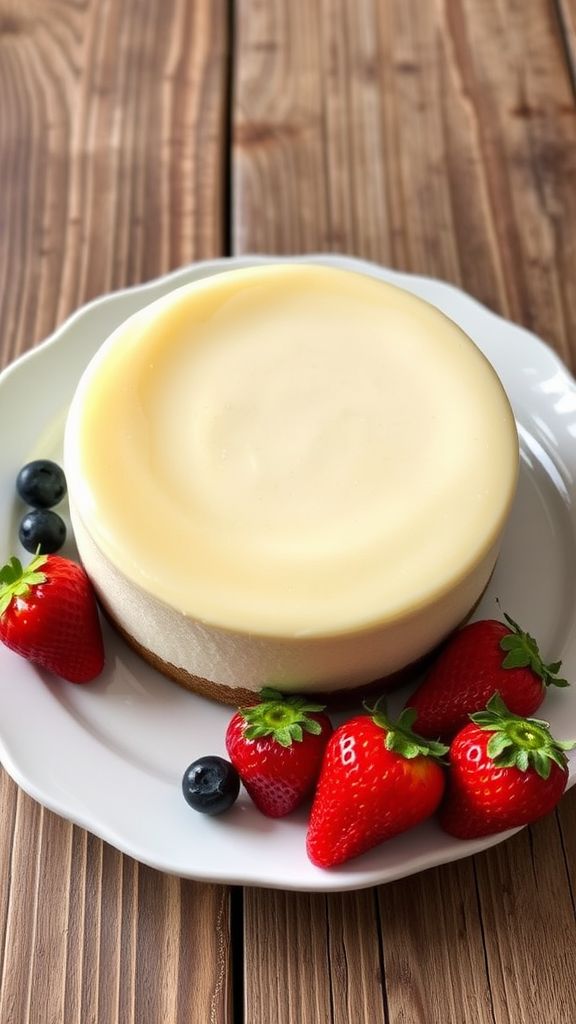
This Vanilla Bean and Elderflower Cheesecake is a delightful treat that whispers the essence of spring in every rich, creamy bite. The combination of fragrant vanilla beans and delicate elderflower creates a unique flavor that is sure to impress your guests. Perfect for special occasions or just because, this cheesecake is a real showstopper!
Prep Time: 20 minutes
Additional Time: 6 hours, chilling
Total Time: 6 hours 20 minutes
Servings: 8
Ingredients:
- 1 ½ cups graham cracker crumbs
- ½ cup unsalted butter, melted
- 2 packages (8 oz each) cream cheese, softened
- ¾ cup sour cream
- ¾ cup granulated sugar
- 2 large eggs
- 1 tablespoon vanilla bean paste
- ¼ cup elderflower cordial
- 1 tablespoon lemon juice
Instructions:
Start by preheating your oven to 325°F (163°C). In a mixing bowl, combine the graham cracker crumbs and melted butter. Stir until the mixture resembles wet sand. Press this mixture firmly into the bottom of a 9-inch springform pan to form the crust.
Next, in a large bowl, beat the cream cheese until it’s smooth and creamy. You want to avoid lumps here! Then, add the sour cream and granulated sugar, mixing until well blended. Scrape down the sides of the bowl to ensure everything is mixed evenly.
Add the eggs one at a time, mixing well after each addition. Then, fold in the vanilla bean paste, elderflower cordial, and lemon juice. Make sure everything is fully combined but be careful not to overmix.
Pour the creamy filling over the prepared crust in the springform pan. Smooth out the top with a spatula. Place the pan in the preheated oven and bake for about 50-60 minutes, or until the center is set but slightly jiggly.
Once done, turn off the oven and leave the cheesecake inside for an additional hour to cool gradually. This helps to prevent cracking. After this, take it out and let it cool to room temperature. Once cooled, cover it with plastic wrap and refrigerate for at least 6 hours or overnight.
Tips:
- For a more delicate flavor, use a high-quality elderflower cordial.
- Consider serving with fresh berries on top for added color and flavor.
- Make sure your cream cheese is at room temperature for a silky smooth filling.
Nutrition Facts:
- Calories: 360 per serving
- Total Fat: 26g
- Saturated Fat: 15g
- Cholesterol: 95mg
- Sodium: 220mg
- Total Carbohydrates: 28g
- Dietary Fiber: 1g
- Sugars: 18g
- Protein: 5g
13 Fresh Mint Chocolate Chip Cookies
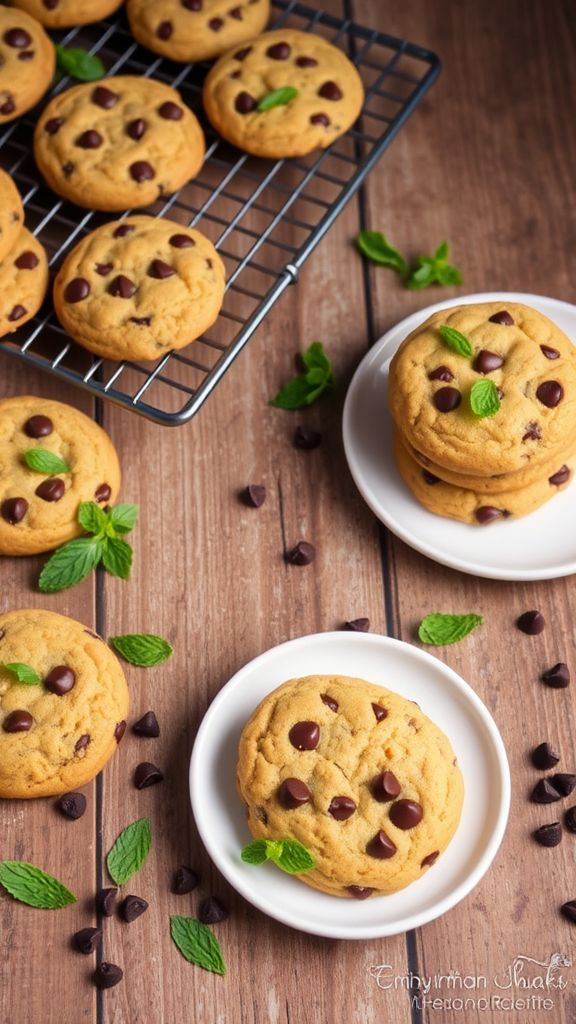
These Fresh Mint Chocolate Chip Cookies are a delightful treat, perfect for spring! The addition of fresh mint brings a refreshing twist to the classic chocolate chip cookies. Your friends and family will love the delicious flavor combination.
Prep Time: 20 minutes
Cook Time: 12 minutes
Additional Time: 10 minutes (to cool)
Total Time: 42 minutes
Servings: 24 cookies
Ingredients:
- 1 cup unsalted butter, softened
- 1 cup granulated sugar
- 1 cup brown sugar, packed
- 2 large eggs
- 2 teaspoons vanilla extract
- 1 cup fresh mint leaves, finely chopped
- 3 cups all-purpose flour
- 1 teaspoon baking soda
- 1/2 teaspoon salt
- 2 cups semi-sweet chocolate chips
Instructions:
Start by preheating your oven to 350°F (175°C). This ensures that your cookies will bake evenly.
In a large mixing bowl, combine the softened butter, granulated sugar, and brown sugar. Using a mixer, beat them together until the mixture is fluffy and creamy. This should take about 2-3 minutes.
Next, add the eggs and vanilla extract to the bowl. Mix until everything is well incorporated.
Now, chop the fresh mint leaves finely and fold them into the butter and sugar mixture. This will give your cookies that fresh mint flavor that everyone loves.
In a separate bowl, whisk together the all-purpose flour, baking soda, and salt. Gradually add this dry mixture to the wet ingredients. Mix until just combined.
Finally, fold in the semi-sweet chocolate chips. Don’t overmix; you want to keep the chocolate chips intact for that delicious melty goodness in every bite.
Using a spoon or cookie scoop, drop rounded tablespoons of dough onto a lined baking sheet, leaving some space between each cookie.
Bake in the preheated oven for 10-12 minutes or until the edges are lightly golden.
Once baked, allow the cookies to cool on the baking sheet for about 10 minutes before transferring them to a wire rack to cool completely.
Tips:
- For extra mint flavor, you can add 1/2 teaspoon of peppermint extract to the wet ingredients.
- Store the cookies in an airtight container to keep them fresh for up to one week.
- If you want to make them extra special, drizzle some melted chocolate on top after they cool.
Nutrition Facts:
- Calories: 150 per cookie
- Total Fat: 7g
- Saturated Fat: 4g
- Cholesterol: 25mg
- Sodium: 80mg
- Total Carbohydrates: 20g
- Dietary Fiber: 1g
- Sugars: 10g
- Protein: 2g
14 Light and Fluffy Fruit Pavlova
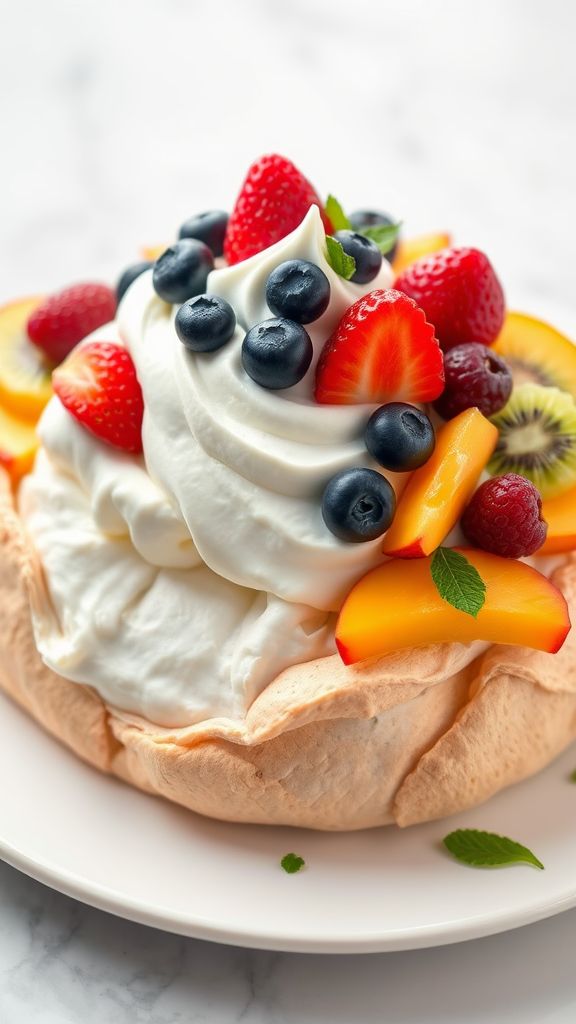
Pavlova is a delightful dessert that’s light and airy, perfect for springtime. The crisp outer shell and soft marshmallow-like center create a wonderful contrast. Topped with fresh fruit and whipped cream, it’s the ideal sweet treat for gatherings.
Prep Time: 20 minutes
Additional Time: 1 hour
Total Time: 1 hour 20 minutes
Servings: 8
Ingredients:
- 4 large egg whites
- 1 cup granulated sugar
- 1 teaspoon white vinegar
- 1 teaspoon cornstarch
- 1 cup heavy cream
- 2 tablespoons powdered sugar
- 1 teaspoon vanilla extract
- 2 cups mixed fresh fruit (like berries, kiwi, and peaches)
Instructions:
Start by preheating your oven to 250°F (121°C). Line a baking sheet with parchment paper, and draw an 8-inch circle to use as a guide for the pavlova base.
In a clean bowl, whip the egg whites with an electric mixer on high until soft peaks form. This usually takes about 3-4 minutes. Gradually add in the granulated sugar, one tablespoon at a time, continuing to whip until stiff peaks form and the mixture is glossy. This step may take up to 10 minutes.
Next, gently fold in the vinegar and cornstarch. This helps the pavlova maintain its light and fluffy texture. Carefully spread the meringue onto the prepared circle, building it up slightly at the edges to form a slight well in the middle.
Once shaped, place the baking sheet in the preheated oven. Bake for 1 hour until the pavlova is dry to the touch. After that, turn off the oven, crack the door open, and let it cool completely inside. This cooling process helps prevent cracks.
Meanwhile, whip the heavy cream with powdered sugar and vanilla extract until soft peaks form. Once the pavlova has cooled, spread the whipped cream on top of it.
Finally, generously top your pavlova with the mixed fresh fruit. Your light and fluffy pavlova is now ready to be served and enjoyed!
Tips:
- Be sure to use a completely clean bowl and beaters while whipping egg whites to achieve the best results.
- For extra flavor, consider adding a splash of lime or lemon juice to the whipped cream.
- Garnish with mint leaves for an added touch of freshness and color.
Nutrition Facts:
- Calories: 250 per serving
- Protein: 3g
- Carbohydrates: 28g
- Fat: 14g
- Sodium: 35mg
- Sugar: 20g
15 Matcha Green Tea Eclairs
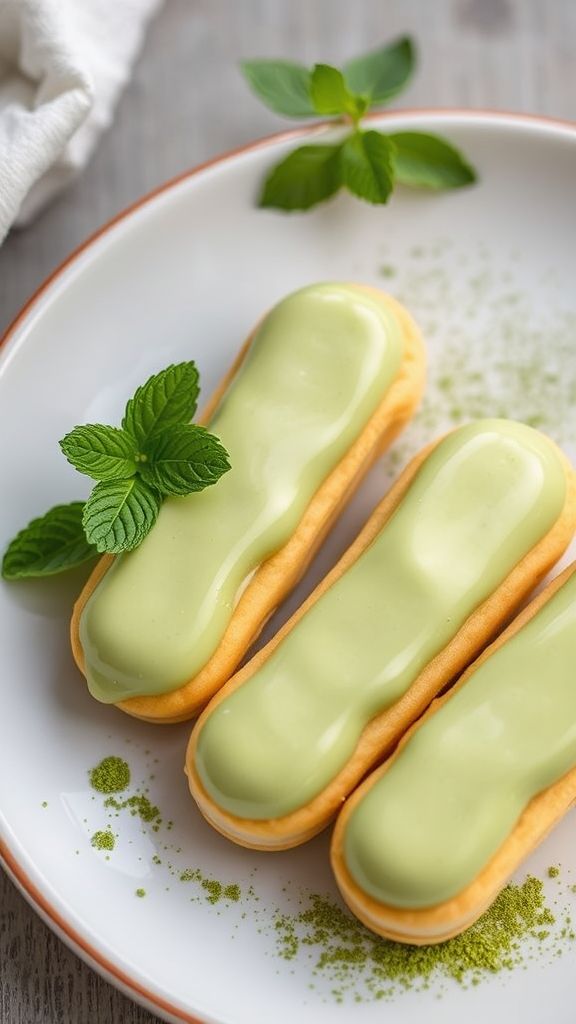
Matcha Green Tea Eclairs are a delightful twist on a classic dessert. The light, airy choux pastry pairs perfectly with the creamy matcha filling, making these eclairs both beautiful and delicious. They’re perfect for impressing friends or family during spring celebrations!
Prep Time: 30 minutes
Cook Time: 30 minutes
Additional Time: 1 hour (for cooling and chilling)
Total Time: 2 hours
Servings: 12 eclairs
Ingredients:
For the Choux Pastry:
- 1 cup water
- 1/2 cup unsalted butter
- 1 cup all-purpose flour
- 4 large eggs
- 1/4 teaspoon salt
For the Matcha Cream Filling:
- 1 cup heavy cream
- 2 tablespoons powdered sugar
- 2 teaspoons matcha green tea powder
For the Matcha Glaze:
- 1 cup powdered sugar
- 1 teaspoon matcha green tea powder
- 2-3 tablespoons water (adjust for desired consistency)
Instructions:
Start by preheating your oven to 400°F (200°C). In a medium saucepan, combine water and butter over medium heat. Stir until the butter is completely melted.
Once the mixture is boiling, remove it from the heat and add the flour and salt all at once. Stir vigorously until a dough forms and pulls away from the sides of the pan. This should take about 1-2 minutes.
Next, let the dough cool slightly for about 5 minutes. Then, add the eggs, one at a time, mixing well after each addition until the batter is smooth and shiny.
Line a baking sheet with parchment paper. Using a piping bag, pipe 3-inch lines of dough onto the baking sheet, leaving space in between for spreading. Bake in the preheated oven for 25-30 minutes until the eclairs are puffed and golden brown. Remove them from the oven and let cool on a wire rack.
While the eclairs cool, prepare the matcha cream filling. In a mixing bowl, beat the heavy cream, powdered sugar, and matcha green tea powder together until soft peaks form. Spoon this mixture into a piping bag.
Once the eclairs have cooled completely, use a small knife to make a slit in each one. Fill them with the matcha cream through the opening you made.
Now, for the glaze, mix the powdered sugar, matcha green tea powder, and enough water to make a smooth, pourable glaze. Dip the tops of each filled eclair into the glaze and place them back on the rack to set.
Tips:
- For extra flavor, add a splash of vanilla extract to the matcha cream.
- Make sure the choux pastry is completely cool before filling to avoid melting the cream.
- Store any leftover eclairs in the refrigerator for up to two days.
Nutrition Facts:
- Calories: 150
- Protein: 2g
- Fat: 9g
- Carbohydrates: 15g
- Fiber: 0g
- Sugar: 5g