My New Cookbook is Out! Check Out Now!
30 Tasty Spring Brunch Recipes
This page contains affiliate links and I earn a commission if you make a purchase through one of the links, at no cost to you.
What if you could transform your weekend mornings into a delightful brunch experience? You deserve to enjoy fresh, seasonal flavors that brighten your table and lift your spirits! With these 30 tasty spring brunch recipes, you’ll impress friends and family, turning every meal into a celebration of spring’s bounty. Let’s get cooking!
Shop Our Must-Haves


1 Lemon Blueberry Pancakes

Start your day off right with these delightful Lemon Blueberry Pancakes! Bursting with flavor and brightened by fresh lemons and juicy blueberries, they’re perfect for a spring brunch. Light, fluffy, and so easy to make, these pancakes are sure to impress your family and friends.
Prep Time: 10 minutes
Cook Time: 15 minutes
Total Time: 25 minutes
Servings: 4
Ingredients:
- 1 cup all-purpose flour
- 2 tablespoons sugar
- 2 teaspoons baking powder
- 1/2 teaspoon baking soda
- 1/4 teaspoon salt
- 1 cup buttermilk
- 1 large egg
- 2 tablespoons melted butter
- 1 tablespoon lemon juice
- 1 tablespoon lemon zest
- 1 cup fresh blueberries
Instructions:
In a large mixing bowl, whisk together the flour, sugar, baking powder, baking soda, and salt. Make sure everything is well combined.
In a separate bowl, mix the buttermilk, egg, melted butter, lemon juice, and lemon zest together. This is where all that flavorful goodness comes from.
Next, pour the wet ingredients into the dry ingredients. Stir gently until just combined. Be careful not to overmix; a few lumps are okay. Now fold in the blueberries.
Heat a non-stick skillet or griddle over medium heat. Once it’s hot, pour about 1/4 cup of batter for each pancake onto the skillet. Cook until bubbles form on the surface and the edges look set, about 2-3 minutes. Flip the pancakes and cook for another 2-3 minutes until golden brown.
Repeat the process until all the batter is used. Serve your pancakes warm, topped with extra blueberries and a drizzle of syrup. Enjoy your delicious breakfast!
Tips:
- Make sure your blueberries are fresh for the best flavor. You can use frozen berries, but thaw and drain them first.
- For a richer flavor, you can add a pinch of cinnamon to the dry ingredients.
- If you want to keep pancakes warm while cooking, place them on a baking sheet in a preheated oven at 200°F.
Nutrition Facts:
- Calories: 250 per serving
- Protein: 6g
- Carbohydrates: 38g
- Fat: 9g
- Fiber: 2g
- Sugar: 5g
2 Asparagus and Goat Cheese Frittata

Asparagus and Goat Cheese Frittata is a delicious and healthy dish perfect for breakfast or brunch. With fresh asparagus and creamy goat cheese, this frittata is full of flavor. It’s easy to make and can be served warm or at room temperature, making it great for gatherings!
Prep Time: 10 minutes
Cook Time: 20 minutes
Total Time: 30 minutes
Servings: 4
Ingredients:
- 6 large eggs
- 1/3 cup milk
- 1 cup asparagus, chopped
- 1/2 cup goat cheese, crumbled
- 1/4 cup onion, diced
- 2 tablespoons olive oil
- Salt and pepper to taste
Instructions:
Start by preheating your oven to 350°F (175°C). In a large skillet, heat 2 tablespoons of olive oil over medium heat. Add the diced onion and sauté for about 2-3 minutes until it becomes translucent.
Next, add the chopped asparagus to the skillet. Stir and cook for another 4-5 minutes until the asparagus is tender but still crisp. Remove the skillet from heat and let the mixture cool slightly.
In a mixing bowl, whisk together the eggs, milk, salt, and pepper until well combined. Sprinkle the cooled asparagus and onion mixture evenly into the skillet, then pour the egg mixture over the top. Finally, add the crumbled goat cheese on top of everything.
Transfer the skillet to the preheated oven and bake for about 15-20 minutes or until the frittata is set and the top is slightly golden. You can check if it’s done by gently shaking the skillet; the center should not jiggle.
Once cooked, remove it from the oven and allow it to cool for a few minutes before slicing. Enjoy your delicious Asparagus and Goat Cheese Frittata warm or at room temperature!
Tips:
- For a little extra flavor, add some fresh herbs like chives or parsley.
- You can customize this frittata by adding other veggies like spinach or bell peppers.
- Serve it alongside a light salad for a complete meal.
Nutrition Facts:
- Calories: 220 per serving
- Protein: 12g
- Fat: 15g
- Carbohydrates: 6g
- Fiber: 2g
- Sodium: 230mg
3 Strawberry Spinach Salad with Poppy Seed Dressing
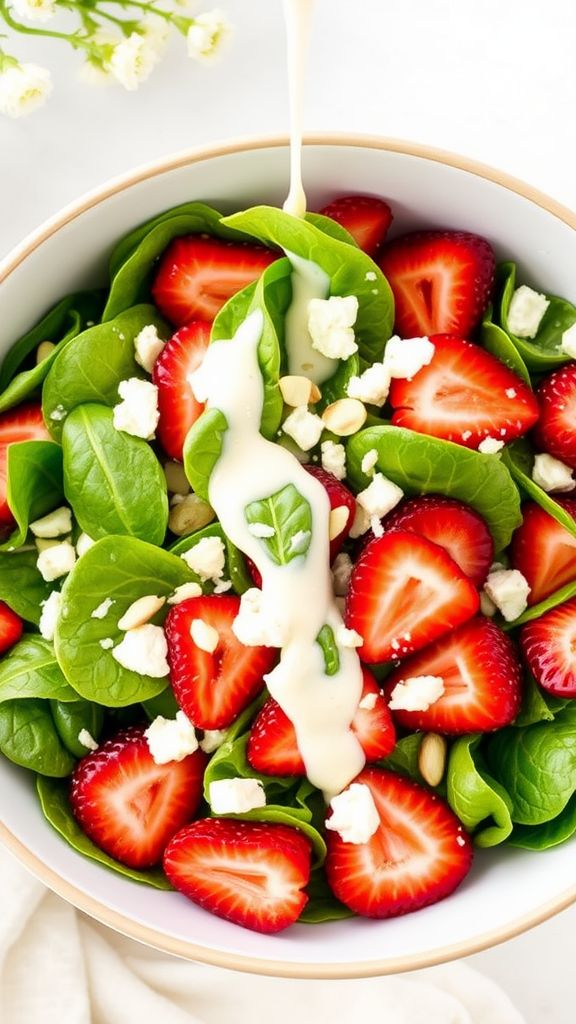
This Strawberry Spinach Salad with Poppy Seed Dressing is a refreshing and colorful dish perfect for any spring gathering. The sweet strawberries paired with fresh spinach create a delightful flavor combination. Plus, the poppy seed dressing adds a creamy, tangy finish that brings it all together!
Prep Time: 10 minutes
Total Time: 10 minutes
Servings: 4
Ingredients:
- 4 cups fresh spinach leaves
- 1 cup strawberries, hulled and sliced
- 1/4 cup sliced almonds (optional)
- 1/4 cup feta cheese, crumbled (optional)
For the Poppy Seed Dressing:
- 1/4 cup plain yogurt
- 2 tablespoons mayonnaise
- 2 tablespoons honey
- 1 tablespoon apple cider vinegar
- 1 teaspoon poppy seeds
- Salt and pepper to taste
Instructions:
Start by washing the spinach leaves thoroughly and patting them dry with a paper towel. Place them in a large salad bowl. Next, add the sliced strawberries on top of the spinach for a burst of color and sweetness.
In a small bowl, whisk together the yogurt, mayonnaise, honey, apple cider vinegar, and poppy seeds until smooth and well combined. Season the dressing with a little salt and pepper to taste.
Pour the dressing over the salad just before serving. Toss it gently to coat the spinach and strawberries evenly. If you’re using them, sprinkle the sliced almonds and feta cheese over the top to add some crunch and creaminess.
Serve immediately and enjoy this deliciously light salad!
Tips:
- For a sweeter dressing, increase the amount of honey to your liking.
- Feel free to add other fruits or nuts, such as blueberries or walnuts, for extra flavor and texture.
- This salad can be made in advance; just keep the dressing separate until ready to serve.
Nutrition Facts:
- Calories: 150 per serving
- Protein: 4g
- Fat: 8g
- Carbohydrates: 18g
- Fiber: 2g
- Sugar: 10g
4 Herb-Infused Quiche with Seasonal Vegetables

This Herb-Infused Quiche with Seasonal Vegetables is a delicious way to enjoy spring’s freshest flavors. Packed with colorful veggies and aromatic herbs, it’s perfect for brunch or a light lunch. Plus, it’s easy to make and looks beautiful on the table!
Prep Time: 15 minutes
Cook Time: 35 minutes
Additional Time: 10 minutes
Total Time: 60 minutes
Servings: 6
Ingredients:
- 1 pre-made pie crust
- 6 large eggs
- 1 cup milk (whole or 2%)
- 1 cup shredded cheese (such as cheddar or Swiss)
- 1 cup chopped seasonal vegetables (like zucchini, bell peppers, or asparagus)
- 2 tablespoons fresh herbs (such as thyme, basil, or parsley)
- Salt and pepper to taste
- 1 tablespoon olive oil
Instructions:
Start by preheating your oven to 375°F (190°C). While it heats, gather all your ingredients and get your pie crust ready in a pie dish. Stretch it out if needed to fit perfectly.
In a large mixing bowl, crack open the eggs. Add the milk and whisk them together until well combined. This will make the base for your quiche. Next, stir in the shredded cheese, chopped vegetables, and fresh herbs. Don’t forget to season with a little salt and pepper for flavor!
Now, carefully pour the egg mixture into the pie crust. Make sure it fills all the way to the edges. Place the quiche in your preheated oven and bake for about 35 minutes. It should puff up and get a nice, golden top.
Once it’s done, take it out of the oven and let it sit for about 10 minutes before cutting. This helps it set up and makes it easier to slice. Serve your delicious quiche warm or at room temperature.
Tips:
- For a flakier crust, let the pie crust chill in the fridge for 15 minutes before filling it.
- Feel free to mix and match vegetables based on what’s in season or what you have on hand!
- If you want to boost flavor, sauté the vegetables in a little olive oil before adding them to the egg mixture.
Nutrition Facts:
- Calories: 250 per serving
- Protein: 12g
- Carbohydrates: 18g
- Fat: 16g
- Fiber: 1g
- Sugar: 2g
5 Avocado Toast with Radish and Microgreens
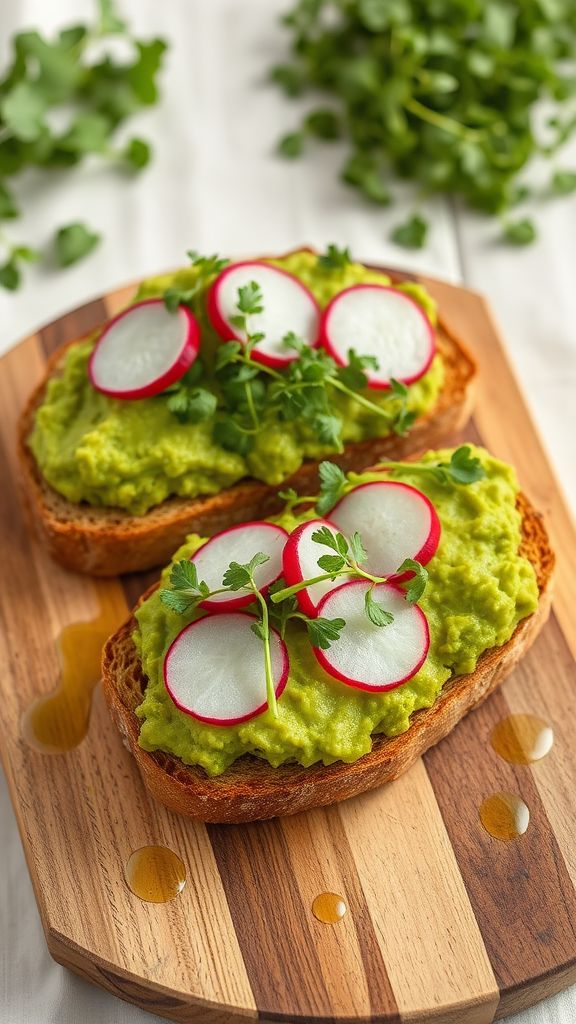
Avocado Toast with Radish and Microgreens is a fresh and delicious treat that you can whip up in just a few minutes. Perfect for a light breakfast or a light lunch, this recipe combines creamy avocado with crunchy radishes and vibrant microgreens for a wholesome meal.
Prep Time: 10 minutes
Total Time: 10 minutes
Servings: 2
Ingredients:
- 2 slices of whole-grain bread
- 1 ripe avocado
- 1 small radish, thinly sliced
- 1 cup of microgreens (such as arugula or pea shoots)
- 1 tablespoon of lemon juice
- Salt and pepper to taste
- Optional: olive oil for drizzling
Instructions:
Start by toasting the whole-grain bread until it is golden brown and crispy. You can use a toaster or toast it in a pan on medium heat.
While the bread is toasting, cut the ripe avocado in half and remove the pit. Scoop the flesh into a bowl. Add lemon juice, a pinch of salt, and pepper. Mash the avocado with a fork until it reaches your desired level of creaminess.
Once the bread is ready, spread the mashed avocado evenly on each slice. Now, layer the thinly sliced radish on top of the avocado for a bit of crunch.
Finally, top the toast with a handful of microgreens. If you like, drizzle a little olive oil over the top for added flavor. Serve immediately and enjoy your delightful avocado toast!
Tips:
- For extra flavor, try adding a sprinkle of red pepper flakes or a drizzle of balsamic glaze on top.
- Choose any type of bread that you love, like sourdough or rye, for different tastes.
- Get creative! Add ingredients like poached eggs or feta cheese for a heartier meal.
Nutrition Facts:
- Calories: 250
- Protein: 7g
- Carbohydrates: 30g
- Dietary Fiber: 10g
- Sugars: 1g
- Fats: 13g
6 Citrus-Glazed Danish Pastries

Citrus-Glazed Danish Pastries are a delightful treat that perfectly combines the flakiness of pastry with a zesty citrus glaze. These pastries are great for brunch and are sure to impress your family and friends with their bright flavors.
Prep Time: 30 minutes
Additional Time: 1 hour
Total Time: 1 hour 30 minutes
Servings: 12
Ingredients:
- 1 package of puff pastry (thawed)
- 1 cup cream cheese (softened)
- 1/4 cup granulated sugar
- 1 teaspoon vanilla extract
- 1 tablespoon lemon juice
- 1 tablespoon orange juice
- 1/2 cup powdered sugar
- 2 tablespoons fresh lemon zest
- 2 tablespoons fresh orange zest
- 1-2 tablespoons milk (for thinning glaze)
- 1 egg (beaten for egg wash)
Instructions:
Start by preheating your oven to 400°F (200°C). Unroll the thawed puff pastry on a lightly floured surface. Cut it into squares, about 4×4 inches each.
In a bowl, mix the cream cheese, granulated sugar, vanilla extract, lemon juice, and orange juice until smooth. Place a tablespoon of the cream cheese mixture in the center of each pastry square.
Fold the corners of the pastry over the filling, pinching them together to create a pocket. Place each pastry on a baking sheet lined with parchment paper. Brush the tops with the beaten egg to give them a nice golden color when baked.
Bake the pastries in the oven for 15-20 minutes or until they are puffed and golden brown. While the pastries are baking, prepare the citrus glaze. In a small bowl, mix the powdered sugar, lemon zest, orange zest, and enough milk to reach a drizzly consistency.
Once the pastries are done, let them cool for a few minutes. Drizzle the citrus glaze over the warm pastries. Serve and enjoy the fresh flavors!
Tips:
- For an extra citrus punch, add a bit more zest to the glaze.
- Try different combinations of citrus like lime or grapefruit for unique flavors.
- Make sure your cream cheese is at room temperature to mix smoothly.
Nutrition Facts:
- Calories: 250 per pastry
- Total Fat: 15g
- Saturated Fat: 7g
- Cholesterol: 40mg
- Sodium: 150mg
- Carbohydrates: 25g
- Fiber: 1g
- Sugar: 8g
- Protein: 3g
7 Sweet Potato and Kale Hash
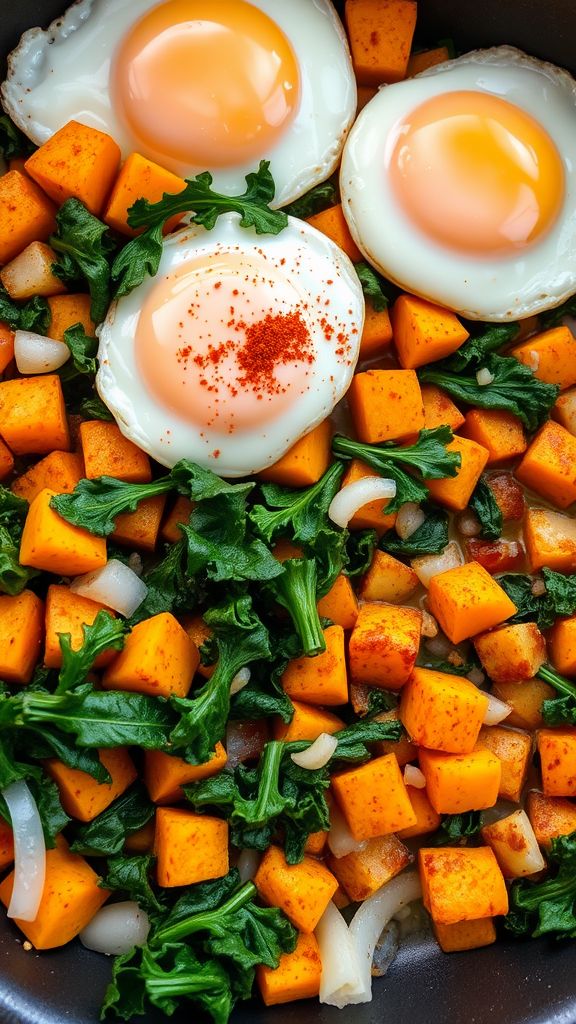
Sweet Potato and Kale Hash is a delicious and nutritious dish perfect for breakfast or brunch. The combination of sweet potatoes and kale creates a colorful and tasty medley that everyone will love. It’s easy to make and packed with flavor, making it a fantastic way to start your day!
Prep Time: 10 minutes
Cook Time: 20 minutes
Total Time: 30 minutes
Servings: 4
Ingredients:
- 2 medium sweet potatoes, peeled and diced
- 1 tablespoon olive oil
- 1 small onion, chopped
- 2 cloves garlic, minced
- 4 cups kale, chopped
- 1 teaspoon smoked paprika
- Salt and pepper, to taste
- Optional: Fried eggs for serving
Instructions:
Start by heating the olive oil in a large skillet over medium heat. Once the oil is hot, add the diced sweet potatoes. Cook for about 10 minutes, stirring occasionally, until the potatoes begin to soften.
Next, add the chopped onion to the skillet. Cook for an additional 5 minutes until the onion becomes translucent. Then, stir in the minced garlic and cook for another minute until it’s fragrant.
Now it’s time to add the chopped kale to the skillet. Stir everything together and cook until the kale wilts, about 3-4 minutes. Sprinkle in the smoked paprika, along with salt and pepper to taste.
Once everything is cooked through, remove from heat. If you like, serve the hash with a fried egg on top for added protein and flavor. Enjoy your Sweet Potato and Kale Hash warm!
Tips:
- For extra flavor, try adding some diced bell peppers or mushrooms to the hash.
- You can switch up the greens by using spinach or Swiss chard if you prefer.
- If you want a bit of spice, add a pinch of red pepper flakes while cooking.
Nutrition Facts:
- Calories: 220
- Protein: 4g
- Carbohydrates: 40g
- Fat: 8g
- Fiber: 6g
- Sugar: 6g
8 Coconut Chia Seed Pudding with Fresh Fruit
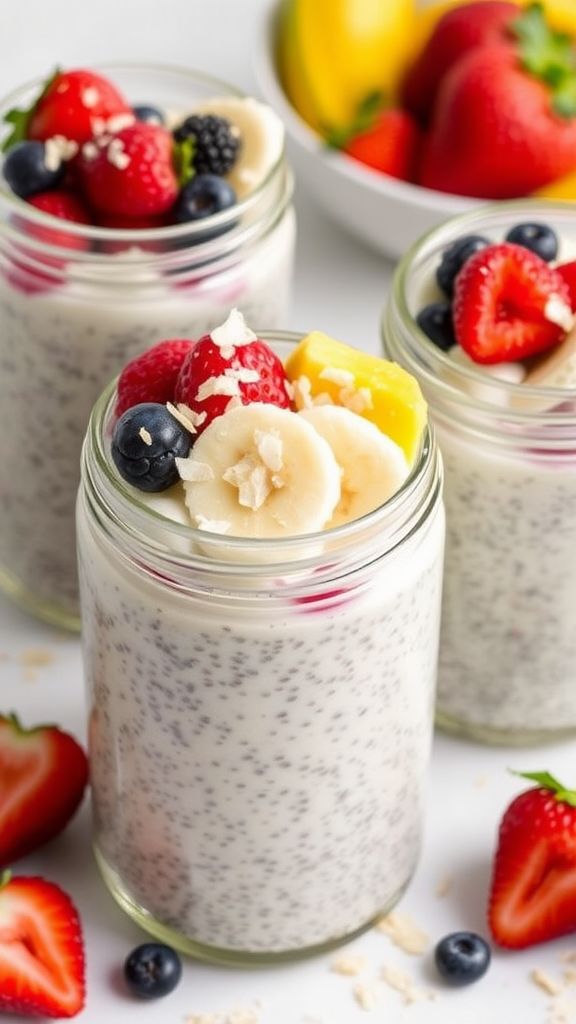
Coconut Chia Seed Pudding with Fresh Fruit is a delicious and healthy treat. It’s super easy to make and perfect for breakfast or dessert. Top it with your favorite fresh fruits for added flavor and nutrition!
Prep Time: 10 minutes
Additional Time: 4 hours (or overnight)
Total Time: 4 hours 10 minutes
Servings: 4
Ingredients:
- 1 cup coconut milk (or any milk of your choice)
- 1/4 cup chia seeds
- 2 tablespoons honey or maple syrup (adjust to taste)
- 1 teaspoon vanilla extract
- Fresh fruit (such as berries, mango, or banana) for topping
- Toasted coconut flakes (optional, for garnish)
Instructions:
Start by mixing the coconut milk, chia seeds, honey, and vanilla extract in a bowl. Whisk them together until everything is well combined.
Next, let the mixture sit for about 5 minutes. This allows the chia seeds to absorb some liquid and thicken up.
After 5 minutes, give the mixture another good stir. Cover the bowl and place it in the refrigerator for at least 4 hours or overnight.
Once the pudding has thickened, scoop it into serving bowls or jars. Add your favorite fresh fruits on top. You can use berries, mango, or any other fruit you love.
If you want, sprinkle some toasted coconut flakes on top for extra flavor and crunch. Enjoy your Coconut Chia Seed Pudding!
Tips:
- Experiment with different types of milk like almond, oat, or soy for variety.
- For a sweeter pudding, add more honey or maple syrup as needed.
- Mix in some nuts or seeds for added texture and nutrition.
Nutrition Facts:
- Calories: 150 per serving
- Protein: 4g
- Carbohydrates: 15g
- Dietary Fiber: 7g
- Sugar: 5g (depends on added sweeteners)
- Fat: 8g
9 Mini Eggs Benedict with Smoked Salmon

These Mini Eggs Benedict with Smoked Salmon are perfect for a delightful spring brunch! They combine fluffy English muffins, delicious smoked salmon, and rich poached eggs topped with creamy hollandaise sauce. Your guests will love these bite-sized treats, making them a hit for any gathering.
Prep Time: 15 minutes
Cook Time: 10 minutes
Additional Time: 5 minutes
Total Time: 30 minutes
Servings: 4
Ingredients:
- 2 English muffins, split and toasted
- 4 large eggs
- 4 oz smoked salmon, cut into small pieces
- ½ cup hollandaise sauce (store-bought or homemade)
- Fresh dill, for garnish
- Salt and pepper, to taste
- Water, for poaching eggs
- 1 tablespoon white vinegar
Instructions:
Begin by boiling water in a medium-sized pot. Add 1 tablespoon of white vinegar to help the eggs stay together while poaching. Once the water reaches a gentle simmer, crack one egg into a small bowl. Slowly lower the egg into the water and cook for about 3-4 minutes until the white is set, but the yolk remains runny. Remove the egg with a slotted spoon and let it drain on a paper towel. Repeat with the remaining eggs.
While the eggs are poaching, prepare your toasted English muffins. Place each half on a serving platter or plate. Next, layer pieces of smoked salmon on top of each muffin half. The rich flavor of the salmon adds a nice touch to the dish.
Once all your eggs are poached, it’s time to assemble. Place one poached egg on top of each piece of smoked salmon. Drizzle with hollandaise sauce generously. If you’d like, you can add a pinch of salt and pepper to taste.
Finally, garnish each mini eggs Benedict with a sprig of fresh dill. This not only adds flavor but also makes them look beautiful and colorful!
Tips:
- If you’re short on time, use store-bought hollandaise sauce to save effort.
- Garnish with chopped green onions for an extra flavor boost and crunch.
- Make sure to poach the eggs right before serving for the best texture.
Nutrition Facts:
- Calories: 350
- Protein: 20g
- Carbohydrates: 30g
- Fat: 18g
- Sodium: 600mg
- Cholesterol: 175mg
10 Honey and Walnut Ricotta Toast
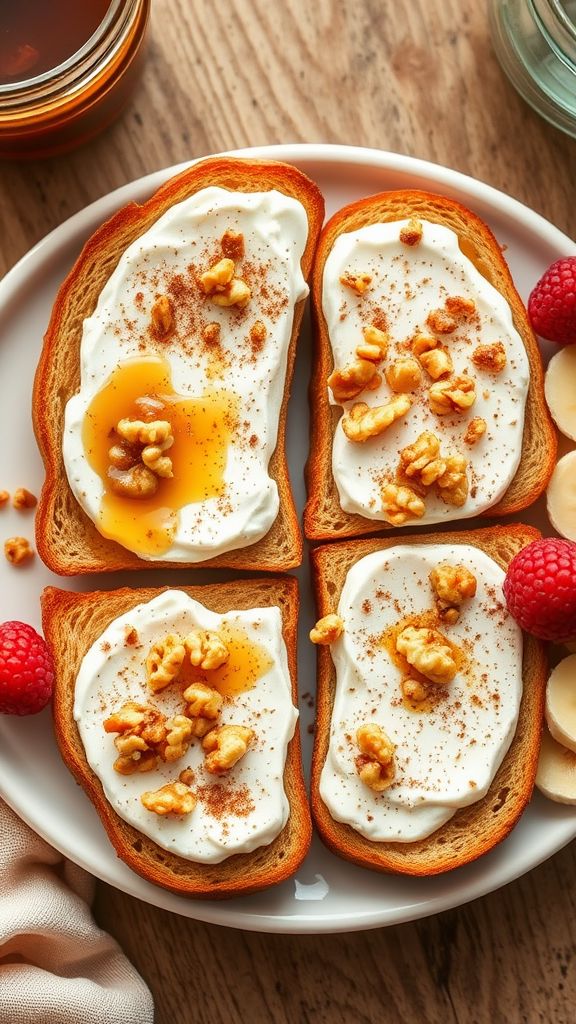
This Honey and Walnut Ricotta Toast is a delicious and healthy option for breakfast or a spring brunch. It combines creamy ricotta cheese, crunchy walnuts, and sweet honey on crispy toast—perfect for sharing with friends or enjoying on your own. Quick to prepare and absolutely delightful, this recipe is sure to impress!
Prep Time: 10 minutes
Total Time: 10 minutes
Servings: 2
Ingredients:
- 4 slices of whole-grain bread
- 1 cup ricotta cheese
- 2 tablespoons honey
- 1/4 cup walnuts, chopped
- 1/2 teaspoon cinnamon (optional)
- Fresh fruit (such as berries or sliced bananas) for topping (optional)
Instructions:
Start by toasting the whole-grain bread in a toaster or under the broiler until it’s golden and crispy. This will give your toast a great texture.
Next, in a small bowl, combine the ricotta cheese with 1 tablespoon of honey. Stir well to mix the flavors. If you like, add 1/2 teaspoon of cinnamon for a warm touch.
Once the toast is ready, spread a generous amount of the ricotta mixture over each slice. Make sure to cover it evenly for the best taste.
Now, sprinkle the chopped walnuts on top of the ricotta. This adds a wonderful crunch and nutty flavor. Drizzle the remaining 1 tablespoon of honey over the toast for a sweet finish.
For an extra touch, add some fresh fruit on top, if desired. Berries or sliced bananas work wonderfully!
Tips:
- Experiment with different types of bread, such as sourdough or gluten-free options, for a unique flavor.
- Try adding a pinch of sea salt on top before serving for enhanced sweetness.
- If you prefer a warmer toast, consider warming the ricotta mixture slightly in the microwave before spreading it on the toast.
Nutrition Facts:
- Calories: 300 per serving
- Protein: 15g
- Carbohydrates: 38g
- Fat: 12g
- Fiber: 5g
- Sugar: 10g
Enjoy your Honey and Walnut Ricotta Toast as a tasty, wholesome treat!
11 Spring Vegetable Risotto

Spring Vegetable Risotto is a creamy and delicious dish that’s perfect for showcasing fresh, springtime veggies. It’s comforting, yet light, making it an excellent choice for brunch or a cozy dinner. Let’s dive into this simple and delightful recipe!
Prep Time: 10 minutes
Cook Time: 30 minutes
Total Time: 40 minutes
Servings: 4
Ingredients:
- 1 cup Arborio rice
- 4 cups vegetable broth
- 1 cup fresh asparagus, chopped
- 1 cup peas (fresh or frozen)
- 1 cup zucchini, diced
- 1 small onion, finely chopped
- 2 cloves garlic, minced
- 1/2 cup dry white wine (optional)
- 1/2 cup grated Parmesan cheese
- 2 tablespoons olive oil
- Salt and pepper, to taste
- Fresh basil, for garnish (optional)
Instructions:
In a medium saucepan, heat the vegetable broth over low heat to keep it warm. In a large pan, heat the olive oil over medium heat. Add the onion and sauté for about 3-4 minutes until it becomes translucent. Then, stir in the garlic and cook for another 1 minute.
Next, add the Arborio rice to the pan and stir it well for about 2 minutes. This will help coat the rice with olive oil and will add a nice nutty flavor. If you’re using it, pour in the white wine and stir until it is mostly absorbed.
Once the wine is absorbed, start adding the warm vegetable broth, one ladle at a time. Stir constantly until the liquid has almost completely absorbed before adding the next ladle. This process should take about 20 minutes.
After about 15 minutes, add the asparagus, peas, and zucchini to the rice. Keep stirring and adding broth until the rice is creamy and al dente.
Once the rice is cooked, remove the pan from the heat. Stir in the Parmesan cheese, and season with salt and pepper to taste. Let it rest for about 2-3 minutes before serving.
For a beautiful finishing touch, garnish with fresh basil. Enjoy your Spring Vegetable Risotto warm!
Tips:
- For extra creaminess, substitute half of the vegetable broth with cream.
- You can use any seasonal vegetables you prefer, like carrots or bell peppers.
- Make sure to stir the risotto often to keep it from sticking to the bottom of the pan.
Nutrition Facts:
- Calories: 350 per serving
- Protein: 12g
- Fat: 10g
- Carbohydrates: 55g
- Fiber: 4g
- Sugar: 2g
12 Jasmine Lime Iced Tea

Refreshing and vibrant, Jasmine Lime Iced Tea is a delightful drink perfect for warm days. The floral notes of jasmine tea combined with the zesty lime create a beautiful balance. Enjoy this tasty iced tea at your spring brunch or any sunny afternoon!
Prep Time: 15 minutes
Additional Time: 1 hour
Total Time: 1 hour 15 minutes
Servings: 4
Ingredients:
- 4 cups water
- 4 jasmine tea bags
- 1/4 cup honey (or to taste)
- Juice of 2 limes
- Lime slices (for garnish)
- Fresh mint leaves (optional, for garnish)
Instructions:
Start by boiling 4 cups of water in a pot. Once it reaches a rolling boil, remove it from the heat. Place the jasmine tea bags in the hot water and let them steep for about 5 minutes.
After steeping, remove the tea bags and stir in the honey. Make sure to mix well until the honey dissolves completely. Next, allow the tea to cool down to room temperature.
Once cooled, add the juice of 2 limes to the tea and stir again. You can taste it and add more honey or lime juice if you prefer it sweeter or more tart.
Transfer the tea to a pitcher and refrigerate for at least 1 hour to chill it thoroughly. When ready to serve, pour the iced tea over ice in glasses. Garnish with lime slices and fresh mint leaves if desired. Enjoy your refreshing Jasmine Lime Iced Tea!
Tips:
- For a stronger flavor, let the tea bags steep for an extra minute or two.
- You can replace honey with agave nectar for a vegan alternative.
- Feel free to add other fruits, like strawberries or blueberries, for an added twist!
Nutrition Facts:
- Calories: 60 per serving
- Carbohydrates: 16g
- Sugars: 15g
- Vitamin C: 15% of the Daily Value
- Caffeine: 30mg (depends on the tea used)
13 Raspberry Almond Croissant Bake

This Raspberry Almond Croissant Bake is a delightful way to start your day! Bursting with fresh raspberries and a hint of almond, this dish is perfect for a spring brunch or a cozy weekend breakfast. It’s easy to prepare and sure to impress your guests.
Prep Time: 15 minutes
Cook Time: 30 minutes
Additional Time: 30 minutes (to soak)
Total Time: 1 hour 15 minutes
Servings: 8
Ingredients:
- 4 large croissants, torn into pieces
- 1 cup of fresh raspberries
- 1 cup of milk
- 4 large eggs
- ½ cup of sugar
- 1 teaspoon of vanilla extract
- ½ teaspoon of almond extract
- ½ cup of sliced almonds
- Powdered sugar, for dusting (optional)
Instructions:
Start by preheating your oven to 350°F (175°C). Grease a 9×13 inch baking dish with cooking spray or butter.
In a bowl, place the torn croissant pieces and scatter the fresh raspberries evenly on top. This will create a lovely base for your bake.
Next, in another bowl, whisk together the milk, eggs, sugar, vanilla extract, and almond extract until smooth. Pour this mixture evenly over the croissant and raspberry layers. Make sure it gets into all the croissant pieces.
Sprinkle the sliced almonds on top for added crunch. Cover your baking dish with plastic wrap and let it sit for 30 minutes. This allows the croissants to soak up all the delicious flavors.
After soaking, remove the wrap and place the dish in the preheated oven. Bake for 30 minutes, or until the top is golden and set.
Once it’s done, let it cool for a few minutes before dusting it lightly with powdered sugar if you like. Serve warm and enjoy!
Tips:
- You can use frozen raspberries if fresh ones aren’t available, just make sure to thaw them first.
- Add a drizzle of maple syrup or a dollop of whipped cream on top for extra sweetness.
- For a different flavor, try substituting the almond extract with hazelnut extract.
Nutrition Facts:
- Calories: 350 per serving
- Protein: 10g
- Carbohydrates: 45g
- Fat: 15g
- Saturated Fat: 4g
- Sugars: 20g
- Fiber: 2g
14 Grilled Peach and Burrata Salad
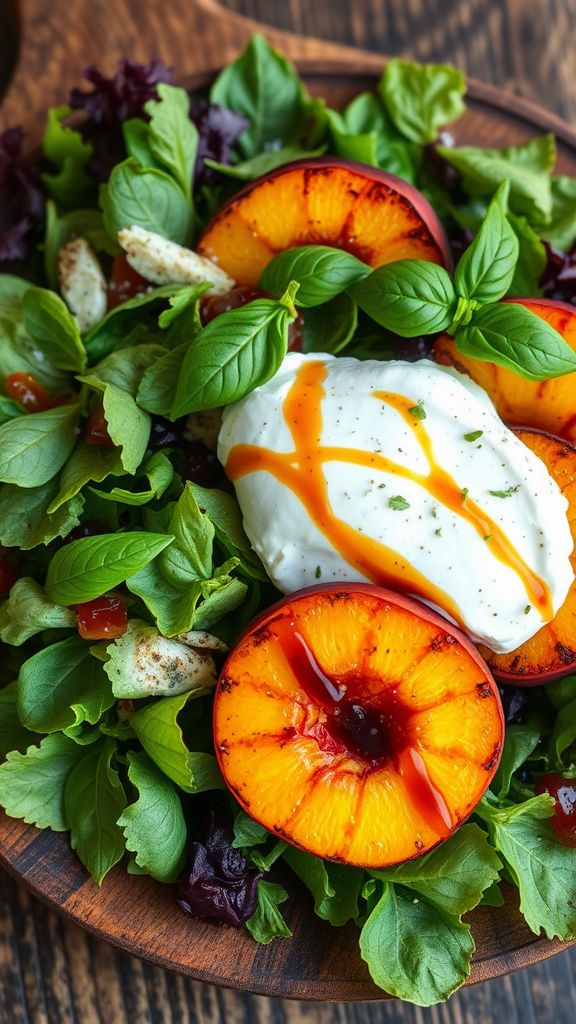
Grilled Peach and Burrata Salad is a refreshing and delicious dish perfect for sunny days. The sweet peaches pair beautifully with creamy burrata and fresh greens, making it an ideal choice for brunch or a light lunch. Let’s dive into this delightful recipe!
Prep Time: 10 minutes
Cook Time: 5 minutes
Total Time: 15 minutes
Servings: 4
Ingredients:
- 2 ripe peaches, halved and pitted
- 8 ounces burrata cheese
- 4 cups mixed salad greens (like arugula or spinach)
- 3 tablespoons olive oil
- 1 tablespoon balsamic glaze
- Salt and pepper, to taste
- Optional: fresh basil leaves for garnish
Instructions:
Start by preheating your grill or grill pan over medium-high heat. While it’s heating, wash and dry the salad greens and place them in a large bowl.
Next, take the halved peaches and brush them lightly with olive oil. Once the grill is hot, place the peaches cut-side down on the grill. Grill for about 3 to 5 minutes or until you see nice grill marks and the peaches are slightly softened.
After grilling, remove the peaches from the grill. In your bowl of greens, drizzle in the remaining olive oil, and season with salt and pepper to taste. Toss gently to coat the greens.
Now it’s time to assemble your salad! Place the dressed greens on a serving plate. Next, add the grilled peach halves, and lastly, tear the burrata cheese and place chunks throughout the salad. Drizzle some balsamic glaze on top for extra flavor and finish it off with fresh basil leaves if using.
Serve immediately and enjoy the bright flavors of your Grilled Peach and Burrata Salad!
Tips:
- For the best flavor, look for ripe peaches that yield slightly to pressure.
- You can substitute burrata with fresh mozzarella if needed.
- Feel free to add nuts like walnuts or almonds for extra crunch.
Nutrition Facts:
- Calories: 240
- Protein: 10g
- Carbohydrates: 18g
- Fat: 16g
- Fiber: 3g
- Sugar: 6g
15 Minted Watermelon and Feta Salad
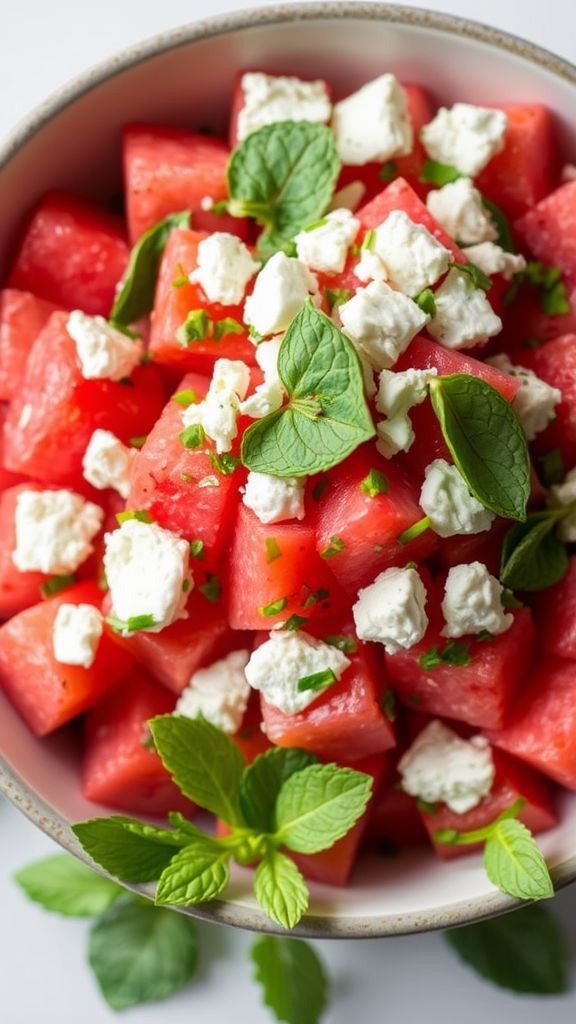
This Minted Watermelon and Feta Salad is a refreshing and colorful dish perfect for any spring brunch. The sweet watermelon pairs beautifully with the salty feta, while the fresh mint adds a bright flavor. This salad is easy to make and sure to impress your guests!
Prep Time: 10 minutes
Total Time: 10 minutes
Servings: 4
Ingredients:
- 4 cups of diced watermelon
- 1 cup of crumbled feta cheese
- 1/4 cup of fresh mint leaves, chopped
- 2 tablespoons of olive oil
- 1 tablespoon of balsamic vinegar
- Salt and pepper to taste
Instructions:
Start by cutting the watermelon into small cubes. You want about 4 cups of diced watermelon, so adjust the amount accordingly. Place the diced watermelon in a large mixing bowl.
Next, add the crumbled feta cheese to the bowl with the watermelon. Make sure the feta is spread evenly throughout the salad for the best flavor.
Chop the fresh mint leaves into small pieces and sprinkle them over the watermelon and feta. The mint will add a fresh taste that complements the sweetness of the watermelon.
In a small bowl, mix together the olive oil and balsamic vinegar. Drizzle this dressing over the salad, and then gently toss everything together. You want to mix it well, but be careful not to squish the watermelon too much.
Finally, season the salad with a pinch of salt and pepper to taste. Serve the salad immediately for the best flavor, or chill it for about 15 minutes if you prefer it cold.
Tips:
- For extra crunch, add some cucumber to the salad.
- If you want a bit of zing, include a splash of lime juice in the dressing.
- This salad is best when served fresh, but you can store any leftovers in the fridge for up to 1 day.
Nutrition Facts:
- Calories: 150
- Protein: 5g
- Fat: 10g
- Carbohydrates: 15g
- Fiber: 1g
- Sugar: 10g
16 Spinach and Artichoke Dip with Crostini

Spinach and Artichoke Dip with Crostini is a delicious and creamy appetizer that is perfect for any gathering. It’s packed with flavors and pairs wonderfully with crispy crostini. This dish is sure to be a hit at your next brunch!
Prep Time: 15 minutes
Cook Time: 25 minutes
Total Time: 40 minutes
Servings: 8
Ingredients:
- 1 cup fresh spinach, chopped
- 1 can (14 oz) artichoke hearts, drained and chopped
- 1 cup cream cheese, softened
- 1 cup sour cream
- 1 cup shredded mozzarella cheese
- 1/2 cup grated Parmesan cheese
- 2 cloves garlic, minced
- 1 teaspoon lemon juice
- Salt and pepper, to taste
- 1 baguette, sliced into 1/2-inch pieces
- Olive oil, for brushing
Instructions:
Preheat your oven to 350°F (175°C). In a mixing bowl, combine the cream cheese, sour cream, and mozzarella cheese. Mix until everything is well blended.
Next, add the chopped spinach, artichoke hearts, garlic, lemon juice, Parmesan cheese, and a pinch of salt and pepper. Stir everything together until it’s evenly mixed.
Transfer the mixture to a baking dish. Spread it out evenly and bake in the oven for 25 minutes, or until it’s bubbly and golden on top.
While the dip is baking, prepare the crostini. Place the slices of baguette on a baking sheet. Brush each piece with a little olive oil. Bake for about 10 minutes in the same oven, or until they are crispy and lightly golden.
Once everything is done, remove the dip from the oven and let it cool for a minute. Serve the warm dip with the crispy crostini for dipping. Enjoy!
Tips:
- For extra flavor, you can add red pepper flakes for a bit of spice.
- Feel free to use frozen spinach instead of fresh, just make sure it’s fully thawed and drained.
- Make it ahead of time! You can prepare the dip and keep it in the fridge until you’re ready to bake.
Nutrition Facts:
- Calories: 300 per serving
- Total Fat: 20g
- Saturated Fat: 10g
- Cholesterol: 40mg
- Sodium: 550mg
- Total Carbohydrates: 18g
- Dietary Fiber: 2g
- Sugars: 1g
- Protein: 10g
17 Scone Trio: Berry, Lemon, and Cheese

Enjoy a delightful trio of scones that will brighten your spring brunch! These Berry, Lemon, and Cheese scones are bursting with flavor and are easy to make. You can serve them warm or at room temperature, making them perfect for any gathering.
Prep Time: 20 minutes
Cook Time: 15 minutes
Total Time: 35 minutes
Servings: 12 scones
Ingredients:
-
For Berry Scones:
- 2 cups all-purpose flour
- 1/2 cup sugar
- 1 tablespoon baking powder
- 1/2 teaspoon salt
- 1/2 cup cold butter, cubed
- 1 cup mixed berries (fresh or frozen)
- 1/2 cup heavy cream
- 1 teaspoon vanilla extract
-
For Lemon Scones:
- 2 cups all-purpose flour
- 1/2 cup sugar
- 1 tablespoon baking powder
- 1/2 teaspoon salt
- 1/2 cup cold butter, cubed
- Zest of 1 lemon
- 1/2 cup heavy cream
- 1 teaspoon lemon extract
-
For Cheese Scones:
- 2 cups all-purpose flour
- 1 tablespoon baking powder
- 1/2 teaspoon salt
- 1/2 cup cold butter, cubed
- 1 cup shredded cheese (like cheddar or gouda)
- 1/2 cup heavy cream
Instructions:
Start by heating your oven to 400°F (200°C) and lining a baking sheet with parchment paper.
For the Berry Scones, mix flour, sugar, baking powder, and salt in a bowl. Add the cubed butter and mix until it resembles coarse crumbs. Gently fold in the berries, heavy cream, and vanilla extract until just combined.
For the Lemon Scones, in another bowl, combine flour, sugar, baking powder, and salt. Mix in the cold butter until crumbly. Add the lemon zest, heavy cream, and lemon extract. Stir until everything is combined, but don’t overmix.
For the Cheese Scones, mix the flour, baking powder, and salt in a bowl. Add the cubed butter and mix until crumbly. Stir in the shredded cheese and then add the heavy cream until just combined.
Once you have all three mixtures ready, use a floured surface to shape them into rounds about 1 inch thick. Place the scones on the prepared baking sheet, leaving space between them.
Bake for 15 minutes or until they are lightly golden on top. Let them cool slightly before serving.
Tips:
- Be careful not to overwork the dough to keep the scones light and fluffy.
- You can brush the tops with a little heavy cream before baking for a golden crust.
- Store leftover scones in an airtight container at room temperature for up to 2 days.
Nutrition Facts:
- Calories: 250 per scone
- Protein: 4g
- Carbohydrates: 34g
- Fat: 12g
- Fiber: 1g
- Sugar: 6g
18 Open-Faced Caprese Sandwiches
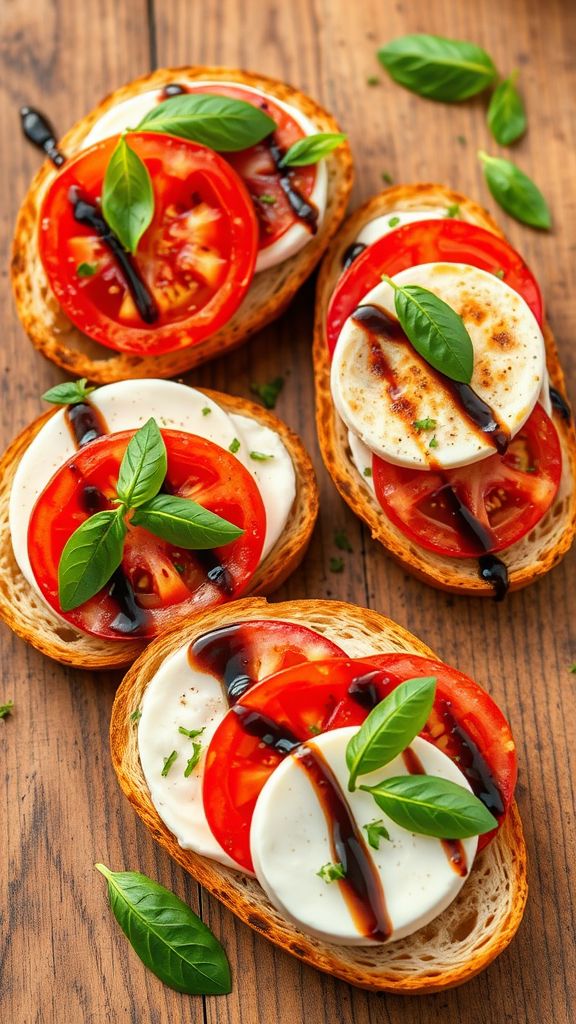
Enjoy the fresh flavors of summer with these delightful Open-Faced Caprese Sandwiches. This classic Italian dish is simple to make and bursting with the tastes of tomatoes, basil, and mozzarella. Perfect for a quick lunch or a light brunch!
Prep Time: 10 minutes
Total Time: 10 minutes
Servings: 4
Ingredients:
- 4 slices of crusty bread (like ciabatta or baguette)
- 2 medium tomatoes, sliced
- 8 ounces fresh mozzarella cheese, sliced
- 1/4 cup fresh basil leaves
- 2 tablespoons balsamic glaze
- 1 tablespoon olive oil
- Salt and pepper, to taste
Instructions:
Start by toasting the slices of crusty bread in a toaster or on a grill until they are golden brown. This will give your sandwiches a nice crunch.
Once toasted, place the slices of bread on a serving platter. Lay out the slices of tomato neatly on top of each piece of bread.
Next, add a slice of fresh mozzarella cheese on top of the tomatoes. The cheese will melt just a bit from the warmth of the toast.
Sprinkle some fresh basil leaves over the mozzarella for that burst of flavor. Then, drizzle the whole thing with olive oil and balsamic glaze.
Finally, season with a pinch of salt and pepper to taste. Serve immediately for the best flavor and freshness!
Tips:
- Use heirloom tomatoes for an extra flavor boost and vibrant color.
- Try adding a slice of avocado for a creamy texture.
- For a bit of heat, add some red pepper flakes on top before serving.
Nutrition Facts:
- Calories: 200 per serving
- Total Fat: 10g
- Saturated Fat: 4g
- Cholesterol: 20mg
- Sodium: 150mg
- Total Carbohydrates: 22g
- Dietary Fiber: 2g
- Sugars: 3g
- Protein: 8g
19 Zucchini Noodle Salad with Lemon Vinaigrette

Zucchini Noodle Salad with Lemon Vinaigrette is a fresh and healthy dish perfect for spring gatherings. This light salad combines crunchy zucchini noodles with a zesty lemon dressing that will brighten your meal. It’s so simple to make and tastes amazing!
Prep Time: 15 minutes
Total Time: 15 minutes
Servings: 4
Ingredients:
- 4 medium zucchinis
- 1 cup cherry tomatoes, halved
- 1/2 cup red onion, thinly sliced
- 1/2 cup bell pepper, diced
- 1/4 cup fresh parsley, chopped
- Salt and pepper to taste
For the Lemon Vinaigrette:
- 1/4 cup olive oil
- 2 tablespoons fresh lemon juice
- 1 teaspoon Dijon mustard
- 1 teaspoon honey
- 1 clove garlic, minced
Instructions:
Start by spiralizing the zucchinis to create noodle-like strands. If you don’t have a spiralizer, you can use a vegetable peeler to make thin strips.
In a large bowl, combine the zucchini noodles, cherry tomatoes, red onion, bell pepper, and fresh parsley. Toss them together gently to mix the ingredients.
Now, let’s make the lemon vinaigrette. In a small bowl, whisk together the olive oil, fresh lemon juice, Dijon mustard, honey, and minced garlic. Continue whisking until the mixture is smooth and combined.
Pour the vinaigrette over the salad mixture. Toss everything together until the zucchini and veggies are well coated with the dressing. Season with salt and pepper to taste.
Serve the salad immediately, or refrigerate it for a bit to let the flavors meld together. Enjoy the refreshing flavors of this zucchini noodle salad!
Tips:
- Feel free to add other vegetables like carrots or cucumbers for extra crunch.
- For a protein boost, consider adding grilled chicken or chickpeas.
- This salad can be made ahead of time; just wait to add the vinaigrette until right before serving.
Nutrition Facts:
- Serving size: 1 cup
- Calories: 120
- Total fat: 9g
- Saturated fat: 1g
- Sodium: 150mg
- Total carbohydrates: 10g
- Dietary fiber: 3g
- Sugars: 4g
- Protein: 2g
20 Cinnamon Roll Casserole with Cream Cheese Frosting

This delicious Cinnamon Roll Casserole with Cream Cheese Frosting is perfect for a cozy brunch or a sweet breakfast treat! It combines all the flavors of classic cinnamon rolls in a warm, fluffy casserole. Topped with creamy frosting, it’s sure to be a hit with family and friends.
Prep Time: 15 minutes
Cook Time: 30 minutes
Additional Time: 10 minutes (for cooling)
Total Time: 55 minutes
Servings: 8
Ingredients:
- 2 cans of refrigerated cinnamon roll dough (with icing)
- 4 large eggs
- 1 cup of milk
- 1 teaspoon of vanilla extract
- 1/2 teaspoon of ground cinnamon
- 1/4 cup of brown sugar
- 1/4 cup of chopped pecans (optional)
Instructions:
Start by preheating your oven to 350°F (175°C). Grease a 9×13-inch baking dish with cooking spray or butter to prevent sticking.
Open the cans of cinnamon roll dough and cut each roll into quarters. Place these pieces in the prepared baking dish, spreading them out evenly.
In a separate bowl, whisk together the eggs, milk, vanilla extract, ground cinnamon, and brown sugar until well combined. Pour this mixture evenly over the cinnamon roll pieces in the baking dish.
If you like, sprinkle the chopped pecans over the top for extra flavor and crunch. Gently press the cinnamon roll pieces into the egg mixture to help them soak up the custard.
Bake in the preheated oven for 25-30 minutes or until the casserole is puffed and golden brown. Once done, remove it from the oven and let it cool for about 10 minutes.
Finally, drizzle the included icing from the cinnamon roll cans over the top of the casserole. Serve warm and enjoy your sweet treat!
Tips:
- Feel free to add your favorite mix-ins like chocolate chips or diced apples for a fun twist.
- You can make this casserole the night before! Just assemble it and cover it tightly in the fridge. Bake it in the morning.
- Try serving with fresh fruit or a dusting of powdered sugar for extra sweetness.
Nutrition Facts:
- Calories: 350 per serving
- Total Fat: 18g
- Saturated Fat: 6g
- Cholesterol: 120mg
- Sodium: 450mg
- Total Carbohydrates: 43g
- Dietary Fiber: 1g
- Sugars: 15g
- Protein: 6g
21 Tomato Basil Bruschetta

Tomato Basil Bruschetta is a fresh and tasty appetizer that’s perfect for any spring gathering. This dish brings together ripe tomatoes, fragrant basil, and crispy bread for a delightful flavor combination. Serve it at your next brunch, and watch your guests come back for more!
Prep Time: 15 minutes
Total Time: 15 minutes
Servings: 4-6
Ingredients:
- 4 medium ripe tomatoes, diced
- 1/4 cup fresh basil leaves, chopped
- 2 cloves garlic, minced
- 1/4 cup extra virgin olive oil
- 1 tablespoon balsamic vinegar
- Salt and pepper to taste
- 1 French baguette or Italian bread, sliced
Instructions:
Start by preparing the tomato mixture. In a medium-sized bowl, combine the diced tomatoes, chopped basil, and minced garlic. Mix everything gently using a spoon.
Next, add the extra virgin olive oil and balsamic vinegar to the bowl. Season the mixture with salt and pepper to taste. Stir everything together until the tomatoes are well-coated with the oil and vinegar.
Now, let’s prepare the bread. Preheat your oven to 400°F (200°C). Arrange the sliced bread on a baking sheet. Brush each slice lightly with some olive oil if you like. Bake in the oven for about 5-7 minutes, or until the bread is lightly toasted and golden.
Once the bread is ready, remove it from the oven. Scoop a generous amount of the tomato mixture onto each slice of toasted bread. Serve immediately while the bread is warm.
Tips:
- To add extra flavor, you can also sprinkle some ** grated Parmesan cheese** over the bruschetta before serving.
- If you want some heat, consider adding a pinch of red pepper flakes to the tomato mixture.
- For a twist, try using different types of fresh herbs, like parsley or chives, in place of basil.
Nutrition Facts:
- Calories: 210 per serving
- Total Fat: 10g
- Sodium: 240mg
- Total Carbohydrates: 25g
- Dietary Fiber: 2g
- Sugars: 2g
- Protein: 5g
22 Peach and Poppy Seed Salad
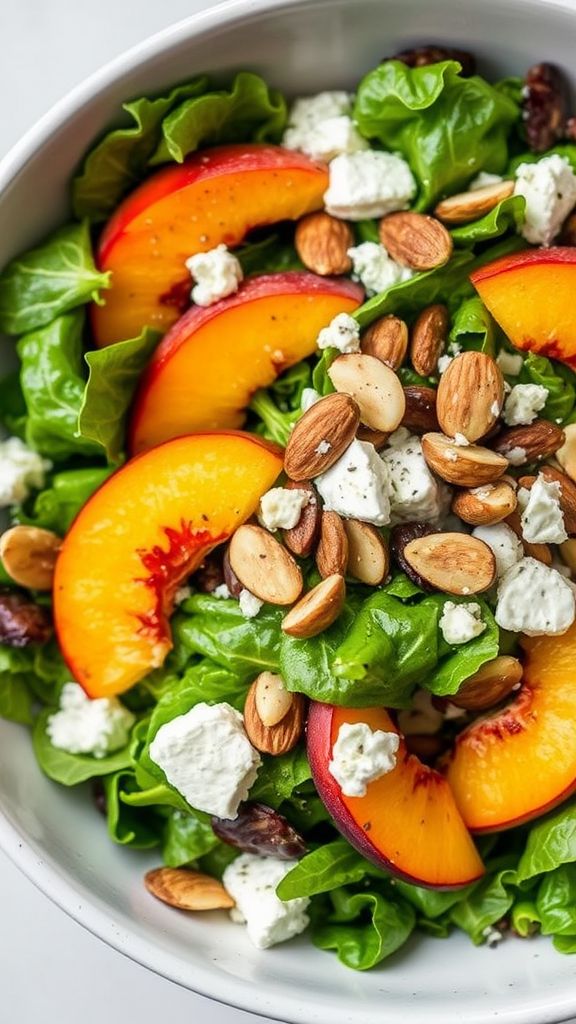
This Peach and Poppy Seed Salad is a bright and refreshing dish perfect for spring brunch. The combination of sweet peaches and crunchy poppy seeds brings a delightful mix of flavors and textures. Toss it together quickly, and you have a vibrant salad in no time!
Prep Time: 15 minutes
Total Time: 15 minutes
Servings: 4
Ingredients:
- 4 cups fresh mixed greens (like spinach and arugula)
- 2 ripe peaches, sliced
- 1/4 cup sliced almonds, toasted
- 1/4 cup crumbled feta cheese
- 2 tablespoons poppy seeds
- 3 tablespoons olive oil
- 1 tablespoon apple cider vinegar
- 1 teaspoon honey
- Salt and pepper to taste
Instructions:
Start by washing the mixed greens thoroughly and patting them dry. Place them in a large salad bowl as the base of your salad.
Next, slice the peaches into thin wedges. Arrange the peach slices over the mixed greens to add brightness and sweetness.
Now, sprinkle the toasted almonds and crumbled feta cheese over the top. These ingredients will add a nice crunch and saltiness to balance the sweetness of the peaches.
In a smaller bowl, whisk together the olive oil, apple cider vinegar, honey, and poppy seeds. This will be your dressing. Make sure everything is blended well before pouring it over the salad.
Finally, season the salad with a pinch of salt and pepper to taste. Toss gently to combine all the ingredients and coat them evenly with the dressing.
Tips:
- Use ripe peaches for the best flavor. They should be slightly soft to the touch.
- Feel free to substitute other nuts or cheese based on your preference.
- For added texture, you can include some cucumber or red onion slices.
Nutrition Facts:
- Calories: 240 per serving
- Protein: 6g
- Fat: 18g
- Carbohydrates: 20g
- Fiber: 3g
- Sugars: 10g
23 Savory Breakfast Tarts with Spinach and Feta

Start your day right with these delicious Savory Breakfast Tarts with Spinach and Feta. These tarts are flaky, cheesy, and packed with nutrients from fresh spinach. They’re perfect for a cozy brunch or a quick breakfast on the go!
Prep Time: 20 minutes
Cook Time: 25 minutes
Total Time: 45 minutes
Servings: 6
Ingredients:
- 1 sheet of puff pastry, thawed
- 1 tablespoon olive oil
- 1 small onion, finely chopped
- 2 cloves garlic, minced
- 4 cups fresh spinach, chopped
- 1/2 cup feta cheese, crumbled
- 4 large eggs
- 1/2 cup milk
- Salt and pepper, to taste
- 1/4 teaspoon red pepper flakes (optional)
- Fresh parsley, for garnish (optional)
Instructions:
Preheat your oven to 400°F (200°C). Line a baking sheet with parchment paper for easy cleanup.
On a lightly floured surface, roll out the puff pastry until it’s about 1/8 inch thick. Cut it into 6 squares, each about 4 inches on each side. Place the squares on the baking sheet and prick them with a fork to prevent puffing.
Heat the olive oil in a skillet over medium heat. Add the onion and sauté until it’s soft, about 3-4 minutes. Then, add the garlic and cook for an additional 30 seconds until fragrant.
Stir in the chopped spinach and cook until wilted, about 2 minutes. Remove the skillet from heat and let it cool slightly.
In a bowl, whisk together the eggs, milk, salt, pepper, and red pepper flakes if using. Add the spinach mixture into this bowl and mix well.
Spoon the spinach and egg mixture evenly onto each puff pastry square. Sprinkle feta cheese over the top of each tart.
Bake in the oven for 20-25 minutes until the pastry is golden brown and the egg is set. Once done, remove from the oven and let cool for a few minutes before serving.
Garnish with fresh parsley if desired. Enjoy your tasty breakfast tarts!
Tips:
- You can add other vegetables like tomatoes or bell peppers to the filling for extra flavor.
- These tarts can be made ahead of time and reheated for a quick breakfast.
- For a fun twist, try using different types of cheese like goat cheese or cheddar.
Nutrition Facts:
- Calories: 220 per tart
- Protein: 8g
- Carbohydrates: 15g
- Fat: 15g
- Sodium: 320mg
- Fiber: 1g
24 Almond Flour Banana Bread
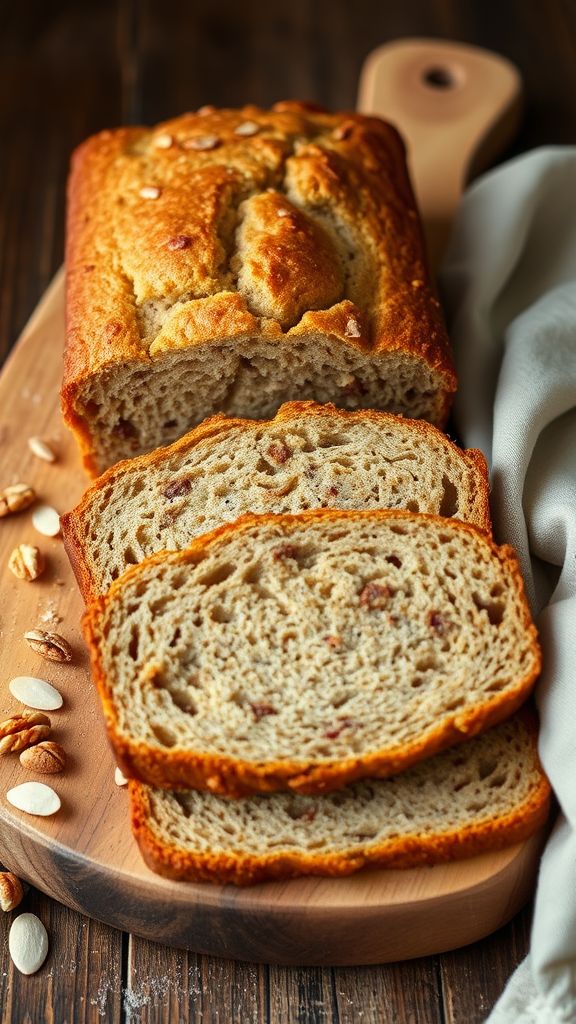
Almond Flour Banana Bread is a delicious and healthy twist on the classic banana bread. It’s perfect for breakfast or as a snack, and it’s gluten-free too! With the rich flavor of bananas and the nutty taste of almond flour, this bread is sure to become a family favorite.
Prep Time: 10 minutes
Cook Time: 25-30 minutes
Total Time: 35-40 minutes
Servings: 8 slices
Ingredients:
- 3 ripe bananas, mashed
- 2 cups almond flour
- 1/4 cup honey or maple syrup
- 2 large eggs
- 1 teaspoon vanilla extract
- 1 teaspoon baking soda
- 1/2 teaspoon salt
- 1 teaspoon cinnamon (optional)
- 1/2 cup walnuts or chocolate chips (optional)
Instructions:
Start by preheating your oven to 350°F (175°C) and greasing a loaf pan. This will help the bread not stick when it’s done baking.
In a large mixing bowl, mash the 3 ripe bananas with a fork until smooth. Make sure there are no lumps left. Then, add 2 cups of almond flour, 1/4 cup of honey, 2 large eggs, and 1 teaspoon of vanilla extract into the bowl. Mix the ingredients together until just combined.
Next, stir in 1 teaspoon of baking soda, 1/2 teaspoon of salt, and 1 teaspoon of cinnamon if you decide to use it. You want to make sure everything is combined well but be careful not to overmix the batter.
If you want to add some crunch or sweetness, fold in 1/2 cup of walnuts or chocolate chips at this stage. This is totally optional but adds extra flavor.
Pour the batter into the prepared loaf pan and smooth the top with a spatula. Bake in the preheated oven for about 25-30 minutes. The bread is ready when it’s golden brown on top and a toothpick inserted in the center comes out clean.
After baking, let the banana bread cool in the pan for about 10 minutes before transferring it to a wire rack to cool completely. This helps it set nicely.
Tips:
- For a sweeter bread, use more honey or add some extra chocolate chips.
- Store the leftovers in an airtight container to keep them fresh for up to a week.
- You can freeze the banana bread for up to 3 months. Just wrap it tightly before freezing.
Nutrition Facts:
- Calories: 130
- Fat: 7g
- Carbohydrates: 15g
- Fiber: 3g
- Protein: 4g
- Sugar: 4g
25 Grapefruit Mimosas

Grapefruit Mimosas are a refreshing and tangy twist on the classic mimosa. Perfect for brunch, these drinks are easy to make and sure to brighten up your table. With just a few simple ingredients, you can impress your guests with this delightful beverage!
Prep Time: 5 minutes
Total Time: 5 minutes
Servings: 4
Ingredients:
- 2 cups of freshly squeezed grapefruit juice
- 1 bottle (750 ml) of champagne or sparkling wine
- 1/4 cup of simple syrup (optional, for sweetness)
- Fresh mint leaves for garnish (optional)
Instructions:
Start by squeezing the juice from fresh grapefruits until you have about 2 cups of juice. Make sure to strain the juice to remove any pulp or seeds for a smoother drink.
Once your juice is ready, chill it in the refrigerator for about 10-15 minutes if you prefer your mimosas cold.
Now it’s time to mix! In a large pitcher, combine the grapefruit juice and simple syrup if you’re using it. Stir gently to mix all the ingredients together.
To serve, fill each champagne flute halfway with the grapefruit mixture. Then, top off each glass with champagne or sparkling wine. Be careful to pour slowly to avoid any overflow!
Finally, garnish your mimosas with fresh mint leaves if desired. Enjoy your refreshing Grapefruit Mimosas!
Tips:
- For a fun twist, try using flavored sparkling wine like peach or raspberry.
- If you want a less bitter taste, use sweeter grapefruits, such as Ruby Red.
- Make a large batch by multiplying the ingredients for a crowd-pleasing brunch option.
Nutrition Facts:
- Calories: 120 per serving
- Total Fat: 0g
- Sodium: 0mg
- Total Carbohydrates: 12g
- Sugars: 10g
- Protein: 0g
26 Quinoa Salad with Spring Peas and Mint
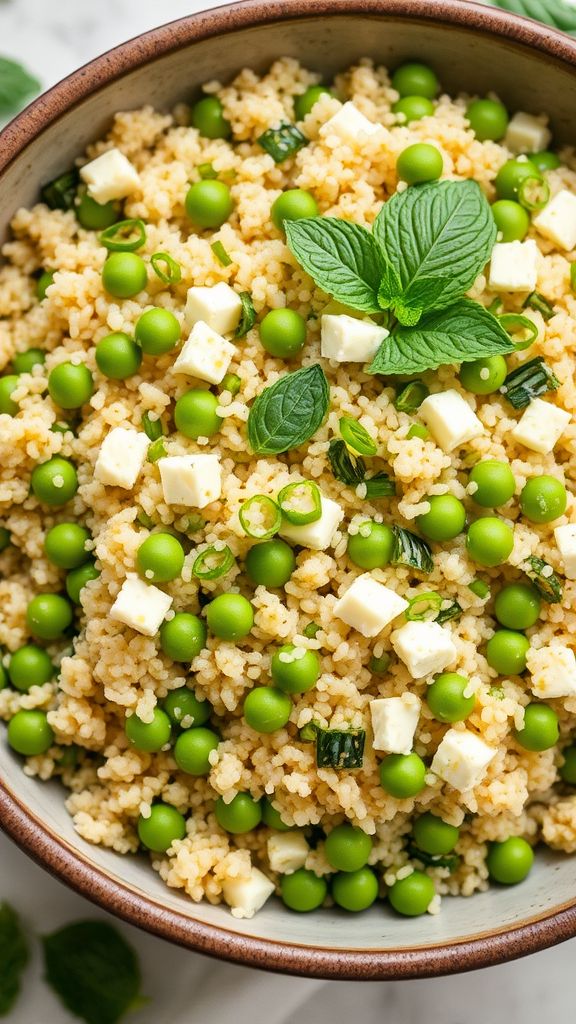
Quinoa Salad with Spring Peas and Mint is a fresh and vibrant dish perfect for springtime gatherings. Packed with protein, fiber, and delightful flavors, this salad is not only healthy but also easy to make. It’s a great addition to any brunch menu!
Prep Time: 15 minutes
Total Time: 15 minutes
Servings: 4
Ingredients:
- 1 cup quinoa, rinsed
- 2 cups water
- 1 cup fresh spring peas, shelled
- 1/4 cup fresh mint leaves, chopped
- 1/4 cup green onion, sliced
- 1/4 cup feta cheese, crumbled (optional)
- 3 tablespoons olive oil
- 2 tablespoons lemon juice
- Salt and pepper to taste
Instructions:
First, cook the quinoa by bringing 2 cups of water to a boil in a medium saucepan. Once boiling, add the 1 cup of rinsed quinoa. Reduce the heat to low, cover, and let it simmer for about 15 minutes or until the water is absorbed. Remove from heat and let it cool.
While the quinoa is cooking, prepare the vegetables. Shell the 1 cup of spring peas and wash them thoroughly. Chop the 1/4 cup of mint leaves and slice the 1/4 cup of green onions.
In a large mixing bowl, combine the cooled quinoa, spring peas, chopped mint, and green onions. If you want to add some creaminess, sprinkle in the 1/4 cup of feta cheese.
In a small bowl, whisk together the 3 tablespoons of olive oil and 2 tablespoons of lemon juice. Pour the dressing over the quinoa salad and toss everything together gently. Season with salt and pepper to taste.
Let the salad sit for a few minutes for the flavors to blend together, then serve it chilled or at room temperature. Enjoy your fresh and colorful Quinoa Salad with Spring Peas and Mint!
Tips:
- For added crunch, toss in some toasted nuts or seeds.
- Feel free to mix in other seasonal vegetables like radishes or cucumbers.
- This salad can be made a few hours in advance; just keep it covered in the refrigerator.
Nutrition Facts:
- Calories: 210
- Protein: 7g
- Carbohydrates: 30g
- Fat: 9g
- Fiber: 5g
27 Cheesy Herb Biscuits

These Cheesy Herb Biscuits are the perfect addition to your brunch table. Fluffy, cheesy, and packed with fresh herbs, these biscuits are sure to impress your family and friends. Serve them warm with butter for a delightful treat!
Prep Time: 15 minutes
Cook Time: 20 minutes
Total Time: 35 minutes
Servings: 12 biscuits
Ingredients:
- 2 cups all-purpose flour
- 1 tablespoon baking powder
- 1/2 teaspoon baking soda
- 1/2 teaspoon salt
- 1/2 cup unsalted butter, cold and cubed
- 1 cup shredded cheddar cheese
- 1/4 cup chopped fresh herbs (such as parsley, chives, or thyme)
- 3/4 cup buttermilk
Instructions:
Preheat your oven to 425°F (220°C) and line a baking sheet with parchment paper. This will help the biscuits bake evenly and prevents sticking.
In a large bowl, combine 2 cups of all-purpose flour, 1 tablespoon of baking powder, 1/2 teaspoon of baking soda, and 1/2 teaspoon of salt. Mix the dry ingredients together until they’re well combined.
Add the 1/2 cup of cold, cubed butter to the flour mixture. Using a pastry cutter or your fingers, work the butter into the flour until the mixture resembles coarse crumbs. Be careful not to overwork the dough!
Next, fold in 1 cup of shredded cheddar cheese and 1/4 cup of chopped fresh herbs. This will give your biscuits a burst of flavor.
Pour in the 3/4 cup of buttermilk and stir gently until just combined. Be careful not to overmix the dough; it should be somewhat sticky.
Turn the dough out onto a floured surface and gently pat it into a rectangle about 1-inch thick. Use a biscuit cutter to cut out biscuits and place them on the prepared baking sheet.
Bake the biscuits in the preheated oven for 15 to 20 minutes, or until they are golden brown on top. The aroma will fill your kitchen!
Once baked, remove the biscuits from the oven and let them cool slightly before serving. Enjoy them warm with butter or your favorite jam!
Tips:
- For extra cheesy biscuits, feel free to add more cheese to the dough.
- Try using different herbs, like basil or dill, to change up the flavor.
- These biscuits are best served fresh out of the oven, but they can be stored in an airtight container for up to 2 days.
Nutrition Facts:
- Calories: 180 per biscuit
- Total Fat: 10g
- Saturated Fat: 6g
- Cholesterol: 30mg
- Carbohydrates: 18g
- Fiber: 0g
- Protein: 4g
- Sodium: 300mg
28 Lemon Ricotta Pancakes with Maple Syrup

These Lemon Ricotta Pancakes are light, fluffy, and bursting with citrus flavor. Topped with rich maple syrup, they make the perfect brunch treat. Your family and friends will love the fresh twist these pancakes bring to the table!
Prep Time: 10 minutes
Cook Time: 15 minutes
Total Time: 25 minutes
Servings: 4
Ingredients:
- 1 cup ricotta cheese
- 1 cup all-purpose flour
- 2 tablespoons sugar
- 1 tablespoon baking powder
- 1/4 teaspoon salt
- 2 large eggs
- 1/2 cup milk
- Zest of 1 lemon
- 2 tablespoons fresh lemon juice
- 1 teaspoon vanilla extract
- Butter or oil for cooking
- Maple syrup for serving
Instructions:
Start by gathering all your ingredients together. This will make the process smoother and more enjoyable.
In a large mixing bowl, combine the ricotta cheese, eggs, milk, lemon zest, lemon juice, and vanilla extract. Whisk these ingredients until they are well mixed and creamy.
In another bowl, mix the flour, sugar, baking powder, and salt. Stir these dry ingredients until they are combined thoroughly.
Pour the wet mixture into the bowl with the dry ingredients. Gently fold the two mixtures together until just combined. Be careful not to overmix; it’s okay if a few lumps remain.
Heat a non-stick skillet over medium heat and add a little butter or oil. Once the pan is hot, use a 1/4 cup measuring cup to pour the batter onto the skillet.
Cook the pancakes for about 2-3 minutes or until you see bubbles forming on the surface. Then, carefully flip them and cook for another 2-3 minutes on the other side. They should be golden-brown and fluffy.
Once cooked, place the pancakes on a plate and cover them with a clean kitchen towel to keep warm while you cook the remaining batter.
Serve the pancakes warm with a drizzle of maple syrup on top. Enjoy your delicious Lemon Ricotta Pancakes!
Tips:
- For extra lemon flavor, add a little more lemon zest or juice to the batter.
- If you want to make the pancakes even fluffier, separate the eggs. Whisk the egg whites until fluffy and fold them in last.
- You can add fresh berries or chocolate chips to the batter for additional tasty variations.
Nutrition Facts:
- Calories: 320 per serving
- Protein: 10g
- Carbohydrates: 45g
- Fat: 12g
- Sugar: 8g
29 Roasted Beet and Goat Cheese Salad
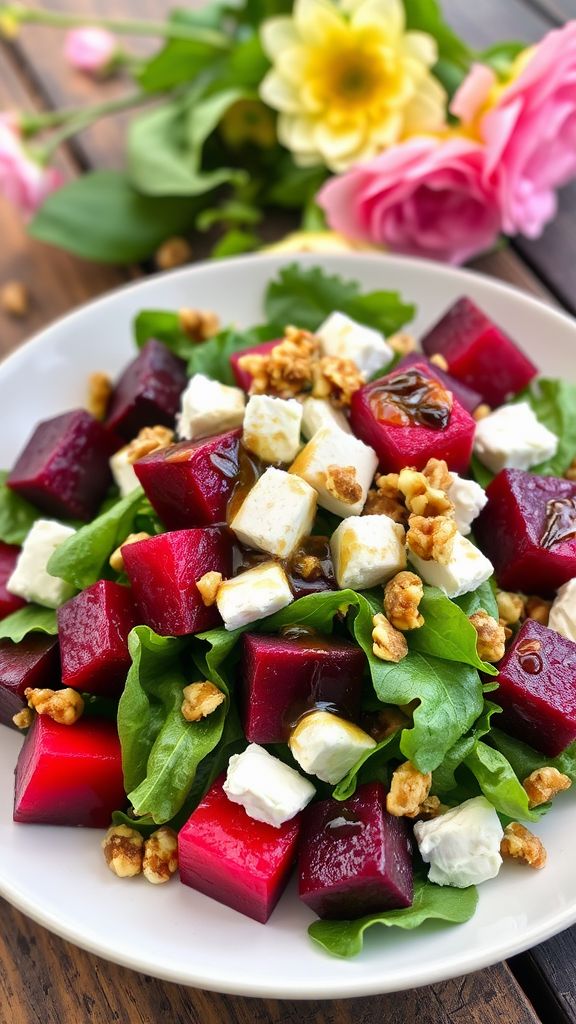
Roasted Beet and Goat Cheese Salad is a colorful and delicious dish perfect for spring brunches. The sweetness of roasted beets pairs wonderfully with the creamy goat cheese, making this salad not only tasty but also beautiful on the plate. With a drizzle of balsamic vinaigrette, it’s sure to impress your guests!
Prep Time: 15 minutes
Cook Time: 45 minutes
Additional Time: 10 minutes
Total Time: 1 hour 10 minutes
Servings: 4
Ingredients:
- 4 medium-sized beets
- 4 cups mixed greens (such as arugula, spinach, or kale)
- 4 oz. goat cheese, crumbled
- 1/4 cup walnuts, chopped
- 1/4 cup balsamic vinegar
- 1/3 cup olive oil
- 1 tsp honey
- Salt and pepper to taste
Instructions:
First, preheat your oven to 425°F (220°C). Rinse the beets well to remove any dirt, then wrap each beet in aluminum foil. Place them on a baking sheet and roast in the oven for 45 minutes until fork-tender. Once done, let the beets cool for about 10 minutes before unwrapping.
Next, peel the beets using some paper towels or gloves, as they can stain. Once peeled, cut them into bite-sized cubes. In a small bowl, whisk together the balsamic vinegar, olive oil, honey, and a pinch of salt and pepper to make your dressing.
In a large salad bowl, combine the mixed greens, roasted beet cubes, and chopped walnuts. Drizzle the dressing over the salad and toss gently to combine. Finally, sprinkle the crumbled goat cheese on top.
Serve the Roasted Beet and Goat Cheese Salad immediately or chill it for a few minutes before serving.
Tips:
- For added flavor, try toasting the walnuts in a dry skillet for a few minutes before adding them to the salad.
- You can also add sliced apples or pears for extra sweetness and crunch.
- If you have leftover beets, they make a great addition to sandwiches or grain bowls!
Nutrition Facts:
- Calories: 260
- Protein: 7g
- Fat: 23g
- Carbohydrates: 13g
- Fiber: 4g
- Sugar: 7g
30 Berry Compote Overnight Oats
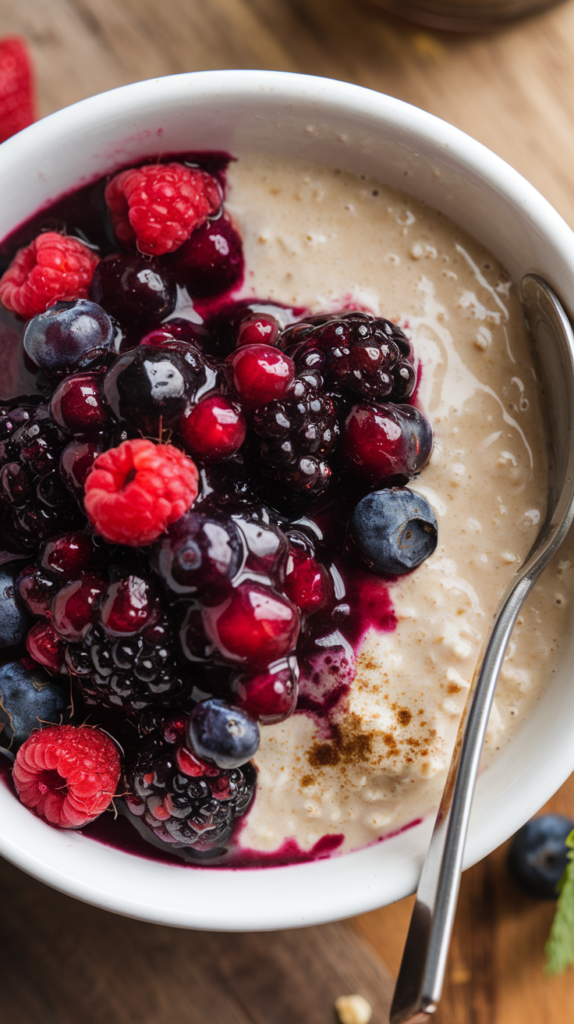
Start your day with a delicious and healthy breakfast! These Berry Compote Overnight Oats are easy to make and packed with flavor. Prepare them the night before, and you’ll have a delightful meal ready to enjoy in the morning.
Prep Time: 10 minutes
Total Time: 10 minutes
Servings: 2
Ingredients:
- 1 cup rolled oats
- 1 1/2 cups milk (dairy or non-dairy)
- 1 tablespoon honey or maple syrup
- 1 cup mixed berries (strawberries, blueberries, raspberries)
- 1 teaspoon vanilla extract
- 1/2 teaspoon cinnamon
- Pinch of salt
Instructions:
Start by mixing the rolled oats, milk, honey, vanilla extract, cinnamon, and a pinch of salt in a medium bowl. Stir the mixture until everything is well combined.
Next, divide the oat mixture into two jars or bowls. You can use mason jars for a fun presentation!
Now, it’s time to make the berry compote. In a small saucepan, add the mixed berries and heat over medium-low heat. Cook until the berries break down and become saucy, about 5-7 minutes. You can mash them with a fork for a smoother texture.
Once the compote is ready, allow it to cool slightly. Then, pour the warm berry compote over the oats in each jar.
Cover the jars with a lid or plastic wrap and place them in the refrigerator. Let the oats soak overnight or for at least 4 hours.
When you’re ready to eat, simply give your oats a quick stir and enjoy them cold or warm them up in the microwave for a minute!
Tips:
- Feel free to use any berries you love or have on hand, like strawberries or blackberries.
- For added texture, sprinkle some nuts or seeds on top before serving.
- If you like it sweeter, add more honey or maple syrup to taste.
Nutrition Facts:
- Calories: 320
- Protein: 10g
- Fat: 5g
- Carbohydrates: 58g
- Fiber: 8g
- Sugar: 12g