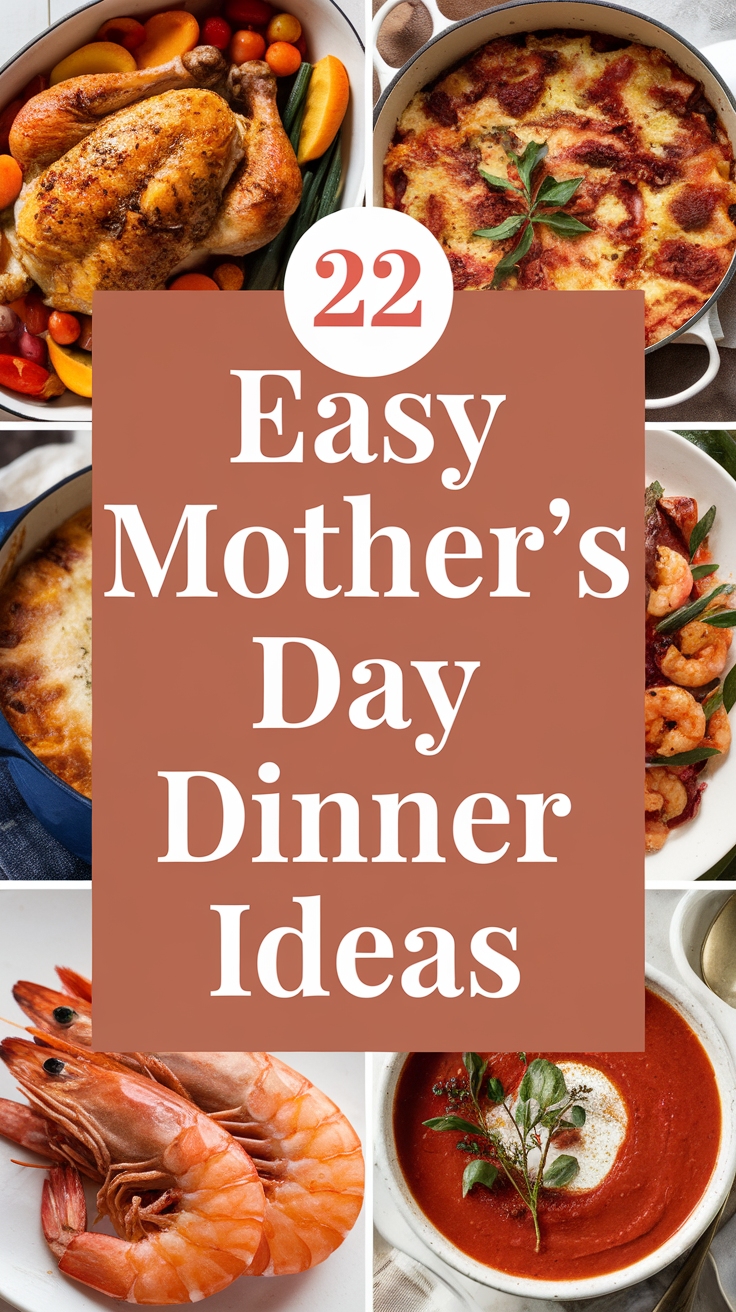
My New Cookbook is Out! Check Out Now!
22 Quick & Easy Mother’s Day Dinner Recipes for a Memorable Meal
This page contains affiliate links and I earn a commission if you make a purchase through one of the links, at no cost to you.
Want to make this Mother’s Day extra special with a delicious meal? You’re not alone! Many of us want to show our love through food, but cooking can feel overwhelming. Don’t worry—we’ve got you covered with 22 quick and easy dinner recipes that will make your celebration memorable without the stress.
Shop Our Must-Haves


1 Herb-Crusted Salmon with Lemon Butter Sauce
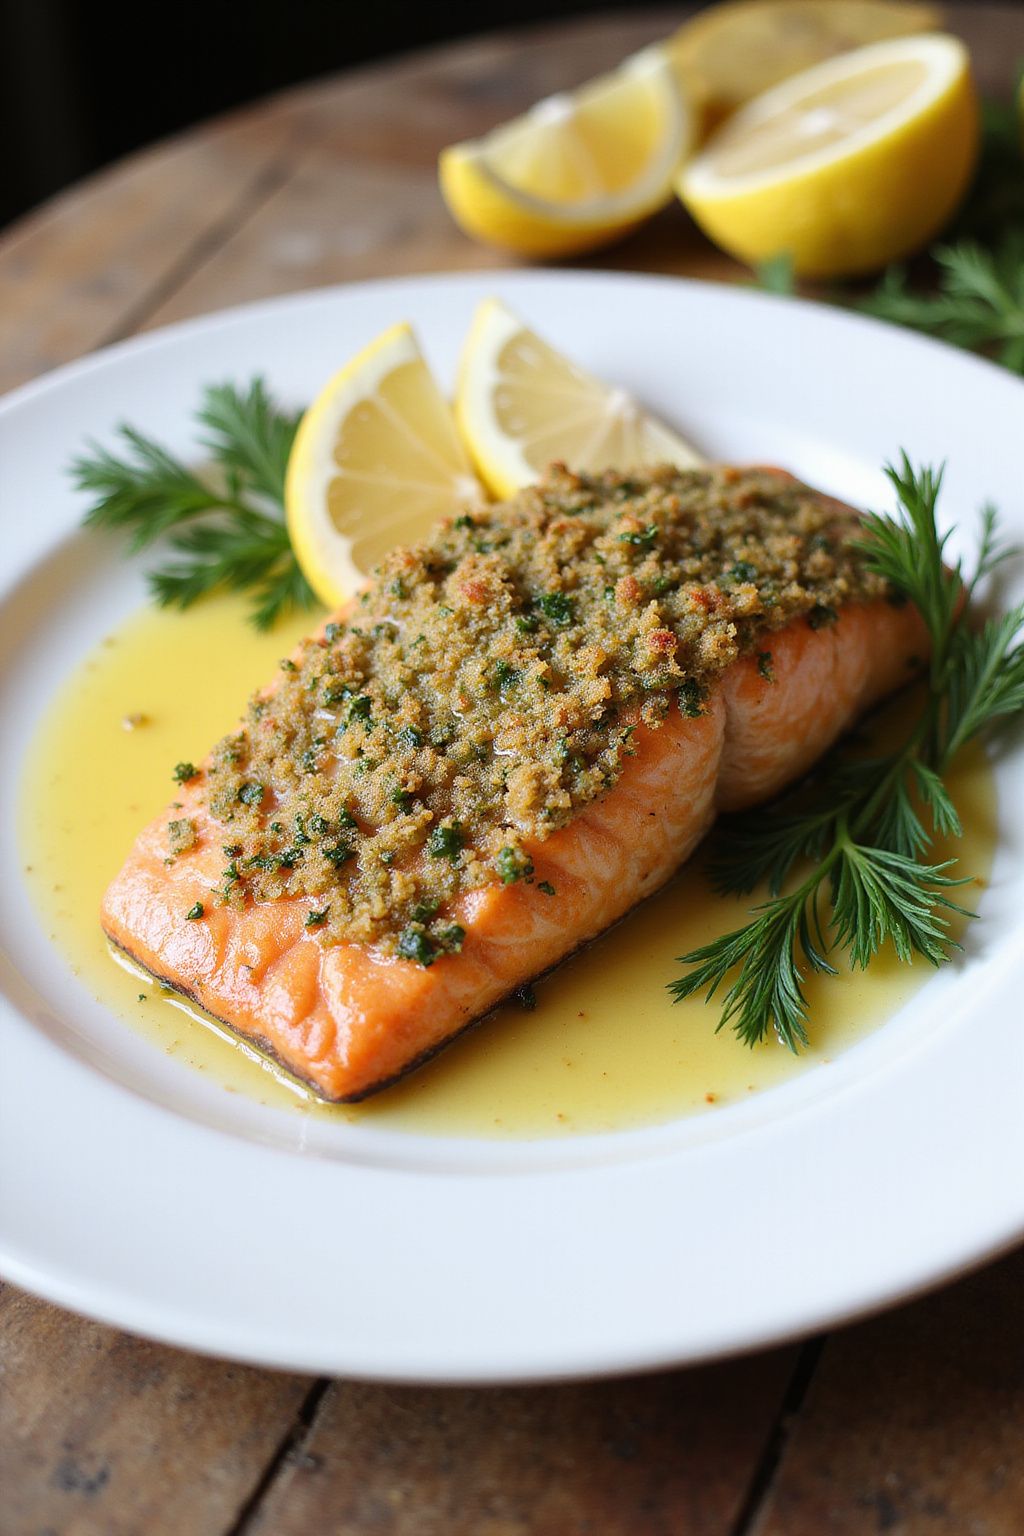
Herb-Crusted Salmon with Lemon Butter Sauce is a delicious and elegant dish that’s perfect for special occasions like Mother’s Day. The crunchy herb crust adds great flavor, while the zesty lemon butter sauce brings everything together. Your family will love this simple and healthy dinner!
Prep Time: 10 minutes
Cook Time: 15 minutes
Additional Time: 5 minutes
Total Time: 30 minutes
Servings: 4
Ingredients:
- 4 salmon fillets (about 6 ounces each)
- 1/2 cup fresh parsley, chopped
- 1/4 cup fresh dill, chopped
- 1/4 cup breadcrumbs
- 2 cloves garlic, minced
- 1/4 cup olive oil
- Salt and pepper to taste
- 1 lemon (zested and juiced)
- 1/2 cup unsalted butter
Instructions:
Preheat your oven to 400°F (200°C). Line a baking sheet with parchment paper for easy cleanup.
In a bowl, mix together the chopped parsley, dill, breadcrumbs, garlic, olive oil, and a pinch of salt and pepper. This will be your herb crust.
Place the salmon fillets on the prepared baking sheet. Squeeze the juice of half a lemon over each fillet. Then, evenly spread the herb mixture on top of the salmon, pressing it onto the fish gently.
Bake the salmon in the preheated oven for about 12-15 minutes or until the salmon flakes easily with a fork. It should be nice and golden on top.
While the salmon is baking, prepare the lemon butter sauce. In a small saucepan, melt the unsalted butter over medium heat. Once melted, whisk in the lemon juice and zest. Cook for an additional 2-3 minutes without boiling.
Once the salmon is done, remove it from the oven and let it sit for about 5 minutes. Drizzle the lemon butter sauce over the salmon before serving.
Tips:
- You can swap out the herbs for your favorites, like thyme or basil.
- For extra zing, add a pinch of red pepper flakes to the lemon butter sauce.
- Serve with a side of roasted vegetables or a fresh salad to complete your meal.
Nutrition Facts:
- Calories: 350
- Protein: 30g
- Fat: 25g
- Carbohydrates: 7g
- Fiber: 1g
- Sugar: 1g
2 Creamy Garlic Tuscan Chicken
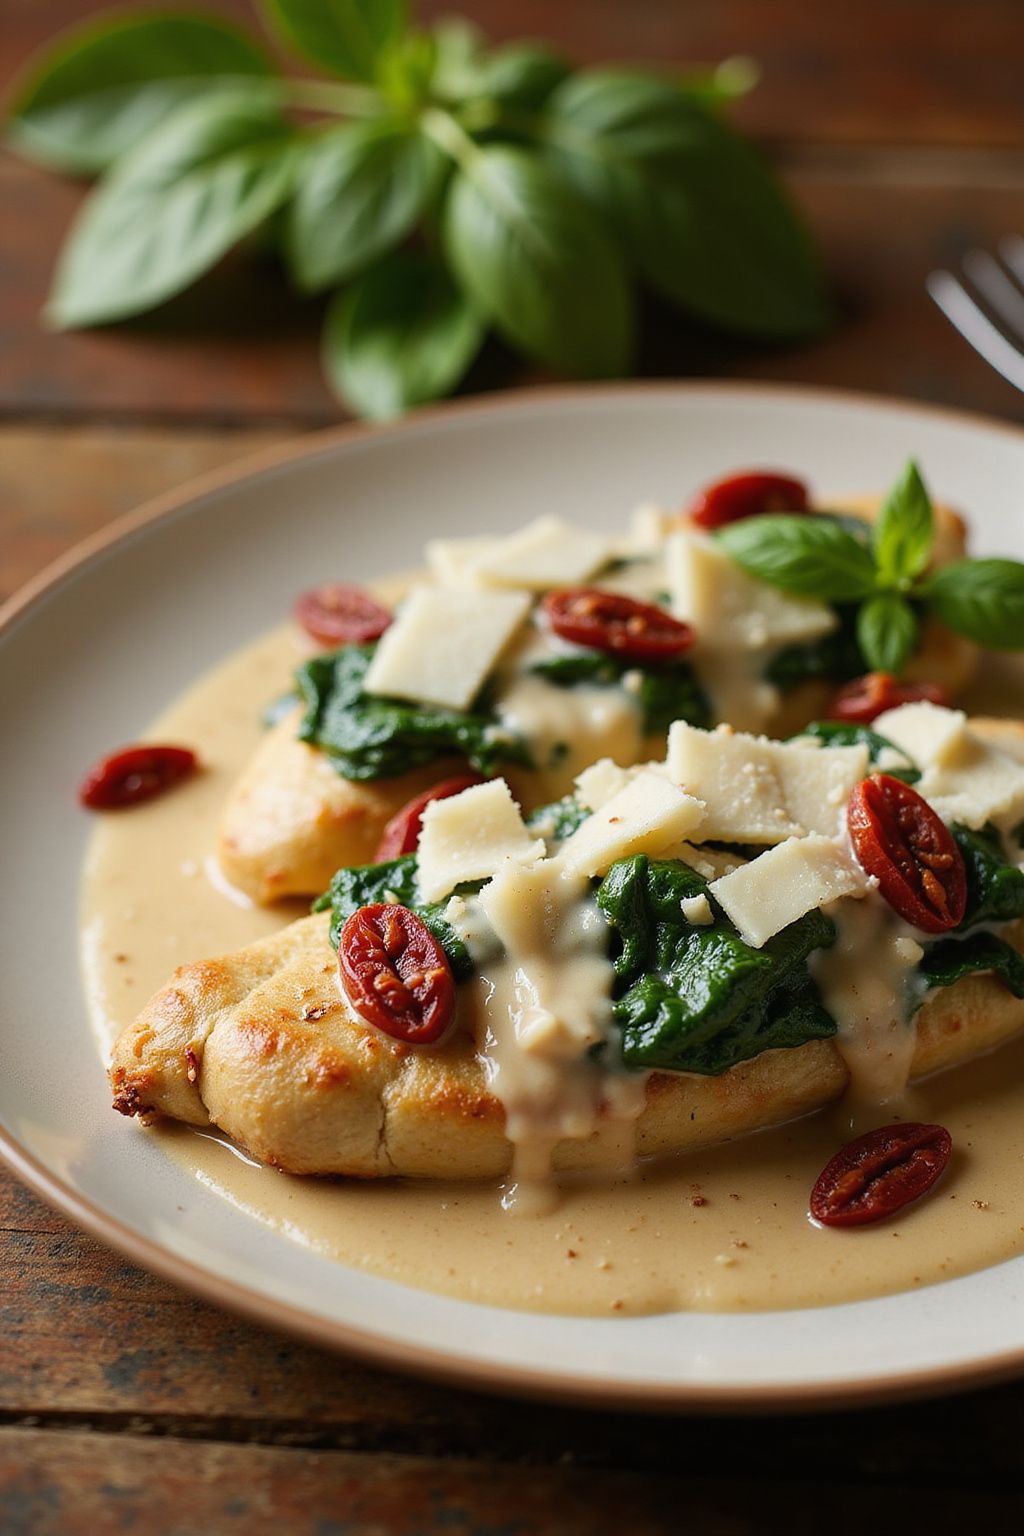
Creamy Garlic Tuscan Chicken is a wonderful dish that brings the flavors of the Italian countryside right to your table. The creamy sauce, loaded with garlic and fresh herbs, perfectly complements the tender chicken. It’s simple enough for a weeknight dinner but impressive enough for special occasions.
Prep Time: 10 minutes
Cook Time: 20 minutes
Additional Time: 5 minutes
Total Time: 35 minutes
Servings: 4
Ingredients:
- 4 boneless, skinless chicken breasts
- Salt and pepper, to taste
- 2 tablespoons olive oil
- 4 cloves garlic, minced
- 1 cup heavy cream
- ½ cup chicken broth
- 1 cup fresh spinach
- ½ cup sun-dried tomatoes, sliced
- 1 teaspoon Italian seasoning
- ¼ cup grated Parmesan cheese
Instructions:
Start by seasoning the chicken breasts with salt and pepper on both sides. Heat the olive oil in a large skillet over medium heat. Once hot, carefully place the chicken breasts in the skillet and cook for about 5-7 minutes on each side until they’re golden brown and cooked through. Remove the chicken from the skillet and set it aside.
In the same skillet, add the minced garlic and sauté for about 1 minute until it becomes fragrant. Make sure not to burn it! Now, pour in the chicken broth and bring the heat up to medium-high. Let this simmer for about 2 minutes to reduce slightly.
Next, reduce the heat to medium-low and stir in the heavy cream, Italian seasoning, and Parmesan cheese. Mix well until the sauce becomes creamy and smooth. Add the fresh spinach and sun-dried tomatoes to the skillet, allowing the spinach to wilt for about 2 minutes.
Finally, return the cooked chicken to the skillet, spoon some sauce over it, and let everything heat together for an additional 2-3 minutes. After that, it’s ready to serve. Enjoy your delicious Creamy Garlic Tuscan Chicken!
Tips:
- For extra flavor, marinate the chicken in garlic and Italian herbs for a few hours before cooking.
- Serve the chicken over pasta or rice to soak up the creamy sauce.
- Feel free to add in other vegetables like mushrooms or bell peppers for more color and nutrients!
Nutrition Facts:
- Calories: 480 per serving
- Protein: 40g
- Carbohydrates: 10g
- Fat: 32g
- Sodium: 800mg
3 One-Pan Balsamic Chicken and Veggies
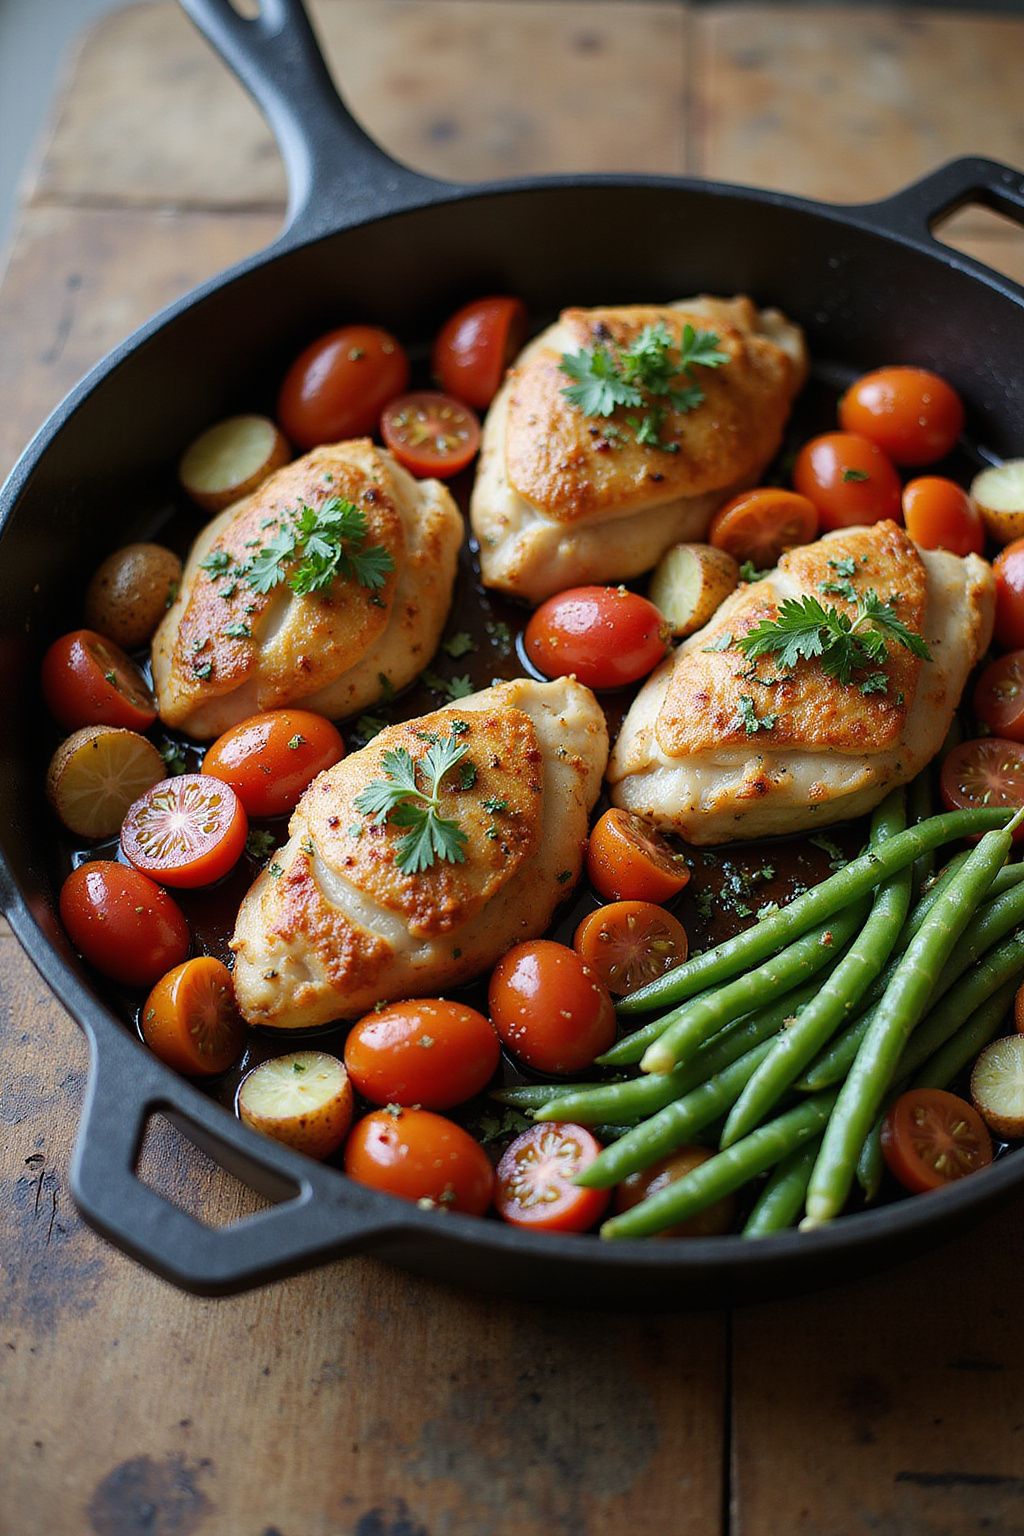
One-Pan Balsamic Chicken and Veggies is a delicious and easy meal that comes together in one pan. It’s packed with flavor from the balsamic vinegar and fresh veggies, making it a healthy choice for dinner. Perfect for busy weeknights or special occasions!
Prep Time: 15 minutes
Cook Time: 30 minutes
Total Time: 45 minutes
Servings: 4
Ingredients:
- 4 boneless, skinless chicken breasts
- 2 cups baby potatoes, halved
- 1 cup cherry tomatoes
- 1 cup green beans, trimmed
- 1/4 cup balsamic vinegar
- 1/4 cup olive oil
- 3 cloves garlic, minced
- 1 teaspoon dried oregano
- 1 teaspoon dried basil
- Salt and pepper to taste
- Fresh parsley, for garnish (optional)
Instructions:
Preheat your oven to 400°F (200°C). This helps the chicken and veggies cook evenly. While the oven heats up, prepare the pan by lining it with parchment paper or lightly oiling it to prevent sticking.
In a large bowl, mix together the balsamic vinegar, olive oil, minced garlic, oregano, basil, salt, and pepper. This will be the marinade for your chicken and veggies.
Add the chicken breasts to the bowl with the marinade. Make sure they are well-coated. Let them sit for about 10 minutes to soak up the flavors. While the chicken marinates, you can arrange the potatoes on one side of the prepared baking sheet.
Take the marinated chicken out of the bowl and place it in the center of the pan. On the other side of the chicken, arrange the cherry tomatoes and green beans.
Drizzle any remaining marinade over the veggies and chicken. This keeps everything juicy and flavorful while it cooks. Pop the pan into the preheated oven and roast for about 25-30 minutes, or until the chicken is cooked through and the potatoes are tender.
Once done, remove the pan from the oven and let it rest for a few minutes. Garnish with fresh parsley if desired. Serve warm and enjoy your delicious One-Pan Balsamic Chicken and Veggies!
Tips:
- For extra flavor, add some sliced bell peppers or zucchini to the veggie mix.
- Make sure to check the chicken’s internal temperature; it should reach 165°F for safety.
- If you like a bit of heat, sprinkle some red pepper flakes over the dish before serving.
Nutrition Facts:
- Calories: 350
- Protein: 30g
- Fat: 15g
- Carbohydrates: 30g
- Fiber: 5g
- Sugar: 4g
4 Lemon Thyme Shrimp and Asparagus
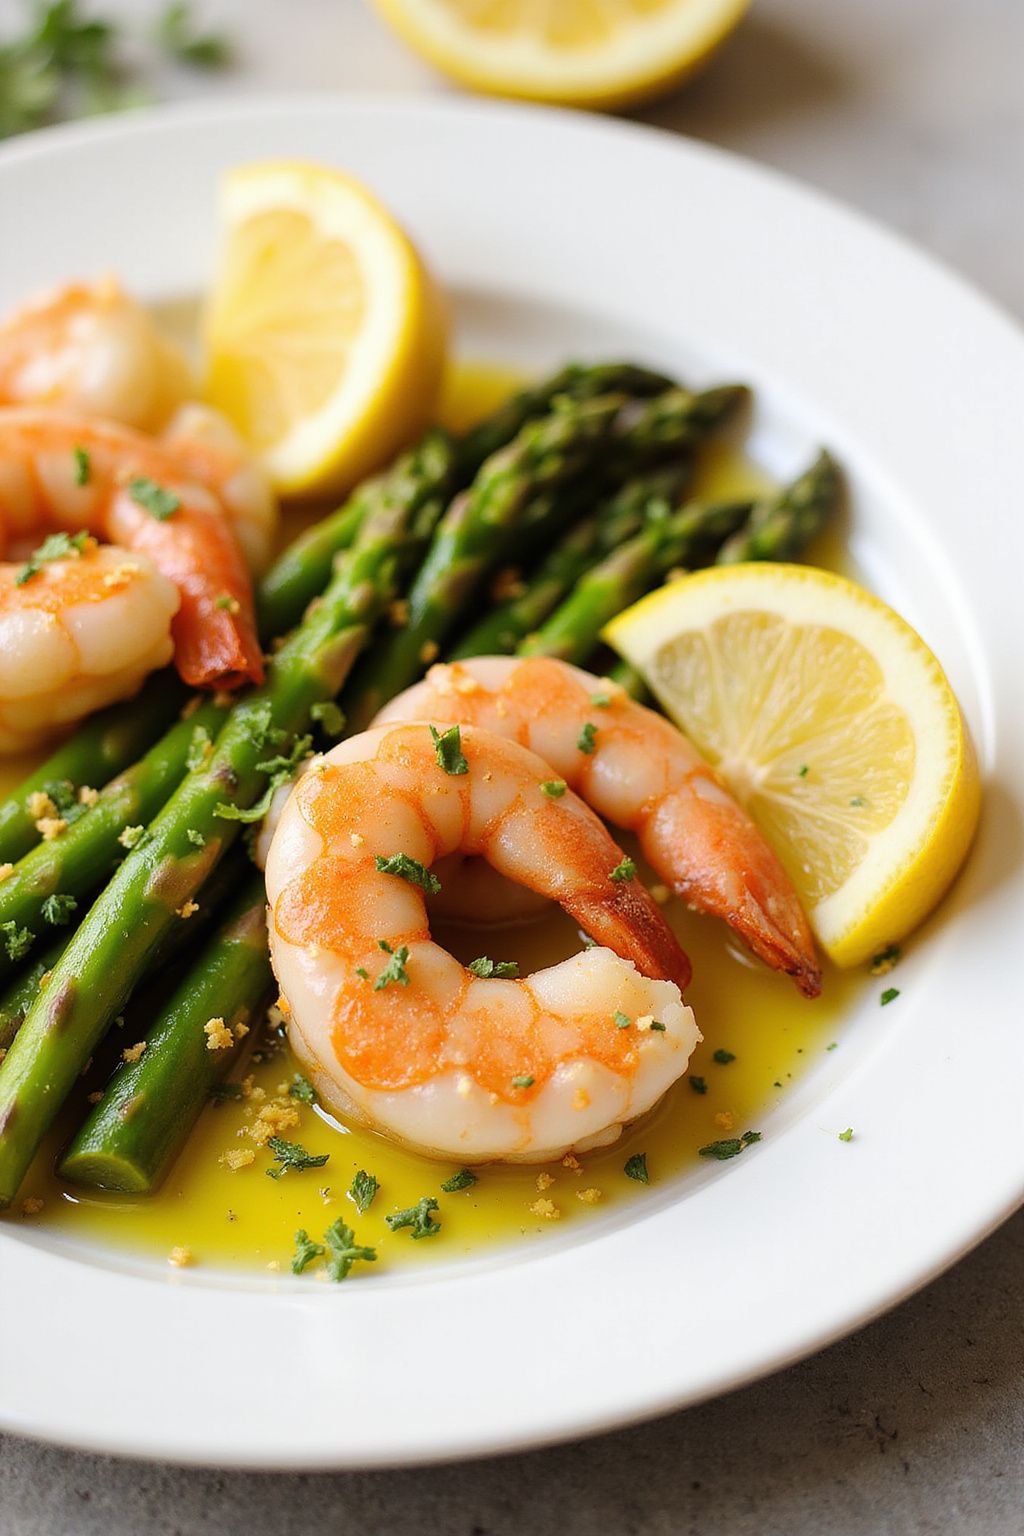
Lemon Thyme Shrimp and Asparagus is a bright and flavorful dish that’s perfect for any special occasion. The combination of juicy shrimp and tender asparagus, all tied together with a zesty lemon-thyme sauce, will impress your family and friends. It’s quick to make, yet it looks and tastes gourmet!
Prep Time: 10 minutes
Cook Time: 15 minutes
Total Time: 25 minutes
Servings: 4
Ingredients:
- 1 pound large shrimp, peeled and deveined
- 1 bunch asparagus, trimmed and cut into 2-inch pieces
- 2 tablespoons olive oil
- 2 cloves garlic, minced
- 1 teaspoon fresh thyme leaves (or ½ teaspoon dried thyme)
- 1 lemon, zested and juiced
- Salt and pepper, to taste
- Optional: Lemon wedges, for serving
Instructions:
Start by heating 1 tablespoon of olive oil in a large skillet over medium heat. Once the oil is hot, add the garlic and sauté for about 30 seconds until fragrant, but be careful not to burn it.
Next, add the asparagus pieces to the skillet. Cook for around 3-4 minutes, stirring occasionally until they begin to soften and turn bright green. This will help bring out their natural flavors.
Now, it’s time to add the shrimp. Toss them into the skillet with the asparagus. Stir in the lemon zest, lemon juice, thyme, salt, and pepper. Cook everything together for an additional 5-7 minutes until the shrimp are pink and opaque.
Once done, remove from heat and drizzle with the remaining 1 tablespoon of olive oil. Give it a gentle stir to mix everything well.
Serve your Lemon Thyme Shrimp and Asparagus warm, with lemon wedges on the side if desired.
Tips:
- Make sure to use fresh shrimp for the best flavor; frozen shrimp can also be used but should be thawed beforehand.
- Feel free to add other vegetables like bell peppers or snap peas for extra color and nutrition.
- Pair this dish with rice or quinoa to make it a complete meal!
Nutrition Facts:
- Calories: 240 per serving
- Protein: 27 grams
- Total Fat: 10 grams
- Saturated Fat: 1.5 grams
- Carbohydrates: 8 grams
- Fiber: 3 grams
- Sugar: 2 grams
5 Spinach and Ricotta Stuffed Shells
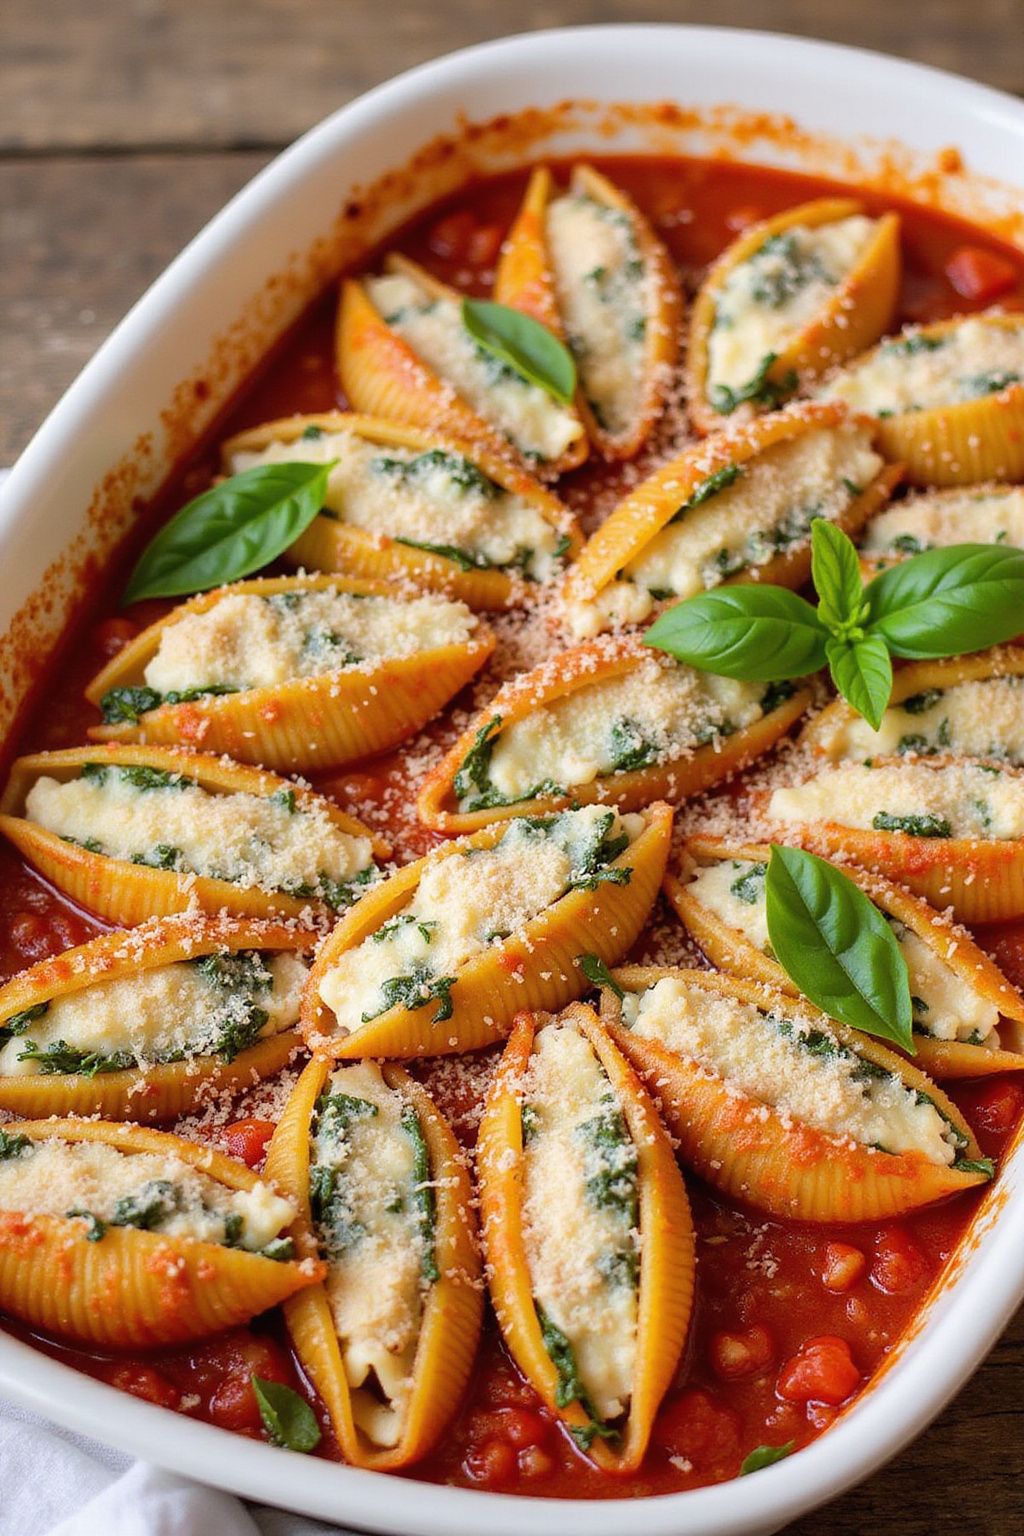
Spinach and Ricotta Stuffed Shells are a delicious and hearty dish that combines ricotta cheese and fresh spinach, all stuffed inside large pasta shells. This comforting meal is perfect for family dinners or special occasions. Let’s dive into this easy-to-follow recipe!
Prep Time: 20 minutes
Cook Time: 30 minutes
Additional Time: 10 minutes
Total Time: 1 hour
Servings: 6
Ingredients:
- 12 large pasta shells
- 2 cups fresh spinach, chopped
- 1 cup ricotta cheese
- 1 cup shredded mozzarella cheese
- 1/2 cup grated Parmesan cheese
- 1 egg
- 1 teaspoon garlic powder
- 1/2 teaspoon salt
- 1/4 teaspoon black pepper
- 2 cups marinara sauce
- Fresh basil leaves (for garnish, optional)
Instructions:
Start by preheating your oven to 375°F (190°C). In a large pot, bring salted water to a boil and carefully add the pasta shells. Cook them for about 8-10 minutes until they are al dente. Drain the shells and set them aside to cool.
In a mixing bowl, combine the chopped spinach, ricotta cheese, mozzarella cheese, Parmesan cheese, egg, garlic powder, salt, and black pepper. Stir everything together until it is well mixed. This mixture will be the delicious filling for your shells.
Next, take a large baking dish and spread about 1 cup of marinara sauce on the bottom. Now, fill each pasta shell with a generous amount of the spinach and ricotta mixture. Place the stuffed shells in the baking dish, open side up. Once all the shells are filled, pour the remaining marinara sauce over the top.
Sprinkle a little more mozzarella cheese on top for extra flavor. Cover the dish with aluminum foil to keep the shells moist. Bake in the preheated oven for 25 minutes. After that time, remove the foil and bake for an additional 5-10 minutes until the cheese is bubbly and golden.
Let the stuffed shells cool for about 10 minutes before serving. Garnish with fresh basil leaves if you’d like. Enjoy your delightful Spinach and Ricotta Stuffed Shells!
Tips:
- You can substitute frozen spinach for fresh spinach; just make sure to thaw it and squeeze out excess moisture.
- If you want a little kick, add red pepper flakes to your marinara sauce.
- For a creamier flavor, mix in a little cream cheese with your ricotta filling.
Nutrition Facts:
- Calories: 350
- Fat: 15g
- Carbohydrates: 40g
- Protein: 18g
- Fiber: 3g
- Sugar: 4g
6 Honey Glazed Carrots with Thyme
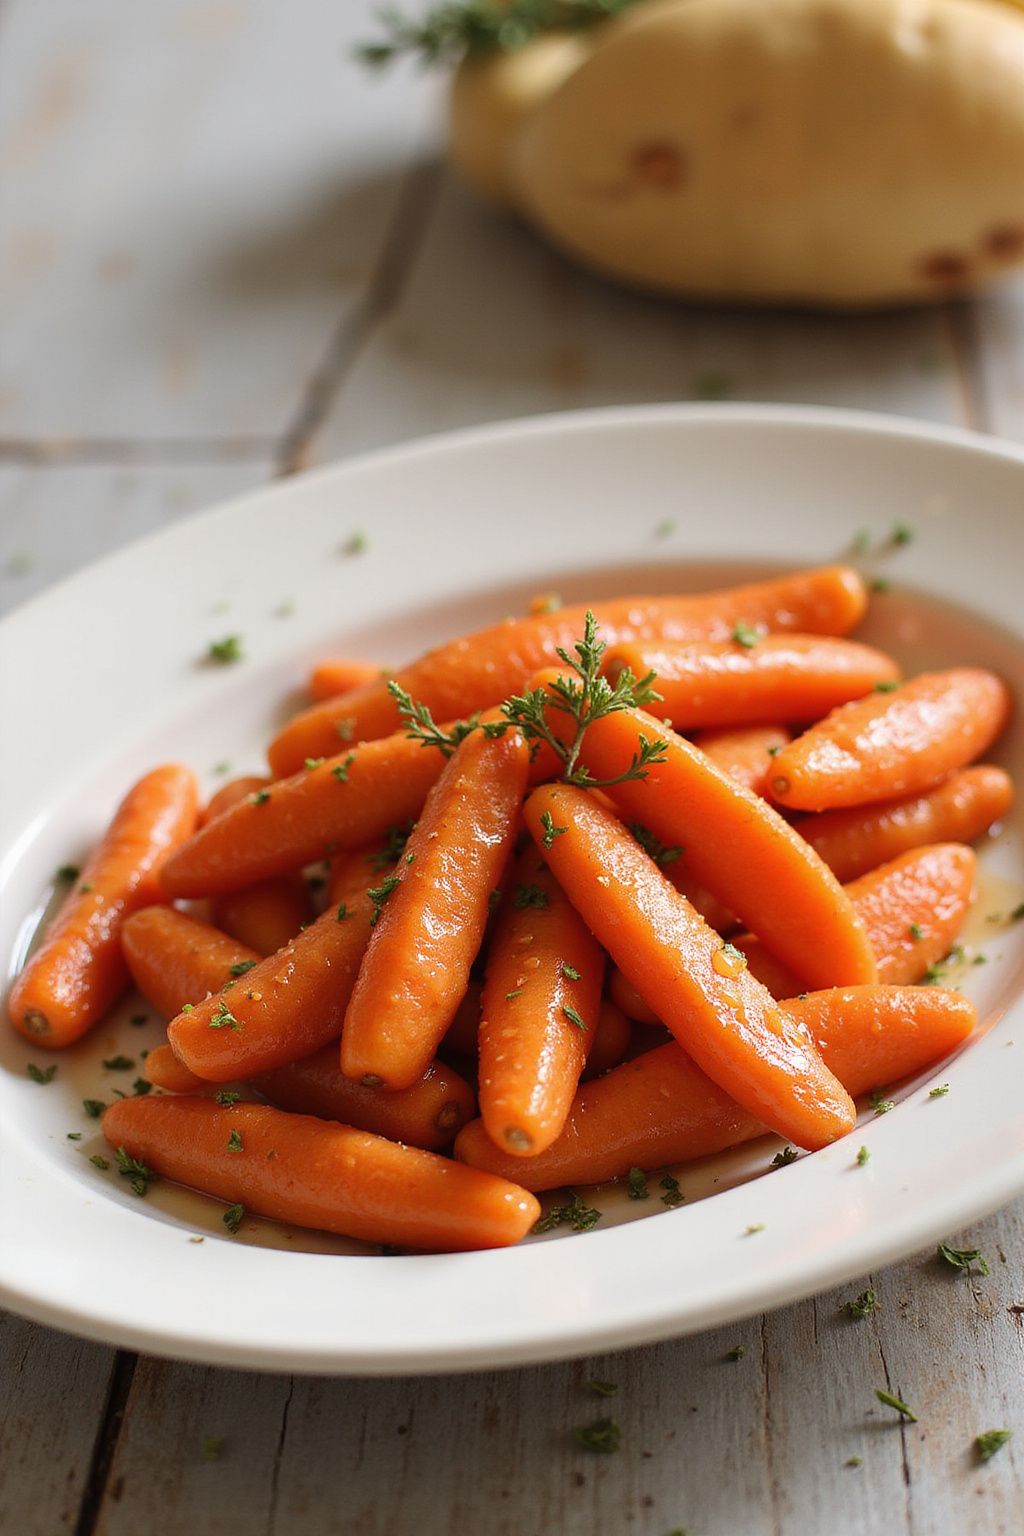
Sweet, tender carrots coated in a honey glaze make a perfect side dish. The addition of thyme gives them a lovely herb flavor. This recipe is simple and sure to impress everyone at your dinner table!
Prep Time: 10 minutes
Cook Time: 20 minutes
Total Time: 30 minutes
Servings: 4
Ingredients:
- 1 pound fresh carrots, peeled and sliced into thin rounds
- 3 tablespoons honey
- 2 tablespoons unsalted butter
- 1 teaspoon fresh thyme leaves, chopped (or ½ teaspoon dried thyme)
- Salt and pepper to taste
- Water (for boiling)
Instructions:
Start by bringing a pot of water to a boil. Once it’s boiling, add the sliced carrots. Cook them for 5-7 minutes until they’re tender but still slightly crisp. Drain the carrots and set them aside.
In the same pot, melt the butter over medium heat. Once melted, add the honey and stir until combined. Then, add the cooked carrots to the pot and mix well.
Sprinkle the thyme over the carrots. Season with salt and pepper to taste. Stir everything together gently so the carrots are evenly coated in the honey glaze.
Cook for an additional 5 minutes, stirring occasionally. The glaze should thicken and stick to the carrots nicely. Once done, remove from heat and serve warm.
Tips:
- For extra flavor, you can add a pinch of cinnamon or nutmeg to the honey glaze.
- If you want a bit of crunch, you can garnish the carrots with chopped nuts like walnuts or pecans.
- Use baby carrots for quicker prep time; they just need a rinse!
Nutrition Facts:
- Calories: 130 per serving
- Fat: 5g
- Carbohydrates: 20g
- Protein: 1g
- Fiber: 3g
- Sugars: 10g
7 Strawberry Spinach Salad with Poppy Seed Dressing
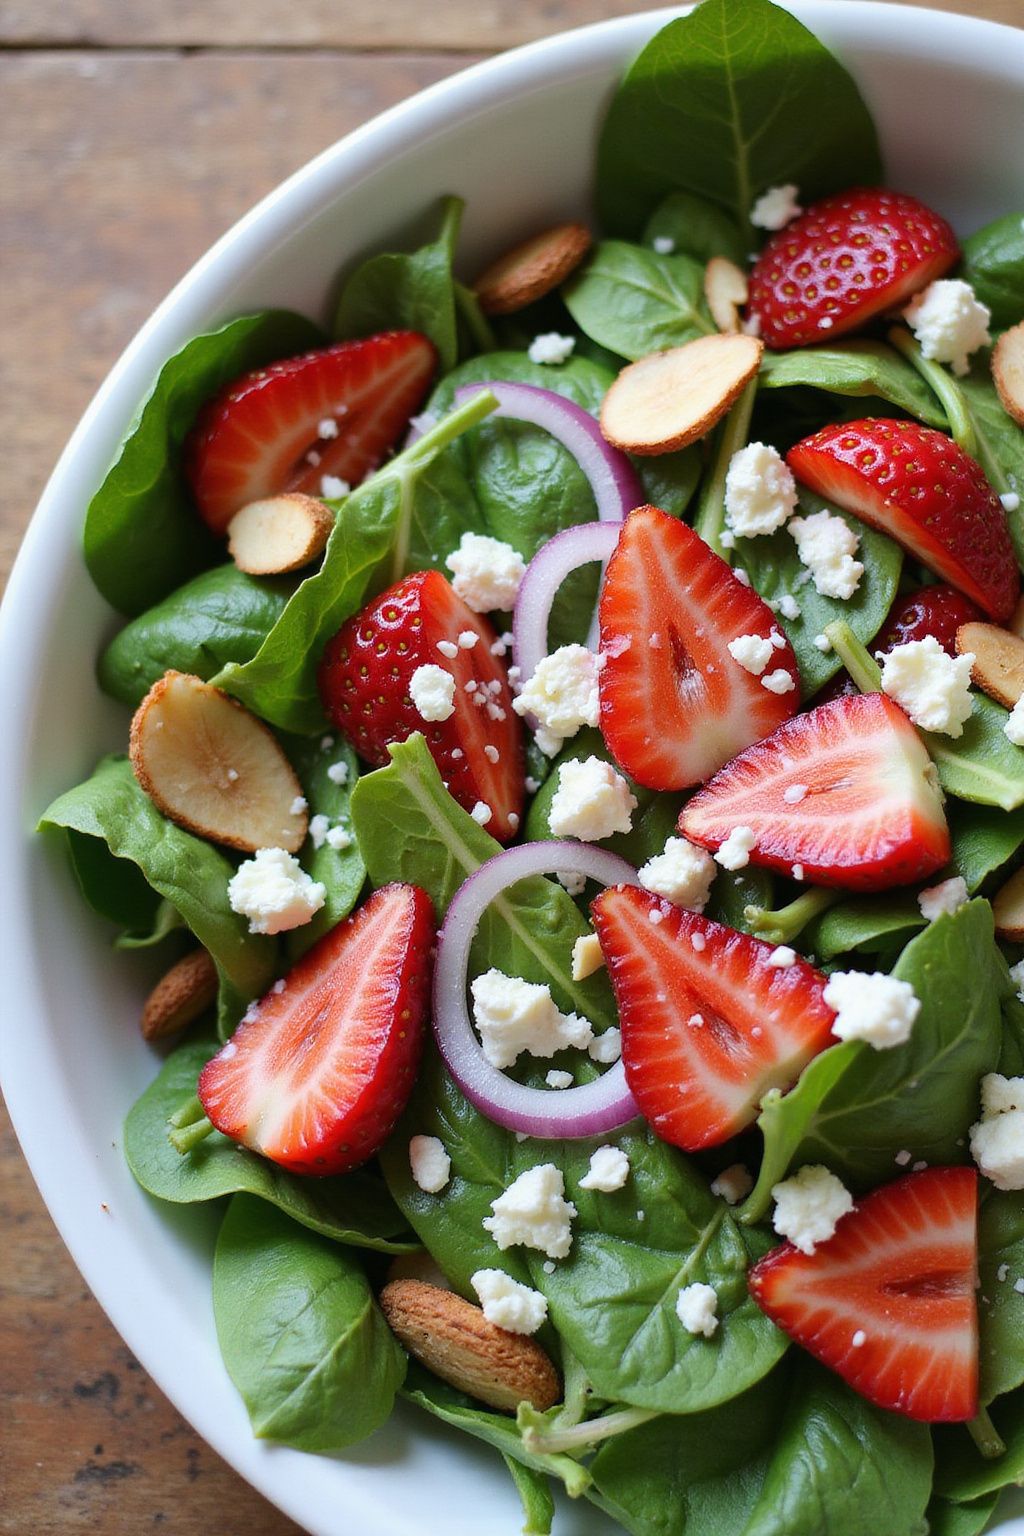
This Strawberry Spinach Salad with Poppy Seed Dressing is perfect for a refreshing meal. It’s colorful, tasty, and great for special occasions like Mother’s Day. You’ll love the sweet strawberries mixed with fresh spinach, topped off with a delicious dressing!
Prep Time: 15 minutes
Total Time: 15 minutes
Servings: 4
Ingredients:
- 6 cups fresh spinach leaves, washed and dried
- 1 cup strawberries, sliced
- 1/2 cup sliced almonds (or walnuts)
- 1/4 cup red onion, thinly sliced
- 1/2 cup feta cheese, crumbled (optional)
Instructions:
Start by preparing the spinach. Place the 6 cups of fresh spinach leaves into a large salad bowl. Make sure they are washed and properly dried for the best texture.
Next, add the sliced strawberries. Use 1 cup of strawberries and sprinkle them evenly over the spinach. The strawberries will add a nice pop of color and sweetness to the salad.
Now, it’s time for the crunch! Toss in 1/2 cup of sliced almonds or walnuts. These nuts will give your salad a satisfying texture.
Next, add the 1/4 cup of thinly sliced red onion. The onions will provide a slight kick that complements the sweetness of the strawberries.
If you want an extra layer of flavor, crumble 1/2 cup of feta cheese on top. This is optional, but it adds a salty contrast that many people love.
Finally, drizzle your favorite poppy seed dressing over the salad just before serving. Toss everything gently to combine, making sure the dressing coats the leaves and toppings evenly. Enjoy!
Tips:
- For a brighter and more flavorful salad, prepare it just before serving to keep the spinach crisp.
- You can make the salad more filling by adding grilled chicken or chickpeas.
- Substitute the poppy seed dressing with a balsamic vinaigrette if you prefer a tangier flavor.
Nutrition Facts:
- Calories: 220
- Protein: 6g
- Fat: 15g
- Carbohydrates: 20g
- Fiber: 4g
- Sugar: 5g
8 Quick Beef Stroganoff
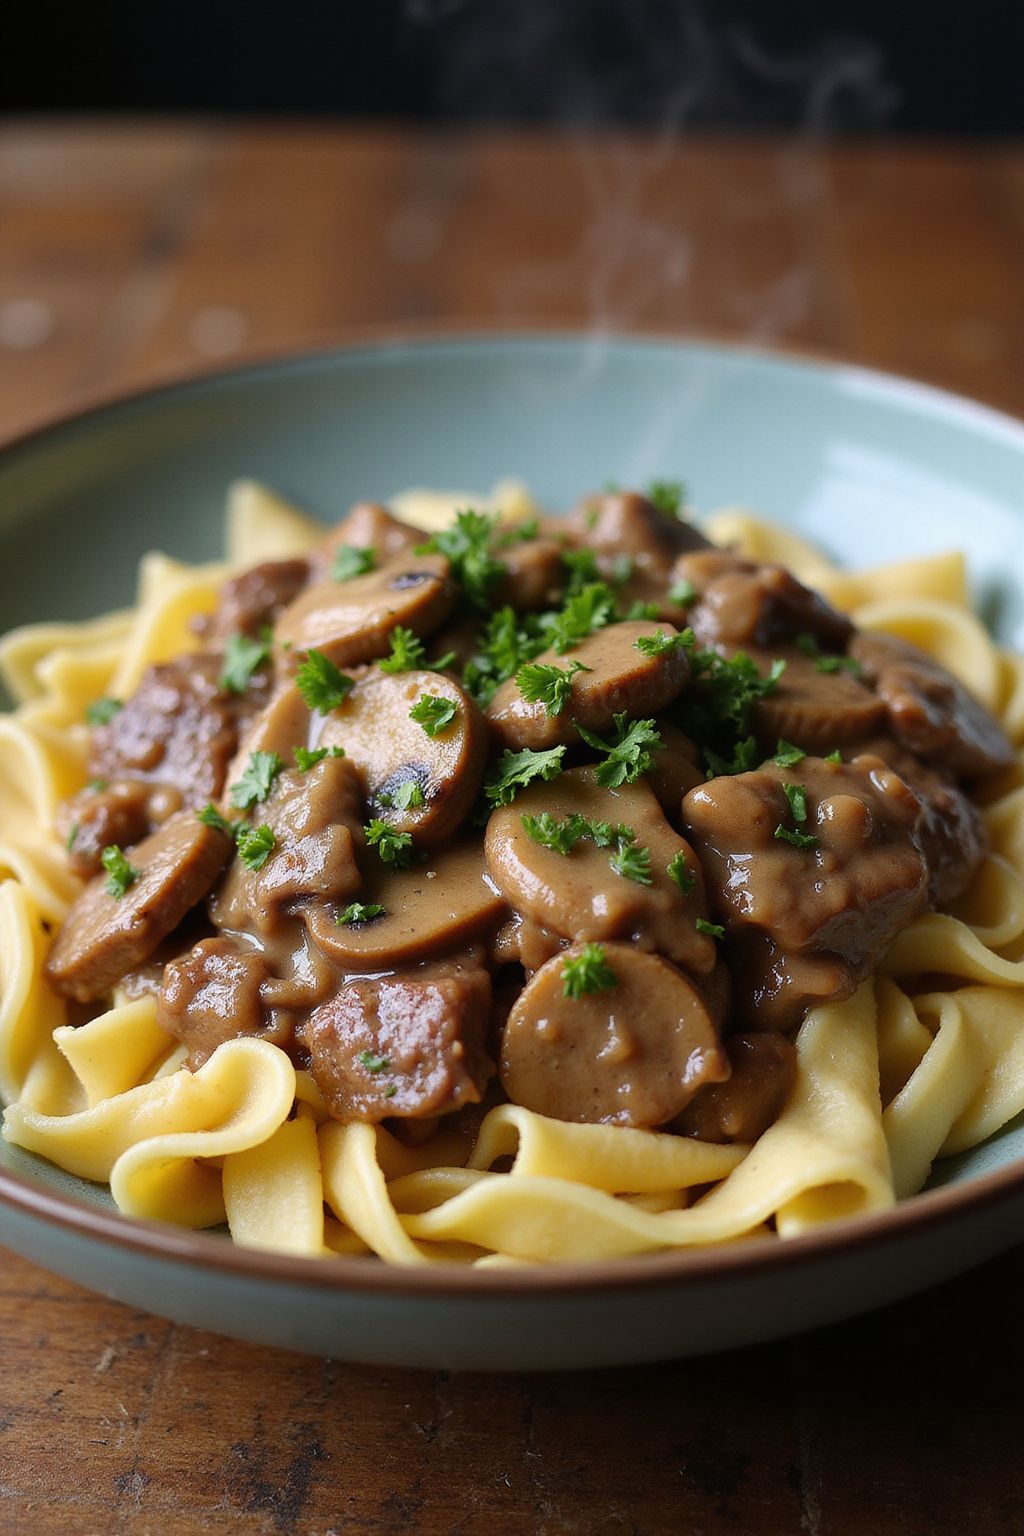
Quick Beef Stroganoff is a delicious and easy meal that you can whip up in no time. Perfect for a cozy family dinner, this dish features tender beef strips in a creamy mushroom sauce served over egg noodles. It’s rich in flavor and sure to please everyone at the table.
Prep Time: 10 minutes
Cook Time: 15 minutes
Total Time: 25 minutes
Servings: 4
Ingredients:
- 1 pound beef sirloin, cut into thin strips
- 1 medium onion, chopped
- 2 cups mushrooms, sliced
- 2 tablespoons olive oil
- 2 teaspoons garlic, minced
- 1 cup beef broth
- 1 tablespoon Worcestershire sauce
- 1 cup sour cream
- 1 tablespoon all-purpose flour
- Salt and pepper to taste
- 8 ounces egg noodles, cooked according to package instructions
- Chopped parsley for garnish (optional)
Instructions:
Start by heating 2 tablespoons of olive oil in a large skillet over medium-high heat. Next, add the chopped onion and sauté it until it becomes soft and translucent, about 3-4 minutes.
Then, add the sliced mushrooms and continue cooking until they are tender, which takes another 4-5 minutes. Stir in the minced garlic and cook for an additional 30 seconds until fragrant.
Now, add the beef strips to the skillet. Cook them until they are browned on all sides, about 3-5 minutes. Make sure to stir occasionally so the beef cooks evenly.
Once the beef is browned, pour in the beef broth and the Worcestershire sauce. Bring the mixture to a gentle simmer and allow it to cook for about 5 minutes. This will help develop the flavors.
In a small bowl, mix 1 tablespoon of flour with 1 cup of sour cream, and blend until smooth. Slowly stir this mixture into the skillet, reducing the heat to low. Cook for 3-4 minutes until the sauce thickens. Season with salt and pepper to taste.
Finally, serve the stroganoff over the cooked egg noodles and garnish with chopped parsley if desired. Enjoy your quick and tasty meal!
Tips:
- For extra flavor, you can add a splash of white wine to the mushroom mixture.
- Feel free to swap beef with chicken or turkey for a lighter option.
- Ensure your beef is sliced thinly to cook evenly and stay tender.
Nutrition Facts:
- Calories: 450
- Protein: 35g
- Carbohydrates: 50g
- Fat: 15g
- Sodium: 800mg
9 Zucchini Noodles with Marinara Sauce
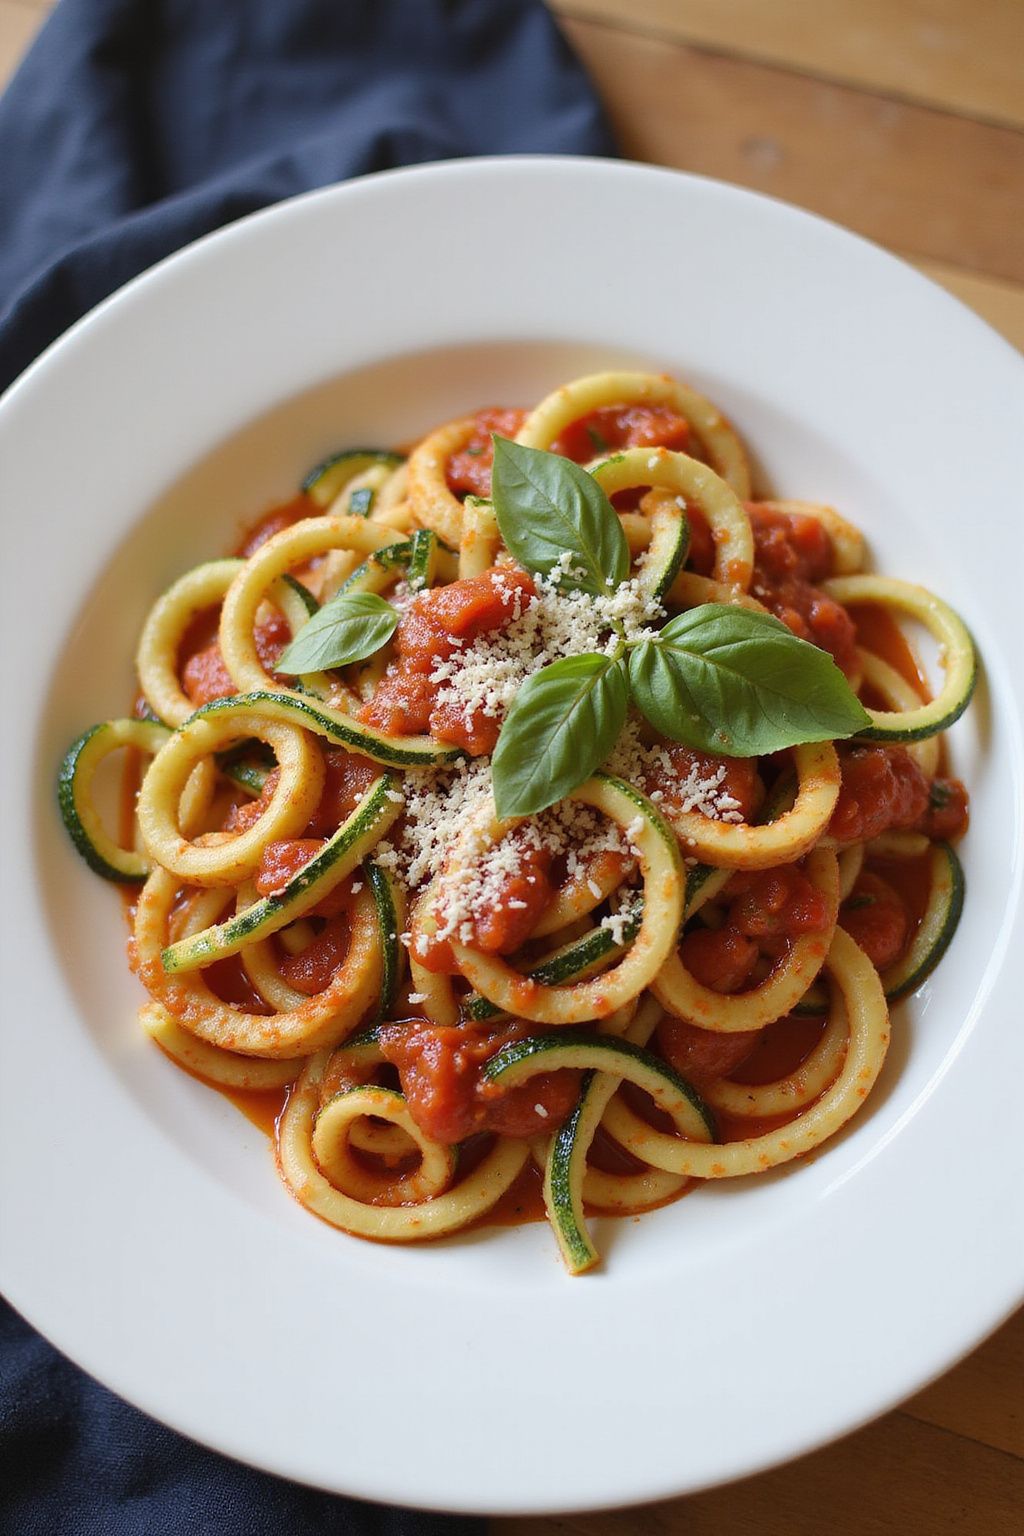
Zucchini noodles, also known as zoodles, are a fantastic and healthy alternative to traditional pasta. Paired with a rich and flavorful marinara sauce, they create a delightful dish that is not only tasty but also low in carbs. This recipe is perfect for a light dinner or a special occasion!
Prep Time: 10 minutes
Cook Time: 15 minutes
Total Time: 25 minutes
Servings: 4
Ingredients:
- 4 medium zucchinis
- 2 tablespoons olive oil
- 3 cloves garlic, minced
- 1 can (14 oz) crushed tomatoes
- 1 teaspoon dried basil
- 1 teaspoon dried oregano
- Salt and pepper, to taste
- Grated Parmesan cheese, for serving (optional)
Instructions:
Start by washing the zucchinis. Use a spiralizer to turn the zucchinis into noodles, creating long, thin strands. If you don’t have a spiralizer, a vegetable peeler can work too.
Next, heat 2 tablespoons of olive oil in a large skillet over medium heat. Once the oil is hot, add the minced garlic and sauté it for about 1 minute until it becomes fragrant. Be careful not to let it burn!
Now, pour the can of crushed tomatoes into the skillet. Sprinkle in the dried basil and dried oregano. Stir this mixture well. Allow it to simmer for about 10 minutes, letting the flavors blend together.
While the sauce is simmering, take another large skillet and add a little olive oil. Once the oil is hot, add your zucchini noodles. Sauté them for 2-3 minutes, until they’re tender but still have a bit of crunch. Don’t overcook them, otherwise, they will become mushy.
After the zucchini noodles are ready, it’s time to combine everything. Pour the marinara sauce over the zucchini noodles in the pan. Toss gently to coat the zoodles in the sauce. Season with salt and pepper to taste.
Serve the zucchini noodles hot, and top with grated Parmesan cheese if desired. Enjoy your delicious and healthy meal!
Tips:
- If you don’t have a spiralizer, you can use a vegetable peeler or a grater to create flat noodles.
- To make it a full meal, consider adding cooked chicken or meatballs for extra protein.
- Leftover marinara sauce can be stored in the fridge for up to a week or frozen for later use.
Nutrition Facts:
- Calories: 150
- Fat: 9g
- Carbohydrates: 15g
- Fiber: 4g
- Protein: 3g
10 Savory Stuffed Bell Peppers

Savory Stuffed Bell Peppers are a delicious and colorful dish that everyone will love. They are perfect for dinner and can be easily customized to fit your taste. The combination of juicy bell peppers filled with a savory mixture makes for a delightful meal!
Prep Time: 15 minutes
Cook Time: 30 minutes
Total Time: 45 minutes
Servings: 4
Ingredients:
- 4 large bell peppers (any color you like)
- 1 pound ground beef or turkey
- 1 cup cooked rice
- 1 small onion, diced
- 2 cloves garlic, minced
- 1 can (14.5 oz) diced tomatoes, undrained
- 1 teaspoon Italian seasoning
- 1/2 teaspoon salt
- 1/4 teaspoon black pepper
- 1 cup shredded cheese (cheddar or mozzarella)
- Fresh parsley for garnish (optional)
Instructions:
Start by preheating your oven to 375°F (190°C). This will ensure that your stuffed peppers will cook evenly and be nice and warm when served.
Next, wash your bell peppers. Cut the tops off and carefully remove the seeds and membranes. Set them aside for now as they will be filled with our savory mixture.
In a large skillet, heat some oil over medium heat. Add the diced onion and minced garlic. Sauté until the onion becomes soft, which usually takes about 3-5 minutes.
Then, add the ground beef or turkey to the skillet. Cook it until it is browned and fully cooked. Drain any excess fat if needed.
Once the meat is cooked, stir in the cooked rice, diced tomatoes, Italian seasoning, salt, and black pepper. Mix everything together until it’s well combined. Let it cook for another 2-3 minutes to let the flavors meld.
Now, remove the skillet from the heat and stir in half of the shredded cheese. This will make the filling extra cheesy and delicious!
Carefully spoon the meat mixture into each bell pepper until they are packed full. Place the stuffed peppers upright in a baking dish. If they won’t stand up, you can slice a little off the bottom.
Cover the baking dish with aluminum foil and bake in the preheated oven for 25 minutes. After that, remove the foil and sprinkle the remaining cheese on top of each pepper. Bake for an additional 5 minutes or until the cheese is melted and bubbly.
Once finished, remove the peppers from the oven. Let them cool for a few minutes before serving. If desired, garnish with fresh parsley for an extra touch of color.
Tips:
- For a vegetarian option, substitute the meat with black beans or lentils.
- Feel free to add other vegetables like corn or zucchini into the filling for extra flavor and nutrition.
- These stuffed peppers can be made ahead of time and stored in the refrigerator before baking.
Nutrition Facts:
- Calories: 350 per serving
- Protein: 25g
- Carbohydrates: 30g
- Fat: 15g
- Fiber: 3g
- Sodium: 400mg
11 Caprese Pasta Salad
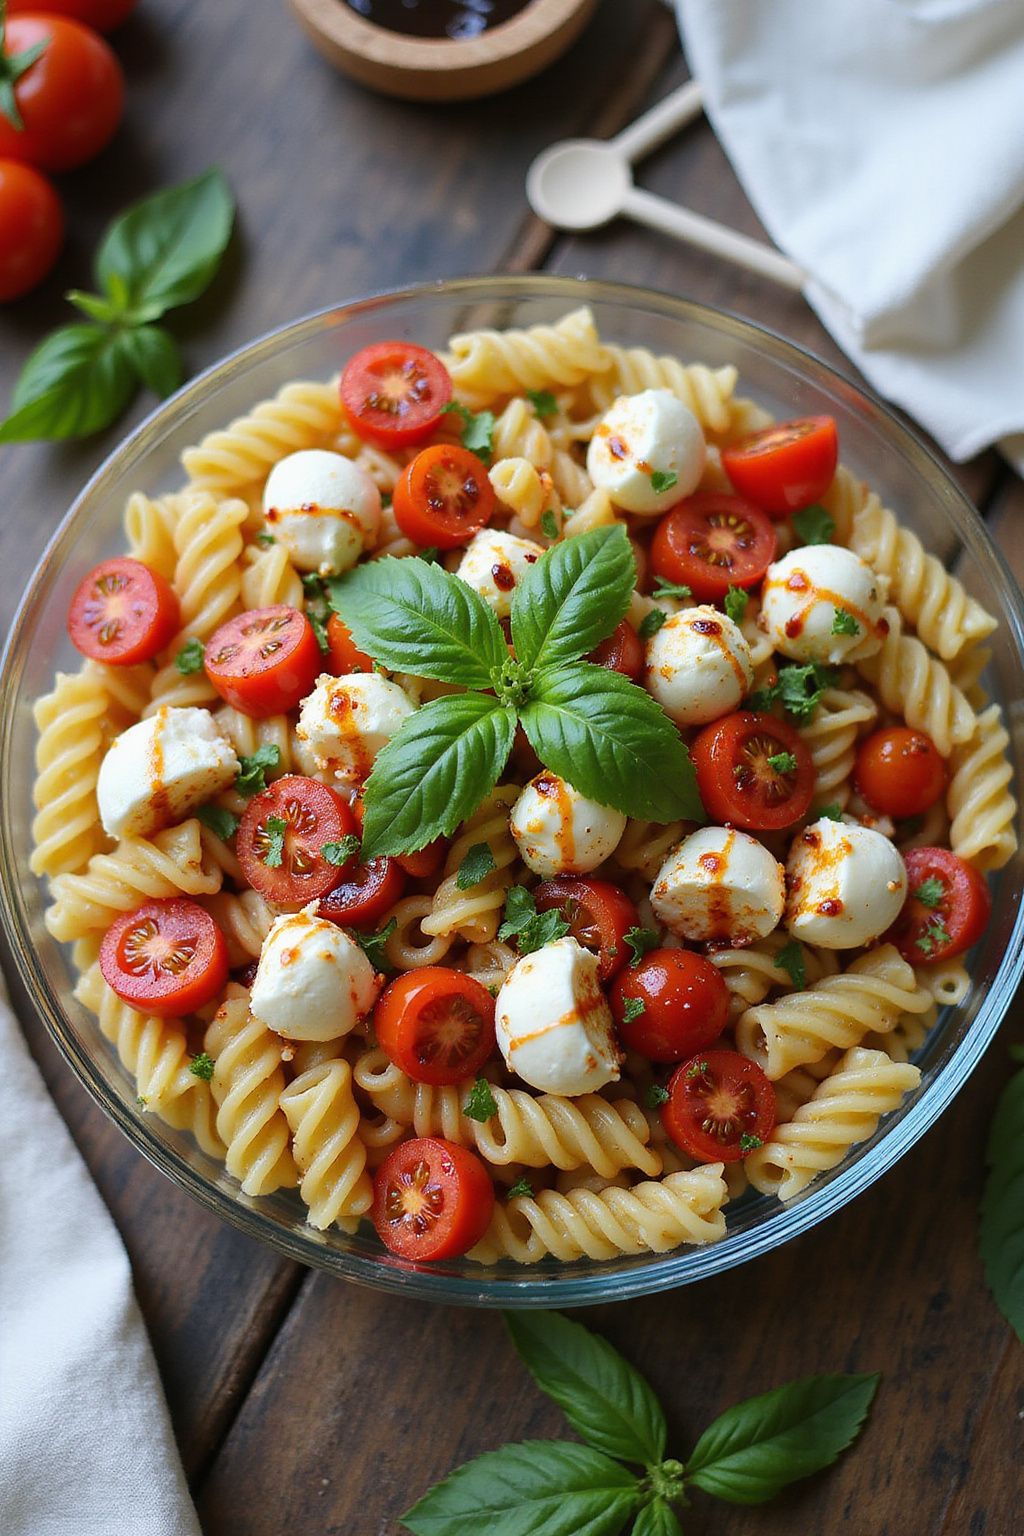
Caprese Pasta Salad is a fresh and vibrant dish that combines the flavors of Italy in a pasta form. It is perfect for gatherings, picnics, or even a simple lunch. This salad is easy to make and can be enjoyed as a side dish or as a light main course.
Prep Time: 15 minutes
Total Time: 15 minutes
Servings: 4
Ingredients:
- 8 ounces of pasta (fusilli or penne work great)
- 1 cup cherry tomatoes, halved
- 1 cup fresh mozzarella balls
- 1/2 cup fresh basil leaves, torn
- 1/4 cup extra virgin olive oil
- 2 tablespoons balsamic vinegar
- Salt and pepper to taste
Instructions:
Start by cooking the pasta according to the package instructions. Make sure to add a pinch of salt to the boiling water. Once the pasta is al dente, drain it and rinse it under cold water to stop the cooking process.
In a large bowl, combine the cooked pasta, halved cherry tomatoes, and fresh mozzarella balls. Gently mix them together to combine the flavors.
Next, add the torn basil leaves to the bowl. This will bring a lovely fragrance and taste to your salad.
In a small bowl, whisk together the extra virgin olive oil, balsamic vinegar, salt, and pepper. Pour this dressing over the pasta mixture and toss everything together until well coated.
Lastly, serve your Caprese Pasta Salad right away, or chill it in the fridge for about 30 minutes for a cooler option. Enjoy!
Tips:
- For extra flavor, consider adding sliced black olives or diced avocado.
- You can prepare the salad a few hours in advance, allowing the flavors to meld even more.
- To make this dish gluten-free, use gluten-free pasta instead.
Nutrition Facts:
- Calories: 320
- Protein: 12g
- Carbohydrates: 34g
- Fat: 18g
- Sodium: 400mg
- Fiber: 2g
12 Grilled Lemon Herb Chicken Skewers
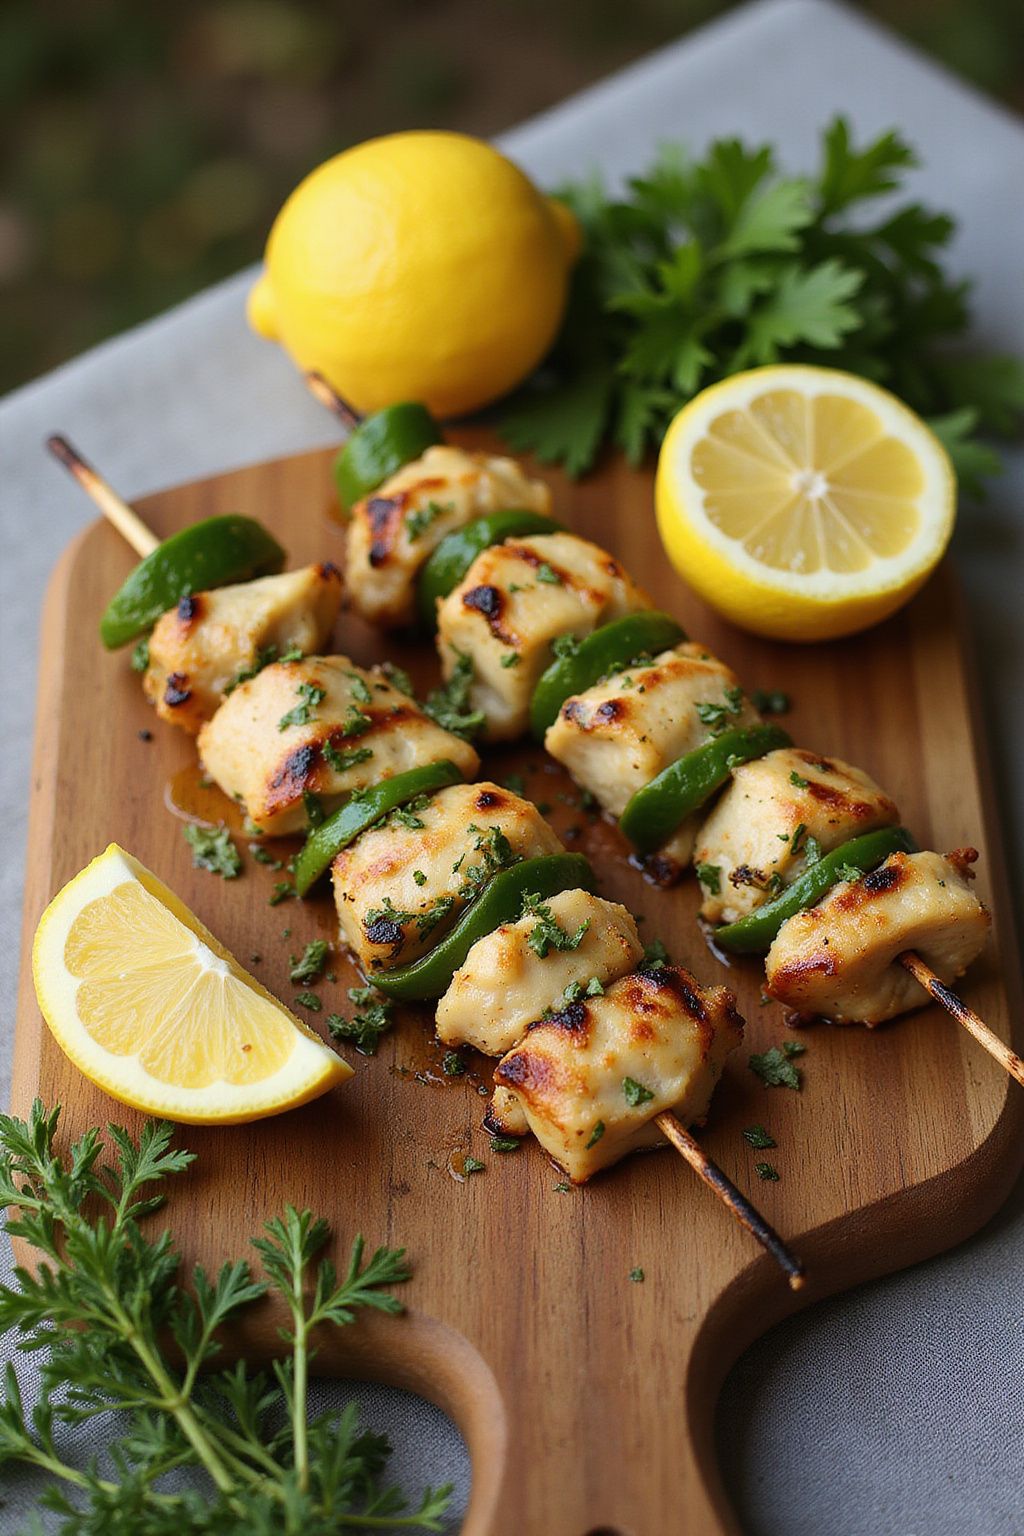
Grilled Lemon Herb Chicken Skewers are a fresh and tasty dish that’s perfect for any occasion, especially for a special Mother’s Day dinner. These skewers are packed with flavor, making them a hit with family and friends. Plus, they’re easy to make and great for grilling season!
Prep Time: 15 minutes
Additional Time: 30 minutes (for marinating)
Total Time: 45 minutes
Servings: 4
Ingredients:
- 1 pound boneless, skinless chicken breasts, cut into 1-inch cubes
- 1/4 cup olive oil
- 2 tablespoons fresh lemon juice
- 2 tablespoons fresh parsley, chopped
- 1 tablespoon fresh thyme, chopped
- 1 tablespoon fresh oregano, chopped
- 2 cloves garlic, minced
- 1 teaspoon salt
- 1/2 teaspoon black pepper
- Wood or metal skewers
Instructions:
Start by preparing the marinade. In a large mixing bowl, combine the olive oil, lemon juice, fresh parsley, thyme, oregano, garlic, salt, and black pepper. Mix well until everything is combined.
Next, add the chicken cubes to the bowl and stir to coat each piece with the marinade. Cover the bowl with plastic wrap and let the chicken marinate in the refrigerator for about 30 minutes. This will help to enhance the flavors.
While the chicken is marinating, soak the wood skewers in water for about 10 minutes if you’re using them. This will prevent them from burning on the grill.
After marinating, take the chicken out of the refrigerator. Preheat your grill to medium-high heat. Once it’s hot, thread the marinated chicken pieces onto the skewers, making sure to leave a bit of space between each piece.
Put the skewers on the grill and cook for about 10-15 minutes, turning them once halfway through. The chicken should be cooked through and have nice grill marks. You can check if they’re done by making sure the internal temperature reaches 165°F.
Once cooked, take the skewers off the grill and let them cool for a couple of minutes. Serve your delicious grilled lemon herb chicken skewers warm, and enjoy!
Tips:
- You can also add bell peppers, onions, or zucchini to the skewers for extra flavor and color.
- If you prefer a bit of spice, feel free to add a pinch of red pepper flakes to the marinade.
- These skewers can be served with a side salad or over rice for a complete meal.
Nutrition Facts:
- Calories: 250 per serving
- Protein: 30g
- Fat: 12g
- Carbohydrates: 2g
- Fiber: 0g
- Sugar: 0g
13 Mediterranean Quinoa Bowl
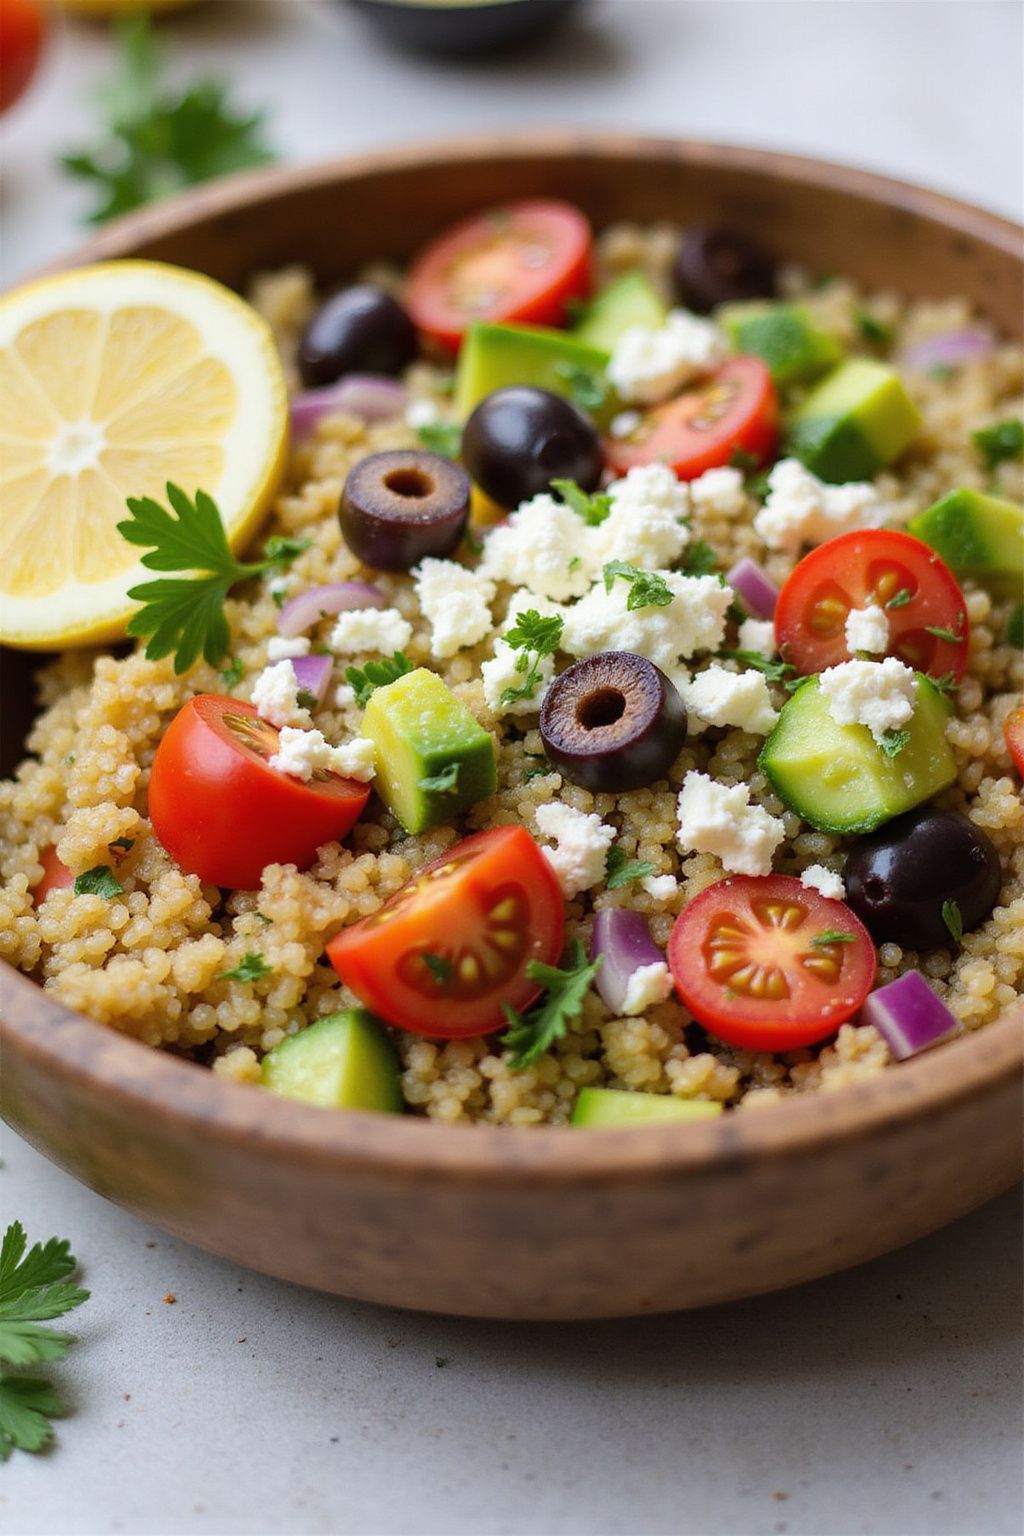
The Mediterranean Quinoa Bowl is a delicious and healthy meal that is packed with nutrients. It’s perfect for lunch or dinner, and you can customize it with your favorite toppings. Plus, it’s super easy to make!
Prep Time: 15 minutes
Cook Time: 20 minutes
Additional Time: 5 minutes (for cooling)
Total Time: 40 minutes
Servings: 4
Ingredients:
- 1 cup quinoa
- 2 cups vegetable broth or water
- 1 cup cherry tomatoes, halved
- 1 cucumber, diced
- 1/2 cup red onion, finely chopped
- 1/2 cup Kalamata olives, pitted and sliced
- 1/2 cup feta cheese, crumbled
- 1/4 cup fresh parsley, chopped
- 1 lemon, juiced
- 3 tablespoons olive oil
- **Salt and pepper to taste
Instructions:
Start by rinsing the quinoa under cold water in a fine mesh strainer. This helps remove any bitterness. Next, you’ll need to cook the quinoa. In a medium pot, add the rinsed quinoa and vegetable broth or water. Bring it to a boil, then reduce the heat to low and cover the pot. Let it simmer for about 15 minutes until all the liquid is absorbed.
Once cooked, remove the pot from the heat and let it sit covered for an additional 5 minutes. This allows the quinoa to fluff up. After resting, use a fork to fluff the quinoa gently and set it aside to cool.
In a large bowl, mix together the cherry tomatoes, cucumber, red onion, Kalamata olives, and feta cheese. Add the cooled quinoa to this mixture. Drizzle with olive oil and the juice of one lemon. Toss everything together until well combined.
Season with salt and pepper to taste. Finally, sprinkle with fresh parsley for an extra burst of flavor. Serve chilled or at room temperature. Enjoy!
Tips:
- You can add grilled chicken or chickpeas for extra protein.
- Substitute feta cheese with vegan cheese if you prefer a dairy-free option.
- Store leftovers in an airtight container in the fridge for up to 3 days.
Nutrition Facts:
- Calories: 300
- Protein: 10g
- Fat: 15g
- Carbohydrates: 32g
- Fiber: 5g
- Sugar: 2g
14 Easy Vegetable Stir-Fry
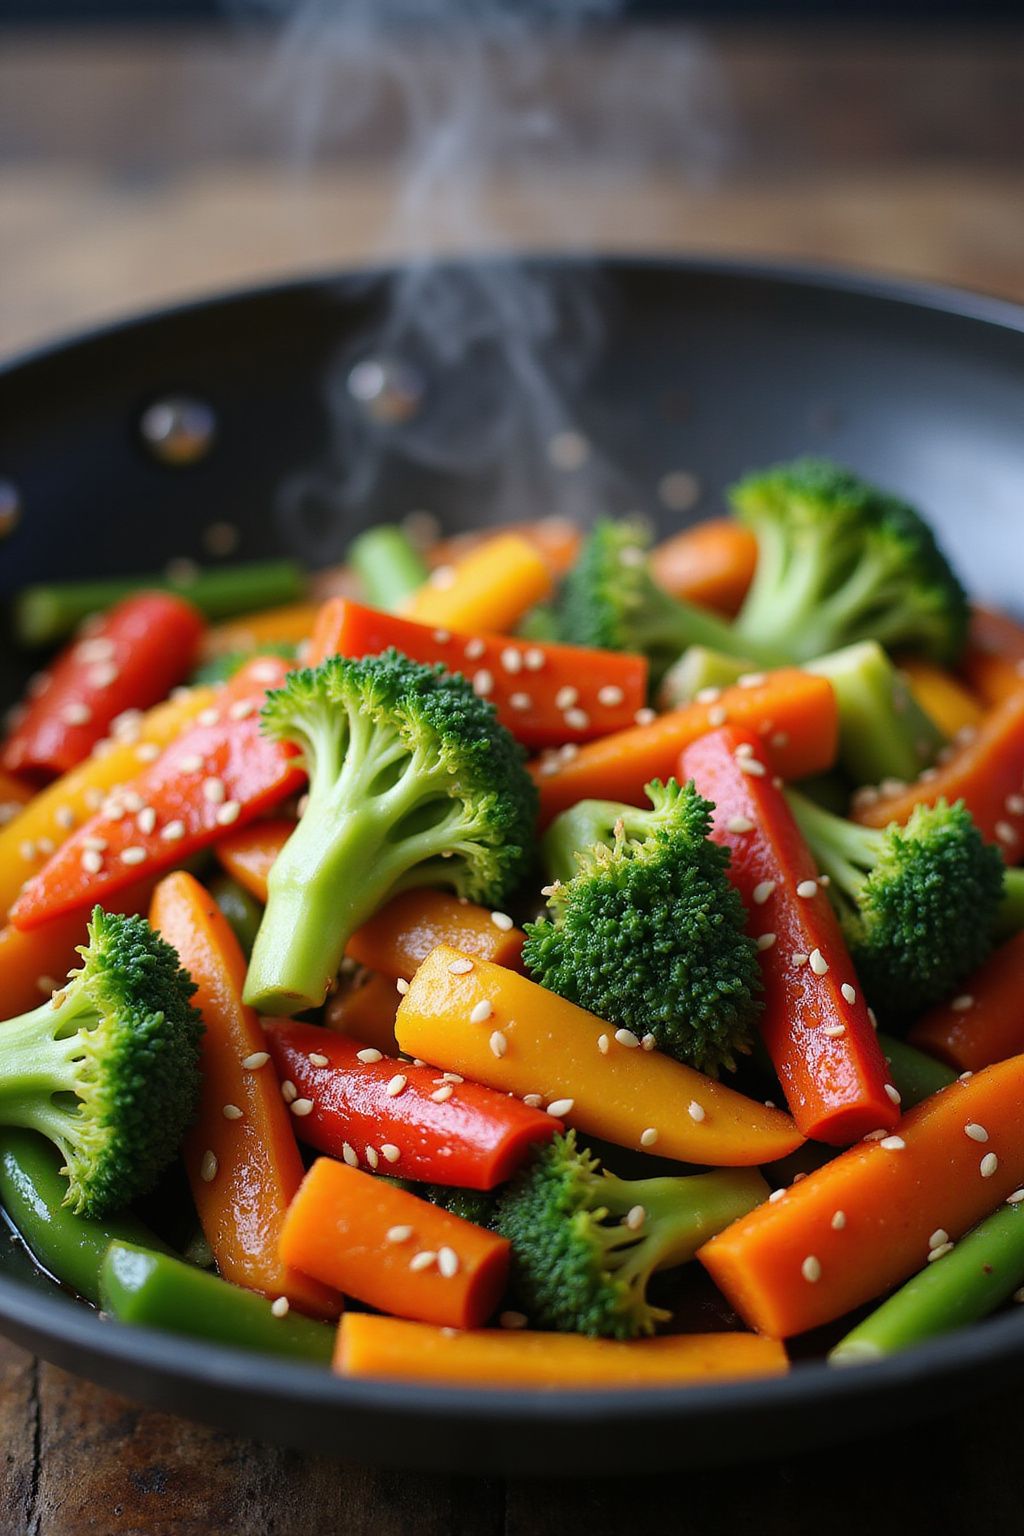
This Easy Vegetable Stir-Fry is a quick and healthy dish that everyone will love. It’s packed with colorful vegetables and can be made in just a few minutes. Whether you’re making dinner for your family or just yourself, this stir-fry is a great choice!
Prep Time: 10 minutes
Cook Time: 15 minutes
Total Time: 25 minutes
Servings: 4
Ingredients:
- 2 cups of mixed vegetables (like bell peppers, broccoli, and carrots)
- 2 tablespoons of vegetable oil
- 2 cloves of garlic, minced
- 1 tablespoon of soy sauce
- 1 teaspoon of sesame oil
- Salt and pepper to taste
- Optional: Cooked rice or noodles for serving
Instructions:
Start by washing and chopping all of your mixed vegetables into bite-sized pieces. It’s important to have them ready before you start cooking.
In a large frying pan or wok, heat 2 tablespoons of vegetable oil over medium-high heat. Once the oil is hot, add the minced garlic. Stir it for about 30 seconds or until it’s fragrant, but be careful not to burn it.
Next, toss in the chopped mixed vegetables. Stir-fry them for about 5-7 minutes or until they are tender but still crisp. Keep stirring so they cook evenly.
Once the vegetables are cooked, add 1 tablespoon of soy sauce and 1 teaspoon of sesame oil to the pan. Mix everything well, and season with salt and pepper to taste.
Cook for another 1-2 minutes, allowing the flavors to blend together. If you want, you can serve this stir-fry over cooked rice or noodles for a complete meal.
Tips:
- Feel free to use any vegetables you have on hand. Zucchini, snow peas, or mushrooms work great too!
- If you like it spicy, add a pinch of red pepper flakes while cooking.
- This dish is perfect for meal prepping—just store it in the fridge for up to three days!
Nutrition Facts:
- Calories: 150 per serving
- Fat: 8g
- Carbohydrates: 15g
- Protein: 3g
- Fiber: 4g
15 Creamy Mushroom Risotto
Creamy Mushroom Risotto is a comforting dish that’s perfect for any special occasion, especially for Mother’s Day. Its rich, creamy texture and earthy mushroom flavor will impress everyone at the table.
Prep Time: 10 minutes
Cook Time: 30 minutes
Total Time: 40 minutes
Servings: 4
Ingredients:
- 1 cup Arborio rice
- 4 cups vegetable or chicken broth
- 1 cup mushrooms, sliced (such as cremini or button)
- 1 small onion, finely chopped
- 2 cloves garlic, minced
- 1/2 cup white wine (optional)
- 1/2 cup grated Parmesan cheese
- 2 tablespoons butter
- 2 tablespoons olive oil
- Salt and pepper to taste
- Fresh parsley for garnish (optional)
Instructions:
Start by heating the broth in a pot over low heat. Keep it warm but not boiling as this will help the risotto cook evenly.
In a separate large pan, heat the olive oil and 1 tablespoon of butter over medium heat. Once the butter melts, add the chopped onion and sauté until it turns translucent, about 2-3 minutes.
Next, stir in the minced garlic and sliced mushrooms. Cook until the mushrooms are tender, which should take another 5 minutes.
Add the Arborio rice to the pan and stir well. Toast the rice in the mixture for about 2 minutes until it becomes slightly translucent. If you’re using white wine, pour it in now and let it simmer until it’s mostly absorbed.
Once the wine is absorbed, add one ladle of warm broth to the rice. Stir continuously until the liquid is absorbed. Repeat this process, adding broth one ladle at a time, until the rice is creamy and cooked al dente. This should take about 20 minutes.
Once the risotto is cooked, stir in the remaining butter and Parmesan cheese. Season with salt and pepper to taste. Cook for an additional minute until everything is well mixed.
Finally, serve hot, garnished with fresh parsley if desired. Enjoy your delicious Creamy Mushroom Risotto!
Tips:
- For extra flavor, add some sautéed spinach or peas to the risotto before serving.
- If you want a richer taste, use homemade broth instead of store-bought.
- Make sure to stir the risotto frequently; this helps to create that creamy texture.
Nutrition Facts:
- Calories: 420 per serving
- Total Fat: 15g
- Saturated Fat: 7g
- Cholesterol: 30mg
- Sodium: 800mg
- Total Carbohydrates: 60g
- Dietary Fiber: 2g
- Sugars: 2g
- Protein: 10g
16 Roasted Garlic Cauliflower Mash
Roasted Garlic Cauliflower Mash is a delicious and creamy alternative to traditional mashed potatoes. This dish is not only healthy but also packed with flavor thanks to the roasted garlic. It’s perfect for special occasions or family dinners!
Prep Time: 10 minutes
Cook Time: 30 minutes
Total Time: 40 minutes
Servings: 4
Ingredients:
- 1 large head of cauliflower, chopped into florets
- 1 head of garlic
- 2 tablespoons olive oil
- 1/4 cup milk (or more for desired creaminess)
- 2 tablespoons butter
- Salt, to taste
- Black pepper, to taste
- Fresh parsley, chopped for garnish (optional)
Instructions:
Start by preheating your oven to 400°F (200°C). Take your head of garlic and slice off the top just to expose the cloves. Drizzle 1 tablespoon of olive oil over it, then wrap it in aluminum foil. Place it on a baking sheet and put it in the oven for about 30 minutes until it’s soft and golden.
While the garlic roasts, bring a large pot of water to a boil. Add the chopped cauliflower florets to the boiling water and cook for about 10-12 minutes until they are tender. Drain the cauliflower and set it aside.
Once the garlic is done roasting, let it cool for a few minutes. Squeeze the roasted garlic cloves out of their skins and into a large mixing bowl. Add the drained cauliflower, 2 tablespoons of butter, 1/4 cup of milk, and the remaining 1 tablespoon of olive oil to the bowl.
Now, mash the mixture using a potato masher or an immersion blender until it’s smooth and creamy. Season with salt and black pepper to taste. If you want it creamier, feel free to add an extra splash of milk!
Finally, serve your Roasted Garlic Cauliflower Mash warm, garnished with fresh chopped parsley if you like. Enjoy this flavorful dish!
Tips:
- For an extra flavor boost, add grated cheese like Parmesan or cheddar to the mash.
- You can use a blender for a super-smooth consistency, but be careful not to over-blend or it may become gummy.
- This cauliflower mash can be made ahead of time and reheated when ready to serve.
Nutrition Facts:
- Calories: 120 per serving
- Protein: 3g
- Fat: 7g
- Carbohydrates: 11g
- Fiber: 4g
- Sugars: 2g
17 Easy Chicken Piccata
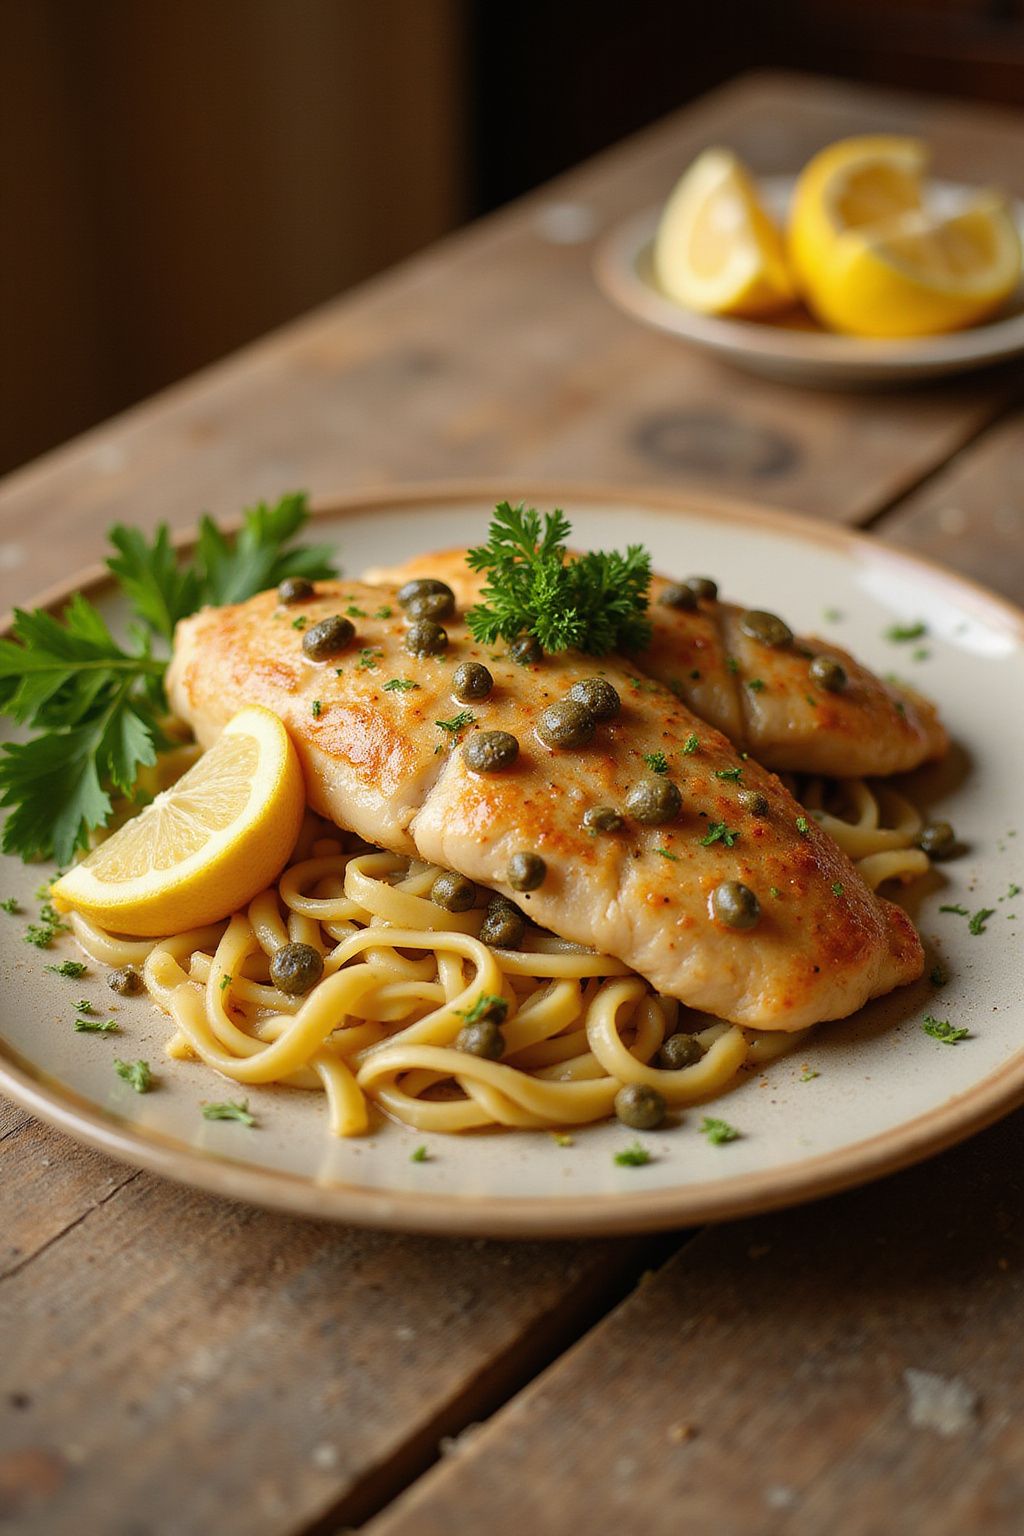
Chicken Piccata is a simple yet delicious dish that brings a taste of Italy to your dinner table. It features tender chicken breasts cooked in a lemony sauce with capers, creating a perfect balance of flavors. This recipe is quick to prepare, making it ideal for a special occasion or a weeknight meal.
Prep Time: 10 minutes
Cook Time: 15 minutes
Total Time: 25 minutes
Servings: 4
Ingredients:
- 4 boneless, skinless chicken breasts
- 1/2 cup all-purpose flour
- Salt and pepper, to taste
- 4 tablespoons olive oil
- 4 tablespoons unsalted butter
- 1/2 cup chicken broth
- 1/4 cup fresh lemon juice
- 2 tablespoons capers, rinsed and drained
- Fresh parsley, chopped (for garnish)
Instructions:
First, start by flattening the chicken breasts to an even thickness. Place each chicken breast in a plastic bag and gently pound it with a meat mallet or rolling pin. This will help them cook evenly.
Next, season both sides of the chicken breasts with salt and pepper. Then, dredge each chicken breast in flour, shaking off the excess. This step will give your chicken a nice golden crust.
In a large skillet, heat 2 tablespoons of olive oil and 2 tablespoons of butter over medium heat. Once the butter is melted and bubbling, add the chicken breasts to the skillet. Cook for about 3-4 minutes on each side until they are golden brown and cooked through. Remove the chicken from the skillet and set aside on a plate.
In the same skillet, pour in the chicken broth and lemon juice. Use a wooden spoon to scrape any bits stuck to the pan. Allow the sauce to simmer for about 2-3 minutes. Then, stir in the capers and the remaining 2 tablespoons of butter until melted.
Finally, return the chicken to the skillet, spoon some sauce over the top, and let it simmer for an additional minute to warm it up. Garnish with fresh parsley before serving.
Tips:
- Serve this dish with pasta or rice to soak up the delicious sauce.
- For extra flavor, you can marinate the chicken in lemon juice and garlic for 30 minutes before cooking.
- If you prefer a thicker sauce, mix a teaspoon of cornstarch with water and add it to the broth while simmering.
Nutrition Facts:
- Calories: 310
- Protein: 27g
- Fat: 18g
- Carbohydrates: 8g
- Fiber: 0g
- Sodium: 400mg
18 Teriyaki Salmon with Broccoli
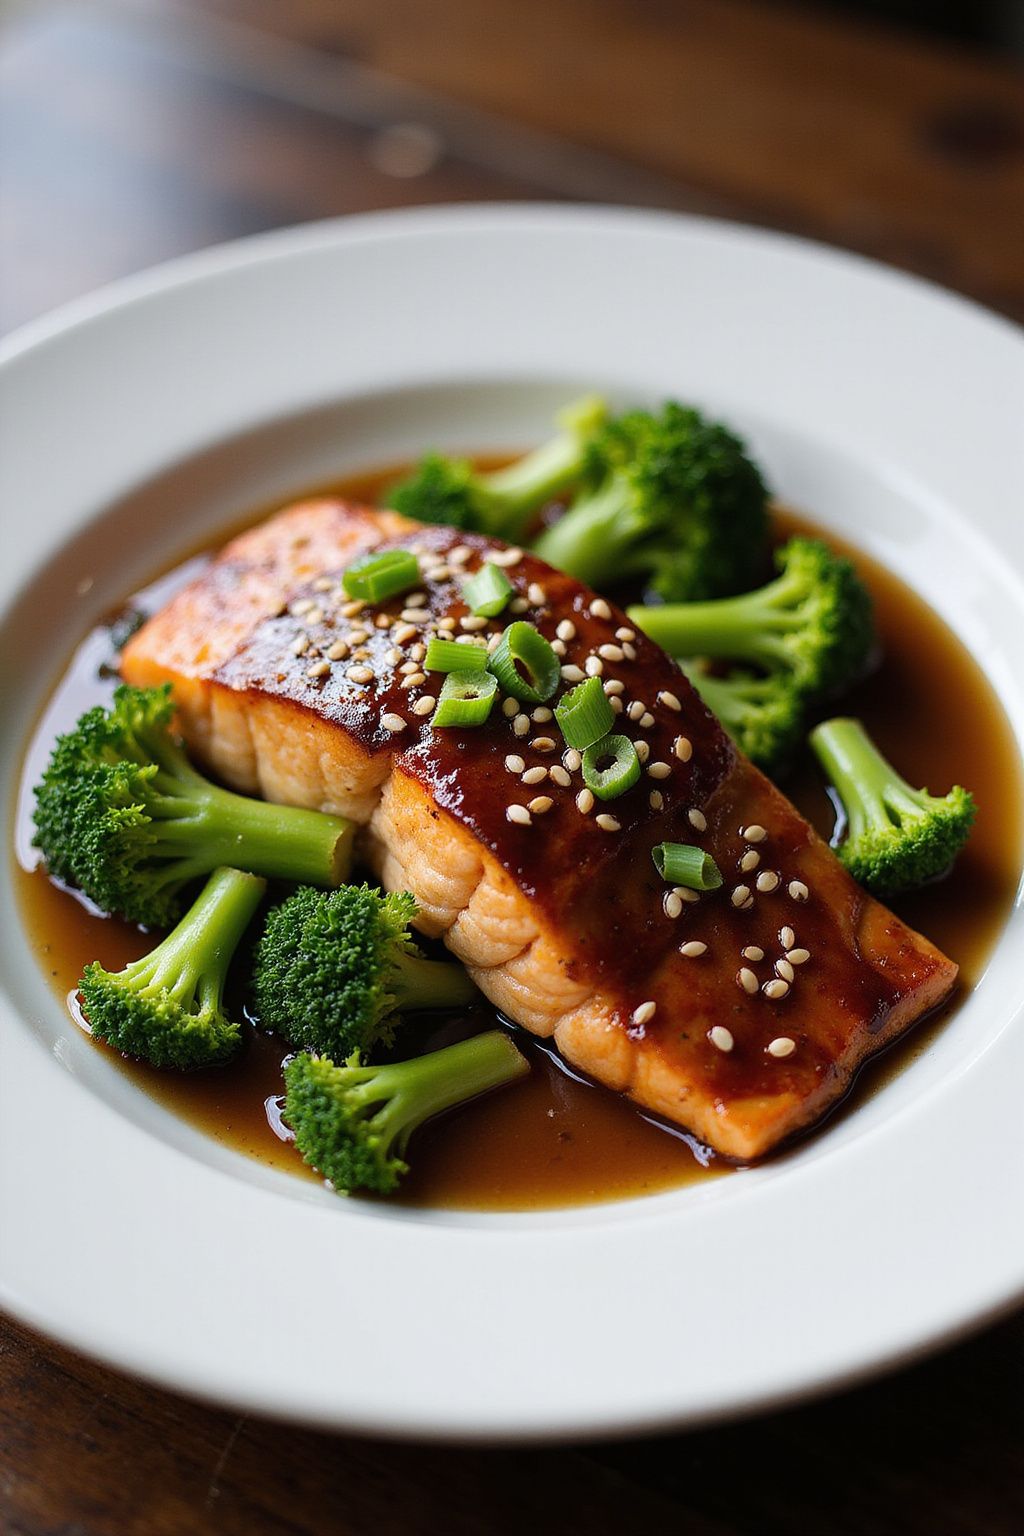
A delightful dish for your next family dinner is Teriyaki Salmon with Broccoli. It’s packed with flavor and comes together quickly, making it perfect for a special occasion like Mother’s Day. The sweetness of the teriyaki sauce complements the tender salmon and bright green broccoli beautifully.
Prep Time: 10 minutes
Cook Time: 15 minutes
Total Time: 25 minutes
Servings: 4
Ingredients:
- 4 salmon fillets
- 1 cup broccoli florets
- 1/3 cup teriyaki sauce
- 2 tablespoons soy sauce
- 1 tablespoon honey
- 1 tablespoon sesame oil
- 1 teaspoon minced garlic
- 1 teaspoon minced ginger
- 1 tablespoon sesame seeds (optional for garnish)
- Green onions for garnish (optional)
Instructions:
Start by preheating your oven to 400°F (200°C). This will help cook your salmon and broccoli evenly.
In a small bowl, mix together the teriyaki sauce, soy sauce, honey, sesame oil, minced garlic, and minced ginger. This will be your tasty marinade.
Place the salmon fillets in a baking dish. Pour half of the marinade mixture over the salmon fillets, making sure they are well-coated. Let them sit for about 5 minutes to absorb the flavors.
While the salmon marinates, prepare the broccoli. Toss the broccoli florets with the remaining marinade in a separate bowl. Make sure they are evenly coated.
After marinating, place the broccoli around the salmon in the baking dish. Bake everything in the preheated oven for about 12-15 minutes. The salmon should be flaky and the broccoli tender.
Once done, take the dish out of the oven. Optionally, sprinkle sesame seeds and sliced green onions on top for a fresh look. Serve immediately and enjoy your delicious Teriyaki Salmon with Broccoli!
Tips:
- For extra flavor, marinate the salmon for 30 minutes before baking.
- You can substitute broccoli with other vegetables like bell peppers or snap peas.
- Serve over rice or quinoa for a complete meal.
Nutrition Facts:
- Calories: 350
- Protein: 30g
- Carbohydrates: 20g
- Fat: 20g
- Fiber: 3g
19 Cheesy Broccoli and Rice Casserole
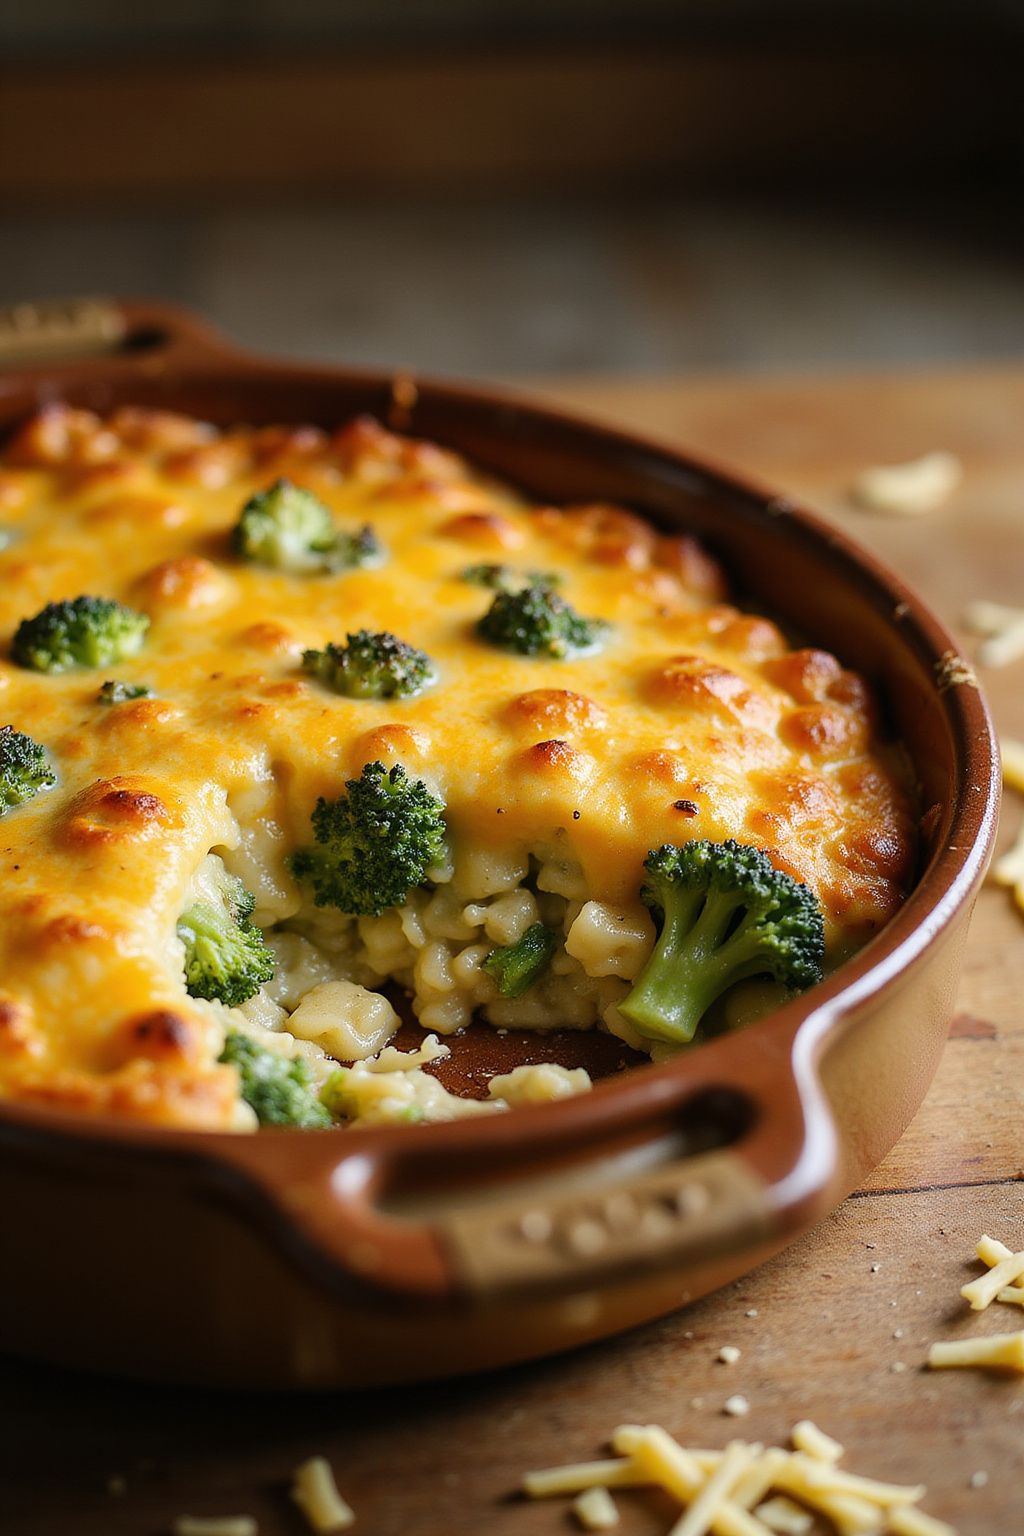
This Cheesy Broccoli and Rice Casserole is a delightful blend of flavors that brings comfort to any dinner table. It’s creamy, cheesy, and loaded with nutritious broccoli, making it a perfect side dish or even a meal on its own. You’ll love how easy and quick it is to prepare!
Prep Time: 15 minutes
Cook Time: 30 minutes
Total Time: 45 minutes
Servings: 6
Ingredients:
- 2 cups cooked white or brown rice
- 1 cup broccoli florets (fresh or frozen)
- 1 can (10.5 oz) cream of mushroom soup
- 1 cup shredded cheddar cheese
- 1/2 cup milk
- 1/2 tsp garlic powder
- 1/2 tsp onion powder
- 1/4 tsp black pepper
- 1/2 cup breadcrumbs (optional)
- 2 tbsp butter (for greasing the baking dish)
Instructions:
First, preheat your oven to 350°F (175°C). Grease a 2-quart baking dish with butter to ensure nothing sticks during baking.
In a large bowl, combine the cooked rice, broccoli florets, cream of mushroom soup, and milk. Stir well until everything is fully mixed. The creamy soup will help bind all the ingredients together.
Next, add the shredded cheddar cheese, garlic powder, onion powder, and black pepper. Mix until the cheese is evenly distributed throughout the rice and broccoli mixture.
Transfer the mixture to your prepared baking dish, spreading it evenly. If you like a crunchy topping, sprinkle the breadcrumbs over the casserole. This step is optional but adds great texture!
Now, bake the casserole in your preheated oven for 30 minutes or until it’s bubbly and golden brown on top. Once it’s ready, remove it from the oven and let it cool for a few minutes before serving.
Tips:
- For extra flavor, try adding cooked chicken or ham into the casserole mix.
- If you want a lighter version, substitute the cream of mushroom soup with a homemade cheese sauce.
- Feel free to experiment with different types of cheese like mozzarella or pepper jack for a spicy kick.
Nutrition Facts:
- Calories: 320 per serving
- Protein: 12g
- Fat: 15g
- Carbohydrates: 36g
- Fiber: 2g
- Sodium: 450mg
Enjoy your delicious Cheesy Broccoli and Rice Casserole! This scrumptious dish is sure to be a hit with everyone.
20 Rustic Tomato and Basil Tart

This Rustic Tomato and Basil Tart is a wonderful dish that combines fresh, juicy tomatoes with aromatic basil in a flaky pastry. It’s perfect for any occasion, but especially impressive for a Mother’s Day dinner. Enjoy the flavors of summer with every bite!
Prep Time: 20 minutes
Additional Time: 30 minutes
Total Time: 50 minutes
Servings: 6
Ingredients:
- 1 sheet of store-bought puff pastry, thawed
- 3-4 medium ripe tomatoes, sliced
- 1 cup of fresh basil leaves
- 1 cup of shredded mozzarella cheese
- 1/4 cup of grated Parmesan cheese
- 2 tablespoons of olive oil
- 1 teaspoon of balsamic vinegar
- Salt and pepper to taste
- 1 egg, beaten (for egg wash)
Instructions:
Preheat your oven to 400°F (200°C). While it’s heating, roll out the puff pastry on a lightly floured surface. Lay the dough on a baking sheet lined with parchment paper.
Next, use a knife to create a 1-inch border around the edges of the pastry, being careful not to cut all the way through. This will help create a nice crust.
Now, sprinkle the shredded mozzarella cheese evenly over the pastry, staying inside the border. Then, layer the sliced tomatoes on top of the cheese. Make sure to slightly overlap each slice for the best appearance.
Tear the basil leaves and scatter them over the tomatoes. Drizzle the olive oil and balsamic vinegar over the top. Add a pinch of salt and pepper to taste.
Fold the edges of the pastry inwards to help contain the filling. Brush the border of the pastry with the beaten egg for a lovely golden color.
Bake the tart in the oven for about 30 minutes or until the crust is golden and the cheese is bubbly. Once done, let it cool for a few minutes before slicing and serving.
Tips:
- Use a mix of different colored tomatoes for a more vibrant tart.
- For added flavor, sprinkle some Italian herbs or garlic powder on top before baking.
- Serve warm or at room temperature for the best taste.
Nutrition Facts:
- Calories: 280 per serving
- Total Fat: 18g
- Saturated Fat: 8g
- Cholesterol: 45mg
- Total Carbohydrates: 24g
- Dietary Fiber: 1g
- Sugars: 2g
- Protein: 8g
21 Spaghetti Aglio e Olio
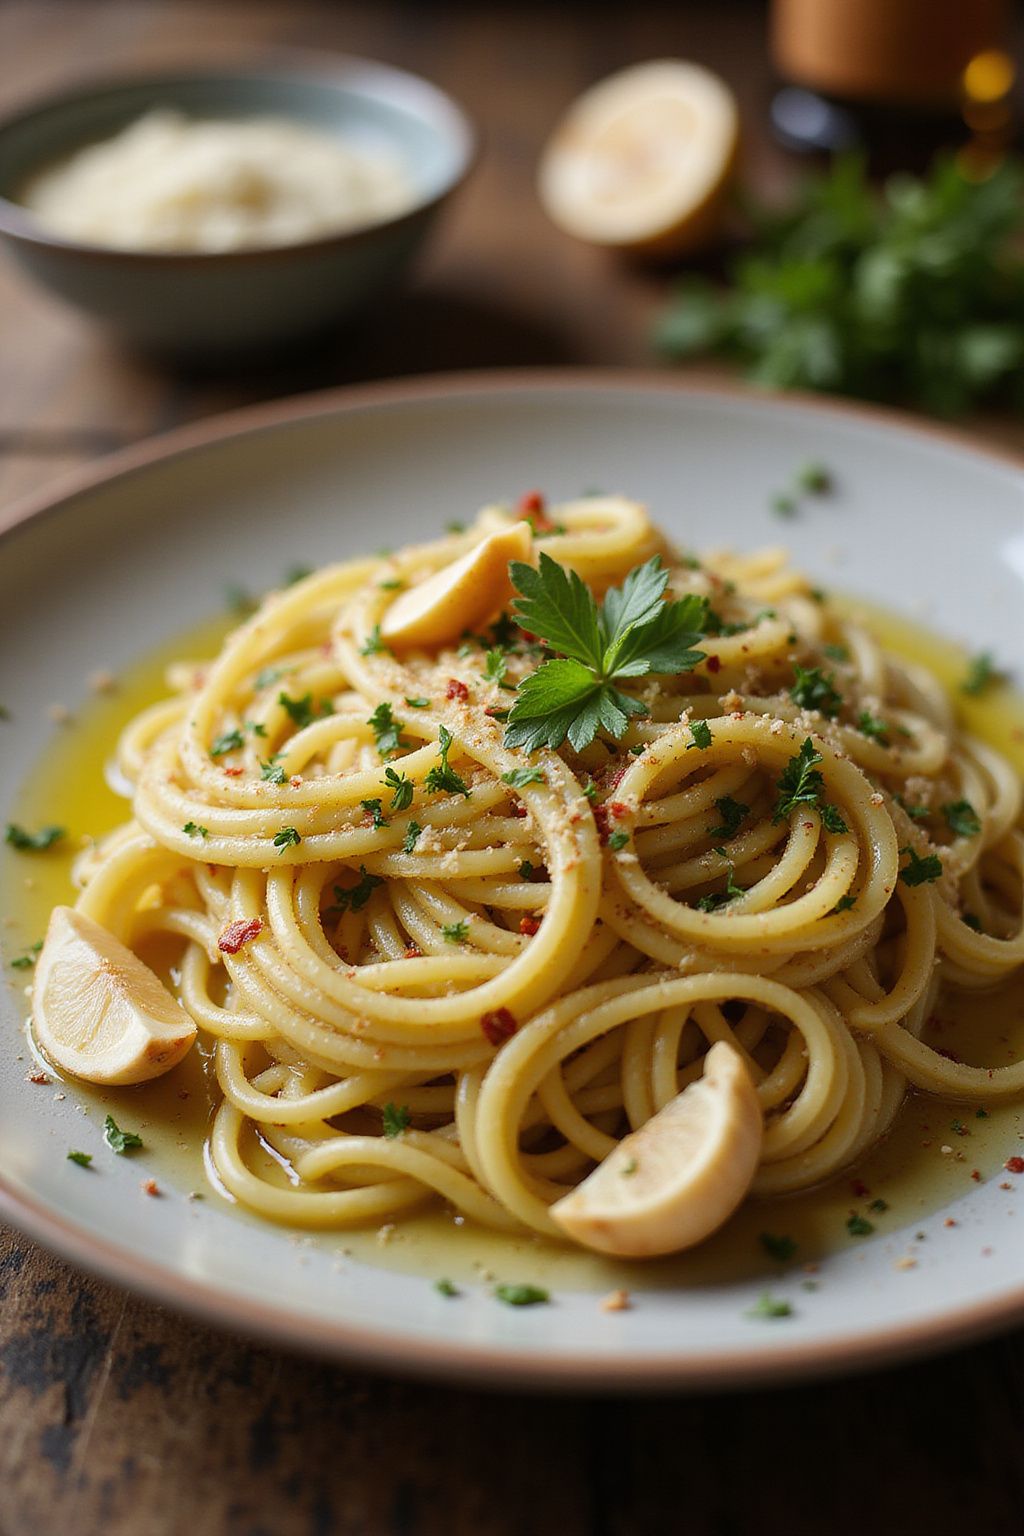
Spaghetti Aglio e Olio is a simple and delicious Italian dish that highlights the flavors of garlic and olive oil. It’s quick to make, perfect for a cozy evening, and it only requires a few ingredients. You can impress your family or friends with this lovely pasta!
Prep Time: 10 minutes
Cook Time: 10 minutes
Total Time: 20 minutes
Servings: 4
Ingredients:
- 12 ounces spaghetti
- 1/2 cup extra virgin olive oil
- 6 cloves garlic, thinly sliced
- 1 teaspoon red pepper flakes (adjust to taste)
- Salt to taste
- Freshly ground black pepper to taste
- 1/4 cup chopped fresh parsley
- Grated Parmesan cheese (optional, for serving)
Instructions:
Start by bringing a large pot of salted water to a boil. Add the spaghetti and cook according to the package directions until it’s al dente. Once cooked, reserve about 1 cup of pasta water, and then drain the spaghetti.
While the pasta is cooking, heat the olive oil in a large skillet over medium heat. Add the sliced garlic and cook it for about 2-3 minutes. Stir it frequently so that the garlic becomes golden and fragrant but doesn’t burn.
Next, add the red pepper flakes to the skillet. Stir it in with the garlic for another 30 seconds. This will infuse the oil with a nice heat.
Now, add the cooked spaghetti directly into the skillet. Toss the spaghetti in the garlic oil until it’s well coated. If it seems dry, you can add a bit of the reserved pasta water to help it along.
Season the pasta with salt and black pepper to taste. Finally, sprinkle the chopped parsley over the top and toss everything together again.
Serve the Spaghetti Aglio e Olio hot, adding some grated Parmesan cheese on top if you like. Enjoy your meal!
Tips:
- For more flavor, you can add a splash of lemon juice or zest before serving.
- If you want to add protein, toss in some shrimp or chicken while cooking the garlic.
- Be careful not to burn the garlic; keep the heat low and watch it closely!
Nutrition Facts:
- Calories: 400 per serving
- Total Fat: 20g
- Saturated Fat: 3g
- Cholesterol: 0mg
- Sodium: 200mg
- Total Carbohydrates: 56g
- Dietary Fiber: 3g
- Sugars: 0g
- Protein: 10g
22 Quick Beef Tacos with Fresh Salsa

Get ready for a delicious dinner with these Quick Beef Tacos topped with Fresh Salsa! This tasty recipe is not only fast to make, but it’s also packed with flavor. Perfect for a weeknight meal or a fun get-together, your family will love these tacos!
Prep Time: 15 minutes
Cook Time: 10 minutes
Total Time: 25 minutes
Servings: 4
Ingredients:
- 1 lb ground beef
- 1 packet taco seasoning
- 8 taco shells
- 1 cup shredded lettuce
- 1 cup diced tomatoes
- 1 cup shredded cheese (cheddar or your choice)
- 1/2 cup sour cream
- 1 avocado, sliced
- 1/4 cup fresh cilantro, chopped (optional)
Instructions:
Start by cooking the ground beef in a large skillet over medium heat. Break it apart with a spatula as it cooks. When it’s almost fully browned, stir in the taco seasoning and a little water according to the packet instructions. Let it simmer for a few minutes until the flavors combine.
While the beef is cooking, prepare your fresh salsa. In a bowl, mix the diced tomatoes, chopped cilantro, and a pinch of salt. This will add a refreshing zing to your tacos.
Now, it’s time to warm the taco shells. You can place them in the oven or microwave for a few seconds until they are hot and crispy.
Once everything is ready, start assembling your tacos. Spoon the seasoned beef into each taco shell. Then, add a handful of shredded lettuce, a sprinkle of shredded cheese, and a spoonful of fresh salsa. Top them off with a slice of avocado and a dollop of sour cream.
Serve your tacos right away and enjoy a tasty meal with family and friends!
Tips:
- For an extra kick, add some diced jalapeños to your fresh salsa.
- Use ground turkey or chicken instead of beef for a lighter option.
- Serve with corn chips and extra salsa on the side for a complete meal.
Nutrition Facts:
- Calories: 350 per serving
- Protein: 23g
- Carbohydrates: 30g
- Fat: 18g
- Fiber: 3g
- Sugar: 2g