My New Cookbook is Out! Check Out Now!
25 Light and Fresh Spring Meals for Warmer Days
This page contains affiliate links and I earn a commission if you make a purchase through one of the links, at no cost to you.
Are you ready to welcome the sunny days ahead with delicious, light meals? Spring is the perfect time for fresh flavors that uplift your mood and nourish your body. You’ll find 25 vibrant recipes here that make cooking fun and refreshing, giving you a chance to enjoy the season’s bounty!
Shop Our Must-Haves


1 Lemon Herb Grilled Chicken Salad
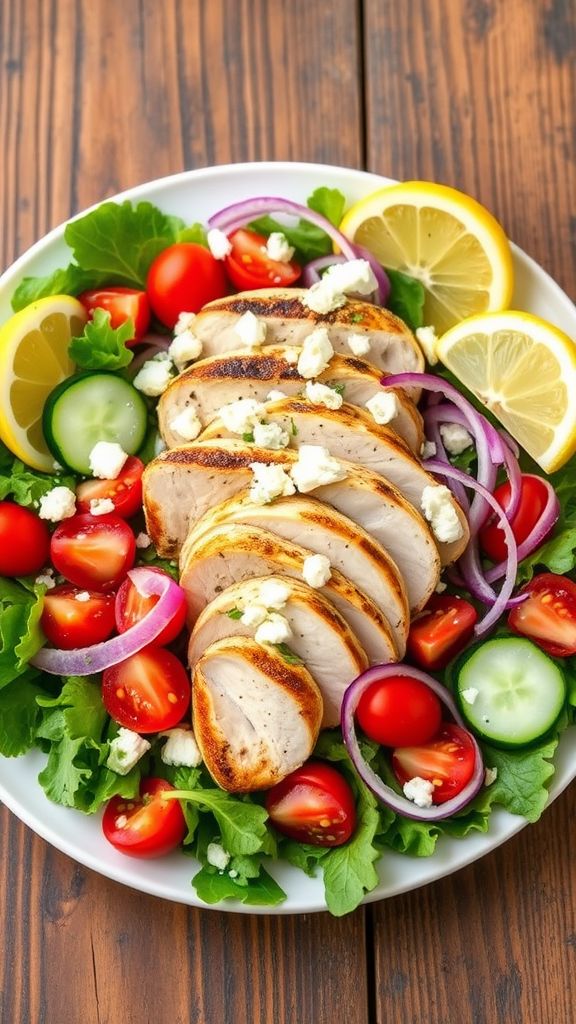
This Lemon Herb Grilled Chicken Salad is a perfect dish for springtime. It’s fresh, healthy, and full of flavor. With juicy grilled chicken and a zesty lemon dressing, this salad is a great choice for lunch or dinner.
Prep Time: 15 minutes
Cook Time: 10 minutes
Additional Time: 30 minutes (for marinating)
Total Time: 55 minutes
Servings: 4
Ingredients:
- 2 boneless, skinless chicken breasts
- 2 tablespoons olive oil
- Juice of 1 lemon
- Zest of 1 lemon
- 2 cloves of garlic, minced
- 1 teaspoon dried oregano
- 1 teaspoon dried thyme
- Salt and pepper to taste
- 4 cups mixed greens (like spinach and arugula)
- 1 cup cherry tomatoes, halved
- ½ cucumber, sliced
- ¼ red onion, thinly sliced
- ¼ cup feta cheese, crumbled (optional)
Instructions:
Start by preparing the marinade for the chicken. In a bowl, mix together the olive oil, lemon juice, lemon zest, garlic, oregano, thyme, salt, and pepper. This mixture gives the chicken a bright and herbaceous flavor.
Next, take the chicken breasts and place them in a zip-top bag or bowl. Pour the marinade over the chicken, making sure it coats evenly. Seal the bag or cover the bowl and let it marinate in the refrigerator for at least 30 minutes. This step helps to infuse the chicken with flavor.
After marinating, preheat your grill or grill pan to medium-high heat. Remove the chicken from the marinade and discard the leftover marinade. Grill the chicken for about 5-7 minutes on each side, or until the internal temperature reaches 165°F. Once cooked, take the chicken off the grill and let it rest for a few minutes before slicing.
While the chicken is resting, assemble your salad. In a large bowl, combine the mixed greens, cherry tomatoes, cucumber, and red onion. Toss them gently to mix the ingredients.
Slice the grilled chicken and arrange it on top of the salad. If you like, sprinkle with feta cheese for added flavor. Serve immediately with extra lemon wedges on the side for those who enjoy a zesty kick.
Tips:
- You can substitute the chicken with tofu or shrimp for a different protein option.
- Feel free to add other veggies like bell peppers or avocado for extra nutrition.
- Make the salad ahead of time but keep the dressing separate until you’re ready to eat to avoid sogginess.
Nutrition Facts:
- Calories: 350
- Protein: 30g
- Carbohydrates: 15g
- Fat: 20g
- Fiber: 4g
- Sugar: 4g
2 Zucchini Noodle Primavera
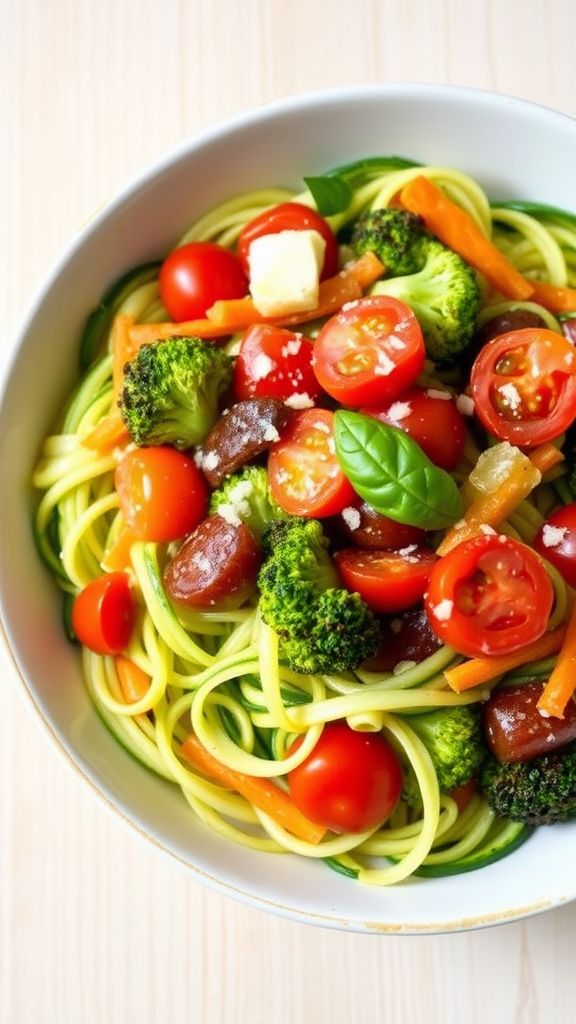
Zucchini Noodle Primavera is a fresh and colorful dish that’s perfect for any spring meal. It’s healthy, packed with vegetables, and you don’t need to cook pasta! Instead, we’ll use zucchini noodles, making it light and delicious.
Prep Time: 15 minutes
Cook Time: 10 minutes
Total Time: 25 minutes
Servings: 4
Ingredients:
- 2 medium zucchinis
- 1 bell pepper (any color, sliced)
- 1 cup cherry tomatoes (halved)
- 1 cup broccoli florets
- 1 carrot (julienned)
- 3 cloves garlic (minced)
- 2 tablespoons olive oil
- Salt and pepper (to taste)
- 1 teaspoon Italian seasoning
- Fresh basil (for garnish, optional)
- Parmesan cheese (for serving, optional)
Instructions:
Start by making the zucchini noodles. You can use a spiralizer, a vegetable peeler, or a knife to slice the zucchini into thin strands. Set them aside on a clean paper towel to absorb any extra moisture.
In a large skillet, heat 2 tablespoons of olive oil over medium heat. Add the minced garlic and sauté it for about 30 seconds until it’s fragrant. Be careful not to burn the garlic!
Next, toss in the sliced bell pepper, broccoli florets, and julienned carrot. Cook these vegetables for about 5 minutes until they start to soften. Then, add the halved cherry tomatoes and cook for another 2-3 minutes.
Now, it’s time to add the zucchini noodles to the skillet. Sprinkle in the Italian seasoning, and season with salt and pepper. Stir everything together and cook for 2-3 minutes until the zucchini noodles are just tender but still slightly crisp.
Remove the skillet from the heat and serve the Zucchini Noodle Primavera warm. You can garnish it with fresh basil and sprinkle some Parmesan cheese on top if you like. Enjoy your delicious and healthy spring meal!
Tips:
- For a spicier kick, add some red pepper flakes while cooking the vegetables.
- You can add other favorite veggies like asparagus or snap peas for even more color and nutrition.
- If you like a creamier texture, mix in a splash of coconut milk or a spoonful of cream cheese while cooking.
Nutrition Facts:
- Calories: 150
- Protein: 5g
- Carbohydrates: 14g
- Dietary Fiber: 4g
- Sugars: 5g
- Fat: 10g
- Sodium: 150mg
3 Asparagus and Pea Risotto

Asparagus and Pea Risotto is a delicious and creamy dish that’s perfect for spring. The fresh flavors of asparagus and sweet peas make this risotto a delightful choice for any meal. It’s easy to make and is sure to impress your family or friends.
Prep Time: 10 minutes
Cook Time: 30 minutes
Total Time: 40 minutes
Servings: 4
Ingredients:
- 1 cup Arborio rice
- 4 cups vegetable broth
- 1 cup chopped asparagus
- 1 cup peas (fresh or frozen)
- 1 small onion, finely chopped
- 2 cloves garlic, minced
- 1/2 cup white wine
- 2 tablespoons olive oil
- 1/2 cup grated Parmesan cheese
- Salt and pepper to taste
- Fresh parsley for garnish (optional)
Instructions:
Start by heating the vegetable broth in a saucepan over low heat. It should be warm but not boiling.
In a large pan, heat olive oil over medium heat. Add the chopped onion and minced garlic. Cook until the onion is translucent, about 3-4 minutes.
Next, add the Arborio rice to the pan. Stir it for about 2 minutes so the rice gets coated in oil and starts to toast slightly. This step adds flavor and texture.
Pour in the white wine and let it simmer until the liquid is mostly absorbed. This should take around 2-3 minutes.
Now it’s time to start adding the broth. Use a ladle to add 1 cup of the warm vegetable broth to the rice. Stir it continuously until the liquid is absorbed. Repeat this process, adding one cup of broth at a time and stirring, until the rice is creamy and tender. This takes about 20 minutes.
When you have about 5 minutes left, add the chopped asparagus and peas to the risotto. Stir well and continue cooking until the vegetables are tender and the rice is cooked to your liking.
Finally, stir in the Parmesan cheese and season with salt and pepper to taste. Serve it warm, garnished with fresh parsley if you like.
Tips:
- For extra creaminess, add a little more Parmesan cheese or a splash of cream at the end.
- You can substitute fresh peas with frozen peas if they are not in season.
- Keep stirring! The stirring helps release the starch from the rice, making the risotto creamy.
Nutrition Facts:
- Calories: 350
- Protein: 12g
- Carbohydrates: 55g
- Fat: 10g
- Fiber: 5g
- Sugar: 2g
4 Spicy Shrimp Tacos with Mango Salsa
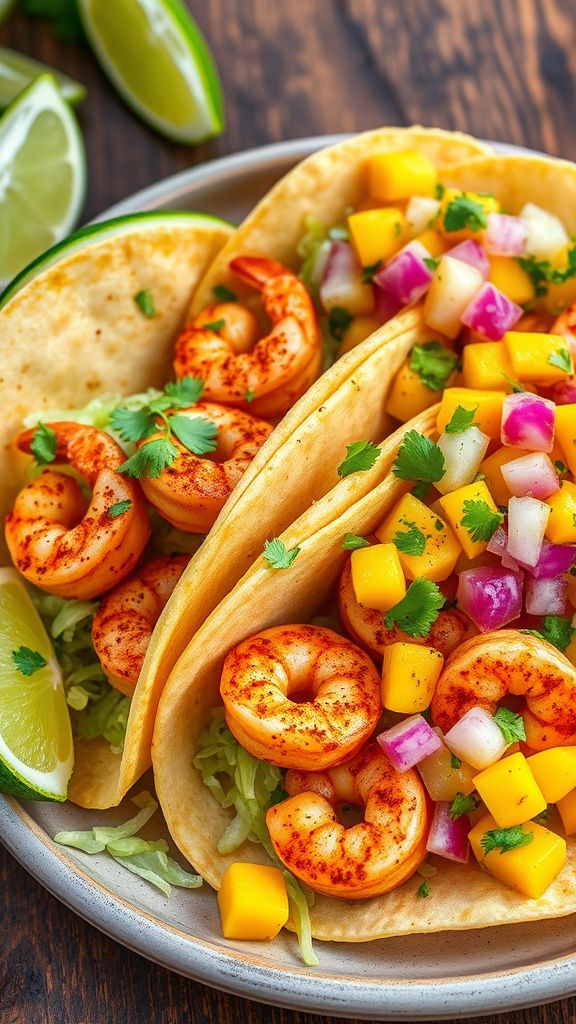
These Spicy Shrimp Tacos with Mango Salsa are the perfect blend of heat and sweetness. They’re fresh, flavorful, and packed with protein, making them a great choice for a quick meal. You’ll love how easy they come together!
Prep Time: 15 minutes
Cook Time: 10 minutes
Total Time: 25 minutes
Servings: 4
Ingredients:
- 1 lb shrimp, peeled and deveined
- 1 tbsp olive oil
- 2 tsp chili powder
- 1 tsp paprika
- 1/2 tsp cumin
- 1/2 tsp garlic powder
- 1/4 tsp cayenne pepper (adjust to taste)
- 8 small corn tortillas
- 1 cup shredded cabbage
For Mango Salsa:
- 1 ripe mango, diced
- 1/2 red onion, finely chopped
- 1/4 cup cilantro, chopped
- 1 lime, juiced
- 1/2 jalapeño, minced (optional)
- Salt to taste
Instructions:
Start by marinating your shrimp. In a bowl, mix the olive oil, chili powder, paprika, cumin, garlic powder, and cayenne pepper. Add the shrimp and toss to coat evenly. Let it sit for about 10 minutes to soak in the flavors.
While the shrimp is marinating, make the mango salsa. In another bowl, combine the diced mango, red onion, cilantro, lime juice, and jalapeño. Stir everything together and add salt to taste. Set aside.
Next, heat a skillet over medium-high heat. Add the marinated shrimp to the pan and cook for about 2-3 minutes on each side, or until they turn pink and opaque. This will give them a nice, spicy flavor.
Once the shrimp are cooked, warm the corn tortillas in the same skillet for about 30 seconds on each side. This will give them a nice, soft texture.
To assemble the tacos, start with a tortilla, add a handful of shredded cabbage, then top with the spicy shrimp. Finish off with a generous scoop of mango salsa. Enjoy your fresh and delicious tacos!
Tips:
- If you prefer milder flavors, reduce or skip the cayenne pepper in the shrimp marinade.
- For extra crunch, you can add sliced radishes or avocado to your tacos.
- Serve with lime wedges on the side for an extra burst of flavor.
Nutrition Facts:
- Calories: 350
- Protein: 25g
- Fat: 12g
- Carbohydrates: 40g
- Fiber: 5g
- Sugar: 6g
5 Quinoa and Roasted Vegetable Bowl
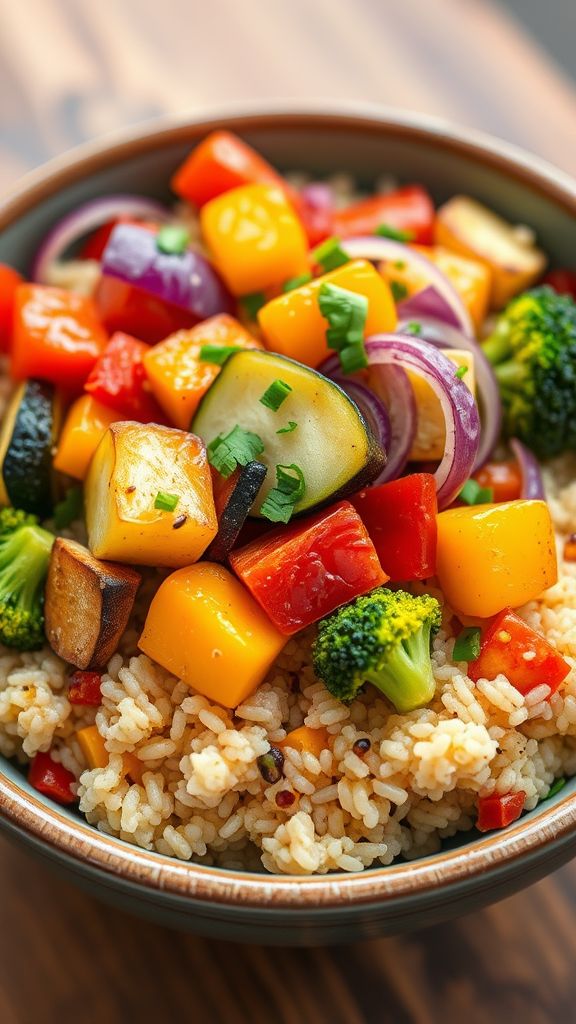
This Quinoa and Roasted Vegetable Bowl is a fantastic way to enjoy healthy ingredients packed with flavor! Bursting with colorful veggies and whole grains, it’s a perfect meal for lunch or dinner. It’s easy to make and is sure to satisfy everyone at the table.
Prep Time: 15 minutes
Cook Time: 30 minutes
Total Time: 45 minutes
Servings: 4
Ingredients:
- 1 cup quinoa, rinsed
- 2 cups vegetable broth or water
- 1 red bell pepper, chopped
- 1 yellow bell pepper, chopped
- 1 zucchini, diced
- 1 red onion, chopped
- 2 cups broccoli florets
- 3 tablespoons olive oil
- 1 teaspoon garlic powder
- 1 teaspoon paprika
- Salt and pepper, to taste
- 1 teaspoon lemon juice
- Fresh parsley, chopped (for garnish)
Instructions:
Start by preheating your oven to 425°F (220°C). This will ensure your vegetables roast perfectly.
Next, prepare the quinoa. In a saucepan, combine 1 cup of quinoa with 2 cups of vegetable broth or water. Bring it to a simmer, cover the pot, and let it cook for about 15 minutes or until the liquid has absorbed. Fluff the quinoa with a fork and set it aside.
Now, let’s get those veggies ready! In a large bowl, mix the chopped bell peppers, zucchini, red onion, and broccoli. Drizzle with 3 tablespoons of olive oil, then sprinkle on 1 teaspoon of garlic powder, 1 teaspoon of paprika, and add salt and pepper to taste. Toss everything together until the vegetables are well coated.
Spread the seasoned vegetables evenly on a baking sheet, making sure they’re in a single layer. Roast them in the preheated oven for about 20 minutes or until they are tender and slightly caramelized.
Once the vegetables are done, combine them with the cooked quinoa in a large bowl. Drizzle with 1 teaspoon of lemon juice and toss gently. Serve it warm, garnished with fresh parsley.
Tips:
- For added protein, consider adding chickpeas or black beans to the bowl.
- Feel free to use your favorite vegetables; sweet potatoes or carrots work great too.
- If you like a bit of heat, toss in some red pepper flakes before roasting.
Nutrition Facts:
- Calories: 350 per serving
- Protein: 10g
- Carbohydrates: 55g
- Fat: 12g
- Fiber: 8g
- Sugar: 5g
6 Spring Vegetable Stir-Fry
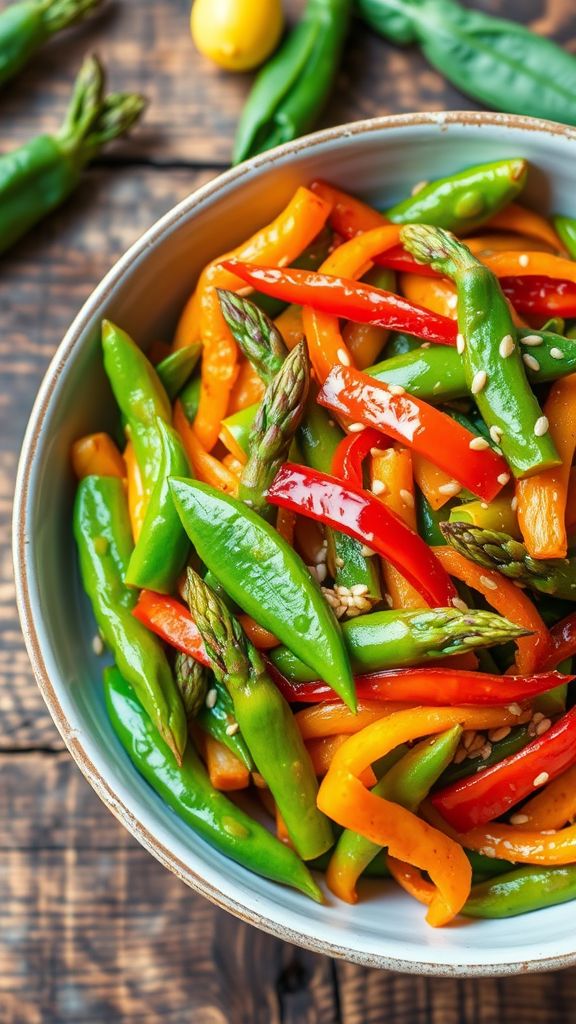
Spring Vegetable Stir-Fry is a colorful and healthy dish perfect for welcoming the spring season. With fresh vegetables and a light sauce, this stir-fry can be a quick and delightful meal any day of the week. Let’s get started!
Prep Time: 15 minutes
Cook Time: 10 minutes
Total Time: 25 minutes
Servings: 4
Ingredients:
- 2 tablespoons vegetable oil
- 1 cup snap peas, trimmed
- 1 cup asparagus, cut into bite-sized pieces
- 1 cup bell peppers, sliced (any color)
- 1 cup carrots, julienned
- 2 cloves garlic, minced
- 1 tablespoon ginger, minced
- 3 tablespoons soy sauce
- 1 tablespoon sesame oil
- 1 tablespoon honey (optional)
- Sesame seeds for garnish (optional)
Instructions:
Begin by preparing all your vegetables. Wash and cut the snap peas, asparagus, bell peppers, and carrots into bite-sized pieces. Mince the garlic and ginger to add flavor later.
In a large skillet or wok, heat 2 tablespoons of vegetable oil over medium-high heat. Once the oil is hot, add the garlic and ginger. Stir them for about 30 seconds until they are fragrant but not burned.
Next, add the carrots and stir-fry for about 2 minutes. After that, add the snap peas and asparagus to the skillet. Continue to cook for another 3 minutes, stirring frequently.
Now, it’s time to add the bell peppers. Stir all the vegetables together and let them cook for another 2-3 minutes. You want them to be tender but still crisp.
In a small bowl, mix the soy sauce, sesame oil, and honey, if using. Pour this sauce over the stir-fried vegetables and toss everything to coat evenly. Cook for another 1-2 minutes for the flavors to blend.
Finally, remove the skillet from heat and sprinkle some sesame seeds on top for garnish. Serve your Spring Vegetable Stir-Fry warm, either on its own or over rice.
Tips:
- Feel free to mix in your favorite spring vegetables like zucchini or broccoli for variety.
- For added protein, you can include cooked chicken, shrimp, or tofu.
- Adjust the soy sauce based on your taste preference; less for a milder flavor, more for a saltier kick.
Nutrition Facts:
- Calories: 150
- Protein: 3g
- Total Fat: 7g
- Saturated Fat: 1g
- Carbohydrates: 22g
- Fiber: 5g
- Sugar: 4g
- Sodium: 450mg
7 Lemon Garlic Shrimp with Broccoli

Lemon Garlic Shrimp with Broccoli is a quick and healthy dish that packs a punch of flavor. It combines tender shrimp with vibrant broccoli, all tossed in a tangy lemon garlic sauce. Perfect for a busy weeknight dinner, this meal is both satisfying and simple to prepare.
Prep Time: 10 minutes
Cook Time: 15 minutes
Total Time: 25 minutes
Servings: 4
Ingredients:
- 1 pound large shrimp, peeled and deveined
- 2 cups broccoli florets
- 3 tablespoons olive oil
- 4 cloves garlic, minced
- 1 lemon, juiced and zested
- Salt and pepper, to taste
- 1 teaspoon red pepper flakes (optional)
- Fresh parsley, chopped for garnish
Instructions:
Start by heating 2 tablespoons of olive oil in a large skillet over medium heat. Once hot, add the minced garlic and sauté it for about 30 seconds until fragrant. Be careful not to burn the garlic, as it can turn bitter.
Next, toss in the broccoli florets. Sauté the broccoli for about 4-5 minutes until it becomes vibrant and tender-crisp. Stir occasionally to ensure even cooking.
Now, push the broccoli to one side of the skillet and add the remaining 1 tablespoon of olive oil. Place the shrimp in the skillet and season with salt, pepper, and red pepper flakes if you’re using them. Cook the shrimp for about 2-3 minutes on each side until they turn pink and opaque.
Once the shrimp are cooked, pour the lemon juice and zest over the shrimp and broccoli. Stir everything together to coat the shrimp and broccoli in the delicious sauce. Cook for another 1-2 minutes to heat through.
Remove the skillet from the heat and garnish with chopped parsley. Serve your Lemon Garlic Shrimp with Broccoli warm, and enjoy!
Tips:
- For extra flavor, marinate the shrimp in lemon juice, garlic, and a little olive oil for 30 minutes before cooking.
- Serve this dish over rice or quinoa for a complete meal.
- Don’t overcook the shrimp; they cook quickly and can become rubbery if left too long in the pan.
Nutrition Facts:
- Calories: 200 per serving
- Protein: 25g
- Carbohydrates: 7g
- Fat: 10g
- Fiber: 3g
- Sodium: 250mg
8 Caprese Salad with Balsamic Glaze
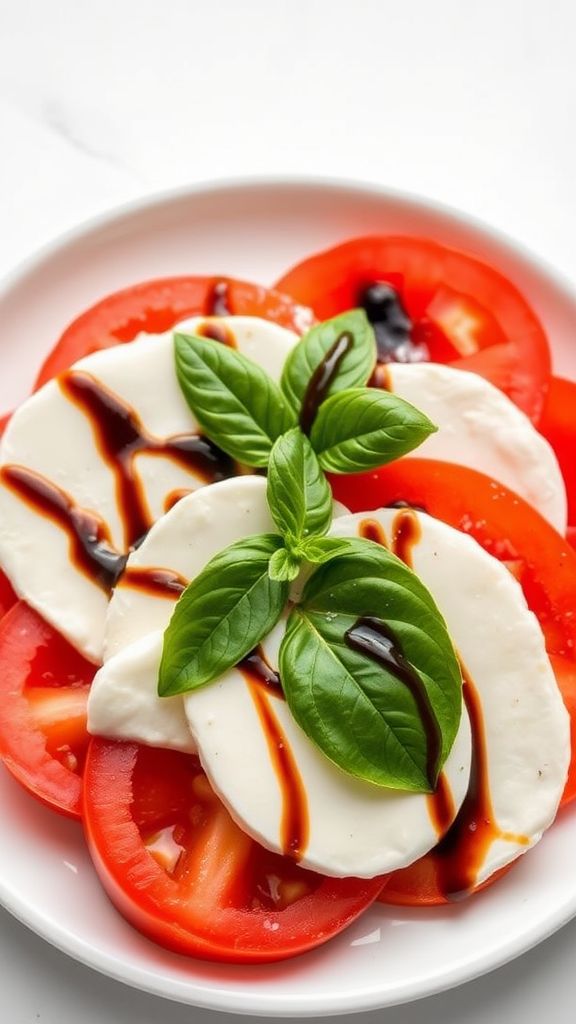
Caprese Salad with Balsamic Glaze is a fresh and simple dish that celebrates the flavors of summer. With juicy tomatoes, creamy mozzarella, and fragrant basil, it’s perfect for any occasion. Drizzle it with balsamic glaze for an extra touch of sweetness!
Prep Time: 15 minutes
Total Time: 15 minutes
Servings: 4
Ingredients:
- 4 ripe tomatoes
- 8 ounces fresh mozzarella cheese
- 1 cup fresh basil leaves
- 1/4 cup balsamic glaze
- 2 tablespoons extra virgin olive oil
- Salt and pepper to taste
Instructions:
Start by washing the tomatoes and basil leaves under cold water. Pat them dry with a clean towel. Next, slice the tomatoes into thick slices. You should aim for about 1/4 inch thick.
Now, slice the mozzarella cheese into similar thick slices. This will help create beautiful layers for your salad. Take a large plate and start stacking the slices. Alternate the tomatoes and mozzarella slices to create an eye-catching pattern.
Once the tomatoes and mozzarella are arranged, tuck the basil leaves in between the layers. This will give your salad a fresh aroma and flavor.
To finish it off, drizzle the balsamic glaze over the salad, followed by the extra virgin olive oil. Sprinkle with salt and pepper to taste. Serve your delightful Caprese Salad immediately for the best flavor!
Tips:
- For a twist, try adding avocado slices for creaminess.
- You can make your balsamic glaze by simmering balsamic vinegar until it reduces and thickens.
- Use fresh ingredients for the best taste; this salad shines with quality produce!
Nutrition Facts:
- Calories: 240
- Fat: 18g
- Carbohydrates: 10g
- Protein: 12g
- Fiber: 1g
9 Herbed Yogurt and Cucumber Dip
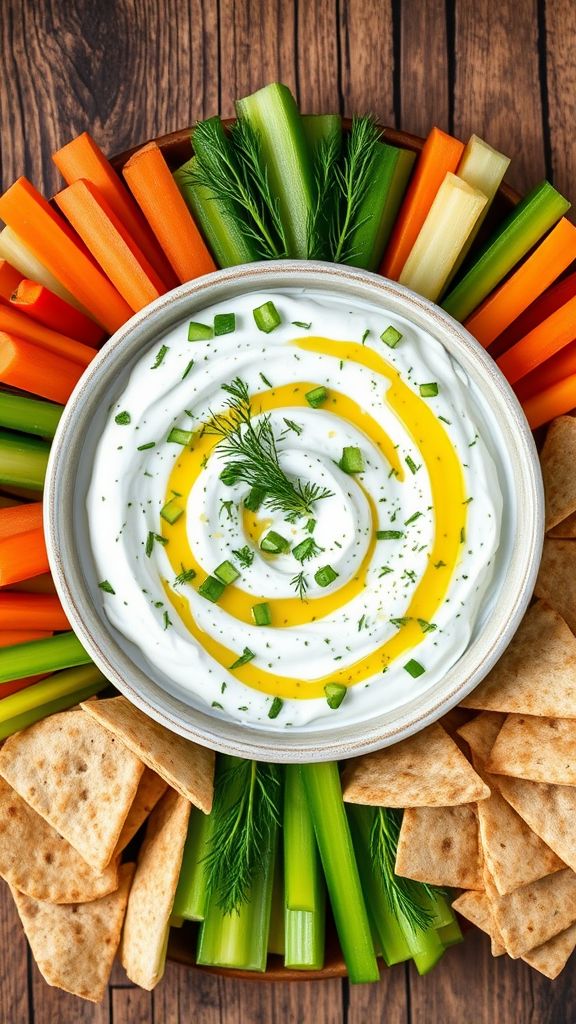
Herbed Yogurt and Cucumber Dip is a refreshing and tasty treat that pairs well with veggies, chips, or even grilled meats. This easy dip is packed with flavor and makes a perfect addition to any spring meal. Plus, it’s quick to prepare and full of healthy ingredients!
Prep Time: 10 minutes
Total Time: 10 minutes
Servings: 4
Ingredients:
- 1 cup plain Greek yogurt
- 1 medium cucumber, finely diced
- 2 tablespoons fresh dill, chopped (or 1 tablespoon dried dill)
- 1 tablespoon fresh parsley, chopped
- 1 teaspoon garlic powder
- 1 teaspoon lemon juice
- Salt and pepper, to taste
Instructions:
Start by chopping the cucumber into small pieces. You want them to be bite-sized, so they mix well into the dip.
In a medium-sized bowl, combine the Greek yogurt with the chopped cucumber. Stir them together until the cucumber is evenly mixed into the yogurt.
Next, add the dill, parsley, garlic powder, and lemon juice to the bowl. Mix everything together until well combined.
Now, it’s time to season your dip. Add a pinch of salt and pepper according to your taste. Stir once again to make sure the seasoning is mixed evenly throughout the dip.
Cover the bowl with plastic wrap or a lid and let it sit in the fridge for about 30 minutes. This gives the flavors time to blend together nicely. Serve chilled and enjoy your homemade dip!
Tips:
- You can substitute Greek yogurt with regular yogurt if you prefer a lighter texture.
- For a spicy kick, add a pinch of cayenne pepper or some chopped jalapeños.
- This dip can be served with pita chips, fresh veggies, or used as a spread on sandwiches.
Nutrition Facts:
- Calories: 120
- Fat: 5g
- Carbohydrates: 10g
- Protein: 10g
- Fiber: 1g
- Sugars: 3g
10 Fresh Strawberry Spinach Salad
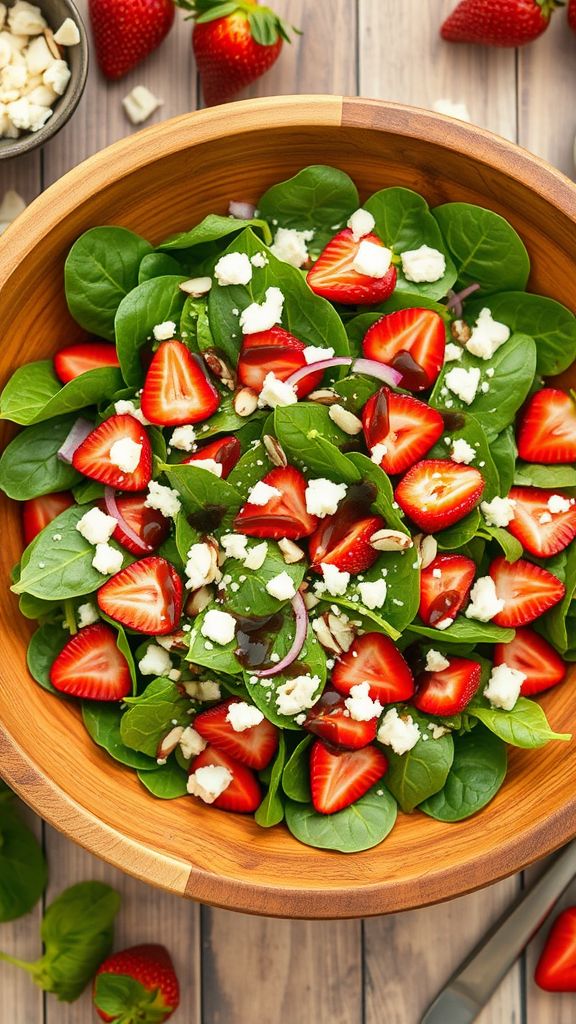
Fresh Strawberry Spinach Salad is a delightful and refreshing dish perfect for any spring meal. The combination of sweet strawberries, crunchy nuts, and fresh spinach makes it not only tasty but also healthy. This salad is easy to prepare and can be a great side or a light main dish.
Prep Time: 15 minutes
Total Time: 15 minutes
Servings: 4
Ingredients:
- 4 cups fresh spinach leaves, washed and dried
- 1 cup strawberries, hulled and sliced
- 1/4 cup slivered almonds (or your choice of nuts)
- 1/4 cup feta cheese, crumbled (optional)
- 1/4 cup red onion, thinly sliced
- 1/4 cup balsamic vinaigrette dressing (or your favorite dressing)
Instructions:
Start by preparing the spinach. Place the fresh spinach leaves in a large salad bowl. Make sure they are well washed and dried to keep the salad crisp.
Next, add the sliced strawberries on top of the spinach. The sweetness of the strawberries will balance well with the earthy flavor of the spinach.
Now it’s time to add the slivered almonds. These will bring a nice crunch to the salad. Feel free to substitute with other nuts like walnuts or pecans if you prefer.
Sprinkle the crumbled feta cheese and red onion over the salad. This step adds extra flavor and texture.
Finally, drizzle the balsamic vinaigrette dressing over the top. Toss the salad gently to combine all the ingredients evenly. Serve immediately for the best taste!
Tips:
- For added sweetness, consider adding a touch of honey to your dressing.
- You can mix in some grilled chicken for a more filling meal.
- This salad tastes even better after chilling in the fridge for about 30 minutes before serving.
Nutrition Facts:
- Calories: 150 per serving
- Fat: 10g
- Carbohydrates: 15g
- Protein: 4g
- Fiber: 2g
11 Grilled Salmon with Avocado Salsa
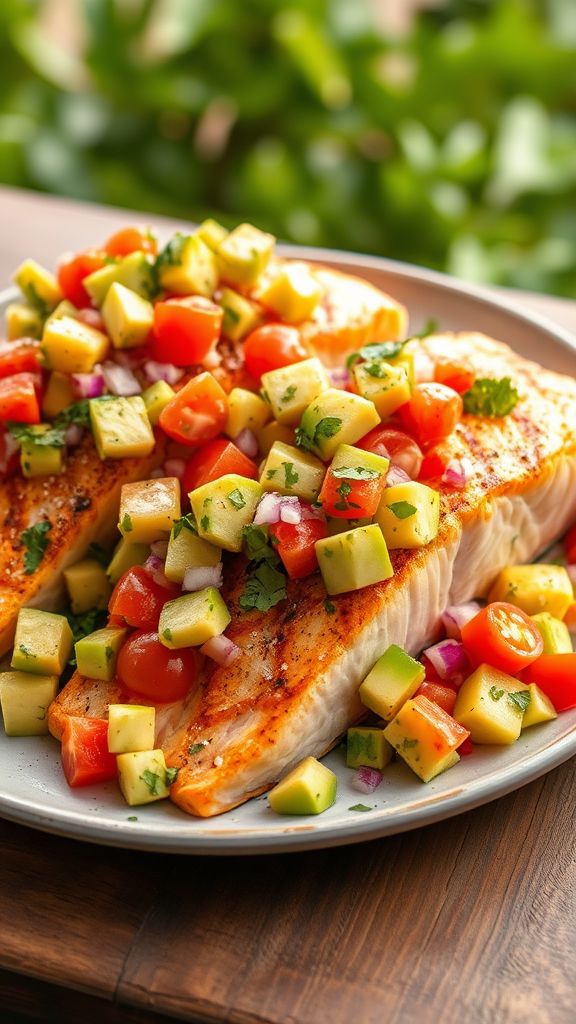
Grilled Salmon with Avocado Salsa is a tasty and healthy dish that’s perfect for spring. The rich flavor of the salmon pairs beautifully with the fresh and zesty avocado salsa. This recipe is easy to make and sure to impress your family and friends!
Prep Time: 15 minutes
Cook Time: 10 minutes
Total Time: 25 minutes
Servings: 4
Ingredients:
- 4 salmon fillets
- 2 tablespoons olive oil
- 1 teaspoon garlic powder
- 1 teaspoon paprika
- Salt and pepper to taste
- 2 ripe avocados, diced
- 1 medium tomato, diced
- 1/4 cup red onion, finely chopped
- 1/4 cup fresh cilantro, chopped
- Juice of 1 lime
- Salt and pepper to taste
Instructions:
Start by preheating your grill to medium-high heat. While the grill is warming up, prepare the salmon. In a bowl, mix olive oil, garlic powder, paprika, and a pinch of salt and pepper. Brush this mixture over the salmon fillets to add flavor.
Once your grill is hot, place the salmon fillets on the grill. Cook them for about 5 minutes on one side. After that, carefully flip the fillets and grill for another 5 minutes, or until they are cooked through and flake easily with a fork.
While the salmon is grilling, let’s make the avocado salsa. In a large bowl, combine the diced avocados, tomato, red onion, cilantro, and lime juice. Sprinkle with salt and pepper to taste and gently mix everything together.
Once the salmon is ready, remove it from the grill and let it rest for a minute. Serve the grilled salmon on a plate and top it generously with the fresh avocado salsa. Enjoy your delicious and healthy meal!
Tips:
- You can substitute lime juice with lemon juice for a different flavor.
- If you like a bit of heat, consider adding diced jalapeño to the avocado salsa.
- Make sure your avocados are ripe for the best taste and creaminess.
Nutrition Facts:
- Calories: 350
- Protein: 30g
- Carbohydrates: 15g
- Fat: 20g
- Fiber: 7g
- Sugar: 1g
12 Chickpea and Avocado Salad
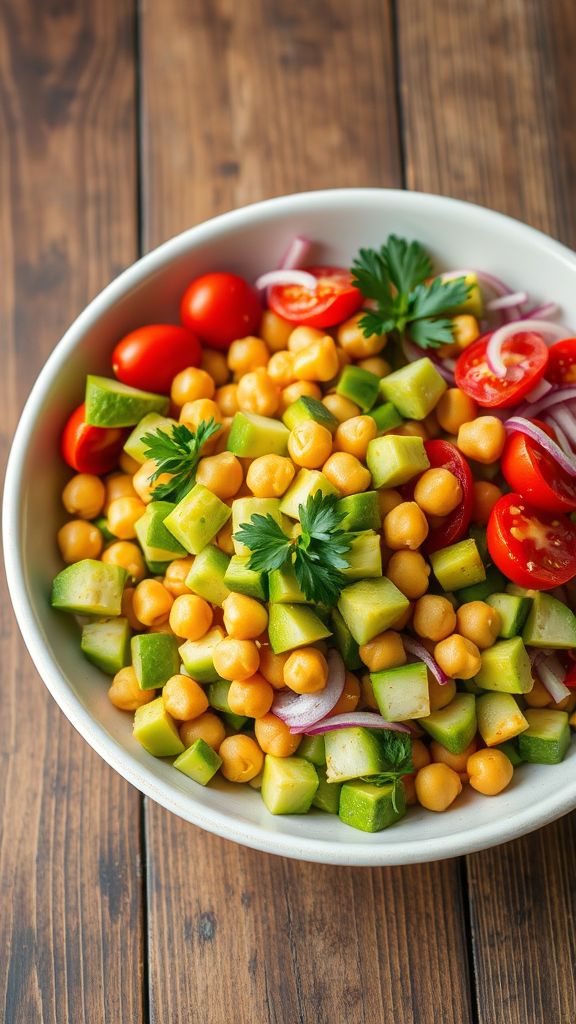
This Chickpea and Avocado Salad is a refreshing and healthy dish that’s perfect for spring. It’s easy to make and packed full of flavor and nutrients. You can throw it together in just a few minutes!
Prep Time: 10 minutes
Total Time: 10 minutes
Servings: 4
Ingredients:
- 1 can of chickpeas, drained and rinsed
- 1 ripe avocado, diced
- 1 cup of cherry tomatoes, halved
- 1/2 cup of cucumber, diced
- 1/4 cup of red onion, finely chopped
- 1/4 cup of fresh parsley, chopped
- 2 tablespoons of olive oil
- 1 tablespoon of lemon juice
- Salt and pepper to taste
Instructions:
Start by preparing your ingredients. Drain and rinse the chickpeas in a strainer. While that’s happening, dice the avocado, halve the cherry tomatoes, and chop the cucumber, red onion, and parsley.
In a large mixing bowl, combine the chickpeas, diced avocado, cherry tomatoes, cucumber, red onion, and parsley.
Next, drizzle the olive oil and lemon juice over the salad. Gently toss everything together until well mixed. Be careful not to mash the avocado too much.
Lastly, add salt and pepper to taste. Serve immediately or chill it in the refrigerator for a few minutes before serving to let the flavors meld together. Enjoy your fresh and wholesome salad!
Tips:
- For an extra kick, add some feta cheese or jalapeños.
- You can also switch up the herbs and use cilantro instead of parsley.
- This salad tastes even better the next day, so feel free to make it in advance.
Nutrition Facts:
- Calories: 250
- Protein: 9g
- Fat: 15g
- Carbohydrates: 27g
- Fiber: 10g
13 Cucumber and Radish Salad with Feta
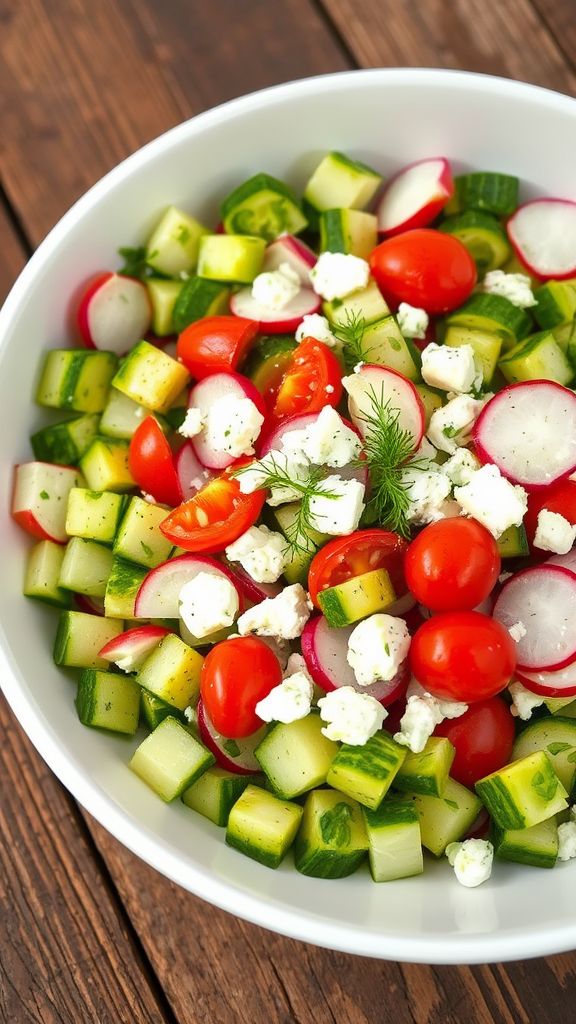
Cucumber and Radish Salad with Feta is a refreshing dish that’s perfect for spring. The cool crunch of cucumbers combined with the peppery bite of radishes makes it a delightful addition to any meal. Topped with creamy feta cheese, this salad is as tasty as it is beautiful.
Prep Time: 15 minutes
Total Time: 15 minutes
Servings: 4
Ingredients:
- 2 cups cucumbers, diced
- 1 cup radishes, thinly sliced
- 1 cup cherry tomatoes, halved
- 1/2 cup feta cheese, crumbled
- 1/4 cup red onion, thinly sliced
- 2 tablespoons olive oil
- 1 tablespoon red wine vinegar
- Salt and pepper to taste
- Fresh dill for garnish (optional)
Instructions:
Start by washing the cucumbers and radishes under cold water. Make sure to slice the radishes thinly for the best texture.
Once prepared, combine the diced cucumbers, sliced radishes, halved cherry tomatoes, crumbled feta cheese, and sliced red onion in a large mixing bowl.
In a separate small bowl, whisk together the olive oil, red wine vinegar, salt, and pepper. Once the dressing is mixed well, pour it over the salad ingredients.
Toss everything gently to coat the vegetables in the dressing. Be careful not to crush the feta!
After mixing, garnish your salad with some fresh dill if you like. Serve the salad immediately for the best taste, or chill it for about 10 minutes for a cooler serving.
Tips:
- Feel free to add other veggies like bell peppers or carrots for extra crunch.
- You can substitute feta with crumbled goat cheese for a different flavor.
- Make this salad ahead of time, but add the dressing just before serving to keep it fresh.
Nutrition Facts:
- Calories: 150
- Total Fat: 12g
- Saturated Fat: 4g
- Cholesterol: 25mg
- Sodium: 300mg
- Total Carbohydrates: 9g
- Dietary Fiber: 2g
- Sugars: 3g
- Protein: 5g
14 Spring Pea and Mint Pesto Pasta
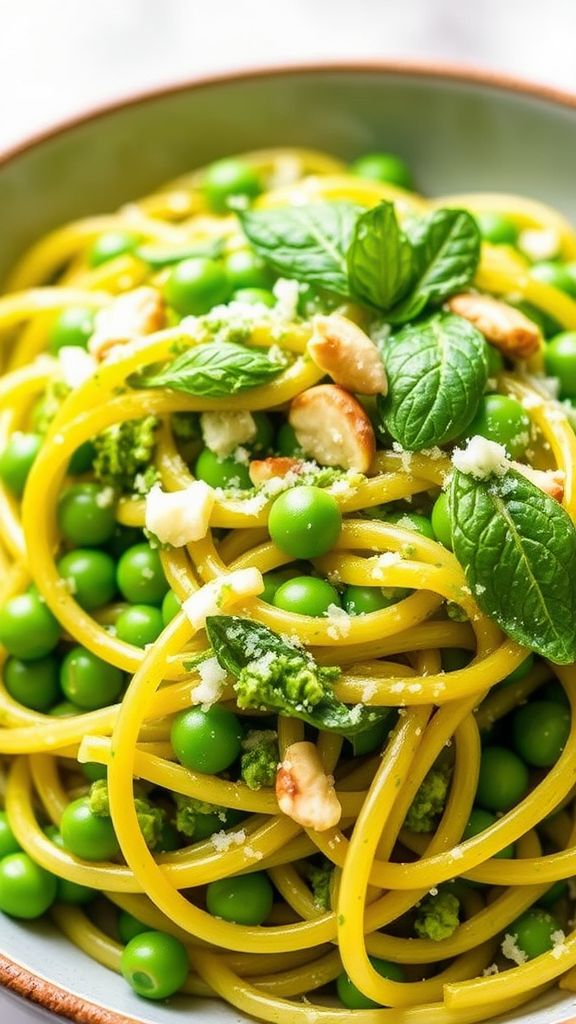
Spring is here, bringing bright flavors and fresh ingredients. This Spring Pea and Mint Pesto Pasta is an easy and delicious way to celebrate the season. Tossed with vibrant peas and fragrant mint, it makes for a delightful dish everyone will love.
Prep Time: 10 minutes
Cook Time: 10 minutes
Total Time: 20 minutes
Servings: 4
Ingredients:
- 8 ounces pasta of your choice (spaghetti or penne works great)
- 1 cup fresh peas (frozen peas are also fine)
- 1/2 cup fresh mint leaves
- 1/4 cup grated Parmesan cheese
- 1/4 cup nuts (pine nuts or walnuts)
- 1 clove garlic
- 1/2 cup olive oil
- Salt and pepper to taste
- Juice of 1 lemon for added freshness
Instructions:
Start by cooking the pasta according to package instructions until al dente. Be sure to save about 1/2 cup of the pasta water before draining. This will help loosen the pesto later.
While the pasta is cooking, prepare your pesto. In a food processor, combine the peas, mint leaves, Parmesan cheese, nuts, and garlic. Pulse these ingredients until they are finely chopped but still a bit chunky.
Next, slowly blend in the olive oil while the processor is running. Stop to scrape down the sides as needed. You’re looking for a smooth but slightly textured mixture. If it seems thick, add some of the reserved pasta water a little at a time until you reach your desired consistency.
After draining the pasta, return it to the pot. Mix in the pesto and stir well. If it’s too thick, add more reserved pasta water until it reaches your preferred creaminess. Finally, add salt, pepper, and lemon juice to taste.
Tips:
- For extra flavor, toast your nuts in a dry skillet before adding them to the pesto.
- If you want to make this dish even heartier, add some cherry tomatoes or spinach.
- This dish is great served warm or cold as a pasta salad for leftovers!
Nutrition Facts:
- Calories: 450
- Protein: 12g
- Carbohydrates: 63g
- Fat: 18g
- Fiber: 5g
- Sugar: 3g
15 Thai Mango Salad with Cilantro
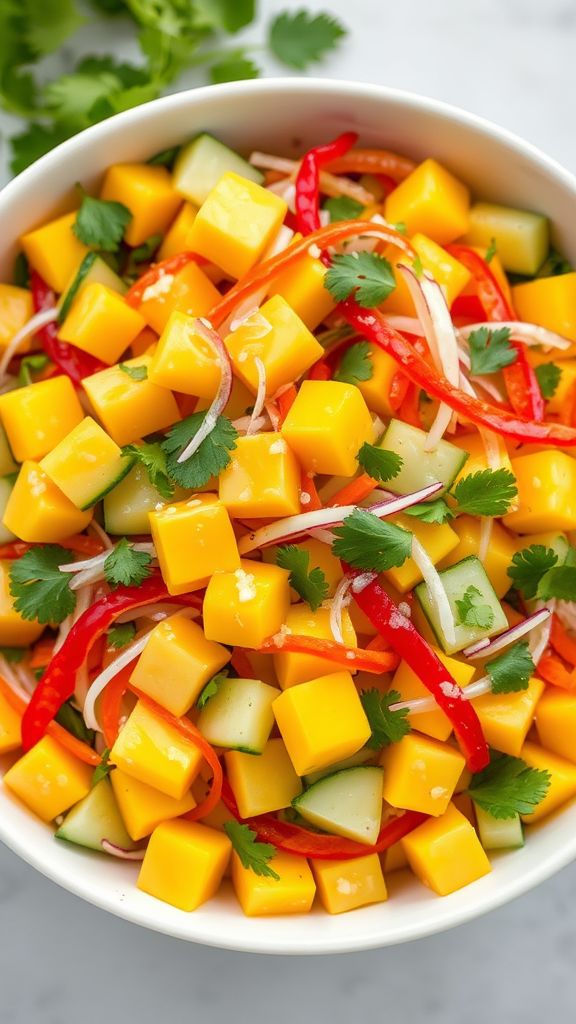
This Thai Mango Salad with Cilantro is a refreshing and vibrant dish that’s perfect for warm days. The combination of sweet mango, crunchy vegetables, and zesty dressing makes it a delightful treat. Plus, it’s super easy to make!
Prep Time: 15 minutes
Total Time: 15 minutes
Servings: 4
Ingredients:
- 2 ripe mangoes, peeled and diced
- 1 cup cucumber, thinly sliced
- 1 cup carrots, shredded
- 1/2 cup red bell pepper, thinly sliced
- 1/4 cup red onion, finely chopped
- 1/4 cup fresh cilantro, chopped
- 2 tablespoons lime juice
- 2 tablespoons fish sauce
- 1 tablespoon honey
- 1 tablespoon peanut butter
- 1 teaspoon sriracha (optional)
- Salt and pepper to taste
Instructions:
Start by preparing all your vegetables and fruits. Peel the mangoes and dice them into small pieces. Next, thinly slice the cucumber, shred the carrots, and slice the red bell pepper. Finely chop the red onion and cilantro.
In a large bowl, combine the mangoes, cucumber, carrots, red bell pepper, red onion, and cilantro. Toss them gently to mix everything together.
Now, let’s make the dressing. In a small bowl, whisk together the lime juice, fish sauce, honey, peanut butter, and sriracha. Make sure to mix it well until all the ingredients are combined smoothly.
Pour the dressing over the salad and toss everything gently to coat the fruits and vegetables. Taste the salad and add salt and pepper to your liking.
Finally, serve the salad right away or chill it for a few minutes in the fridge before serving for an even fresher taste!
Tips:
- For extra crunch, add some chopped peanuts or cashews on top before serving.
- You can substitute fish sauce with soy sauce for a vegetarian version.
- Make it a complete meal by adding some grilled chicken or tofu on top.
Nutrition Facts:
- Calories: 180
- Protein: 4g
- Carbohydrates: 36g
- Fat: 4g
- Fiber: 5g
- Sugar: 14g
16 Lemon Basil Risotto with Peas
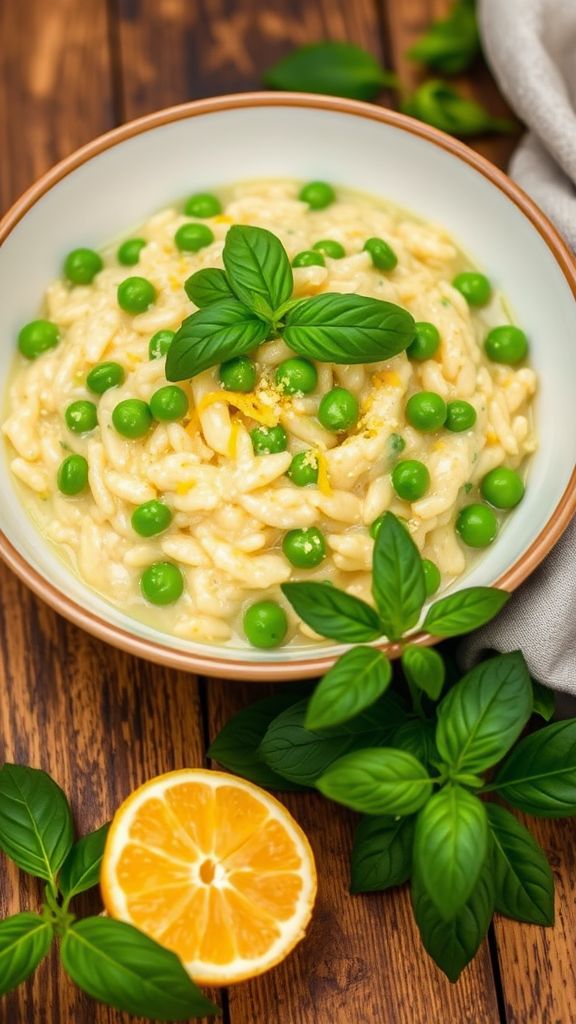
Lemon Basil Risotto with Peas is a delicious and creamy dish that’s perfect for a spring dinner. The bright flavors of lemon and fresh basil make this risotto light and refreshing. This meal is sure to impress your family and friends!
Prep Time: 10 minutes
Cook Time: 20 minutes
Additional Time: 5 minutes
Total Time: 35 minutes
Servings: 4
Ingredients:
- 1 cup Arborio rice
- 4 cups vegetable broth
- 1 cup frozen peas
- 1 small onion, finely chopped
- 2 cloves garlic, minced
- 1/2 cup white wine (optional)
- 1/2 cup grated Parmesan cheese
- 1/4 cup fresh basil leaves, chopped
- 1 tablespoon lemon juice
- 1 tablespoon olive oil
- Salt and pepper, to taste
- Lemon zest, for garnish
Instructions:
Start by heating the vegetable broth in a saucepan over low heat. Keep it warm throughout the cooking process.
In another large pan, heat the olive oil over medium heat. Add the chopped onion and cook for about 3-4 minutes until it becomes soft. Stir in the garlic and cook for another minute until fragrant.
Now, add the Arborio rice to the pan and stir for about 1-2 minutes. This will help the rice toast slightly and absorb the flavors. If using, pour in the white wine and let it simmer until it’s mostly absorbed.
Begin adding the warmed vegetable broth, one ladle at a time, stirring constantly. Wait until the liquid is mostly gone before adding more broth. Continue this process for about 18-20 minutes, or until the rice is creamy and just tender.
Stir in the frozen peas, lemon juice, and grated Parmesan cheese. Mix well until everything is combined and heated through. Finally, add the fresh basil and season with salt and pepper to taste.
Let the risotto sit for about 5 minutes to thicken. When ready to serve, spoon into bowls and garnish with lemon zest and extra basil if desired.
Tips:
- For extra flavor, you can add a splash of lemon juice at the end of cooking.
- Make sure to stir the risotto constantly; this helps to make it creamy.
- You can substitute peas with other vegetables like asparagus or spinach for a different twist.
Nutrition Facts:
- Calories: 350
- Protein: 10g
- Fat: 8g
- Carbohydrates: 60g
- Fiber: 3g
- Sodium: 600mg
17 Sweet Potato and Black Bean Tacos
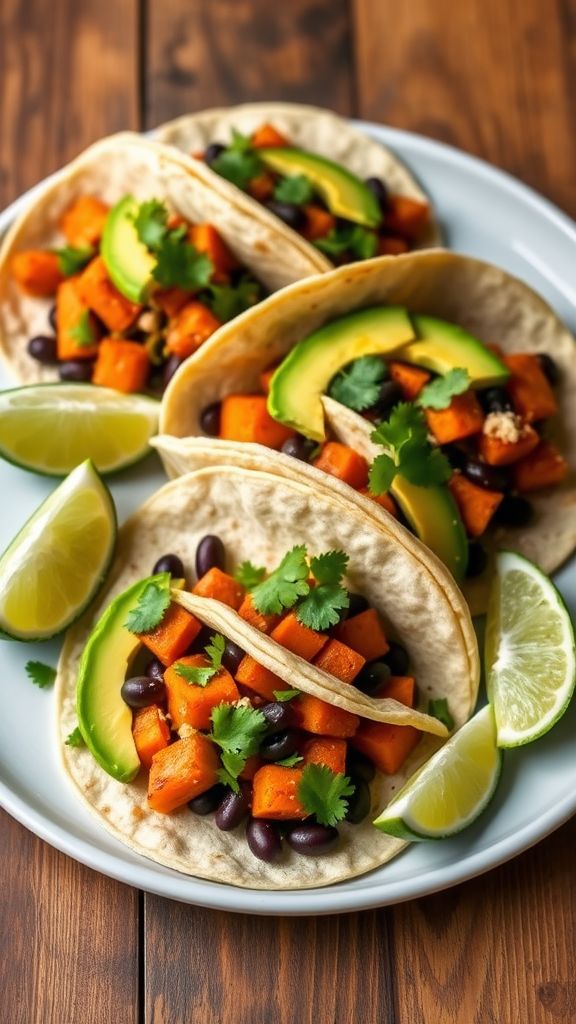
Sweet Potato and Black Bean Tacos are a delicious and healthy choice for lunch or dinner. They are packed with flavor and nutrients, making them perfect for everyone. Plus, they are easy to make!
Prep Time: 10 minutes
Cook Time: 25 minutes
Total Time: 35 minutes
Servings: 4
Ingredients:
- 2 medium sweet potatoes, peeled and diced
- 1 can (15 oz) black beans, drained and rinsed
- 1 tablespoon olive oil
- 1 teaspoon cumin
- 1 teaspoon paprika
- 1/2 teaspoon salt
- 1/4 teaspoon black pepper
- 8 small corn tortillas
- 1 ripe avocado, sliced
- Fresh cilantro for garnish
- Lime wedges for serving
Instructions:
Start by preheating your oven to 425°F (220°C). On a baking sheet, toss the diced sweet potatoes with olive oil, cumin, paprika, salt, and black pepper. Spread them out in a single layer and roast in the oven for about 20 minutes or until they are tender and slightly crispy.
While the sweet potatoes cook, heat the black beans in a small pot over medium heat. Stir them occasionally and let them warm up for about 5 minutes. You can add extra spices if you want more flavor.
After the sweet potatoes are done roasting, take them out of the oven and let them cool for a minute. Now, it’s time to warm the corn tortillas. You can do this in a dry skillet over medium heat for about 30 seconds on each side until they are warm and pliable.
To assemble your tacos, place a spoonful of the roasted sweet potatoes onto each tortilla. Next, add some warmed black beans on top. Then, add slices of avocado and sprinkle fresh cilantro over everything.
Serve your tacos with lime wedges on the side for some extra zing.
Tips:
- You can add toppings like sour cream or salsa for more flavor.
- If you want a spicier kick, try adding diced jalapeños.
- Leftover sweet potatoes can be stored in the fridge for up to three days.
Nutrition Facts:
- Calories: 350 per serving
- Protein: 12g
- Carbohydrates: 50g
- Fat: 12g
- Fiber: 13g
18 Herb-Crusted Chicken with Asparagus
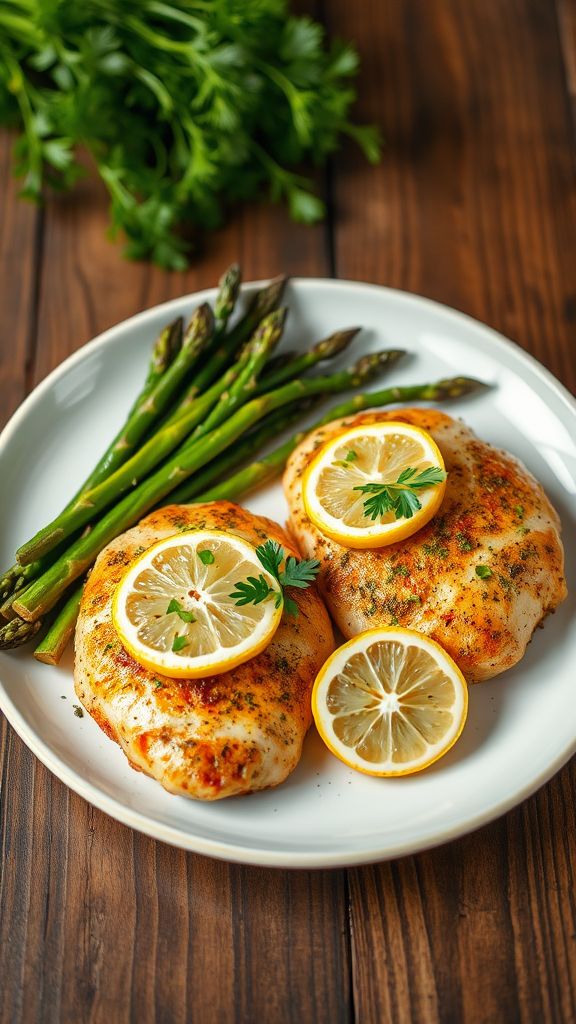
This Herb-Crusted Chicken with Asparagus is a delicious and healthy meal perfect for springtime. With its crunchy herbs and fresh asparagus, it will brighten up your dinner table. Plus, it’s easy to make!
Prep Time: 15 minutes
Cook Time: 25 minutes
Total Time: 40 minutes
Servings: 4
Ingredients:
- 4 boneless, skinless chicken breasts
- 1/2 cup breadcrumbs
- 1/4 cup grated Parmesan cheese
- 2 tablespoons fresh parsley, chopped
- 1 tablespoon fresh thyme, chopped
- 2 cloves garlic, minced
- 1 tablespoon olive oil
- 1/2 teaspoon salt
- 1/4 teaspoon black pepper
- 1 bunch asparagus, trimmed
- 1 lemon, sliced
Instructions:
Preheat your oven to 400°F (200°C). This lets it get hot and ready for your chicken.
In a mixing bowl, combine the breadcrumbs, Parmesan cheese, parsley, thyme, garlic, olive oil, salt, and black pepper. Stir everything together until well mixed.
Take each chicken breast and coat it with the herb mixture. Make sure to cover both sides so it gets all that yummy flavor.
Place the coated chicken breasts on a baking sheet lined with parchment paper. Spread the asparagus around the chicken. Drizzle a little olive oil over the asparagus and sprinkle with a pinch of salt.
Lay the lemon slices on top of the chicken and asparagus for added flavor. It’s a great touch!
Now, bake everything in the preheated oven for about 25 minutes. The chicken should be fully cooked, and the asparagus should be tender.
Once done, remove the dish from the oven and let it sit for a few minutes. Then, serve hot and enjoy your delicious meal!
Tips:
- For extra crunch, you can use panko breadcrumbs instead of regular ones.
- Feel free to add other veggies, like bell peppers or broccoli, to the baking sheet for a colorful dish.
- If you like, squeeze fresh lemon juice over the chicken and asparagus before serving for a zesty flavor.
Nutrition Facts:
- Calories: 320 per serving
- Protein: 30g
- Carbohydrates: 20g
- Fat: 15g
- Fiber: 4g
19 Grilled Vegetable and Hummus Wrap
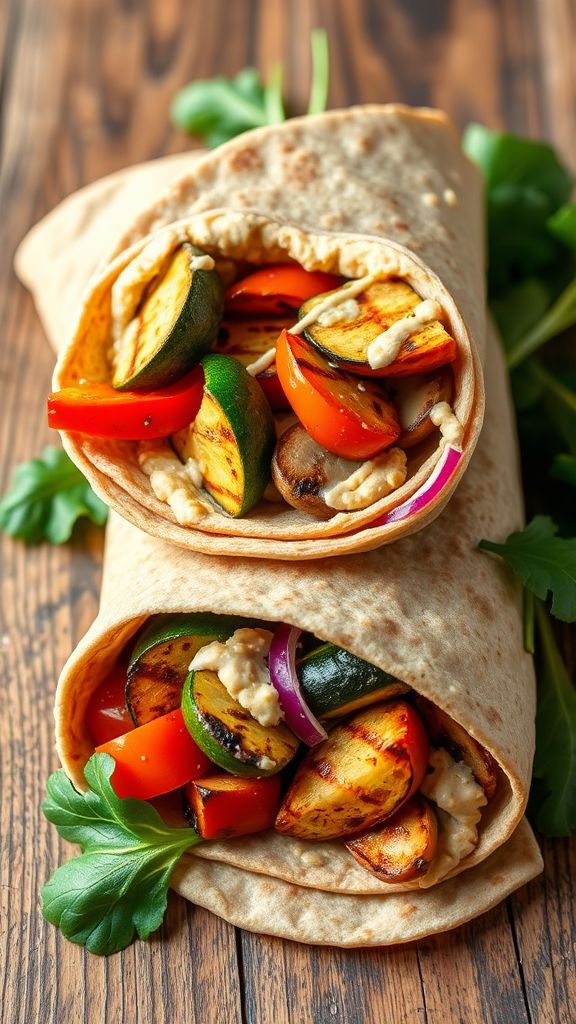
Grilled Vegetable and Hummus Wrap is a fresh and colorful meal that’s perfect for any time of the day. It’s easy to make and packed with nutrients, making it a great choice for a healthy lunch or a quick snack. The mix of grilled vegetables and creamy hummus creates a delicious flavor that everyone will enjoy.
Prep Time: 15 minutes
Additional Time: 10 minutes
Total Time: 25 minutes
Servings: 4
Ingredients:
- 4 whole wheat tortillas
- 1 zucchini, sliced
- 1 bell pepper, sliced (any color)
- 1 red onion, sliced
- 1 cup of mushrooms, sliced
- 2 tablespoons olive oil
- 1 teaspoon garlic powder
- 1 teaspoon Italian seasoning
- 1 cup hummus (store-bought or homemade)
- **Salt and pepper to taste
- Fresh spinach or mixed greens (optional)
Instructions:
First, preheat your grill or grill pan over medium-high heat. While it’s heating, place all the sliced vegetables in a large bowl and drizzle them with olive oil, garlic powder, Italian seasoning, salt, and pepper. Toss until the veggies are fully coated.
Once the grill is hot, carefully add the seasoned vegetables. Grill them for about 5-7 minutes, flipping them occasionally until they are tender and slightly charred.
While the vegetables are grilling, prepare your tortillas. Lay them flat and spread a generous amount of hummus over each tortilla. Leave a small border around the edges to make rolling easier.
After the vegetables are done, remove them from the grill and let them cool for a few minutes. Once cool, place a portion of the grilled veggies in the center of each tortilla. If you like, add some fresh spinach or mixed greens for extra crunch.
Now, roll up the tortillas tightly, folding in the sides as you go to keep the filling inside. You can cut them in half for easy eating. Serve immediately or wrap them in foil for a packed lunch later.
Tips:
- Feel free to customize your wrap with any of your favorite veggies, such as eggplant or asparagus.
- For extra flavor, add some feta cheese or sliced avocado inside the wrap.
- If you have leftovers, store the grilled vegetables in an airtight container in the fridge for up to three days.
Nutrition Facts:
- Calories: 250 per wrap
- Protein: 8g
- Carbohydrates: 35g
- Fat: 10g
- Fiber: 6g
- Sugar: 2g
20 Honey-Lime Fruit Salad
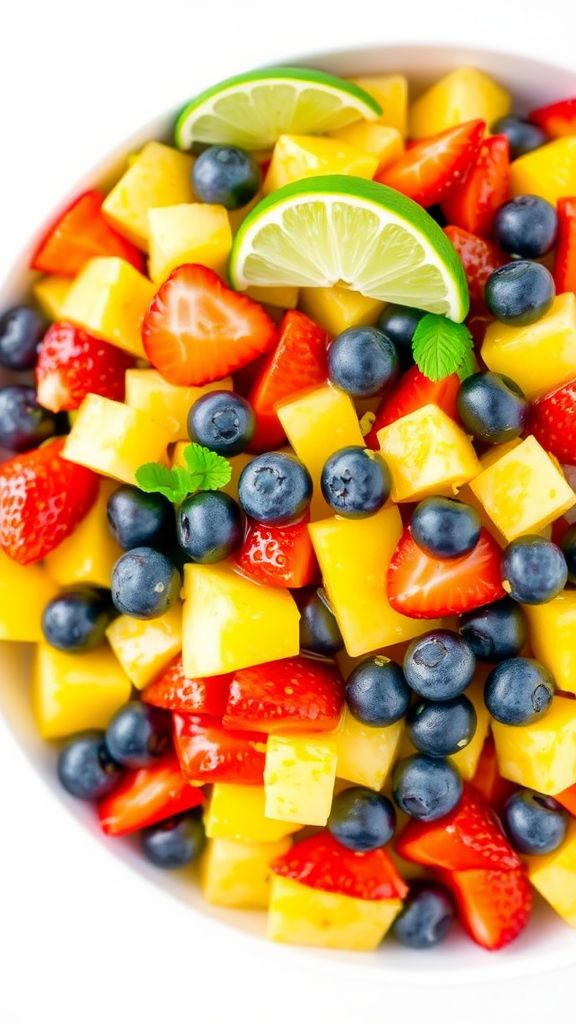
This Honey-Lime Fruit Salad is a fresh and vibrant dish perfect for any spring gathering. The sweet honey combined with zesty lime creates a delicious dressing that brings out the flavors of the fruits. It’s an easy recipe and is sure to be a hit with everyone!
Prep Time: 10 minutes
Total Time: 10 minutes
Servings: 4
Ingredients:
- 2 cups of diced strawberries
- 1 cup of chopped pineapple
- 1 cup of blueberries
- 1 cup of diced mango
- 2 tablespoons of honey
- 1 tablespoon of lime juice
- Zest of 1 lime
Instructions:
Start by washing all the fruits thoroughly. Remove the stems from the strawberries and dice them into small pieces. Dice the pineapple and mango into similar-sized chunks. Place all the fruits into a large mixing bowl.
In a separate small bowl, mix the honey, lime juice, and lime zest together. Whisk until it’s well combined. This dressing will bring a nice sweetness and tang to the fruit.
Pour the honey-lime dressing over the mixed fruits in the large bowl. Toss the fruit gently to make sure everything is coated evenly with the dressing. Be careful not to mash the fruits while mixing.
Once everything is mixed, you can serve the salad immediately or chill it in the fridge for about 30 minutes for an even cooler treat. Enjoy your refreshing fruit salad!
Tips:
- Variety: Feel free to add other fruits like kiwi or grapes for extra flavor and texture.
- Honey Substitute: If you want to make it vegan, you can replace honey with agave syrup or maple syrup.
- Serving: This fruit salad makes a great topping for yogurt or can be served on its own as a light dessert.
Nutrition Facts:
- Calories: 150
- Total Fat: 0g
- Sodium: 10mg
- Total Carbohydrates: 40g
- Dietary Fiber: 5g
- Sugars: 30g
- Protein: 1g
21 Spinach and Feta Stuffed Chicken Breasts
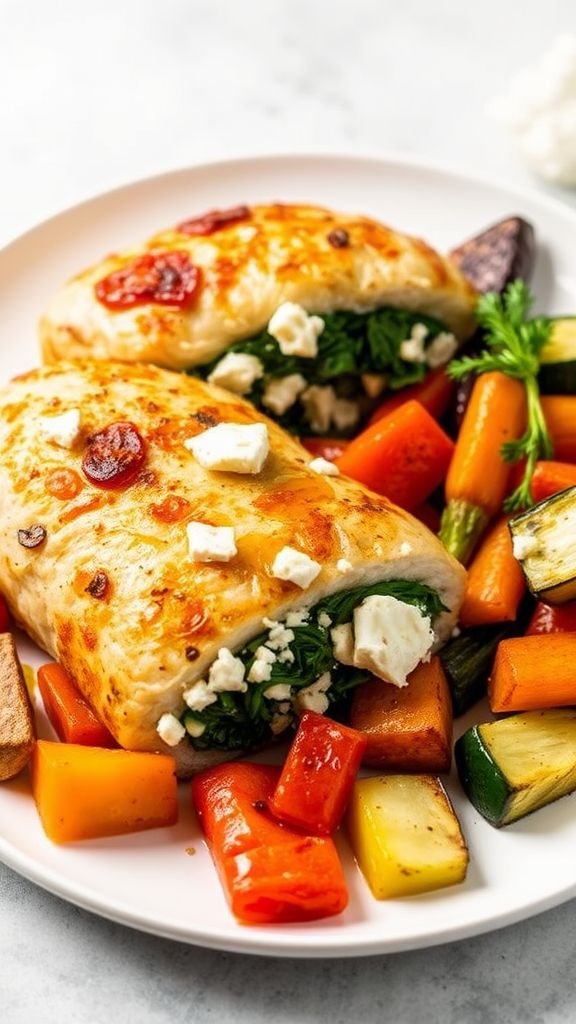
Spinach and Feta Stuffed Chicken Breasts are a delicious and healthy option for dinner. The juicy chicken is filled with flavorful spinach and creamy feta cheese, making each bite perfect. Plus, it’s easy to make and looks impressive on the plate!
Prep Time: 15 minutes
Cook Time: 25 minutes
Additional Time: 5 minutes
Total Time: 45 minutes
Servings: 4
Ingredients:
- 4 boneless, skinless chicken breasts
- 2 cups fresh spinach, chopped
- 1 cup feta cheese, crumbled
- 1 tablespoon olive oil
- 2 cloves garlic, minced
- 1 teaspoon dried oregano
- Salt and pepper to taste
- Toothpicks or kitchen twine
Instructions:
Start by preheating your oven to 375°F (190°C). While it’s heating, get your chicken ready. Place each chicken breast on a cutting board. With a sharp knife, carefully cut a pocket into each chicken breast. Be sure not to slice all the way through.
In a medium skillet, heat 1 tablespoon of olive oil over medium heat. Add the minced garlic and sauté for about 1 minute until it’s fragrant. Now, add the chopped spinach and cook until it wilts, about 2-3 minutes. Remove from heat and let it cool slightly.
In a mixing bowl, combine the wilted spinach, crumbled feta cheese, and dried oregano. Season with salt and pepper to taste. Stuff each chicken breast pocket with the spinach and feta mixture. Secure the openings with toothpicks or tie them with kitchen twine to keep the filling inside.
Place the stuffed chicken breasts in a baking dish. Bake in the oven for about 25 minutes, or until the chicken is cooked through and reaches an internal temperature of 165°F (75°C). Once done, remove from the oven and let it rest for 5 minutes before slicing.
Tips:
- For extra flavor, try adding some chopped sun-dried tomatoes to the spinach mix.
- If you want a crispy exterior, sear the stuffed chicken breasts in a skillet for a few minutes on each side before baking.
- Serve with a side of salad or roasted vegetables for a complete meal.
Nutrition Facts:
- Calories: 320
- Protein: 32g
- Carbohydrates: 4g
- Fat: 20g
- Saturated Fat: 8g
- Fiber: 1g
- Sodium: 550mg
22 Cold Soba Noodle Salad
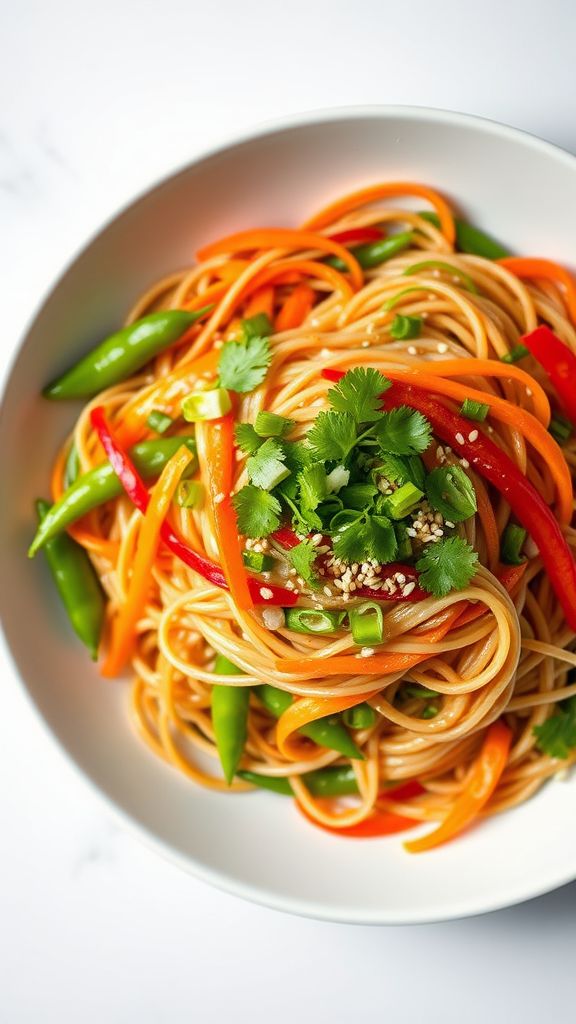
Cold Soba Noodle Salad is a refreshing dish perfect for warm days. It’s packed with flavors and textures that will keep you satisfied. Enjoy this light meal as a lunch option or a side dish at your next gathering!
Prep Time: 15 minutes
Total Time: 15 minutes
Servings: 4
Ingredients:
- 8 oz soba noodles
- 1 cup snap peas, trimmed and halved
- 1 cup carrots, julienned
- 1 bell pepper, sliced (red or yellow)
- 2 green onions, sliced
- 1/4 cup cilantro, chopped
- 1/4 cup sesame oil
- 3 tbsp soy sauce
- 1 tbsp rice vinegar
- 1 tbsp honey or maple syrup
- 1 tsp sesame seeds (for garnish)
Instructions:
First, cook the soba noodles in a large pot of boiling water according to package instructions. Once cooked, drain the noodles, and rinse them under cold water to stop the cooking process. This helps keep the noodles firm and cool.
In a separate bowl, prepare the dressing by mixing sesame oil, soy sauce, rice vinegar, and honey (or maple syrup). Whisk it all together until well combined.
Next, place the cooled soba noodles in a large mixing bowl. Add the snap peas, carrots, bell pepper, green onions, and cilantro. Pour the dressing over the noodles and veggies. Toss everything together gently until it’s well coated.
Finally, transfer the salad to a serving dish and sprinkle with sesame seeds on top for garnish. Your delicious Cold Soba Noodle Salad is ready to serve!
Tips:
- Feel free to add proteins like grilled chicken, tofu, or shrimp for a more filling meal.
- You can customize the vegetables based on your preference or what’s in season.
- This salad can be made ahead of time and stored in the fridge for up to 2 days.
Nutrition Facts:
- Calories: 240 per serving
- Protein: 8g
- Carbohydrates: 30g
- Fat: 12g
- Fiber: 4g
- Sugar: 3g
23 Roasted Beet and Goat Cheese Salad
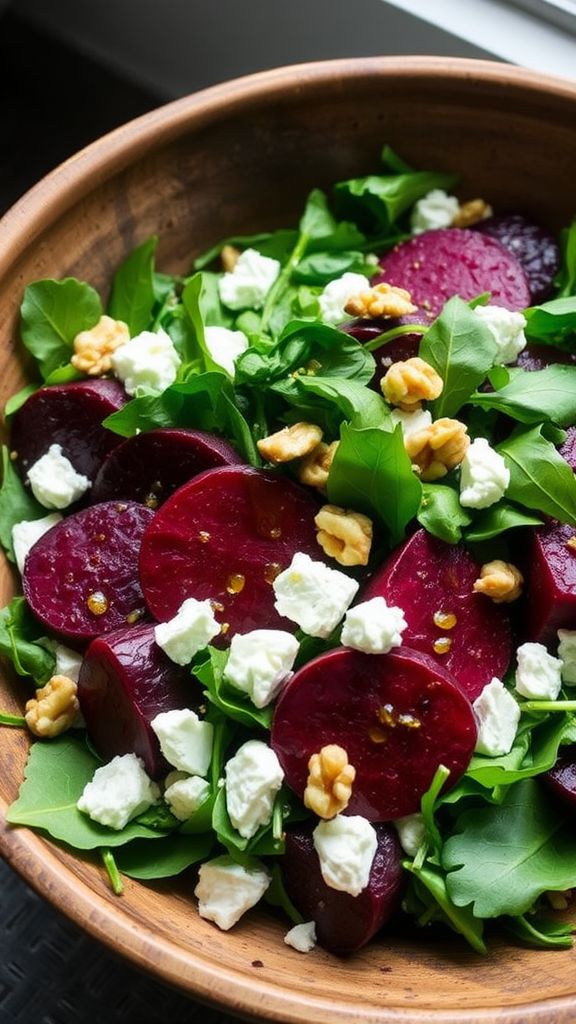
Roasted Beet and Goat Cheese Salad is a fresh and colorful dish that’s perfect for any spring meal. The earthy sweetness of roasted beets pairs wonderfully with the tangy goat cheese, creating a delightful contrast. This salad is not only delicious but also healthy and easy to make!
Prep Time: 15 minutes
Cook Time: 30 minutes
Additional Time: 10 minutes
Total Time: 55 minutes
Servings: 4
Ingredients:
- 4 medium-sized beets, tops removed
- 4 cups mixed greens (such as arugula and spinach)
- 4 oz goat cheese, crumbled
- 1/4 cup walnuts, chopped
- 2 tbsp olive oil
- 1 tbsp balsamic vinegar
- Salt and pepper to taste
Instructions:
Start by preheating your oven to 400°F (200°C). Wrap each beet in aluminum foil, making sure they are completely covered. Place the wrapped beets on a baking sheet and roast them for about 30 minutes or until they are tender when pierced with a knife.
Once roasted, take the beets out of the oven and let them cool for about 10 minutes. After they have cooled enough to handle, peel the skins off. You can use your hands or paper towels to rub off the skins easily. Next, chop the beets into wedges and set them aside.
In a large salad bowl, combine the mixed greens. Add the roasted beet wedges, making sure to distribute them evenly. Sprinkle the crumbled goat cheese and chopped walnuts over the salad.
In a small bowl, whisk together the olive oil, balsamic vinegar, and a pinch of salt and pepper. Drizzle this dressing over the salad just before serving. Toss gently to mix everything together, making sure not to break the cheese too much.
Tips:
- For a sweeter touch, add some sliced apples or pears to the salad.
- If you want a little extra crunch, add croutons or even some toasted sunflower seeds.
- Feel free to mix in other greens or herbs like parsley or cilantro for added flavor.
Nutrition Facts:
- Calories: 250 per serving
- Protein: 8g
- Carbohydrates: 20g
- Fat: 18g
- Fiber: 3g
- Sugar: 6g
24 Chicken and Avocado Lettuce Wraps
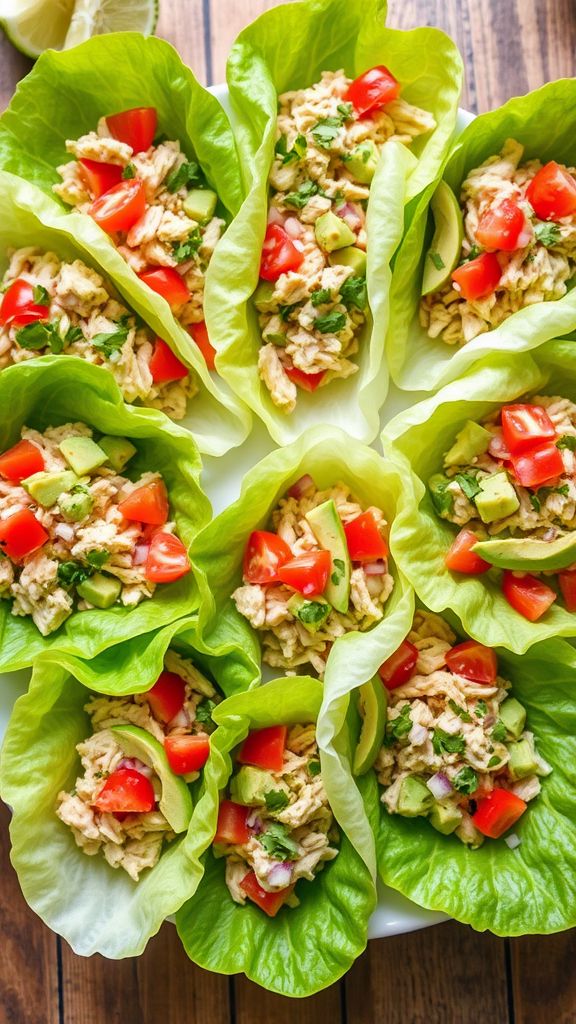
Chicken and Avocado Lettuce Wraps are a fresh and tasty way to enjoy a light meal. These wraps are filled with juicy chicken, creamy avocado, and crunchy veggies, all wrapped in crisp lettuce leaves. They’re perfect for a healthy lunch or a quick dinner!
Prep Time: 15 minutes
Total Time: 15 minutes
Servings: 4
Ingredients:
- 2 cups cooked chicken, shredded or diced
- 1 ripe avocado, diced
- 1 cup cherry tomatoes, halved
- 1/2 cup red onion, finely chopped
- 1/4 cup cilantro, chopped
- 1 tablespoon lime juice
- Salt and pepper to taste
- 8 large romaine or butter lettuce leaves
Instructions:
Begin by preparing the chicken. If you haven’t cooked it yet, you can use leftover chicken or rotisserie chicken for convenience. Shred or dice the chicken into small pieces and set aside.
Next, take the avocado and carefully slice it. Remove the pit and scoop the flesh into a mixing bowl. Mash it slightly with a fork, then add the diced tomatoes, chopped red onion, and cilantro. Pour in the lime juice and mix everything gently. Season with salt and pepper to your liking.
Now, combine the avocado mixture with the shredded chicken in the bowl. Mix until the chicken is evenly coated with the creamy avocado.
Prepare the lettuce by washing the leaves to remove any dirt. Gently pat them dry. These leaves will be your wraps, so choose the largest ones available.
To assemble, take a lettuce leaf and add a generous scoop of the chicken and avocado mixture. Fold the sides of the lettuce over the filling and enjoy it fresh!
Tips:
- You can add other veggies like bell peppers or cucumber for extra crunch.
- For a spicier kick, mix in some chopped jalapeños or a dash of hot sauce.
- These wraps can be made in advance. Just keep the filling and lettuce separate until you’re ready to eat.
Nutrition Facts:
- Calories: 280 per serving
- Protein: 20g
- Fat: 15g
- Carbohydrates: 15g
- Fiber: 8g
25 Citrus and Avocado Quinoa Salad
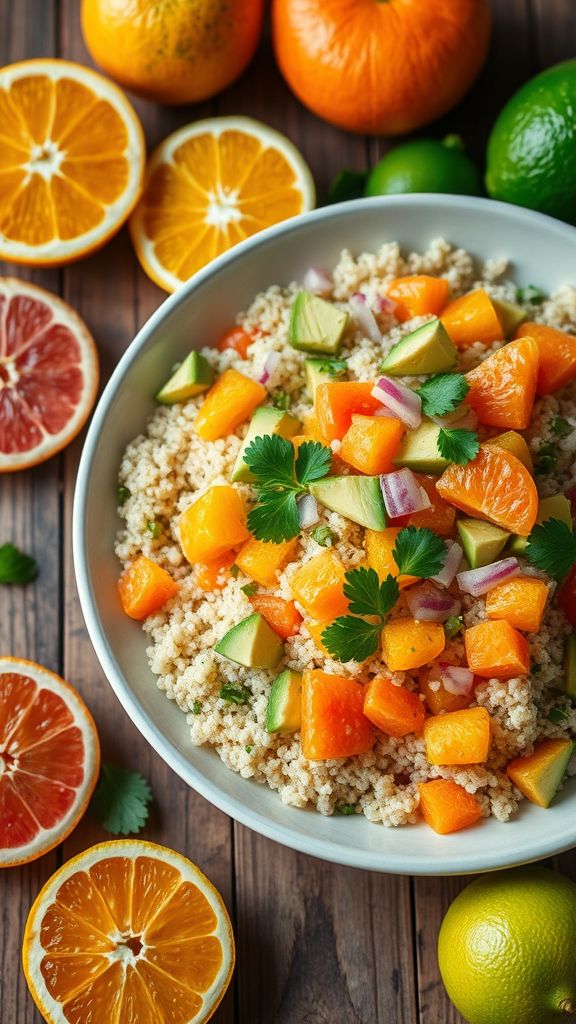
This Citrus and Avocado Quinoa Salad is a bright and refreshing dish, perfect for spring! It’s packed with healthy ingredients that will make your taste buds dance. The combination of citrus and creamy avocado makes it a delightful treat for lunch or dinner.
Prep Time: 15 minutes
Additional Time: 10 minutes
Total Time: 25 minutes
Servings: 4
Ingredients:
- 1 cup quinoa
- 2 cups water
- 1 large avocado, diced
- 1 orange, segmented
- 1 grapefruit, segmented
- 1/4 cup red onion, finely chopped
- 1/4 cup fresh cilantro, chopped
- 1/4 cup olive oil
- 2 tablespoons lime juice
- Salt and pepper to taste
Instructions:
Start by rinsing the quinoa under cold water in a fine mesh strainer. This step helps remove any bitterness. Then, in a medium saucepan, combine the quinoa and water. Bring it to a boil over medium-high heat.
Once it boils, reduce the heat to low and cover the pot. Let the quinoa simmer for about 15 minutes or until all the water is absorbed. After that, remove it from heat and let it sit for about 5 minutes. This resting time will make the quinoa fluffy.
Next, fluff the quinoa with a fork and allow it to cool for about 10 minutes. While the quinoa is cooling, prepare the other ingredients. Dice the avocado and segment the orange and grapefruit. Place these in a large mixing bowl.
Add the cooled quinoa to the bowl with the fruits and the red onion and cilantro. In a separate small bowl, whisk together the olive oil, lime juice, and a pinch of salt and pepper to create the dressing.
Pour the dressing over the salad and gently toss to combine all the flavors together. Make sure the avocado doesn’t get mashed. Serve the salad immediately or cover it and chill in the refrigerator for up to 30 minutes for extra freshness.
Tips:
- You can add other ingredients like cherry tomatoes or cucumber for extra crunch.
- This salad is great for meal prep; simply store it in an airtight container in the fridge.
- Try using different citrus fruits like lemons or limes for a unique flavor twist.
Nutrition Facts:
- Calories: 320
- Protein: 8g
- Fat: 20g
- Carbohydrates: 34g
- Fiber: 8g
- Sugar: 2g