My New Cookbook is Out! Check Out Now!
25 Keto-Friendly Comfort Food Ideas
This page contains affiliate links and I earn a commission if you make a purchase through one of the links, at no cost to you.
Did you know that following a keto diet can actually enhance your enjoyment of comfort foods while keeping sugar and carbs at bay? If you’re on a journey to embrace the keto lifestyle, you’re in for a treat! This collection of 25 keto-friendly comfort food ideas will satisfy your cravings and introduce you to delicious dishes like Creamy Garlic Parmesan Zoodles and Cheesy Cauliflower Mac and Cheese. Get ready to indulge guilt-free and discover how you can enjoy hearty meals without compromising your health goals!
Shop Our Must-Haves


1. Creamy Garlic Parmesan Zoodles

Indulge in the richness of Creamy Garlic Parmesan Zoodles that offer a comforting yet healthy twist on traditional pasta. These zoodles are not only easy to whip up but also bursting with flavor, making them a perfect dish for keto enthusiasts.
Prep Time: ten minutes
Total Time: twenty minutes
Servings: 4
Ingredients:
- 4 medium zucchini
- 2 tablespoons olive oil
- 4 cloves garlic, minced
- 1 cup heavy cream
- 1 cup grated Parmesan cheese
- Salt and pepper to taste
- Fresh parsley for garnish
Instructions:
- Begin by spiralizing the zucchini into zoodles using a spiralizer or a vegetable peeler. Set aside.
- In a large skillet, heat olive oil over medium heat.
- Add the minced garlic and sauté until fragrant, about 1 minute.
- Pour in the heavy cream, stirring to combine, and bring to a slight simmer.
- Gradually add the grated Parmesan cheese, stirring until melted and creamy.
- Season the sauce with salt and pepper to taste.
- Gently toss the zoodles in the skillet until they are well-coated and heated through, about 2-3 minutes.
- Remove from heat and garnish with fresh parsley before serving.
Tips:
For an extra flavor boost, consider adding a pinch of red pepper flakes for some heat. You can also mix in some sautéed mushrooms or spinach for added nutrition and texture. Drizzling with a touch of lemon juice just before serving enhances the freshness of the dish.
Nutrition Facts:
- Calories: 320 per serving
- Protein: 11g
- Fat: 28g
- Carbohydrates: 6g
- Fiber: 2g
- Net Carbs: 4g
2. Cheesy Cauliflower Mac and Cheese

Cheesy Cauliflower Mac and Cheese is a delightful twist on the classic comfort food, offering a creamy, cheesy goodness without the carbs. This dish is perfect for anyone seeking a healthier option while still satisfying those cheesy cravings.
Prep Time: 15 minutes
Cook Time: 30 minutes
Additional Time: 5 minutes
Total Time: 50 minutes
Servings: 4
Ingredients:
- 1 large cauliflower head, cut into florets
- 1 cup shredded sharp cheddar cheese
- 1 cup shredded mozzarella cheese
- 1/2 cup cream cheese
- 1 cup heavy cream
- 1/2 cup grated Parmesan cheese
- 2 tablespoons unsalted butter
- 1 teaspoon garlic powder
- 1 teaspoon onion powder
- Salt and pepper, to taste
- 1/2 teaspoon smoked paprika (optional)
Instructions:
- Preheat your oven to 350°F (180°C) and grease a baking dish.
- In a large pot, bring salted water to a boil and add the cauliflower florets. Cook for 5-7 minutes or until just tender. Drain and set aside.
- In a saucepan over medium heat, melt the butter. Add the cream cheese, stirring until it becomes smooth.
- Gradually whisk in the heavy cream, followed by the garlic powder, onion powder, salt, and pepper. Stir until combined.
- Add the shredded cheddar, mozzarella, and Parmesan cheese to the sauce, stirring until the cheese is melted and the mixture is creamy.
- Combine the cooked cauliflower with the cheese sauce, ensuring all the florets are coated.
- Transfer the mixture to the prepared baking dish and sprinkle with smoked paprika if using.
- Bake in the preheated oven for 20 minutes, or until bubbly and golden on top.
- Let it sit for 5 minutes before serving.
Tips:
For extra flavor, consider adding cooked bacon bits or sautéed spinach to the mixture. A sprinkle of fresh herbs like parsley or chives before serving can elevate the dish even more.
Nutrition Facts:
- Calories: 400 per serving
- Protein: 15g
- Fat: 35g
- Carbohydrates: 8g
- Fiber: 3g
- Net Carbs: 5g
3. Keto Chicken Alfredo Casserole

This Keto Chicken Alfredo Casserole is a creamy, cheesy dish that is perfect for a low-carb lifestyle. Packed with flavors, it’s an easy meal that the whole family will love!
Prep Time: 15 minutes
Cook Time: 30 minutes
Additional Time: 10 minutes
Total Time: 55 minutes
Servings: 6
Ingredients:
- 2 cups cooked chicken, shredded
- 1 cup cauliflower florets
- 1 cup heavy cream
- 1 cup grated Parmesan cheese
- 1 cup shredded mozzarella cheese
- 2 cloves garlic, minced
- 1 teaspoon Italian seasoning
- 1/2 teaspoon salt
- 1/4 teaspoon black pepper
- 2 tablespoons olive oil
- Fresh parsley, for garnish (optional)
Instructions:
- Preheat your oven to 350°F (175°C).
- In a large skillet, heat the olive oil over medium heat. Add the minced garlic and sauté until fragrant, about 1 minute.
- Add the cauliflower florets to the skillet and cook for about 5-7 minutes until tender.
- In a bowl, combine the heavy cream, Parmesan cheese, Italian seasoning, salt, and black pepper. Stir until well mixed.
- In a large mixing bowl, combine the shredded chicken, sautéed cauliflower, and cream mixture. Stir until everything is well coated.
- Transfer the mixture to a greased baking dish and sprinkle the mozzarella cheese on top.
- Bake in the preheated oven for 25-30 minutes, or until the cheese is bubbly and golden.
- Let the casserole cool for about 10 minutes before serving. Garnish with fresh parsley if desired.
Tips:
For an extra flavor boost, consider adding crushed red pepper flakes for a bit of heat. You can also mix in other veggies like spinach or broccoli for more nutrients and color.
Nutrition Facts:
- Calories: 450
- Protein: 30g
- Total Fat: 35g
- Net Carbs: 5g
- Fiber: 2g
- Sugar: 1g
4. Spicy Taco-Stuffed Bell Peppers
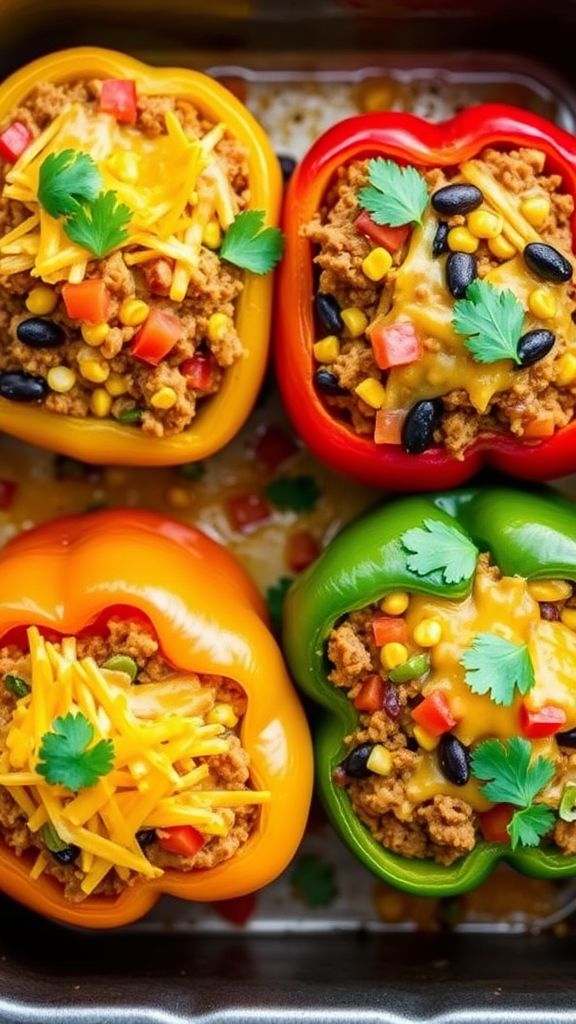
Get ready to indulge in these flavorful Spicy Taco-Stuffed Bell Peppers! They are a fantastic low-carb meal packed with bold flavors and satisfying ingredients. Perfect for dinner or meal prep, these bell peppers are sure to become a favorite.
Prep Time: 15 minutes
Cook Time: 30 minutes
Additional Time: 5 minutes
Total Time: 50 minutes
Servings: 4
Ingredients:
- 4 large bell peppers (any color)
- 1 lb ground beef or chicken
- 1 cup onion, chopped
- 2 cloves garlic, minced
- 1 packet taco seasoning
- 1 can (15 oz) black beans, rinsed and drained
- 1 cup corn (fresh, frozen, or canned)
- 1 cup diced tomatoes (canned or fresh)
- 1 cup shredded cheese (cheddar or Mexican blend)
- Salt and pepper, to taste
- Fresh cilantro, for garnish
Instructions:
- Preheat your oven to 375°F (190°C).
- Slice the tops off the bell peppers and remove the seeds and membranes. Set aside.
- In a large skillet over medium heat, cook the onion and garlic until softened.
- Add the ground beef (or chicken) to the skillet and cook until browned. Drain excess fat if necessary.
- Stir in the taco seasoning, black beans, corn, and diced tomatoes. Let it simmer for about 5 minutes.
- Remove from heat and stir in half of the shredded cheese. Season with salt and pepper to taste.
- Fill each bell pepper with the taco mixture. Place them upright in a baking dish.
- Cover the baking dish with foil and bake in the preheated oven for 25 minutes.
- Remove the foil, sprinkle the remaining shredded cheese on top, and bake for an additional 5 minutes or until the cheese is bubbly.
- Garnish with fresh cilantro before serving.
Tips:
- For an extra kick, add some jalapeños or sriracha to the filling.
- Experiment with different meats or even go meatless by using additional beans or lentils for a hearty option.
Nutrition Facts:
- Calories: 350 per serving
- Protein: 25g
- Carbohydrates: 30g
- Fat: 15g
- Fiber: 8g
5. Low-Carb Meatball Sub Casserole

Looking for a delicious twist on traditional comfort food? This Low-Carb Meatball Sub Casserole is the perfect meal that delivers all the classic flavors with none of the carbs. It’s hearty, satisfying, and sure to be a hit with the whole family!
Prep Time: 20 minutes
Cook Time: 30 minutes
Additional Time: 10 minutes
Total Time: 1 hour
Servings: 6
Ingredients:
- 1 lb ground beef
- 1 lb ground pork
- 1 cup shredded mozzarella cheese
- 1 cup marinara sauce
- 1/2 cup grated Parmesan cheese
- 1/4 cup almond flour
- 1 large egg
- 1 tsp garlic powder
- 1 tsp onion powder
- 1 tsp Italian seasoning
- Salt and pepper to taste
- Fresh basil for garnish (optional)
Instructions:
- Preheat your oven to 375°F (190°C).
- In a large mixing bowl, combine the ground beef, ground pork, almond flour, egg, garlic powder, onion powder, Italian seasoning, salt, and pepper. Mix until fully combined.
- Shape the mixture into 1-inch meatballs and place them in a greased 9×13-inch baking dish.
- Pour the marinara sauce over the meatballs, making sure they are well-coated.
- Top the meatballs with the shredded mozzarella cheese and grated Parmesan cheese.
- Bake in the preheated oven for 25-30 minutes until the meatballs are cooked through and the cheese is melted and bubbly.
- Let the casserole sit for 10 minutes before serving. Garnish with fresh basil if desired.
Tips:
Add some red pepper flakes to the marinara sauce for a spicy kick! You can also mix in chopped bell peppers or spinach for added flavor and nutrition. For extra cheesy goodness, sprinkle more mozzarella on top during the last few minutes of baking.
Nutrition Facts:
- Calories: 380 per serving
- Protein: 28g
- Fat: 25g
- Carbohydrates: 6g
- Fiber: 2g
- Net Carbs: 4g
6. Bacon-Wrapped Jalapeño Poppers

Juicy jalapeños stuffed with creamy cheese and wrapped in crispy bacon make for a delightful appetizer that will impress your guests. These Bacon-Wrapped Jalapeño Poppers are perfect for game day, parties, or just a tasty snack at home.
Prep Time: 15 minutes
Cook Time: 20 minutes
Total Time: 35 minutes
Servings: 12 poppers
Ingredients:
- 12 jalapeño peppers
- 8 oz cream cheese, softened
- 1 cup shredded cheddar cheese
- 1/2 tsp garlic powder
- 1/2 tsp onion powder
- 12 slices of bacon
- Optional: fresh herbs (like cilantro or chives) for garnish
Instructions:
- Preheat your oven to 400°F (200°C) and line a baking sheet with parchment paper.
- Carefully slice each jalapeño in half lengthwise and remove the seeds and membranes (be cautious, as the oils can irritate your skin).
- In a mixing bowl, combine the cream cheese, cheddar cheese, garlic powder, and onion powder until well mixed.
- Using a spoon or spatula, fill each jalapeño half generously with the cheese mixture.
- Wrap each stuffed jalapeño with a slice of bacon, securing it with a toothpick if necessary.
- Place the wrapped jalapeños on the prepared baking sheet and bake for 20 minutes, or until the bacon is crispy and the cheese is bubbly.
- Remove from the oven and let cool for a few minutes before serving. Garnish with fresh herbs if desired.
Tips:
For added flavor, try mixing in some smoked paprika or chopped green onions into the cheese mixture. You can also experiment with different types of cheeses for a unique twist. Serve with a side of ranch or blue cheese dressing for dipping.
Nutrition Facts:
- Calories: 200 per popper
- Protein: 8g
- Fat: 18g
- Carbohydrates: 2g
- Fiber: 1g
- Sodium: 300mg
7. Keto Chicken Pot Pie with Almond Flour Crust

Warm, comforting, and utterly satisfying, this Keto Chicken Pot Pie with Almond Flour Crust is the perfect low-carb meal for any family dinner. With a creamy filling and a flaky almond flour crust, it’s a delightful twist on the classic dish that everyone will love.
Prep Time: 20 minutes
Cook Time: 40 minutes
Additional Time: 10 minutes
Total Time: 1 hour 10 minutes
Servings: 6
Ingredients:
- 2 cups cooked chicken, shredded
- 1 cup cauliflower florets, steamed and chopped
- 1 cup heavy cream
- 1 cup chicken broth
- 1/2 cup carrots, diced
- 1/2 cup celery, diced
- 1/4 cup onion, chopped
- 1 tsp garlic powder
- 1 tsp onion powder
- 1 tsp dried thyme
- 1 tsp salt
- 1/2 tsp black pepper
- 2 cups almond flour
- 1/2 cup butter, melted
- 1 large egg
Instructions:
- Preheat your oven to 375°F (190°C).
- In a pot, combine heavy cream and chicken broth. Heat over medium until warm.
- In a separate skillet, sauté the onion, carrots, and celery until softened. Add in the garlic powder, onion powder, and dried thyme.
- Stir in the shredded chicken and chopped cauliflower, mixing well. Pour the warm cream mixture over and stir until well combined. Season with salt and black pepper. Remove from heat.
- In a mixing bowl, combine almond flour, melted butter, and egg. Mix until a dough forms.
- Press the almond flour mixture into the bottom and up the sides of a pie dish.
- Pour the chicken mixture into the crust.
- Use the remaining dough to create a top crust or crumble over the filling.
- Bake for 30-35 minutes or until the crust is golden brown.
- Let it cool for 10 minutes before serving.
Tips:
For added flavor, toss in some fresh herbs like parsley or rosemary. You can also mix a splash of Worcestershire sauce into the filling for a richer taste. Another great addition would be some freshly grated cheese sprinkled over the top before baking!
Nutrition Facts:
- Calories: 450
- Protein: 28g
- Fat: 35g
- Carbohydrates: 7g
- Fiber: 4g
- Net Carbs: 3g
8. Creamy Spinach and Artichoke Dip

Indulge in this rich and decadent Creamy Spinach and Artichoke Dip that’s perfect for gatherings or cozy nights in. Creamy, cheesy, and packed with flavor, this dip is a favorite among friends and family alike!
Prep Time: 15 minutes
Cook Time: 25 minutes
Total Time: 40 minutes
Servings: 8
Ingredients:
- 1 (10 oz) package frozen chopped spinach, thawed and drained
- 1 (14 oz) can artichoke hearts, drained and chopped
- 1 cup cream cheese, softened
- 1 cup sour cream
- 1 cup mayonnaise
- 1 cup shredded mozzarella cheese
- **1/2 cup grated Parmesan cheese
- 2 cloves garlic, minced
- 1 teaspoon garlic powder
- **1/2 teaspoon salt
- **1/4 teaspoon black pepper
- 1/4 teaspoon red pepper flakes (optional)
Instructions:
- Preheat your oven to 350°F (175°C).
- In a large mixing bowl, combine the cream cheese, sour cream, mayonnaise, mozzarella cheese, Parmesan cheese, and garlic. Mix until well blended and smooth.
- Add the chopped spinach, artichoke hearts, garlic powder, salt, black pepper, and red pepper flakes (if using). Stir until everything is evenly incorporated.
- Transfer the mixture into a baking dish and spread it evenly.
- Bake in the preheated oven for 20-25 minutes, or until the dip is bubbly and golden on top.
- Remove from the oven and let it cool for a few minutes before serving.
Tips:
For an extra cheesy dip, sprinkle some additional mozzarella on top before baking. You can also add in some diced green onions or jalapeños for a kick of flavor. Pair this dip with crackers, bread, or even fresh veggies for a delicious and complete experience!
Nutrition Facts:
- Calories: 230
- Total Fat: 21g
- Saturated Fat: 10g
- Cholesterol: 50mg
- Sodium: 450mg
- Total Carbohydrates: 6g
- Dietary Fiber: 2g
- Sugars: 1g
- Protein: 6g
9. Zesty Lemon Butter Shrimp with Asparagus

Enjoy a burst of flavors with this Zesty Lemon Butter Shrimp with Asparagus! This dish combines tender shrimp and crisp asparagus in a buttery lemon sauce, perfect for a quick weeknight dinner that feels luxurious.
Prep Time: 10 minutes
Cook Time: 15 minutes
Additional Time: 0 minutes
Total Time: 25 minutes
Servings: 4
Ingredients:
- 1 pound large shrimp, peeled and deveined
- 1 bunch asparagus, trimmed and cut into 2-inch pieces
- 4 tablespoons unsalted butter
- 4 cloves garlic, minced
- 2 lemons, juiced and zested
- Salt and pepper, to taste
- 1 teaspoon red pepper flakes (optional)
- Fresh parsley, chopped for garnish
Instructions:
- In a large skillet, melt 2 tablespoons of the butter over medium heat.
- Add the asparagus and sauté for 3-4 minutes until tender but still crisp. Remove the asparagus from the skillet and set aside.
- In the same skillet, add the remaining 2 tablespoons of butter and let it melt.
- Add the minced garlic and cook for about 30 seconds until fragrant.
- Stir in the shrimp, seasoning with salt, pepper, and red pepper flakes (if using). Cook for 3-4 minutes until the shrimp turn pink and opaque.
- Add the lemon juice and zest to the skillet, stirring well to combine.
- Return the asparagus to the skillet and toss to coat everything in the lemon butter sauce. Cook for another 1-2 minutes to heat everything through.
- Serve immediately, garnished with chopped parsley.
Tips:
To enhance the flavor, consider adding a splash of white wine just before adding the shrimp. A sprinkle of Parmesan cheese can also elevate the dish. Additionally, serve over a bed of cauliflower rice for a low-carb delight!
Nutrition Facts:
- Calories: 320 per serving
- Protein: 25g
- Fat: 20g
- Carbohydrates: 8g
- Fiber: 3g
- Sugar: 2g
10. Keto Chili Con Carne

Keto Chili Con Carne is a hearty and satisfying dish that fits perfectly into your low-carb lifestyle. Packed with rich flavors and healthy ingredients, this chili is sure to become a family favorite without compromising your ketogenic goals.
Prep Time: 10 minutes
Cook Time: 30 minutes
Total Time: 40 minutes
Servings: 4
Ingredients:
- 1 lb ground beef
- 1 medium onion, diced
- 2 cloves garlic, minced
- 1 can (14 oz) diced tomatoes (with juice)
- 1 can (6 oz) tomato paste
- 1 cup beef broth
- 1 tbsp chili powder
- 1 tsp cumin
- 1 tsp smoked paprika
- 1/2 tsp dried oregano
- 1/2 tsp salt
- 1/4 tsp black pepper
- 1 cup bell peppers, diced (any color)
- 1 can (15 oz) kidney beans, drained and rinsed (optional for low-carb but can be included for extra fiber)
Instructions:
- In a large pot or skillet over medium heat, add the ground beef. Cook until browned, breaking it apart as it cooks.
- Add the onion and garlic to the pot, sautéing until the onion is translucent.
- Stir in the bell peppers and cook for an additional 2-3 minutes.
- Pour in the diced tomatoes, tomato paste, and beef broth. Mix well.
- Add the chili powder, cumin, smoked paprika, oregano, salt, and black pepper. Stir to combine all ingredients.
- If using, add the kidney beans.
- Bring the mixture to a simmer and reduce the heat to low. Let it cook for about 30 minutes, stirring occasionally, until the chili thickens.
- Taste and adjust seasoning if necessary before serving.
Tips:
For an extra kick, add a dash of cayenne pepper or your favorite hot sauce. Top with sour cream or avocado for added creaminess and flavor. Feel free to experiment with additional low-carb vegetables like zucchini for a nutritious boost!
Nutrition Facts:
- Calories: 350 per serving
- Fat: 25g
- Carbohydrates: 10g
- Fiber: 3g
- Net Carbs: 7g
- Protein: 30g
11. Cheddar and Chive Cauliflower Fritters

These Cheddar and Chive Cauliflower Fritters are a delicious and healthy twist on traditional fritters. Packed with flavor and a crispy texture, they make for a perfect appetizer or snack that everyone will love.
Prep Time: 10 minutes
Cook Time: 20 minutes
Total Time: 30 minutes
Servings: 4
Ingredients:
- 1 head of cauliflower, riced
- 1 cup shredded cheddar cheese
- 1/4 cup chopped fresh chives
- 2 large eggs
- 1/2 cup almond flour
- 1/4 teaspoon garlic powder
- Salt and pepper to taste
- Olive oil for frying
Instructions:
- Begin by ricing the cauliflower in a food processor until it resembles rice grains.
- Steam the riced cauliflower for about 5 minutes until tender. Allow it to cool slightly, then squeeze out excess moisture using a clean kitchen towel.
- In a large mixing bowl, combine the drained riced cauliflower, cheddar cheese, chives, eggs, almond flour, garlic powder, and salt and pepper. Mix until well combined.
- Heat a large skillet over medium heat and add a little olive oil to coat the pan.
- Scoop 1 to 2 tablespoons of the cauliflower mixture and form it into a patty. Place it in the skillet and flatten slightly. Repeat with the remaining mixture.
- Cook the fritters for approximately 3-4 minutes on each side or until golden brown and crispy. Remove and drain on paper towels.
Tips:
For added flavor, try incorporating smoked paprika or red pepper flakes into the mixture. You can also serve the fritters with a tangy dipping sauce like sour cream or Greek yogurt for extra creaminess.
Nutrition Facts:
- Calories: 200
- Fat: 14g
- Carbohydrates: 6g
- Fiber: 3g
- Protein: 10g
12. Buffalo Chicken Lettuce Wraps

Buffalo Chicken Lettuce Wraps are a flavorful and healthy alternative to traditional Buffalo chicken dishes. Perfect for lunch or a light dinner, these wraps combine tender shredded chicken with a zesty Buffalo sauce, all wrapped in crisp lettuce leaves.
Prep Time: 15 minutes
Cook Time: 0 minutes
Additional Time: 0 minutes
Total Time: 15 minutes
Servings: 4
Ingredients:
- 2 cups cooked shredded chicken
- 1/2 cup Buffalo sauce
- 1/4 cup ranch dressing (or blue cheese dressing)
- 1 cup shredded carrots
- 1 cup diced celery
- 1 head of romaine or butter lettuce, leaves separated
- Green onions, chopped, for garnish
Instructions:
- In a mixing bowl, combine the cooked shredded chicken and Buffalo sauce. Stir well until the chicken is evenly coated.
- Add the ranch dressing to the chicken mixture and mix thoroughly.
- Place a generous scoop of the Buffalo chicken mixture onto a lettuce leaf.
- Top with shredded carrots and diced celery for crunch.
- Garnish with chopped green onions if desired.
- Repeat for remaining lettuce leaves and serve immediately.
Tips:
- For an extra kick, add some sliced jalapeños or a dash of hot sauce into the chicken mixture.
- Experiment with different types of lettuce for a unique presentation and texture. Butter lettuce is perfect for a softer wrap, while romaine adds a nice crunch.
Nutrition Facts:
- Calories: 250
- Protein: 30g
- Carbohydrates: 5g
- Fat: 12g
- Fiber: 2g
- Sugar: 1g
13. Coconut Flour Pancakes with Berry Compote

Coconut Flour Pancakes are a fantastic low-carb breakfast option, perfect for those following a keto lifestyle. Light, fluffy, and nutrient-dense, these pancakes paired with a warm berry compote make for an indulgent yet healthy treat.
Prep Time: 10 minutes
Cook Time: 15 minutes
Total Time: 25 minutes
Servings: 4 pancakes
Ingredients:
- 1/2 cup coconut flour
- 1/2 tsp baking powder
- 1/4 tsp salt
- 3 large eggs
- 1 cup almond milk (or your favorite milk)
- 1 tbsp coconut oil (melted)
- 1 tbsp erythritol (or preferred sweetener)
Instructions:
- In a mixing bowl, combine coconut flour, baking powder, and salt. Mix well to avoid lumps.
- In another bowl, whisk together eggs, almond milk, melted coconut oil, and erythritol until smooth.
- Gradually add the wet ingredients into the dry ingredients, stirring until well combined. Let the batter sit for about 5 minutes to thicken.
- Heat a non-stick skillet over medium heat and lightly grease it with coconut oil.
- Pour 1/4 cup of the batter onto the skillet for each pancake. Cook until bubbles form on the surface (about 2-3 minutes), then flip and cook for another 2-3 minutes until golden brown.
- While pancakes are cooking, prepare the berry compote by warming 1 cup of mixed berries and 1 tbsp of erythritol in a saucepan over medium heat until the berries break down and form a sauce, about 5 minutes.
- Serve the pancakes warm, topped with the warm berry compote.
Tips:
For extra flavor, add a dash of vanilla extract to the batter. You can also top the pancakes with a spoonful of Greek yogurt for added creaminess and protein. Experiment with different types of berries in the compote for a unique twist!
Nutrition Facts:
- Calories: 320
- Protein: 12g
- Fat: 22g
- Carbohydrates: 18g
- Fiber: 10g
- Net Carbs: 8g
14. Cauliflower Rice Sushi Rolls

Enjoy a delicious and healthy twist on traditional sushi with these Cauliflower Rice Sushi Rolls. This keto-friendly recipe is a great way to incorporate more vegetables into your diet while satisfying your sushi cravings!
Prep Time: 20 minutes
Additional Time: 10 minutes
Total Time: 30 minutes
Servings: 4 rolls
Ingredients:
- 1 medium head of cauliflower
- 2 tablespoons rice vinegar
- 1 tablespoon sesame oil
- 1 avocado, sliced
- 1 cucumber, julienned
- 1 large carrot, julienned
- 4 sheets nori (seaweed)
- Soy sauce or tamari, for serving
- Pickled ginger, optional
- Wasabi, optional
Instructions:
- Remove the leaves and stem from the cauliflower, and cut it into smaller florets.
- Place the florets in a food processor and pulse until the cauliflower resembles rice grains.
- Transfer the riced cauliflower to a microwave-safe bowl and cover with a damp paper towel. Microwave for 4-5 minutes to soften.
- Once cooked, let the cauliflower cool for a few minutes before adding rice vinegar and sesame oil. Mix well and set aside.
- Place a sheet of nori on a bamboo sushi mat or a piece of plastic wrap.
- Spread a thin layer of the cauliflower rice evenly over the nori, leaving about an inch at the top edge.
- In the center of the rice, layer with slices of avocado, julienned cucumber, and carrot.
- Using the mat, carefully roll the nori tightly away from you, tucking in the filling as you go.
- Once rolled, moisten the top edge of the nori to seal.
- Use a sharp knife to slice the roll into bite-sized pieces and serve with soy sauce, pickled ginger, and wasabi if desired.
Tips:
- For an extra flavor boost, try adding a sprinkle of sesame seeds on top of the sushi before rolling.
- Feel free to customize your fillings with other veggies or cooked proteins like shrimp or tofu for a different taste experience.
Nutrition Facts:
- Calories: 90 per serving
- Protein: 3g
- Fat: 5g
- Carbohydrates: 12g
- Fiber: 4g
- Net Carbs: 8g
15. Eggplant Lasagna with Ricotta Cheese
Discover a delicious twist on classic lasagna with this Eggplant Lasagna with Ricotta Cheese. This dish is not only keto-friendly but also packed with flavor, making it a perfect comforting meal for any day of the week.
Prep Time: 30 minutes
Cook Time: 45 minutes
Additional Time: 10 minutes
Total Time: 1 hour 25 minutes
Servings: 6
Ingredients:
- 2 medium eggplants, sliced into 1/4 inch thick rounds
- 2 cups ricotta cheese
- 2 cups mozzarella cheese, shredded
- 1 cup parmesan cheese, grated
- 1 jar (24 oz) marinara sauce
- 1 large egg
- 1 teaspoon oregano
- 1 teaspoon basil
- Salt and pepper to taste
- Olive oil for brushing
Instructions:
- Preheat your oven to 375°F (190°C).
- In a baking sheet, arrange the sliced eggplants, brush them lightly with olive oil, and sprinkle with salt. Bake in the oven for 20 minutes until softened. Remove and let cool.
- In a mixing bowl, combine the ricotta cheese, egg, oregano, basil, salt, and pepper. Mix until well combined.
- In a baking dish, spread a thin layer of marinara sauce on the bottom.
- Layer half of the baked eggplant slices over the sauce.
- Spread half of the ricotta mixture over the eggplant layer, followed by half of the mozzarella cheese.
- Repeat the layering process with the remaining eggplant, ricotta mixture, and finish with remaining marinara sauce and parmesan cheese on top.
- Cover with foil and bake for 25 minutes. Remove the foil and bake for an additional 15 minutes or until the cheese is bubbly and golden.
- Allow to cool for 10 minutes before serving to let it set.
Tips:
- For added flavor, sauté some garlic and onion in the marinara sauce.
- You can add some spinach or zucchini for extra veggies and nutrients.
- Drizzle a little balsamic glaze on top before serving for a delightful finish.
Nutrition Facts:
- Calories: 320 per serving
- Protein: 20g
- Fat: 22g
- Carbohydrates: 10g
- Fiber: 4g
- Sugar: 5g
16. Savory Avocado and Bacon Egg Cups

Savory Avocado and Bacon Egg Cups are a delicious and nutritious breakfast option that combines creamy avocado, crispy bacon, and rich eggs. These keto-friendly cups are easy to prepare and perfect for meal prep or a quick morning bite.
Prep Time: 10 minutes
Cook Time: 20 minutes
Additional Time: 0 minutes
Total Time: 30 minutes
Servings: 2
Ingredients:
- 2 ripe avocados
- 4 large eggs
- 4 slices of cooked bacon, crumbled
- Salt, to taste
- Pepper, to taste
- Optional: chopped chives or parsley for garnish
Instructions:
- Preheat the oven to 375°F (190°C).
- Slice the avocados in half and remove the pits.
- Scoop out a little extra flesh from the center of each avocado half to create enough space for the egg.
- Place the avocado halves in a baking dish, ensuring they are stable and won’t tip over.
- Crack an egg into each avocado half.
- Sprinkle the crumbled bacon over the top of the eggs.
- Season with salt and pepper to taste.
- Bake in the oven for around 15-20 minutes or until the eggs are cooked to your desired doneness.
- Remove from the oven and garnish with chives or parsley if desired.
- Serve hot and enjoy!
Tips:
For extra flavor, consider adding a sprinkle of paprika or cheese on top before baking. You can also customize these egg cups with other ingredients such as spinach, tomatoes, or different types of cheese for a delicious twist.
Nutrition Facts:
- Calories: 350
- Protein: 20g
- Fat: 30g
- Carbohydrates: 12g
- Fiber: 8g
17. Keto Beef Stroganoff with Zoodles

Keto Beef Stroganoff with Zoodles is a delicious low-carb twist on the classic comfort dish. It features tender beef, rich creamy sauce, and zucchini noodles that perfectly soak up all the flavors. This dish is not only satisfying but also fits perfectly into your keto lifestyle.
Prep Time: 15 minutes
Cook Time: 20 minutes
Total Time: 35 minutes
Servings: 4
Ingredients:
- 1 lb beef sirloin, thinly sliced
- 2 medium zucchinis, spiralized into noodles (zoodles)
- 1 cup mushrooms, sliced
- 1 small onion, diced
- 3 cloves garlic, minced
- 1 cup beef broth
- 1 cup heavy cream
- 2 tbsp olive oil
- 1 tbsp Worcestershire sauce
- 2 tsp Dijon mustard
- Salt and pepper to taste
- Fresh parsley, chopped (for garnish)
Instructions:
- Heat 1 tablespoon of olive oil in a large skillet over medium heat.
- Add the beef sirloin slices to the skillet, seasoning with salt and pepper. Cook until browned, about 3-4 minutes. Remove the beef from the skillet and set aside.
- In the same skillet, add the remaining 1 tablespoon olive oil. Sauté the onions and garlic until translucent, about 2-3 minutes.
- Add the sliced mushrooms to the skillet and cook for an additional 5 minutes, until they start to soften.
- Pour in the beef broth, Worcestershire sauce, and Dijon mustard, stirring to combine. Bring the mixture to a simmer.
- Reduce the heat to low and add the heavy cream, stirring until combined. Return the beef to the skillet and let it simmer for about 5 minutes.
- Meanwhile, in a separate pan, sauté the zoodles over medium heat for about 2-3 minutes until slightly tender.
- Serve the beef stroganoff over the zoodles, garnishing with fresh parsley.
Tips:
For an extra punch of flavor, consider adding a dash of garlic powder or smoked paprika to the beef while it cooks. You can also sprinkle some grated Parmesan cheese on top before serving for added richness.
Nutrition Facts:
- Calories: 480
- Protein: 30g
- Fat: 36g
- Carbohydrates: 8g
- Fiber: 2g
- Net Carbs: 6g
18. Sheperd’s Pie with Mashed Cauliflower Topping

Shepherd’s Pie with Mashed Cauliflower Topping is a delightful twist on a classic dish, perfect for a comforting meal without the carbs. The creamy cauliflower topping contrasts beautifully with the savory filling, making this a dish the whole family will love.
Prep Time: 20 minutes
Cook Time: 30 minutes
Total Time: 50 minutes
Servings: 6
Ingredients:
- 1 head of cauliflower, chopped into florets
- 1 lb ground lamb or beef
- 1 medium onion, diced
- 2 cloves garlic, minced
- 1 cup carrots, diced
- 1 cup peas
- 2 tablespoons tomato paste
- 1 cup beef or chicken broth
- 1 teaspoon Worcestershire sauce
- 1 teaspoon dried thyme
- Salt and pepper, to taste
- 2 tablespoons olive oil
- ¼ cup heavy cream
- ½ cup shredded cheese (optional)
Instructions:
- Preheat your oven to 400°F (200°C).
- In a large pot, bring salted water to a boil and add the cauliflower florets. Cook for 10-12 minutes until tender. Drain and set aside.
- In a skillet, heat 2 tablespoons of olive oil over medium heat. Add the onion and garlic, sautéing until the onion is translucent.
- Add the ground lamb or beef to the skillet, cooking until browned. Drain excess fat if necessary.
- Stir in the carrots, peas, tomato paste, broth, Worcestershire sauce, thyme, and season with salt and pepper. Simmer for 5-7 minutes to combine flavors.
- In a blender or food processor, blend the cooked cauliflower with heavy cream until smooth and creamy.
- Pour the meat mixture into a baking dish and spread the cauliflower mash evenly on top.
- If desired, sprinkle with shredded cheese on top of the cauliflower.
- Bake in the preheated oven for 20-25 minutes until the top is golden.
Tips:
- To add extra flavor, try sautéing some mushrooms along with the onions and garlic.
- Consider sprinkling fresh herbs like parsley or chives over the top before serving for a fresh touch.
Nutrition Facts:
- Calories: 350 per serving
- Protein: 25g
- Carbohydrates: 10g
- Fat: 18g
- Fiber: 4g
19. Low-Carb Stuffed Cabbage Rolls

Low-Carb Stuffed Cabbage Rolls are a delicious and hearty meal perfect for a healthy diet. These rolls are packed with flavors and make a great option for anyone looking to enjoy a low-carb meal without sacrificing taste.
Prep Time: 20 minutes
Cook Time: 45 minutes
Additional Time: 10 minutes
Total Time: 1 hour 15 minutes
Servings: 6
Ingredients:
- 1 large head of cabbage
- 1 pound ground beef or turkey
- 1 cup cauliflower rice
- 1/2 cup onion, finely chopped
- 2 cloves garlic, minced
- 1 can (15 ounces) diced tomatoes, undrained
- 1 tablespoon Italian seasoning
- 1 teaspoon smoked paprika
- 1/2 teaspoon salt
- 1/4 teaspoon black pepper
- 1 cup shredded cheese (mozzarella or cheddar)
- Fresh parsley for garnish (optional)
Instructions:
- Preheat your oven to 350°F (175°C).
- Carefully remove the cabbage leaves and blanch them in boiling water for about 2-3 minutes until they are soft. Drain and set aside.
- In a large mixing bowl, combine the ground beef or turkey, cauliflower rice, onion, garlic, half of the diced tomatoes, Italian seasoning, smoked paprika, salt, and pepper. Mix well.
- Place a cabbage leaf on a clean surface, spoon about 1/4 cup of the meat mixture onto the leaf, and roll it tightly, tucking in the sides. Repeat with the remaining leaves and filling.
- Spread the remaining diced tomatoes in the bottom of a baking dish, then arrange the stuffed cabbage rolls seam-side down on top of the tomatoes.
- Cover the dish tightly with foil and bake for 30 minutes. Remove the foil, sprinkle the cheese on top, and bake for an additional 15 minutes or until the cheese is melted and bubbly.
- Let the rolls rest for about 10 minutes before serving. Garnish with fresh parsley if desired.
Tips:
For added flavor, you can mix some parmesan cheese into the meat filling. Serving with a dollop of sour cream can also enhance the dish. Feel free to add your favorite herbs and spices to customize the flavor profile!
Nutrition Facts:
- Calories: 280
- Protein: 25g
- Fat: 15g
- Carbohydrates: 12g
- Fiber: 4g
- Net Carbs: 8g
20. Crispy Parmesan Brussels Sprouts

Crispy Parmesan Brussels Sprouts are the perfect side dish for any meal. With a delightful crunch and a cheesy flavor, these sprouts are sure to impress your family and friends. Enjoy a guilt-free, healthy treat that is packed with flavor!
Prep Time: 10 minutes
Cook Time: 20 minutes
Total Time: 30 minutes
Servings: 4
Ingredients:
- 1 lb Brussels sprouts, trimmed and halved
- 2 tbsp olive oil
- 1/2 cup grated Parmesan cheese
- 1/2 tsp garlic powder
- 1/2 tsp salt
- 1/4 tsp black pepper
- 1/4 tsp red pepper flakes (optional)
Instructions:
- Preheat your oven to 400°F (200°C) and line a baking sheet with parchment paper.
- In a large bowl, toss the halved Brussels sprouts with olive oil, garlic powder, salt, black pepper, and red pepper flakes (if using).
- Spread the Brussels sprouts in a single layer on the prepared baking sheet.
- Roast the Brussels sprouts in the preheated oven for 15 minutes.
- Remove the baking sheet from the oven and sprinkle the grated Parmesan cheese evenly over the sprouts.
- Return to the oven and roast for an additional 5 minutes, or until the edges are crispy and the cheese is melted and golden.
- Serve hot and enjoy your crispy, cheesy delight!
Tips:
For extra flavor, add a squeeze of lemon juice just before serving. You can also mix in some bacon bits for an even heartier option. Experiment with different seasonings like Italian herbs to suit your taste!
Nutrition Facts:
- Calories: 200
- Protein: 8g
- Fat: 14g
- Carbohydrates: 12g
- Fiber: 5g
- Sugars: 2g
21. Keto Chicken and Broccoli Alfredo Bake
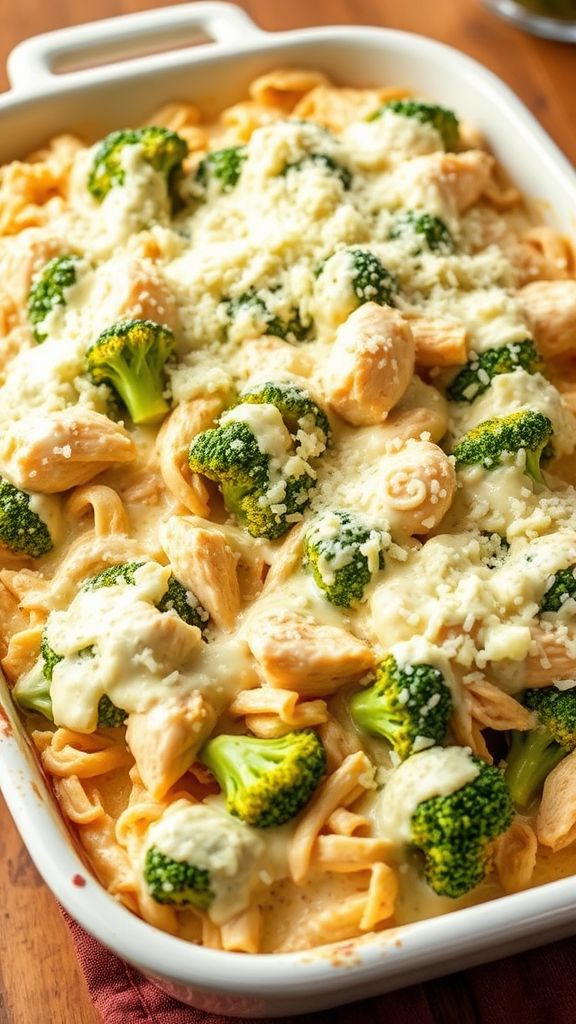
Indulge in this rich and creamy Keto Chicken and Broccoli Alfredo Bake that is not only low-carb but also packed with flavor. Perfect for busy weeknights, this dish combines tender chicken, fresh broccoli, and a luscious alfredo sauce, all baked to perfection.
Prep Time: 15 minutes
Cook Time: 30 minutes
Additional Time: 5 minutes
Total Time: 50 minutes
Servings: 6
Ingredients:
- 2 cups cooked, shredded chicken
- 2 cups fresh broccoli florets
- 1 cup heavy cream
- 1 cup grated parmesan cheese
- 1/2 cup shredded mozzarella cheese
- 2 cloves garlic, minced
- 1 teaspoon Italian seasoning
- Salt and pepper to taste
- 1 tablespoon olive oil (optional)
Instructions:
- Preheat your oven to 350°F (175°C).
- In a large mixing bowl, combine the cooked chicken and broccoli.
- In a separate bowl, whisk together the heavy cream, parmesan cheese, minced garlic, Italian seasoning, salt, and pepper.
- Pour the alfredo sauce over the chicken and broccoli, and mix until evenly coated.
- Transfer the mixture into a greased baking dish.
- Top with shredded mozzarella cheese and drizzle with olive oil if desired.
- Bake in the preheated oven for 25-30 minutes, or until the cheese is bubbly and golden brown.
- Let it cool for 5 minutes before serving.
Tips:
For an extra cheesy flavor, consider stirring in an additional 1/2 cup of mozzarella cheese before baking. You can also add a pinch of red pepper flakes for a hint of spice. Serve with a side salad for a complete meal!
Nutrition Facts:
- Calories: 380
- Fat: 28g
- Carbohydrates: 5g
- Fiber: 1g
- Protein: 30g
- Net Carbs: 4g
22. Cheesy Broccoli and Bacon Stuffed Chicken
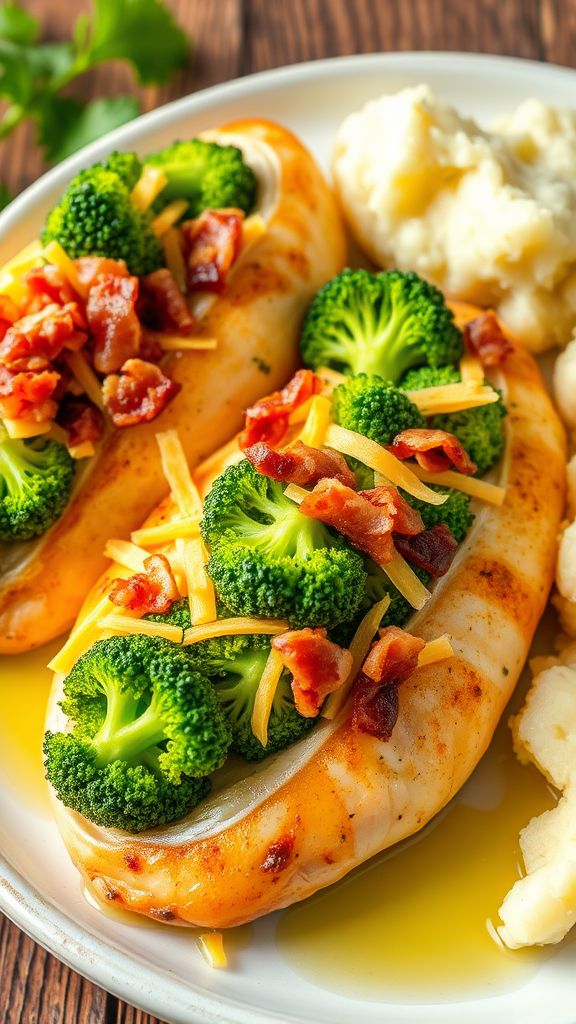
Juicy chicken breasts are stuffed with a delicious mixture of cheesy broccoli and crispy bacon, making this dish a perfect blend of flavors and textures. Ideal for a cozy dinner, this Cheesy Broccoli and Bacon Stuffed Chicken will satisfy your comfort food cravings while keeping it keto-friendly.
Prep Time: 15 minutes
Cook Time: 30 minutes
Additional Time: 5 minutes
Total Time: 50 minutes
Servings: 4
Ingredients:
- 4 large chicken breasts
- 1 cup broccoli florets, chopped
- 1 cup shredded cheddar cheese
- 1/2 cup cooked and crumbled bacon
- 1/2 tsp garlic powder
- 1/2 tsp onion powder
- Salt and pepper, to taste
- 2 tbsp olive oil
- 1/2 cup cream cheese, softened
Instructions:
- Preheat your oven to 375°F (190°C).
- In a medium bowl, mix the chopped broccoli, cheddar cheese, crumbled bacon, garlic powder, onion powder, salt, and pepper until well combined.
- Carefully slice a pocket into each chicken breast, making sure not to cut all the way through.
- Stuff each pocket with the cheesy broccoli and bacon mixture, securing with toothpicks if necessary.
- In a large oven-proof skillet, heat the olive oil over medium heat. Add the stuffed chicken breasts and sear for about 3-4 minutes on each side, until golden brown.
- Transfer the skillet to the preheated oven and bake for 20-25 minutes until the chicken is cooked through and the internal temperature reaches 165°F (75°C).
- Let the chicken rest for about 5 minutes before removing toothpicks and serving.
Tips:
To add an extra layer of flavor, consider seasoning the chicken with smoked paprika before cooking. You can also use different types of cheese, like mozzarella or gouda, for a unique twist. Don’t hesitate to garnish with some fresh parsley for a touch of color and freshness.
Nutrition Facts:
- Calories: 400
- Protein: 30g
- Fat: 28g
- Carbohydrates: 6g
- Fiber: 1g
- Sugars: 2g
23. Garlic Butter Mushroom and Spinach Chicken

Indulge in the savory goodness of Garlic Butter Mushroom and Spinach Chicken! This dish combines tender chicken breasts sautéed in a rich garlic butter sauce with earthy mushrooms and vibrant spinach, making it a perfect keto-friendly comfort food for any occasion.
Prep Time: 10 minutes
Cook Time: 20 minutes
Total Time: 30 minutes
Servings: 4
Ingredients:
- 4 chicken breasts (boneless, skinless)
- 2 cups spinach (fresh)
- 8 oz mushrooms (sliced, preferably cremini or button)
- 4 tablespoons butter
- 4 garlic cloves (minced)
- 1 teaspoon salt
- 1/2 teaspoon black pepper
- 1 teaspoon paprika
- 1/2 teaspoon Italian seasoning
- Fresh parsley (chopped, for garnish)
Instructions:
- Season the chicken breasts with salt, pepper, paprika, and Italian seasoning.
- In a large skillet, melt 2 tablespoons of butter over medium heat.
- Add the seasoned chicken breasts to the skillet and cook for 6-8 minutes on each side, or until golden brown and cooked through. Remove from the skillet and set aside.
- In the same skillet, add the remaining 2 tablespoons of butter. Once melted, add the garlic and sauté for about 30 seconds until fragrant.
- Add the sliced mushrooms to the skillet and cook for 4-5 minutes until they are tender and browned.
- Stir in the spinach and cook until wilted, about 2-3 minutes.
- Return the cooked chicken breasts to the skillet, and coat them with the garlic butter, mushrooms, and spinach.
- Cook for an additional 2 minutes to allow the flavors to meld.
- Serve hot, garnished with fresh parsley.
Tips:
For extra flavor, consider adding a splash of white wine when sautéing the mushrooms. You can also sprinkle some Parmesan cheese on top before serving for a salty, savory kick. Don’t forget to adjust the seasoning to your taste!
Nutrition Facts:
- Calories: 320
- Protein: 36g
- Fat: 16g
- Carbohydrates: 4g
- Fiber: 2g
- Net Carbs: 2g
24. Keto Fettuccine Carbonara
Indulge in this creamy and delicious Keto Fettuccine Carbonara, a perfect comfort food that allows you to enjoy traditional flavors while staying low-carb. With rich bacon and a silky sauce, this dish will satisfy your cravings without the guilt.
Prep Time: 10 minutes
Cook Time: 15 minutes
Total Time: 25 minutes
Servings: 4
Ingredients:
- 8 oz zucchini noodles (or konjac fettuccine for a more authentic texture)
- 4 oz pancetta or bacon, diced
- 2 large eggs
- 1/2 cup grated Parmesan cheese
- 2 cloves garlic, minced
- 1/4 cup heavy cream
- Salt and pepper, to taste
- Fresh parsley, chopped for garnish
Instructions:
- In a large skillet, cook the diced pancetta/bacon over medium heat until crispy, about 5-7 minutes. Remove from heat and set aside.
- In a separate bowl, whisk together the eggs, Parmesan cheese, heavy cream, garlic, salt, and pepper.
- Add the zucchini noodles to the skillet with the cooked pancetta/bacon, mixing well.
- Reduce the heat to low, then pour the egg mixture over the noodles. Stir quickly to create a creamy sauce without scrambling the eggs.
- Cook for an additional 2-3 minutes, allowing the sauce to thicken while mixing evenly with the noodles.
- Remove from heat, serve immediately, and garnish with fresh parsley.
Tips:
For extra flavor, try adding a pinch of nutmeg or some crushed red pepper flakes to the egg mixture. You can also experiment by adding sautéed mushrooms or spinach for added nutrients and texture.
Nutrition Facts:
- Calories: 320
- Fat: 25g
- Carbohydrates: 5g
- Fiber: 2g
- Protein: 20g
25. Herb-Crusted Pork Chops with Creamy Mushroom Sauce

Herb-Crusted Pork Chops with Creamy Mushroom Sauce is a delightful dish that brings the flavors of the herb garden right to your dinner table. Tender and juicy pork chops are coated in a crispy herb crust, and the creamy mushroom sauce adds a rich and savory element that will leave everyone wanting more.
Prep Time: 15 minutes
Cook Time: 25 minutes
Total Time: 40 minutes
Servings: 4
Ingredients:
- 4 bone-in pork chops
- 1/2 cup breadcrumbs
- 1/4 cup grated Parmesan cheese
- 2 tablespoons fresh parsley, chopped
- 1 tablespoon fresh thyme, chopped
- 1 tablespoon fresh rosemary, chopped
- 1/2 teaspoon garlic powder
- 1/2 teaspoon salt
- 1/4 teaspoon black pepper
- 2 tablespoons olive oil
- 8 ounces mushrooms, sliced
- 1 cup heavy cream
- 1/2 cup chicken broth
- 1 tablespoon Dijon mustard
Instructions:
- Preheat your oven to 400°F (200°C).
- In a bowl, mix together the breadcrumbs, Parmesan cheese, parsley, thyme, rosemary, garlic powder, salt, and black pepper.
- Pat the pork chops dry with paper towels. Brush both sides with olive oil and then press the herb mixture onto each pork chop evenly.
- Heat a large oven-safe skillet over medium-high heat. Add the pork chops and sear for 3-4 minutes on each side until golden brown.
- Transfer the skillet to the preheated oven and bake for another 15-20 minutes, or until the internal temperature of the pork reaches 145°F (63°C).
- While the pork chops are baking, prepare the creamy mushroom sauce. In a separate saucepan, add the remaining olive oil and the sliced mushrooms over medium heat. Sauté until they are browned and tender, about 5-7 minutes.
- Add the chicken broth and bring to a simmer. Let it reduce for 3-4 minutes, then stir in the heavy cream and Dijon mustard. Allow the sauce to thicken for an additional 5 minutes.
- Remove the pork chops from the oven and let them rest for 5 minutes. Serve topped with the creamy mushroom sauce.
Tips:
For an extra burst of flavor, consider adding a splash of white wine to the mushroom sauce while it’s simmering. You can also experiment with different fresh herbs to tailor the flavor profile to your liking. For an added crunch, use panko breadcrumbs instead of regular breadcrumbs.
Nutrition Facts:
- Calories: 520
- Protein: 40g
- Fat: 38g
- Carbohydrates: 8g
- Fiber: 1g
- Sugar: 2g