My New Cookbook is Out! Check Out Now!
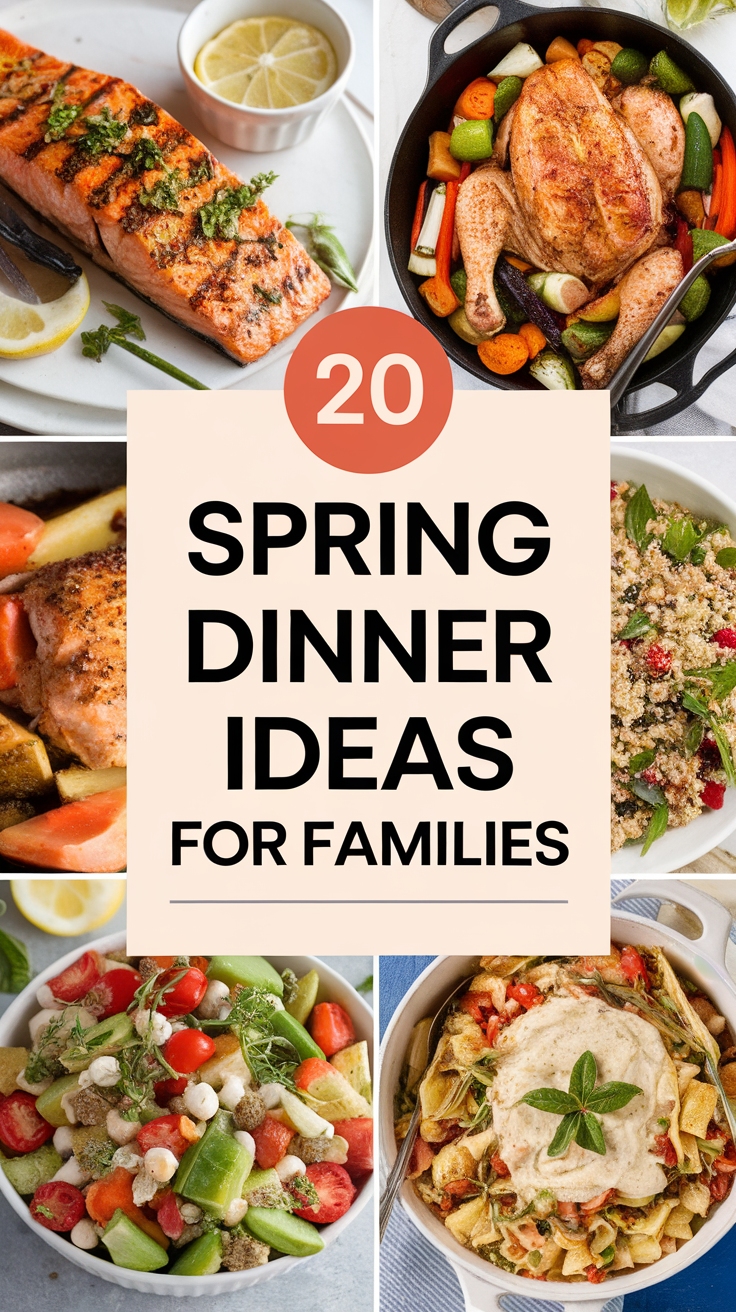
20 Flavorful Spring Dinner Ideas for Family Meals
This page contains affiliate links and I earn a commission if you make a purchase through one of the links, at no cost to you.
Looking for delicious ways to celebrate spring with your family? You’re not alone!
As the days grow longer and the weather warms up, everyone wants to enjoy fresh, vibrant meals that bring the family together.
Dive into these 20 flavorful dinner ideas, packed with seasonal ingredients that make cooking a breeze and dining a delight!
Shop Our Must-Haves
No products found.
1 Lemon Herb Grilled Chicken with Asparagus
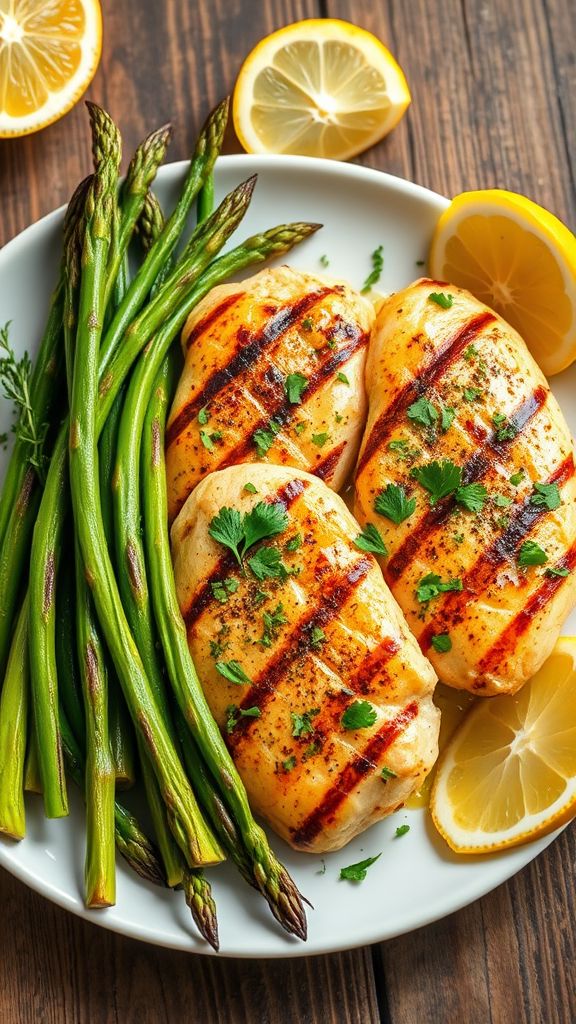
This Lemon Herb Grilled Chicken with Asparagus is a fresh and flavorful dish that’s perfect for a spring dinner. With zesty lemon and fragrant herbs, it’s both delicious and healthy. Plus, the vibrant green asparagus makes it visually appealing and nutritious!
Prep Time: 15 minutes
Cook Time: 15 minutes
Additional Time: 30 minutes (marinating)
Total Time: 1 hour
Servings: 4
Ingredients:
- 4 boneless, skinless chicken breasts
- 1 bunch of asparagus, trimmed
- 1/4 cup olive oil
- Juice of 2 lemons
- Zest of 1 lemon
- 2 cloves of garlic, minced
- 1 tablespoon fresh parsley, chopped
- 1 tablespoon fresh thyme, chopped
- 1 teaspoon salt
- 1/2 teaspoon black pepper
Instructions:
Start by making the marinade. In a large bowl, mix together the olive oil, lemon juice, lemon zest, garlic, parsley, thyme, salt, and black pepper. This mixture will add great flavor to the chicken.
Next, place the chicken breasts in the bowl with the marinade. Ensure each piece is coated well, then cover it and let it marinate in the refrigerator for 30 minutes. This step makes the chicken tender and juicy.
While the chicken is marinating, preheat the grill to medium-high heat. As it heats up, prepare the asparagus. Toss the trimmed asparagus in a little olive oil, salt, and pepper to season.
Once the chicken has finished marinating, remove it from the refrigerator. Place the chicken on the grill and cook for about 6-7 minutes on each side, or until the internal temperature reaches 165°F and the chicken is no longer pink in the center.
At the same time, add the asparagus to the grill. Grill for about 5-7 minutes, turning occasionally, until tender and lightly charred.
Once everything is cooked, remove the chicken and asparagus from the grill. Let them rest for a few minutes before serving to allow the juices to redistribute. Enjoy your delicious grilled chicken with asparagus!
Tips:
- Use a meat thermometer to check the chicken’s internal temperature for perfect doneness.
- You can add other veggies like bell peppers or zucchini to the grill for more variety.
- For a twist, try using different herbs such as rosemary or basil in the marinade.
Nutrition Facts:
- Calories: 280 per serving
- Protein: 40g
- Carbohydrates: 6g
- Fat: 12g
- Fiber: 2g
- Sodium: 400mg
2 Spring Vegetable Risotto with Peas and Mint
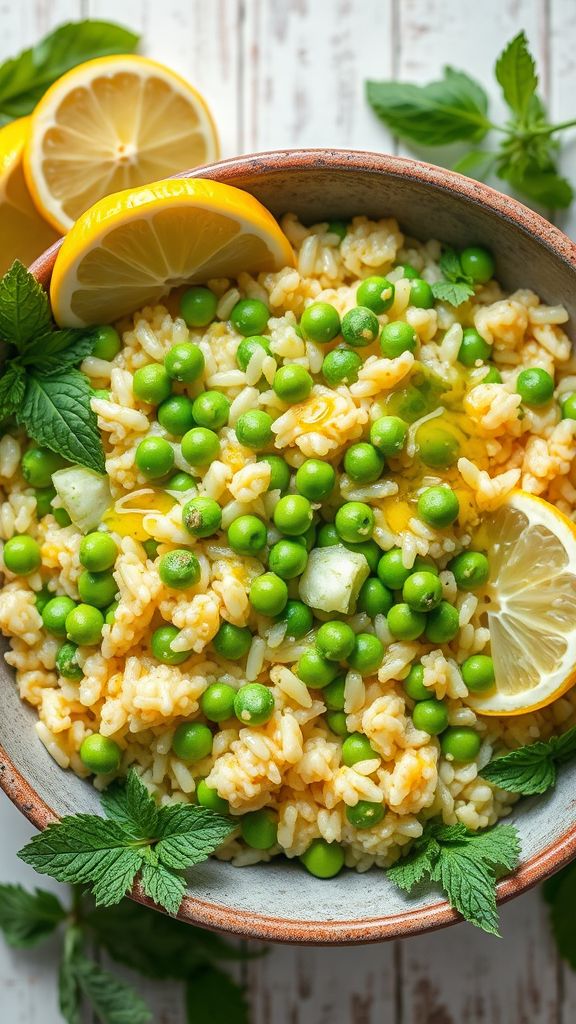
Spring is the perfect time to enjoy fresh, vibrant flavors. This Spring Vegetable Risotto with Peas and Mint will make your taste buds dance with joy! It’s creamy, satisfying, and packed with delicious spring vegetables.
Prep Time: 10 minutes
Cook Time: 30 minutes
Total Time: 40 minutes
Servings: 4
Ingredients:
- 1 cup arborio rice
- 4 cups vegetable broth
- 1 tablespoon olive oil
- 1 medium onion, finely chopped
- 2 cloves garlic, minced
- 1 cup asparagus, chopped
- 1 cup peas (fresh or frozen)
- 1/2 cup white wine (optional)
- 1/2 cup grated Parmesan cheese
- 1/4 cup fresh mint, chopped
- Salt and pepper to taste
- Lemon wedges for serving
Instructions:
Start by heating the vegetable broth in a saucepan over low heat. Keep it warm throughout the cooking process.
In a large skillet or saucepan, heat the olive oil over medium heat. Once it’s hot, add the onion and cook until it becomes translucent, about 3-4 minutes. Then add the garlic and cook for about 1 minute until fragrant.
Next, stir in the arborio rice and cook it for about 2 minutes, letting it toast lightly. If you’re using white wine, pour it in now and stir until the wine is mostly absorbed.
Start adding the warm vegetable broth one ladle at a time, stirring frequently. Wait until the liquid is mostly absorbed before adding the next ladle. This process should take about 20 minutes.
After about 15 minutes, add the asparagus and peas. Continue to add the broth and stir until the rice is creamy and cooked to your liking.
Once done, remove the risotto from heat. Stir in the grated Parmesan cheese, chopped mint, and season with salt and pepper to taste.
Serve the risotto hot, with lemon wedges on the side for an extra burst of flavor.
Tips:
- Use fresh vegetables when possible for the best flavor and texture.
- Stirring the risotto constantly helps release the starches from the rice, making it creamier.
- For a vegan version, skip the Parmesan cheese or use a plant-based alternative.
Nutrition Facts:
- Calories: 350 per serving
- Protein: 12g
- Carbohydrates: 55g
- Fat: 10g
- Fiber: 4g
- Sodium: 400mg
3 Honey Glazed Salmon with Citrus Salad
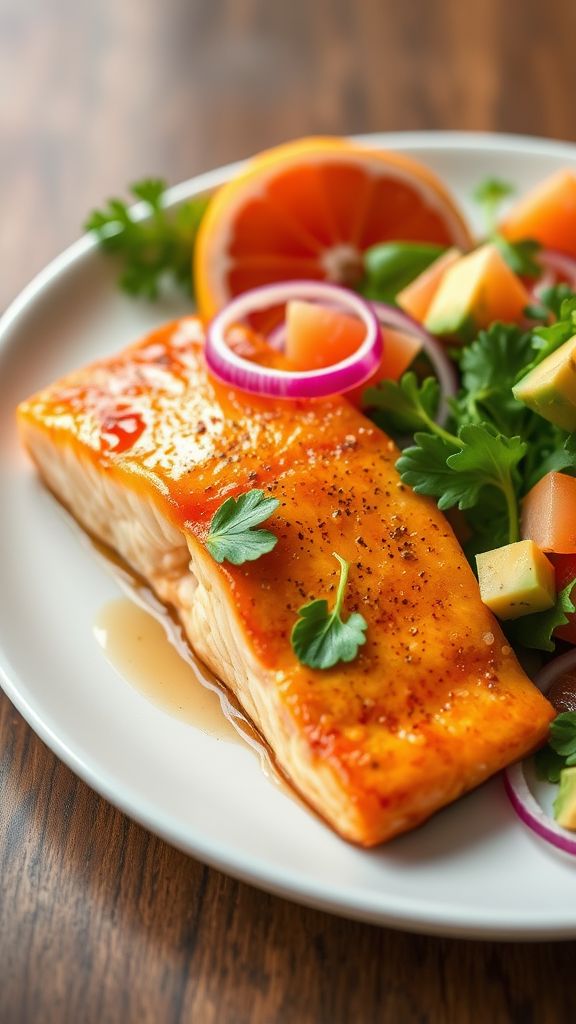
Honey Glazed Salmon with Citrus Salad is a delightful dish that combines sweet and savory flavors. The honey glaze gives the salmon a beautiful caramelized finish, while the citrus salad adds a refreshing crunch. This meal is perfect for a light spring dinner!
Prep Time: 15 minutes
Cook Time: 10 minutes
Additional Time: 5 minutes
Total Time: 30 minutes
Servings: 4
Ingredients:
- 4 salmon fillets
- 1/4 cup honey
- 2 tablespoons soy sauce
- 1 tablespoon Dijon mustard
- 1 tablespoon olive oil
- Salt and pepper to taste
- 2 oranges, segmented
- 1 grapefruit, segmented
- 1 cup mixed greens
- 1/4 cup red onion, thinly sliced
- 1 avocado, diced
Instructions:
First, preheat your grill or skillet over medium heat. While it’s heating, mix together the honey, soy sauce, Dijon mustard, and olive oil in a small bowl. This will be your honey glaze.
Next, season the salmon fillets with salt and pepper on both sides. Brush the honey glaze generously over the top of each fillet. Make sure every piece is nicely coated for that delicious flavor.
Once the grill or skillet is hot, place the salmon fillets skin-side down. Cook for about 5-7 minutes on one side, then flip them over and cook for another 3-5 minutes until cooked through and the glaze is caramelized.
While the salmon is cooking, prepare your citrus salad. In a large bowl, combine the orange segments, grapefruit segments, mixed greens, red onion, and avocado. You can add a drizzle of olive oil and a sprinkle of salt for extra flavor.
Lastly, once the salmon is done, remove it from the heat and let it rest for about 5 minutes. Serve each salmon fillet on a plate alongside a generous portion of the citrus salad. Enjoy your fresh and healthy spring dinner!
Tips:
- For a little heat, add a pinch of red pepper flakes to the honey glaze.
- If you prefer, you can bake the salmon in the oven at 400°F for 12-15 minutes instead of grilling.
- Feel free to mix in other seasonal fruits like kiwi or strawberries to the salad for added variety.
Nutrition Facts:
- Calories: 350 per serving
- Protein: 30g
- Fat: 20g
- Carbohydrates: 15g
- Fiber: 5g
- Sugar: 12g
4 Zucchini Noodles with Pesto and Cherry Tomatoes
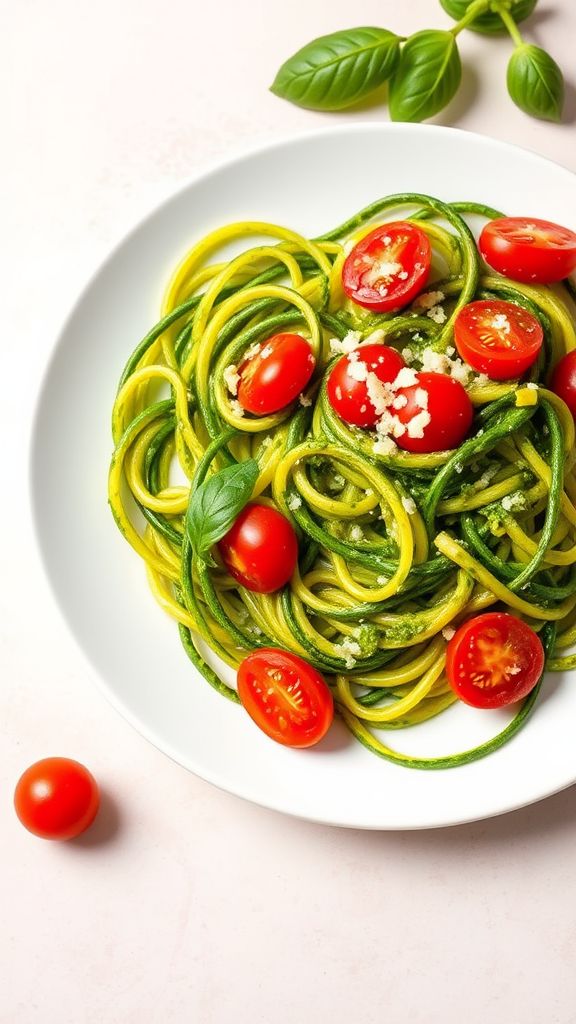
Zucchini Noodles with Pesto and Cherry Tomatoes is a fresh and delicious dish that’s perfect for a light spring dinner. The zucchini noodles, also known as "zoodles," make a great alternative to traditional pasta. When mixed with vibrant pesto and juicy cherry tomatoes, this meal is not only healthy but also full of flavor.
Prep Time: 15 minutes
Total Time: 15 minutes
Servings: 4
Ingredients:
- 4 medium zucchini
- 1 cup cherry tomatoes, halved
- 1 cup basil pesto (store-bought or homemade)
- 1 tablespoon olive oil
- Salt and pepper, to taste
- Grated Parmesan cheese, for serving (optional)
Instructions:
Start by washing the zucchini thoroughly. Using a spiralizer or a vegetable peeler, create the zucchini noodles. If you don’t have a spiralizer, slicing the zucchini into thin strips will work too.
In a large skillet, add 1 tablespoon of olive oil over medium heat. Once the oil is hot, add the zucchini noodles to the pan. Stir and cook them for about 3-4 minutes until they start to soften but still maintain some crunch.
Next, add the halved cherry tomatoes to the skillet. Stir them in with the zucchini noodles. Allow everything to cook together for an additional 2-3 minutes. This will warm the tomatoes while keeping their delicious flavor.
Now, pour in the basil pesto and toss everything together gently. Make sure the noodles and tomatoes are well-coated with the pesto. Season with salt and pepper to taste.
Finally, remove the skillet from the heat. Serve the zucchini noodles warm, topped with grated Parmesan cheese if desired. Enjoy your light and refreshing meal!
Tips:
- For the best flavor, use fresh homemade pesto if you can.
- Feel free to add cooked protein, like grilled chicken or shrimp, to make it a heartier meal.
- This dish is best served immediately, but you can store leftovers in the fridge for up to 2 days.
Nutrition Facts:
- Calories: 150 per serving
- Protein: 4g
- Fat: 10g
- Carbohydrates: 12g
- Fiber: 3g
- Sugar: 3g
5 Balsamic Roasted Beet and Goat Cheese Salad
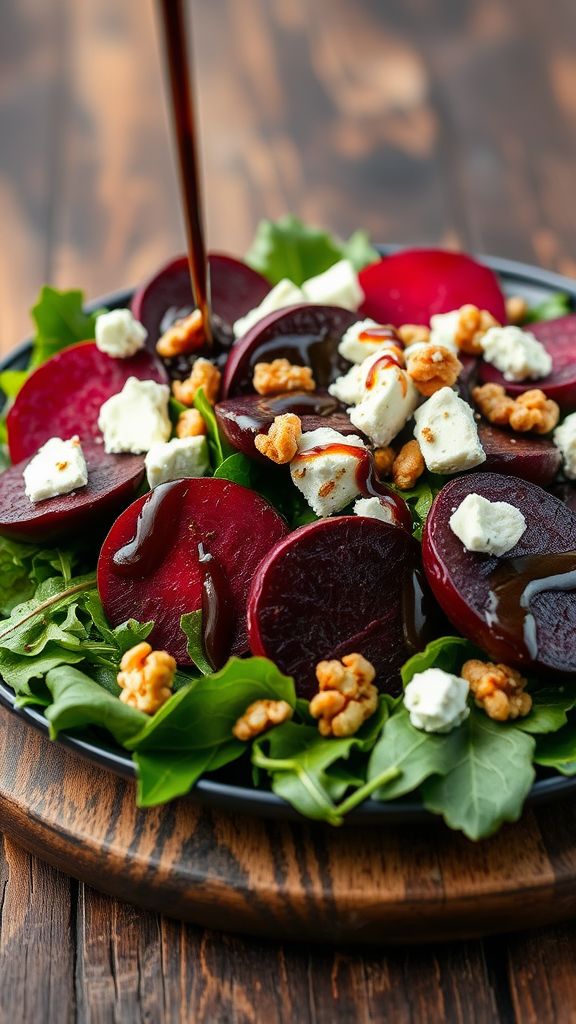
Balsamic Roasted Beet and Goat Cheese Salad is a delicious and colorful dish that brings fresh flavors together. The sweetness of roasted beets pairs perfectly with tangy goat cheese and a simple balsamic vinaigrette. This salad is not only tasty but also makes for a stunning presentation on your dinner table.
Prep Time: 15 minutes
Cook Time: 45 minutes
Additional Time: 10 minutes (for cooling)
Total Time: 1 hour 10 minutes
Servings: 4
Ingredients:
- 4 medium beets, washed and trimmed
- 2 tablespoons olive oil
- Salt and pepper, to taste
- 4 cups mixed greens (like arugula or spinach)
- 1/2 cup goat cheese, crumbled
- 1/4 cup walnuts, chopped and toasted
- 1/4 cup balsamic vinegar
- 2 tablespoons honey
- 1 tablespoon Dijon mustard
Instructions:
First, preheat your oven to 400°F (200°C). Take the washed and trimmed beets and wrap them individually in aluminum foil. Drizzle a bit of olive oil over each beet and sprinkle with salt and pepper. This will help enhance their flavor while they roast.
Next, place the wrapped beets on a baking sheet and roast in the oven for about 45 minutes, or until they are tender. To check if they are done, insert a fork; it should easily go through. Once cooked, let them cool for about 10 minutes before peeling off the skins.
After the beets have cooled, cut them into slices. In a large bowl, combine the mixed greens with the sliced beets. Sprinkle the crumbled goat cheese and toasted walnuts on top for added crunch and flavor.
Now, prepare the balsamic vinaigrette. In a small bowl, whisk together the balsamic vinegar, honey, and Dijon mustard until well combined. Slowly drizzle in olive oil while whisking to create a smooth dressing.
Pour the dressing over the salad just before serving. Toss gently to mix everything together. Enjoy your vibrant Balsamic Roasted Beet and Goat Cheese Salad!
Tips:
- You can add other toppings like sliced avocado or fresh herbs for extra flavor.
- If you want to save time, you can buy pre-cooked beets from the store.
- This salad is great for meal prep! Just keep the dressing separate until you’re ready to eat.
Nutrition Facts:
- Calories: 220
- Total Fat: 15g
- Saturated Fat: 4g
- Cholesterol: 10mg
- Sodium: 150mg
- Total Carbohydrate: 20g
- Dietary Fiber: 4g
- Sugars: 10g
- Protein: 6g
6 Mediterranean Quinoa Bowl with Grilled Shrimp
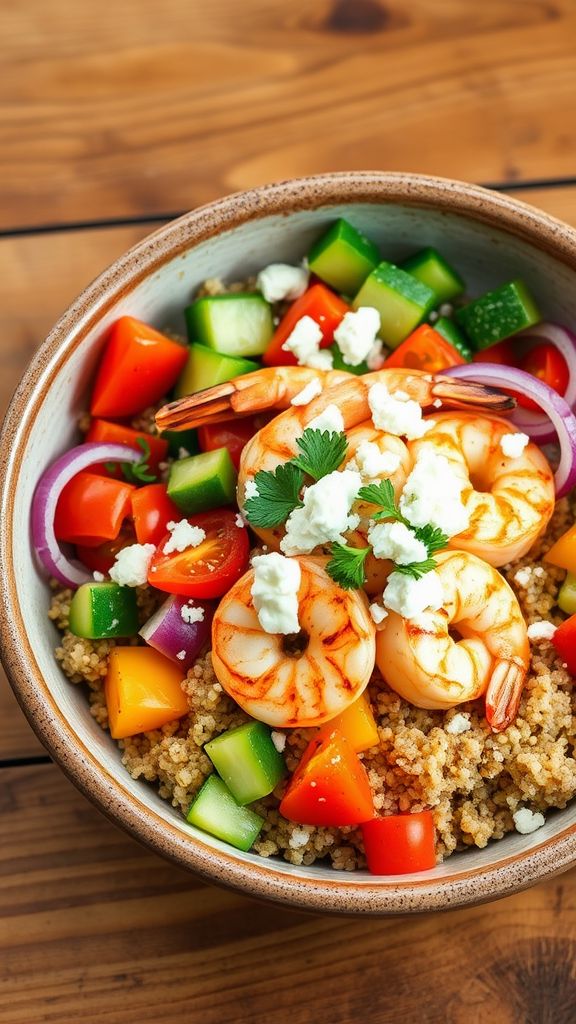
This Mediterranean Quinoa Bowl with Grilled Shrimp is a healthy and flavorful dish that’s perfect for spring. It’s packed with vibrant vegetables, protein-rich shrimp, and fluffy quinoa. You can enjoy this bowl for lunch or dinner!
Prep Time: 15 minutes
Cook Time: 10 minutes
Additional Time: 15 minutes (for marinating shrimp)
Total Time: 40 minutes
Servings: 4
Ingredients:
- 1 cup quinoa, rinsed
- 2 cups water or vegetable broth
- 1 lb large shrimp, peeled and deveined
- 2 tbsp olive oil
- 2 tbsp lemon juice
- 1 tsp dried oregano
- 1 tsp garlic powder
- Salt and pepper to taste
- 1 cup cherry tomatoes, halved
- 1 cucumber, diced
- 1 bell pepper, diced (any color)
- 1/4 cup red onion, thinly sliced
- 1/4 cup feta cheese, crumbled
- Fresh parsley for garnish (optional)
Instructions:
Start by cooking the quinoa. In a medium saucepan, combine the rinsed quinoa and water or vegetable broth. Bring it to a boil, then reduce the heat to low, cover, and let it simmer for about 15 minutes. Once done, fluff it with a fork and set aside.
While the quinoa is cooking, prepare the shrimp. In a bowl, mix together olive oil, lemon juice, dried oregano, garlic powder, salt, and pepper. Add the shrimp to the bowl and toss well to coat them. Let the shrimp marinate for 15 minutes.
Next, heat a grill pan over medium-high heat. Add the marinated shrimp to the pan and grill for about 2-3 minutes on each side, or until they are cooked through and pink. Be careful not to overcook them!
Once the shrimp are grilled, assemble your quinoa bowl. Start with a base of quinoa. Top it with cherry tomatoes, cucumber, bell pepper, and red onion. Add the grilled shrimp on top and sprinkle with feta cheese. Garnish with fresh parsley if desired.
Tips:
- Feel free to add other veggies like spinach or avocado for extra flavor and nutrition.
- If you want a spicy kick, add some red pepper flakes to the shrimp marinade.
- This bowl is great for meal prep. Just store each component separately and assemble when ready to eat.
Nutrition Facts:
- Calories: 410 per serving
- Protein: 28g
- Carbohydrates: 38g
- Fat: 18g
- Fiber: 5g
- Sodium: 300mg
7 Lemon Garlic Shrimp Tacos with Cabbage Slaw

Are you ready for a delicious and fresh dinner? These Lemon Garlic Shrimp Tacos with Cabbage Slaw are bursting with flavor and easy to make. Perfect for a spring dinner, they are quick to prepare and sure to satisfy everyone’s taste buds!
Prep Time: 15 minutes
Cook Time: 10 minutes
Total Time: 25 minutes
Servings: 4
Ingredients:
- 1 pound shrimp, peeled and deveined
- 2 tablespoons olive oil
- 3 cloves garlic, minced
- Juice of 2 lemons
- 1 teaspoon chili powder
- Salt and pepper to taste
- 8 small corn tortillas
- 2 cups green cabbage, shredded
- 1 cup carrots, grated
- 1/4 cup cilantro, chopped
- 1/4 cup sour cream (optional)
- Lime wedges for serving
Instructions:
Start by making the shrimp mixture. In a large bowl, combine the shrimp, olive oil, minced garlic, lemon juice, chili powder, salt, and pepper. Toss everything together until the shrimp are well coated.
Heat a large skillet over medium heat. Once hot, add the shrimp mixture. Cook for about 3-4 minutes on each side or until the shrimp turn pink and are cooked through. Remove from heat.
While the shrimp is cooking, prepare the cabbage slaw. In a separate bowl, mix together the shredded cabbage, grated carrots, and chopped cilantro. You can add a splash of lemon juice and a pinch of salt for extra flavor if you like.
Next, warm the corn tortillas in a dry skillet or microwave for a few seconds until soft.
To assemble the tacos, place a few shrimp on each tortilla, then top with the cabbage slaw. If you want, drizzle some sour cream on top.
Serve the tacos with lime wedges on the side for squeezing. Enjoy your zesty, flavorful tacos!
Tips:
- Feel free to add other toppings like avocado, diced tomatoes, or hot sauce for some extra kick.
- If you’re not a fan of shrimp, you can substitute them with chicken or tofu.
- For a spicier version, add a pinch of cayenne pepper to the shrimp mixture.
Nutrition Facts:
- Calories: 350 per serving
- Protein: 25g
- Carbohydrates: 30g
- Fat: 15g
- Fiber: 3g
8 Creamy Spinach and Artichoke Pasta
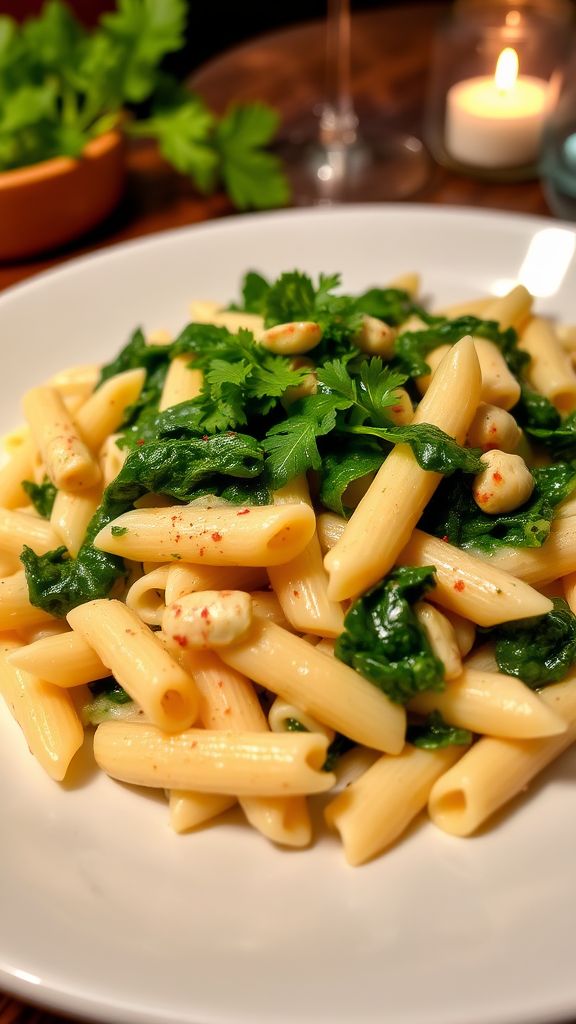
Start your dinner off right with this delicious Creamy Spinach and Artichoke Pasta! It’s packed with flavor, creamy goodness, and is super easy to make. Perfect for spring nights when you want something comforting yet fresh!
Prep Time: 15 minutes
Cook Time: 20 minutes
Total Time: 35 minutes
Servings: 4
Ingredients:
- 8 oz pasta (penne or rotini works well)
- 1 cup fresh spinach, chopped
- 1 can (14 oz) artichoke hearts, drained and chopped
- 2 cloves garlic, minced
- 1 cup heavy cream
- 1 cup grated Parmesan cheese
- 1 tablespoon olive oil
- 1 teaspoon salt
- 1/2 teaspoon black pepper
- 1/4 teaspoon red pepper flakes (optional)
- Fresh parsley for garnish (optional)
Instructions:
First, bring a large pot of salted water to a boil and cook the pasta according to package instructions until al dente. This usually takes about 8-10 minutes. Once done, drain the pasta and set it aside.
While the pasta is cooking, heat the olive oil in a large skillet over medium heat. Add the minced garlic and sauté for about 1 minute until it’s fragrant. Be careful not to let it burn!
Next, stir in the chopped artichoke hearts and spinach. Cook for about 2-3 minutes until the spinach wilts down. Then, pour in the heavy cream and bring the mixture to a simmer.
Once it’s simmering, add the Parmesan cheese, salt, black pepper, and red pepper flakes (if using). Stir until the cheese melts and the sauce becomes creamy.
Now, add in the cooked pasta to the skillet, tossing it with the sauce until everything is well-coated. Cook for another 2-3 minutes to let the flavors combine.
Finally, serve the pasta warm, and feel free to garnish with some fresh parsley for a pop of color. Enjoy your meal!
Tips:
- For added flavor, consider incorporating other vegetables like mushrooms or sun-dried tomatoes.
- If you like a bit more heat, increase the amount of red pepper flakes.
- This dish is great for meal prep! Store in the fridge and reheat for a quick lunch or dinner.
Nutrition Facts:
- Calories: 540 per serving
- Protein: 18g
- Carbohydrates: 60g
- Fat: 26g
- Sodium: 600mg
9 Roasted Vegetable and Feta Stuffed Peppers
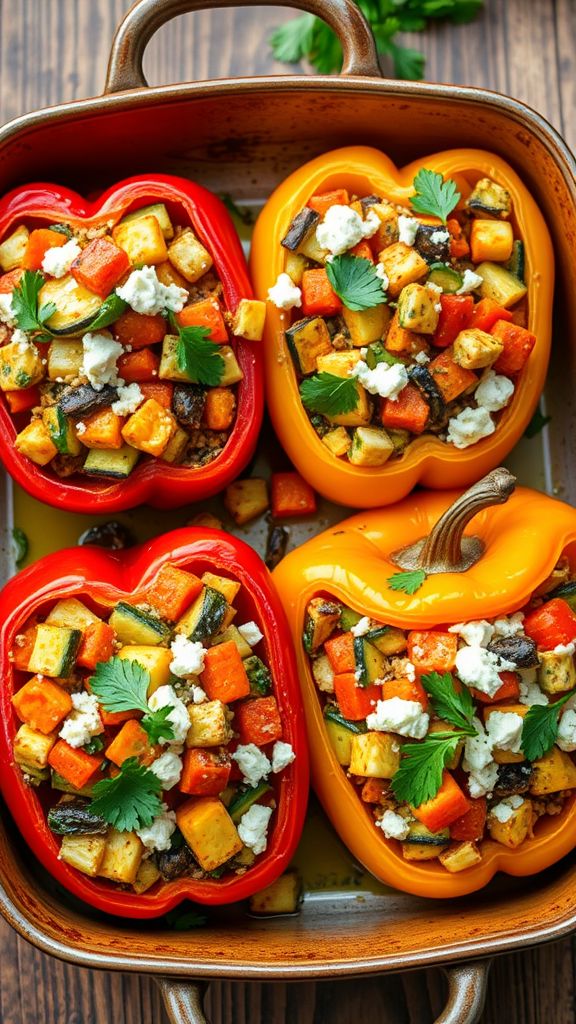
Roasted Vegetable and Feta Stuffed Peppers are a delicious and healthy dish that makes a perfect spring dinner. The combination of roasted veggies with creamy feta cheese brings great flavor and texture. Plus, they’re colorful and fun to eat!
Prep Time: 15 minutes
Cook Time: 30 minutes
Total Time: 45 minutes
Servings: 4
Ingredients:
- 4 large bell peppers (any color)
- 2 cups assorted vegetables (like zucchini, bell peppers, and carrots), chopped
- 1 tablespoon olive oil
- 1 teaspoon dried oregano
- 1 teaspoon garlic powder
- Salt and pepper to taste
- 1 cup crumbled feta cheese
- ½ cup cooked quinoa or rice (optional)
- Fresh parsley for garnish (optional)
Instructions:
Preheat your oven to 400°F (200°C). Start by preparing the bell peppers. Cut the tops off and carefully remove the seeds and membranes inside. Place the peppers upright in a baking dish.
In a bowl, combine the chopped vegetables, olive oil, oregano, garlic powder, salt, and pepper. Toss everything together until the vegetables are well coated. Spread the mixture evenly on a baking sheet. Roast in the oven for about 20 minutes until softened.
Once the veggies are done, take them out of the oven and let them cool for a few minutes. In another bowl, mix the roasted vegetables with crumbled feta cheese and optional cooked quinoa or rice. Stir until everything is well combined.
Stuff the bell peppers with the vegetable and feta mixture. Make sure to pack them in tightly. Return the stuffed peppers to the baking dish and bake for another 10 minutes until the peppers are tender.
Garnish with fresh parsley if desired before serving your Roasted Vegetable and Feta Stuffed Peppers. Enjoy!
Tips:
- Feel free to use any vegetables you like or have on hand.
- You can replace feta with goat cheese for a creamier texture.
- Consider adding some chopped olives for an extra flavor kick.
Nutrition Facts:
- Calories: 250 per serving
- Protein: 10g
- Carbohydrates: 30g
- Dietary Fiber: 6g
- Fat: 10g
10 Thai Basil Chicken Stir-Fry with Bell Peppers
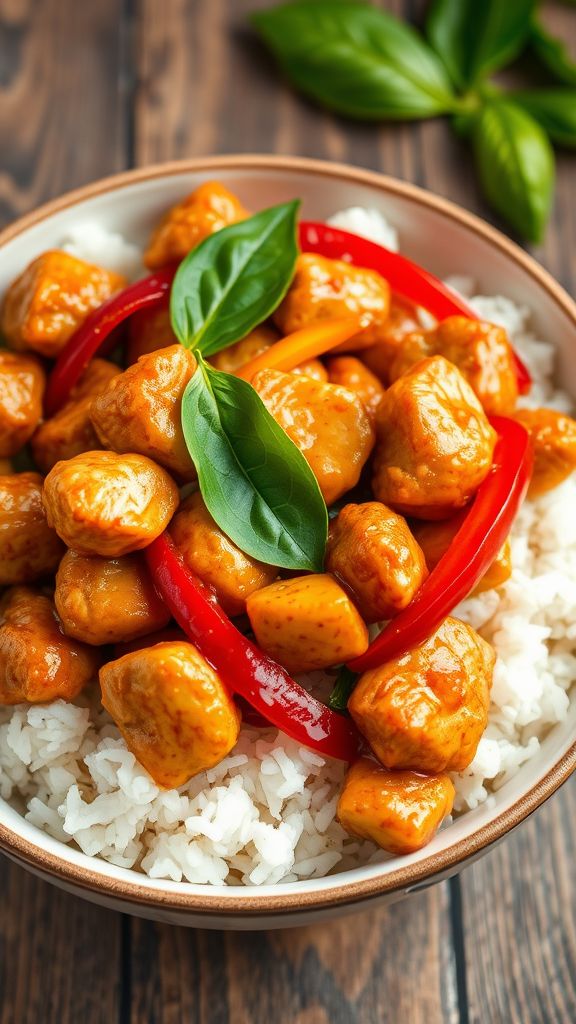
Thai Basil Chicken Stir-Fry with Bell Peppers is a quick and tasty dish that combines the bold flavors of Thailand into a single bowl. This meal is perfect for busy weeknights or anytime you crave something delicious and satisfying. The fragrant basil and colorful bell peppers make it not only tasty but also beautiful!
Prep Time: 10 minutes
Cook Time: 15 minutes
Total Time: 25 minutes
Servings: 4
Ingredients:
- 1 lb boneless, skinless chicken thighs, cut into bite-sized pieces
- 2 tablespoons vegetable oil
- 1 red bell pepper, sliced
- 1 yellow bell pepper, sliced
- 1 cup fresh Thai basil leaves
- 3 cloves garlic, minced
- 1 tablespoon soy sauce
- 1 tablespoon oyster sauce
- 1 tablespoon fish sauce
- 1 teaspoon sugar
- 1 tablespoon chili paste (optional, for heat)
Instructions:
Start by heating 2 tablespoons of vegetable oil in a large skillet or wok over medium-high heat. Once the oil is hot, add the chicken pieces. Stir-fry the chicken for about 5-7 minutes until it’s cooked through and has a nice golden color.
Next, add the minced garlic to the skillet. Stir well and cook for about 30 seconds until the garlic is fragrant. Then, toss in the sliced red and yellow bell peppers and stir everything together. Cook for another 2-3 minutes until the peppers are slightly tender but still crisp.
Now, it’s time to add the flavor! Pour in the soy sauce, oyster sauce, fish sauce, and sugar. If you want some heat, mix in the chili paste. Stir everything well to ensure the chicken and vegetables are coated in the sauce.
Finally, stir in the fresh Thai basil leaves and cook for another 1-2 minutes until the basil is wilted. Make sure not to overcook it, as you want to keep that fresh flavor.
Serve the Thai Basil Chicken Stir-Fry hot over rice or noodles, and enjoy this tasty dish!
Tips:
- Feel free to add other vegetables like broccoli or snap peas for extra nutrition.
- If you can’t find Thai basil, regular basil can work too, but it will change the flavor slightly.
- Make it a meal prep option by storing leftovers in an airtight container in the fridge for up to 3 days.
Nutrition Facts:
- Calories: 320 per serving
- Protein: 25g
- Fat: 15g
- Carbohydrates: 20g
- Fiber: 2g
11 Grilled Eggplant and Chickpea Salad
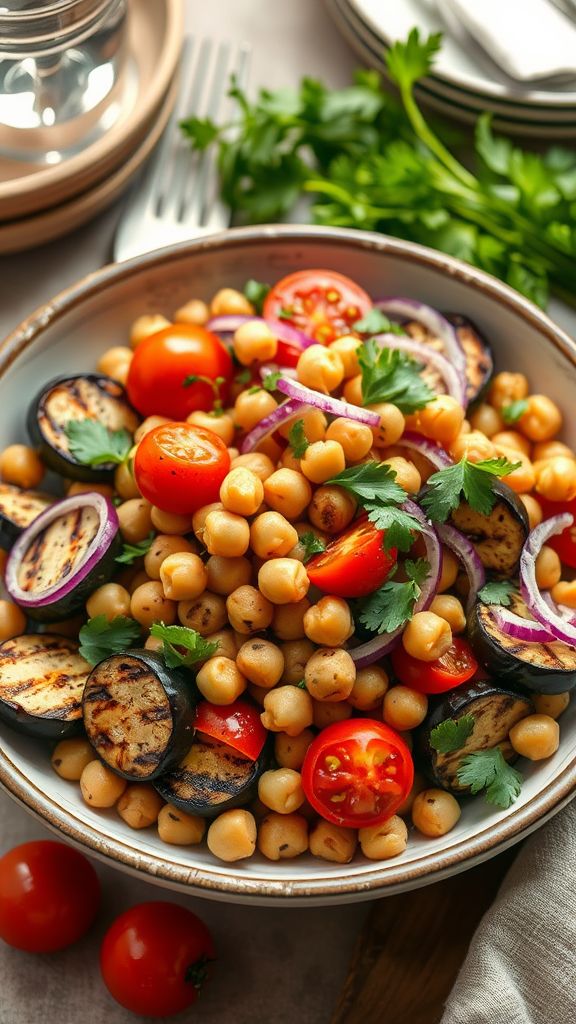
Grilled Eggplant and Chickpea Salad is a delicious and healthy dish that’s perfect for a spring dinner. The combination of grilled eggplant, crunchy chickpeas, and fresh herbs makes it both filling and refreshing. It’s easy to prepare and packed with flavor!
Prep Time: 15 minutes
Total Time: 30 minutes
Servings: 4
Ingredients:
- 1 large eggplant, sliced into rounds
- 1 can (15 oz) chickpeas, drained and rinsed
- 2 tablespoons olive oil
- 1 teaspoon salt
- 1 teaspoon black pepper
- 1 teaspoon paprika
- 1 teaspoon garlic powder
- 1 cup cherry tomatoes, halved
- 1/2 red onion, thinly sliced
- 1/4 cup fresh parsley, chopped
- 2 tablespoons lemon juice
Instructions:
Start by preheating your grill to medium heat. While it’s heating up, take the sliced eggplant and brush both sides with 1 tablespoon of olive oil. Make sure to season it with 1/2 teaspoon of salt and 1/2 teaspoon of black pepper.
Place the eggplant slices on the grill. Cook them for about 5-7 minutes on each side, or until they are soft and have nice grill marks. Once done, remove them from the grill and let them cool for a few minutes.
In a bowl, combine the chickpeas, cherry tomatoes, red onion, and parsley. Toss this mixture lightly to combine all the ingredients evenly.
Next, chop the grilled eggplant into bite-sized pieces and add it to the bowl with the chickpea mixture. Drizzle the remaining 1 tablespoon of olive oil, along with 1 teaspoon of salt, 1/2 teaspoon of black pepper, paprika, garlic powder, and lemon juice over everything. Mix gently until everything is well coated.
Serve your Grilled Eggplant and Chickpea Salad fresh or at room temperature. Enjoy this tasty and nutritious salad as a light main dish or a side!
Tips:
- For extra flavor, try adding feta cheese or avocado to the salad.
- You can marinate the chickpeas in lemon juice and herbs for 30 minutes before mixing for added taste.
- This salad can be made ahead of time and stored in the fridge for a quick meal later.
Nutrition Facts:
- Calories: 220 per serving
- Protein: 8g
- Carbohydrates: 30g
- Fat: 10g
- Fiber: 10g
12 Lemon Dill Couscous with Grilled Salmon Cakes

This Lemon Dill Couscous with Grilled Salmon Cakes recipe is a perfect dish for a fresh spring dinner. The bright flavors of lemon and dill combine wonderfully with succulent salmon cakes. It’s a healthy, delicious meal that everyone will enjoy!
Prep Time: 20 minutes
Additional Time: 10 minutes
Total Time: 30 minutes
Servings: 4
Ingredients:
- 1 cup couscous
- 1 1/4 cups vegetable broth or water
- 2 tablespoons olive oil, divided
- 1 tablespoon fresh lemon juice
- 1 tablespoon fresh dill, chopped
- 1 teaspoon lemon zest
- 1/2 teaspoon salt
- 1/4 teaspoon black pepper
- 12 ounces canned salmon, drained and flaked
- 1/4 cup breadcrumbs
- 1/4 cup green onion, chopped
- 1 egg
- 1/2 teaspoon garlic powder
- 1 tablespoon mayonnaise (optional)
Instructions:
Start by bringing the vegetable broth or water to a boil in a saucepan. Once it’s boiling, remove it from the heat and stir in the couscous. Cover the pan and let it sit for about 5 minutes until the couscous absorbs all the liquid.
In a large bowl, combine the flaked salmon, breadcrumbs, green onion, egg, garlic powder, and the rest of the olive oil. If you want a creamier texture, you can add mayonnaise at this step. Mix well until everything is blended together.
Now, form the mixture into small patties—around 2 to 3 inches in diameter. You should get about 4 to 6 salmon cakes.
Next, heat a non-stick skillet over medium heat. Add a little olive oil to coat the bottom. Carefully place the salmon cakes in the skillet. Cook them for about 4-5 minutes on each side, or until they are golden brown and heated through.
While the salmon cakes are cooking, fluff the couscous with a fork and stir in the lemon juice, dill, lemon zest, salt, and pepper. Mix until well combined.
Once everything is cooked, serve the salmon cakes on a bed of lemon dill couscous. Enjoy your delightful and fresh meal!
Tips:
- For extra flavor, let the salmon cakes chill in the fridge for about 10 minutes before cooking. This will help them hold their shape.
- You can add other herbs, like parsley or chives, for a different taste in the couscous.
- Serve with a side of fresh vegetables or a green salad for a complete meal.
Nutrition Facts:
- Calories: 350
- Protein: 25g
- Carbohydrates: 30g
- Fat: 15g
- Fiber: 3g
- Sodium: 500mg
13 Spring Green Soup with Fresh Herbs
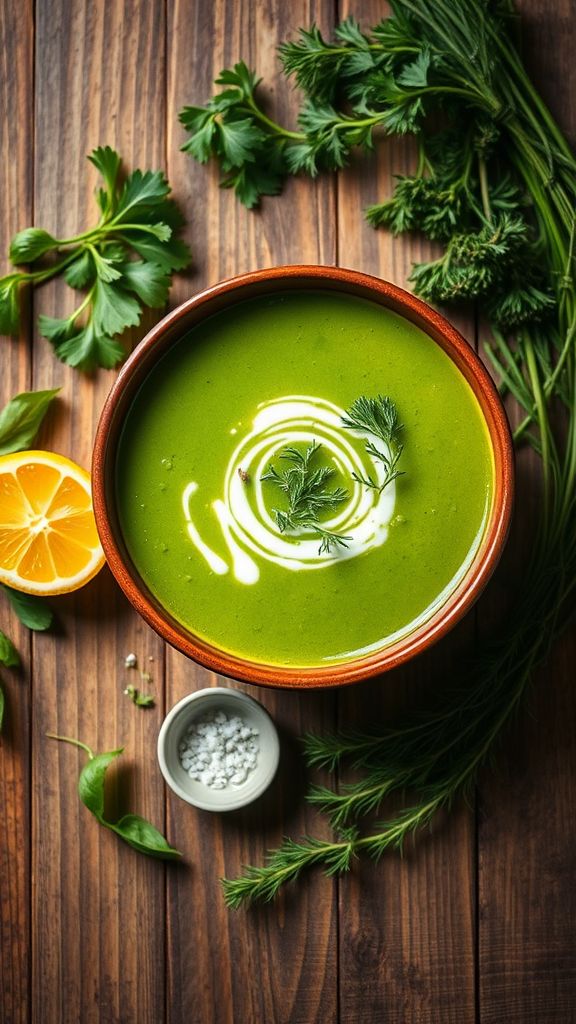
Spring is the perfect time to enjoy fresh and vibrant flavors. This Spring Green Soup with Fresh Herbs is a delightful way to celebrate the season. It’s light, nutritious, and packed with delicious greens that will warm your soul.
Prep Time: 15 minutes
Cook Time: 20 minutes
Total Time: 35 minutes
Servings: 4
Ingredients:
- 1 tablespoon olive oil
- 1 medium onion, chopped
- 2 garlic cloves, minced
- 4 cups vegetable broth
- 2 cups spinach leaves
- 1 cup peas (fresh or frozen)
- 1 cup chopped asparagus
- 1 cup parsley, roughly chopped
- 1 tablespoon fresh thyme, chopped
- 1 tablespoon fresh dill, chopped
- Salt and pepper to taste
- Juice of 1 lemon
- 1/4 cup heavy cream (optional)
Instructions:
Start by heating the olive oil in a large pot over medium heat. Once the oil is hot, add the chopped onion and sauté it until it becomes translucent, which should take about 5 minutes.
Next, stir in the minced garlic and cook for another minute until it becomes fragrant. Then add the vegetable broth to the pot and bring it to a gentle boil.
Once boiling, add the spinach, peas, and chopped asparagus. Let it simmer for about 10 minutes until the vegetables are tender.
After that, remove the pot from heat and let it cool slightly. Pour the soup into a blender and blend until it becomes smooth and creamy. Be careful when blending hot liquids; you can blend in batches if needed.
Once blended, return the soup to the pot and stir in the chopped parsley, thyme, and dill. Season it with salt and pepper to taste. If you want a creamier texture, stir in the heavy cream and squeeze in the lemon juice.
Finally, heat the soup gently for a minute or two before serving. Garnish with extra herbs if desired.
Tips:
- For a vegan option, skip the heavy cream or use a substitute like coconut cream.
- You can add any seasonal greens you have on hand, such as kale or collard greens.
- This soup can be stored in the refrigerator for up to 3 days. Just reheat it before serving.
Nutrition Facts:
- Calories: 180 per serving
- Protein: 5g
- Fat: 7g
- Carbohydrates: 29g
- Fiber: 8g
- Sugar: 3g
14 Garlic Butter Shrimp and Asparagus

Garlic Butter Shrimp and Asparagus is a quick and delicious dish that brings the flavors of the sea and fresh veggies together. With juicy shrimp tossed in a rich garlic butter sauce and tender asparagus, this meal is perfect for a spring dinner. It comes together in just a few steps, making it an easy choice for busy weeknights!
Prep Time: 10 minutes
Cook Time: 10 minutes
Total Time: 20 minutes
Servings: 4
Ingredients:
- 1 pound shrimp, peeled and deveined
- 1 bunch asparagus, trimmed and cut into 2-inch pieces
- 4 tablespoons butter
- 4 cloves garlic, minced
- 1 teaspoon lemon juice
- Salt and pepper, to taste
- 1 teaspoon red pepper flakes (optional)
- Fresh parsley, chopped for garnish
Instructions:
Start by heating a large skillet over medium-high heat. Add 2 tablespoons of butter to the skillet and let it melt. Once melted, toss in the minced garlic and sauté for about 30 seconds, until fragrant.
Next, add the shrimp to the skillet, spreading them out evenly. Cook the shrimp for 2-3 minutes on each side until they turn pink and are cooked through. After that, remove the shrimp from the skillet and set them aside on a plate.
In the same skillet, add the remaining 2 tablespoons of butter and the trimmed asparagus. Sauté the asparagus for about 4-5 minutes, until they are tender but still crisp. Season with salt, pepper, and red pepper flakes, if using.
Now, return the cooked shrimp to the skillet along with the lemon juice. Stir everything together and cook for another 1-2 minutes to warm the shrimp back up.
Finally, garnish with fresh parsley before serving. Enjoy your Garlic Butter Shrimp and Asparagus immediately!
Tips:
- For extra flavor, consider adding some zest from a lemon before serving.
- Try swapping asparagus for your favorite vegetables, such as broccoli or bell peppers.
- Serve with rice or pasta to make a complete meal.
Nutrition Facts:
- Calories: 250 per serving
- Protein: 25g
- Fat: 15g
- Carbohydrates: 5g
- Fiber: 2g
- Sugar: 2g
15 Smoky Chipotle Chicken Fajitas with Seasonal Veggies
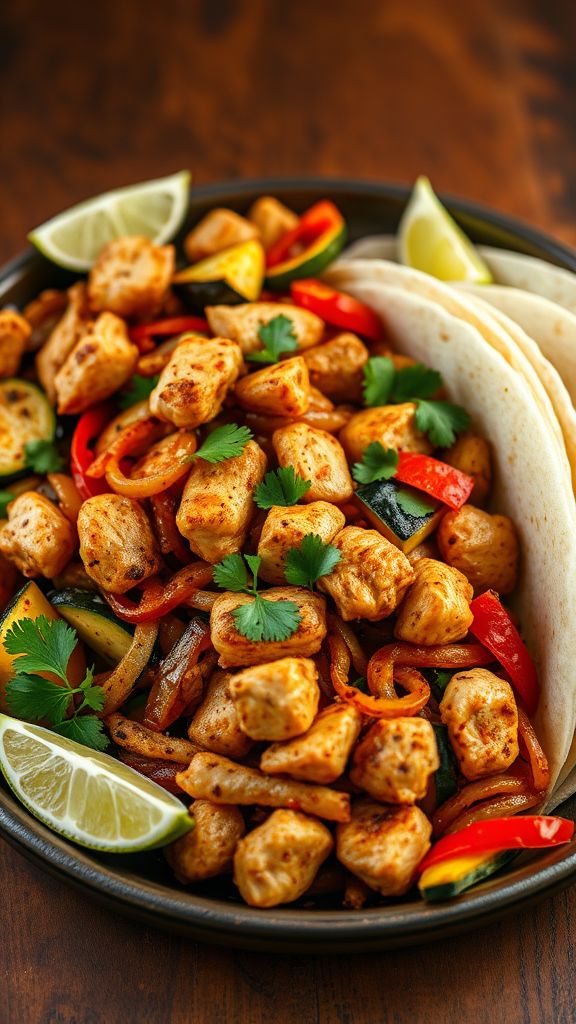
Get ready to spice up your dinner with these Smoky Chipotle Chicken Fajitas! Packed with bold flavors and colorful seasonal veggies, this dish is perfect for a fun family meal or a gathering with friends. It’s simple to make and will surely impress your guests.
Prep Time: 15 minutes
Cook Time: 20 minutes
Additional Time: 15 minutes (marinating)
Total Time: 50 minutes
Servings: 4
Ingredients:
- 1 lb chicken breast, sliced into thin strips
- 1 onion, sliced
- 1 bell pepper (any color), sliced
- 1 zucchini, sliced
- 1 tablespoon olive oil
- 2 teaspoons chipotle powder
- 1 teaspoon smoked paprika
- 1 teaspoon garlic powder
- 1 teaspoon cumin
- Salt and pepper to taste
- 8 small flour tortillas
- Fresh cilantro for garnish
- Lime wedges for serving
Instructions:
Begin by marinating the chicken. In a large bowl, combine the sliced chicken, olive oil, chipotle powder, smoked paprika, garlic powder, cumin, salt, and pepper. Mix well to coat the chicken evenly. Let it marinate in the fridge for 15 minutes to enhance the flavor.
While the chicken marinates, prepare your veggies. Slice the onion, bell pepper, and zucchini. Set them aside for later.
After the chicken has marinated, heat a large skillet over medium-high heat. Add the marinated chicken to the skillet and cook for about 5-7 minutes, stirring occasionally, until it is browned and fully cooked.
Next, add the sliced onion, bell pepper, and zucchini to the skillet. Cook the veggies with the chicken for an additional 5-7 minutes or until they are tender but still have some crunch.
While everything is cooking, warm the tortillas. You can do this in a separate skillet or in the microwave for 30 seconds.
Once everything is ready, assemble the fajitas. Place a generous portion of the chicken and veggie mixture onto each tortilla. Garnish with fresh cilantro and serve with lime wedges on the side.
Tips:
- For added flavor, try adding some diced tomatoes or corn to the veggie mix.
- If you like it spicy, consider adding some chopped jalapeños or a dash of hot sauce.
- Make it a vegetarian dish by replacing the chicken with grilled tofu or black beans.
Nutrition Facts:
- Calories: 350 per serving
- Protein: 30g
- Carbohydrates: 40g
- Fat: 10g
- Fiber: 4g
- Sodium: 600mg
16 Carrot and Ginger Soup with Crusty Bread

A warm bowl of Carrot and Ginger Soup is perfect for any evening, especially when paired with crusty bread. This soup is not only vibrant in color but also loaded with flavor and nutrition. It’s quick to make and will surely impress your family and friends!
Prep Time: 10 minutes
Cook Time: 30 minutes
Additional Time: 0
Total Time: 40 minutes
Servings: 4
Ingredients:
- 1 tablespoon olive oil
- 1 onion, chopped
- 3 cloves garlic, minced
- 1 tablespoon fresh ginger, grated
- 6 cups carrots, peeled and chopped
- 4 cups vegetable broth
- 1 teaspoon salt
- 1/2 teaspoon black pepper
- 1/4 teaspoon ground cumin
- 1/4 teaspoon ground coriander
- 1 cup coconut milk (optional for creaminess)
- Crusty bread for serving
Instructions:
Start by heating the olive oil in a large pot over medium heat. Add the onion, and sauté it until it becomes translucent, about 5 minutes. Then, stir in the garlic and ginger. Cook for another minute until fragrant.
Next, add the carrots to the pot. Mix well, letting the flavors combine for a couple of minutes. Pour in the vegetable broth, and season with salt, black pepper, cumin, and coriander. Bring the mixture to a boil, then reduce the heat and let it simmer until the carrots are tender, which should take about 20 minutes.
Once the carrots are cooked, use an immersion blender to puree the soup until smooth. If you don’t have an immersion blender, you can carefully transfer the soup to a regular blender in batches. If you want a creamier texture, stir in the coconut milk after blending and heat through.
Serve the soup hot with slices of crusty bread on the side. Enjoy your delicious and comforting meal!
Tips:
- Try adding a squeeze of lime juice before serving for an extra zing to the soup.
- Garnish the soup with some fresh cilantro or chives for added flavor and color.
- Store any leftover soup in the fridge for up to 3 days or freeze it for longer storage.
Nutrition Facts:
- Calories: 180
- Protein: 4g
- Total Fat: 8g
- Saturated Fat: 2g
- Carbohydrates: 25g
- Fiber: 6g
- Sugar: 5g
- Sodium: 400mg
17 Herbed Turkey Burgers with Avocado Salsa
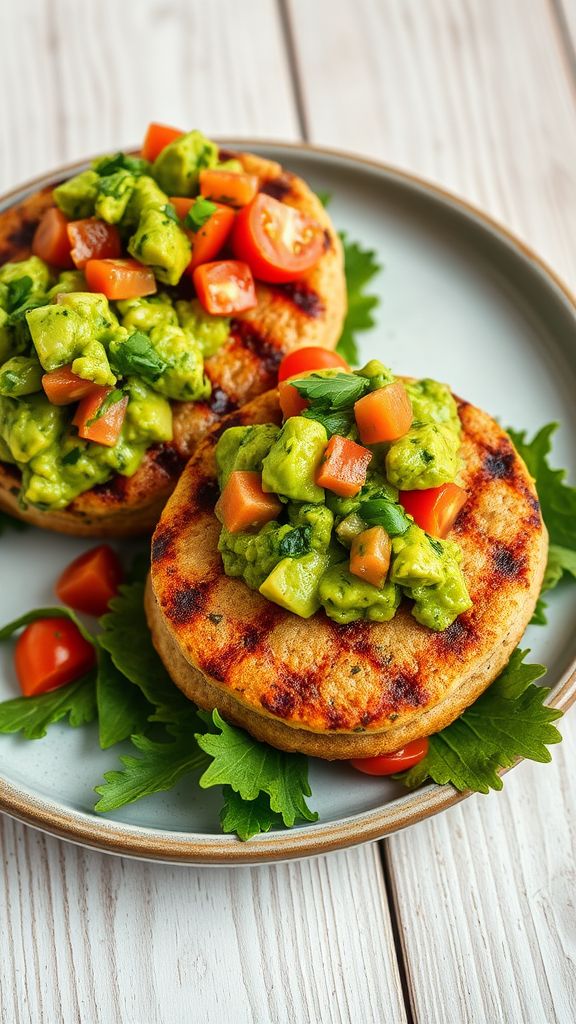
Herbed Turkey Burgers with Avocado Salsa are a delicious and healthy option for a spring dinner. Packed with fresh flavors, these burgers bring a tasty twist to your regular meal. Top them with a zesty avocado salsa for an extra kick!
Prep Time: 15 minutes
Cook Time: 10 minutes
Total Time: 25 minutes
Servings: 4
Ingredients:
- 1 lb ground turkey
- 1 small onion, finely chopped
- 2 cloves garlic, minced
- 2 tsp dried oregano
- 1 tsp dried thyme
- 1 tsp paprika
- Salt and pepper, to taste
- 1 tbsp olive oil
- 1 ripe avocado, diced
- 1 small tomato, diced
- 1 tbsp lime juice
- ¼ cup fresh cilantro, chopped
- 4 whole wheat hamburger buns
- Leafy greens (like lettuce or spinach), for serving
Instructions:
In a large bowl, combine ground turkey, chopped onion, minced garlic, oregano, thyme, paprika, salt, and pepper. Mix everything together until just combined. Be careful not to overmix.
Form the mixture into four equal patties. Preheat a grill or skillet over medium heat and add olive oil. Once hot, place the patties on the grill. Cook for about 5 minutes on each side, or until the internal temperature reaches 165°F.
While the turkey burgers are cooking, prepare the avocado salsa. In a medium bowl, mix together the diced avocado, tomato, lime juice, and cilantro. Gently stir to combine and set aside.
Once the burgers are done, toast the whole wheat buns lightly if desired. Assemble the burgers by placing a turkey patty on the bottom half of each bun. Top with a generous scoop of the avocado salsa and add some leafy greens before placing the top half of the bun on.
Tips:
- Feel free to add your favorite spices to the turkey mixture for extra flavor.
- To make this meal even quicker, you can prepare the salsa while the burgers are cooking.
- These burgers freeze well. Shape the patties and store them in the freezer for a quick future meal.
Nutrition Facts:
- Calories: 350
- Protein: 28g
- Fat: 15g
- Carbohydrates: 30g
- Fiber: 5g
- Sugar: 1g
18 Scalloped Potatoes with Spring Onions and Gruyere

Scalloped Potatoes with Spring Onions and Gruyere is a perfect dish for your spring gatherings. The creamy layers of potatoes combined with the mild flavor of spring onions and rich Gruyere cheese create a deliciously comforting side dish. Your family and friends will love this cheesy goodness!
Prep Time: 20 minutes
Cook Time: 1 hour
Total Time: 1 hour 20 minutes
Servings: 6
Ingredients:
- 2 pounds of russet potatoes, peeled and thinly sliced
- 1 cup of spring onions, chopped (both white and green parts)
- 1 ½ cups of Gruyere cheese, shredded
- 2 cups of heavy cream
- 2 tablespoons of butter
- 2 cloves of garlic, minced
- 1 teaspoon of salt
- ½ teaspoon of black pepper
- 1 teaspoon of fresh thyme (optional, for added flavor)
Instructions:
Start by preheating your oven to 375°F (190°C). Grab a large baking dish and grease it lightly with butter. This will help prevent the potatoes from sticking.
Layer half of the sliced potatoes evenly in the bottom of the baking dish. Sprinkle half of the spring onions and half of the Gruyere cheese over the potatoes.
In a mixing bowl, combine the heavy cream, minced garlic, salt, black pepper, and optional fresh thyme. Pour half of this cream mixture over your layered potatoes.
Repeat the layers with the remaining potatoes, spring onions, and Gruyere cheese. Pour the rest of the cream mixture on top, ensuring everything is evenly covered.
Cover the baking dish with aluminum foil and bake it in the preheated oven for about 40 minutes. After that time, remove the foil and bake for an additional 20 minutes or until the top is golden brown and bubbly.
Once done, let the scalloped potatoes cool for about 10 minutes before serving. This will allow the layers to set nicely. Enjoy your delicious side dish!
Tips:
- For a crispy top, you can broil the potatoes on high for a few minutes after baking, just until golden brown.
- Feel free to add other herbs, like rosemary or parsley, for extra flavor.
- Make it ahead of time! You can prepare the dish a day before and bake it right before serving.
Nutrition Facts:
- Calories: 350 per serving
- Total Fat: 22g
- Saturated Fat: 12g
- Cholesterol: 80mg
- Carbohydrates: 33g
- Fiber: 3g
- Protein: 8g
19 Spaghetti Aglio e Olio with Fresh Spinach and Tomatoes
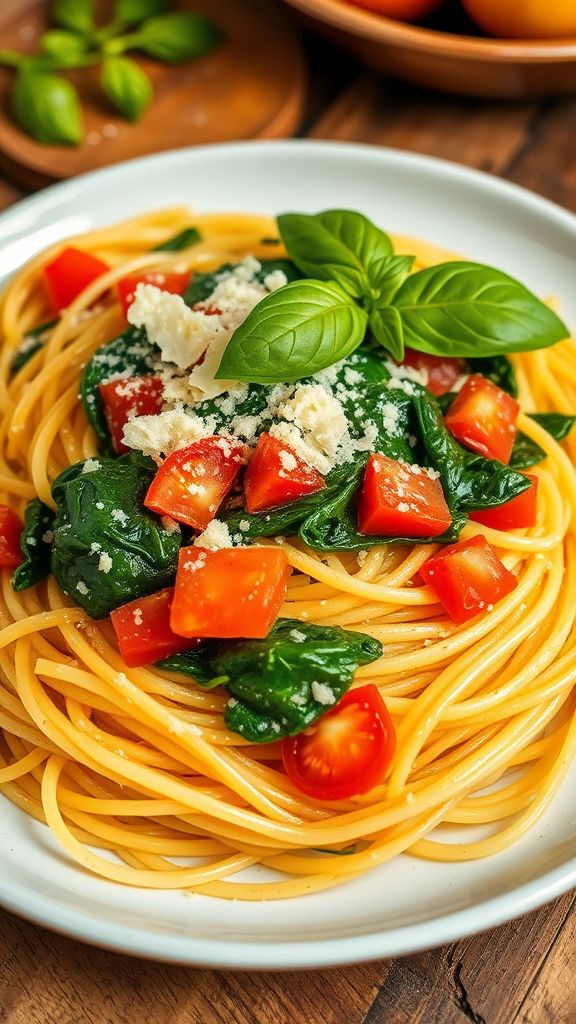
Spaghetti Aglio e Olio with Fresh Spinach and Tomatoes is a simple and delicious dish. It combines the strong flavors of garlic and olive oil with fresh spinach and juicy tomatoes. This quick recipe is perfect for a light spring dinner.
Prep Time: 10 minutes
Cook Time: 15 minutes
Total Time: 25 minutes
Servings: 4
Ingredients:
- 12 ounces spaghetti
- 4 tablespoons olive oil
- 4 cloves garlic, thinly sliced
- 1/4 teaspoon red pepper flakes (optional)
- 4 cups fresh spinach
- 2 medium tomatoes, diced
- Salt to taste
- Black pepper to taste
- 1/4 cup grated Parmesan cheese (optional)
- Fresh basil leaves for garnish (optional)
Instructions:
Start by cooking the spaghetti in a large pot of salted boiling water. Follow the package instructions until it’s al dente. Once done, reserve about 1 cup of pasta water, then drain the spaghetti and set it aside.
In a large skillet, heat olive oil over medium heat. Add the sliced garlic and sauté for about 1 minute until it turns golden brown. Be careful not to burn the garlic, as it can become bitter.
Next, add the red pepper flakes to the skillet if you’re using them. Then, toss in the fresh spinach. Cook until the spinach wilts, which takes about 2-3 minutes. After that, stir in the diced tomatoes and cook for another 2 minutes until they soften.
Now, add the drained spaghetti to the skillet. Toss everything together, making sure the spaghetti is coated with the garlic oil. If the pasta seems dry, gradually add some reserved pasta water until you reach your desired consistency.
Finally, season with salt and black pepper to taste. If you want a cheesy kick, sprinkle some grated Parmesan cheese on top. For a fresh touch, garnish with basil leaves.
Tips:
- For extra flavor, you can add some chopped onions when you sauté the garlic.
- If you like it spicy, add more red pepper flakes to the dish.
- Feel free to mix in other vegetables like zucchini or bell peppers for added nutrition.
Nutrition Facts:
- Calories: 380 per serving
- Protein: 12g
- Carbohydrates: 56g
- Fat: 15g
- Fiber: 3g
- Sugar: 2g
20 Strawberry Spinach Salad with Poppy Seed Dressing
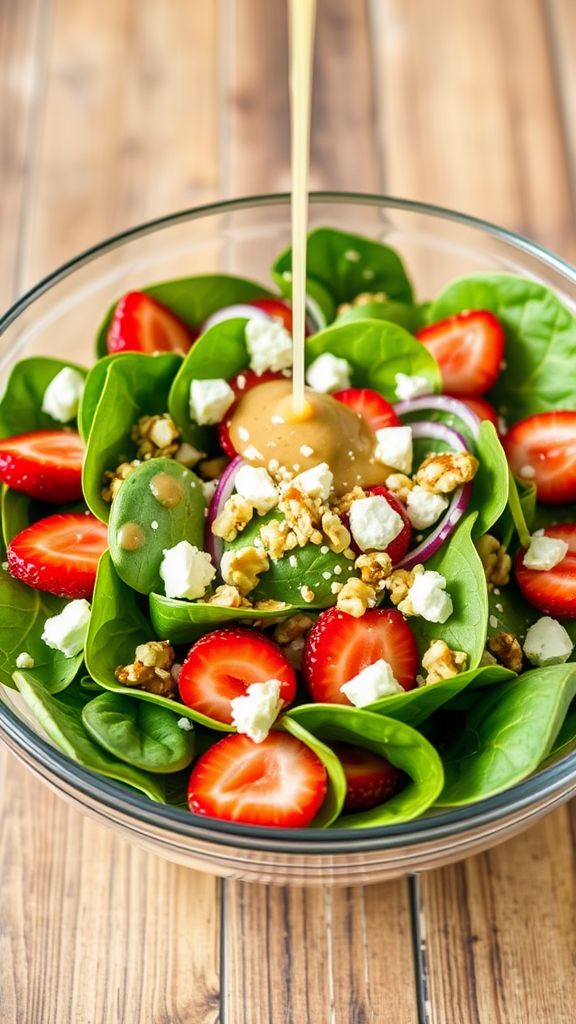
This Strawberry Spinach Salad is a fresh and tasty option for any meal. The sweet strawberries blend perfectly with the crunchy spinach, and the homemade Poppy Seed Dressing adds a delightful touch. It’s easy to make and perfect for spring!
Prep Time: 15 minutes
Total Time: 15 minutes
Servings: 4
Ingredients:
- 6 cups fresh spinach, washed and dried
- 1 cup fresh strawberries, hulled and sliced
- 1/4 cup red onion, thinly sliced
- 1/4 cup walnuts, chopped
- Feta cheese, crumbled (optional)
For the Poppy Seed Dressing:
- 1/4 cup mayonnaise
- 2 tablespoons apple cider vinegar
- 2 tablespoons honey
- 1 tablespoon poppy seeds
- Salt and pepper to taste
Instructions:
Start by combining all the ingredients for the Poppy Seed Dressing in a small bowl. Whisk together mayonnaise, apple cider vinegar, honey, and poppy seeds until smooth. Season it with salt and pepper to suit your taste.
Next, take a large salad bowl and add the fresh spinach. Scatter the sliced strawberries, red onion, and chopped walnuts on top of the spinach. If you like feta, sprinkle some crumbled feta cheese over the salad.
Now, drizzle the prepared Poppy Seed Dressing over the salad. Gently toss everything together to combine the flavors without bruising the spinach.
Serve immediately and enjoy your fresh strawberry spinach salad!
Tips:
- For extra crunch, try using toasted walnuts instead of regular ones.
- Add some grilled chicken for a heartier meal.
- This salad can also be made ahead; just add the dressing right before serving.
Nutrition Facts:
- Calories: 220 per serving
- Protein: 5g
- Carbohydrates: 17g
- Fat: 15g
- Fiber: 3g
- Sugar: 7g