My New Cookbook is Out! Check Out Now!
15 Elegant Dinner Ideas for Mother’s Day
This page contains affiliate links and I earn a commission if you make a purchase through one of the links, at no cost to you.
Planning a special dinner for Mother’s Day can be both exciting and a little overwhelming. You want to create a memorable experience, but choosing the right dishes can be a challenge. Imagine serving elegant meals that’ll impress and delight your mom!
In this collection, you’ll find 15 incredible dinner ideas that not only taste fantastic but also look stunning. These recipes are perfect for making this Mother’s Day truly special, and they’re designed to help you shine in the kitchen!
Shop Our Must-Haves


1 Herbed Lemon Butter Salmon with Asparagus
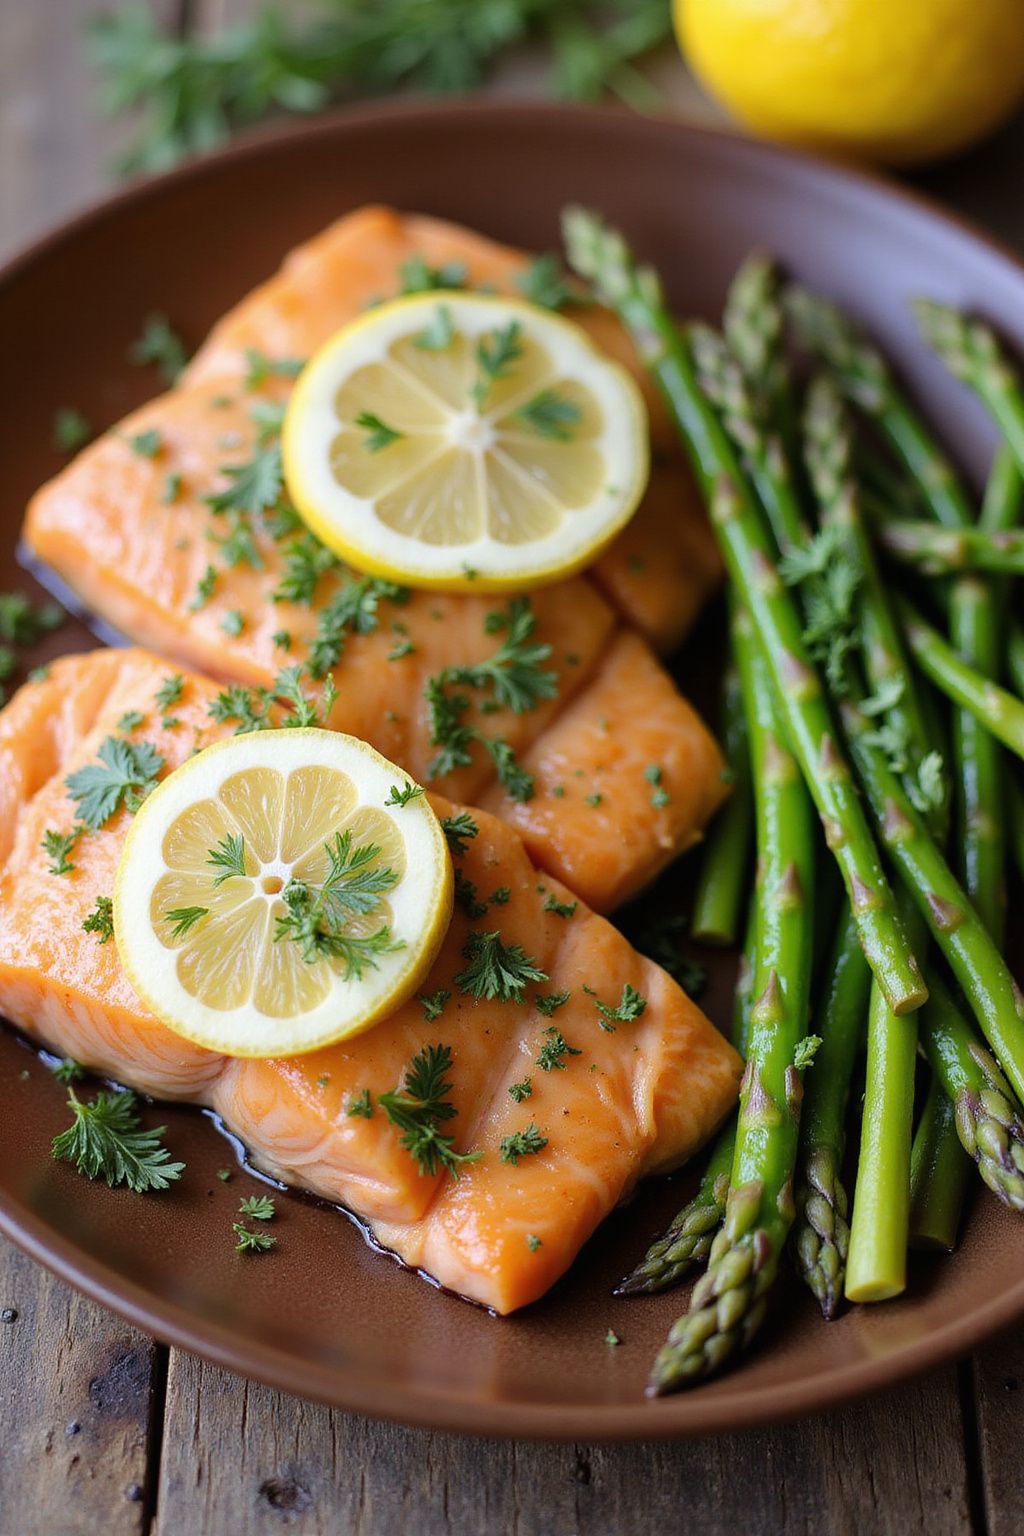
This Herbed Lemon Butter Salmon with Asparagus is a bright and delicious dish that brings together zesty flavors and tender textures. It’s perfect for a cozy dinner or when you want to impress your guests without spending hours in the kitchen. Let’s dive into the recipe!
Prep Time: 15 minutes
Cook Time: 15 minutes
Total Time: 30 minutes
Servings: 4
Ingredients:
- 4 salmon fillets
- 1 pound fresh asparagus spears, trimmed
- 1/4 cup unsalted butter, melted
- 2 tablespoons fresh lemon juice
- 1 tablespoon lemon zest
- 2 cloves garlic, minced
- 2 tablespoons fresh parsley, chopped
- 1 tablespoon fresh dill, chopped
- Salt and pepper, to taste
- Lemon slices, for garnish
Instructions:
Preheat your oven to 400°F (200°C). Take a baking sheet and line it with parchment paper for easy cleanup.
In a small bowl, mix the melted butter, lemon juice, lemon zest, minced garlic, parsley, and dill together. This will be your herbed lemon butter sauce.
Place the trimmed asparagus on one side of the prepared baking sheet. Drizzle half of the herbed lemon butter sauce over the asparagus and toss to coat.
Next, lay the salmon fillets on the other side of the baking sheet. Season them with salt and pepper. Brush the remaining herbed lemon butter sauce generously over the salmon.
Bake everything in the oven for about 12-15 minutes, or until the salmon is flaky and cooked through, and the asparagus is tender.
For serving, transfer the salmon and asparagus to plates and drizzle with any remaining sauce. Add lemon slices on top for a fresh finish.
Tips:
- You can substitute asparagus with green beans or broccoli if desired.
- For extra flavor, let the salmon marinate in the herbed lemon butter sauce for 30 minutes before baking.
- Serve this dish with rice or quinoa for a complete meal.
Nutrition Facts:
- Calories: 350 per serving
- Protein: 30g
- Fat: 20g
- Carbohydrates: 7g
- Fiber: 3g
- Sugar: 1g
2 Filet Mignon with Red Wine Reduction
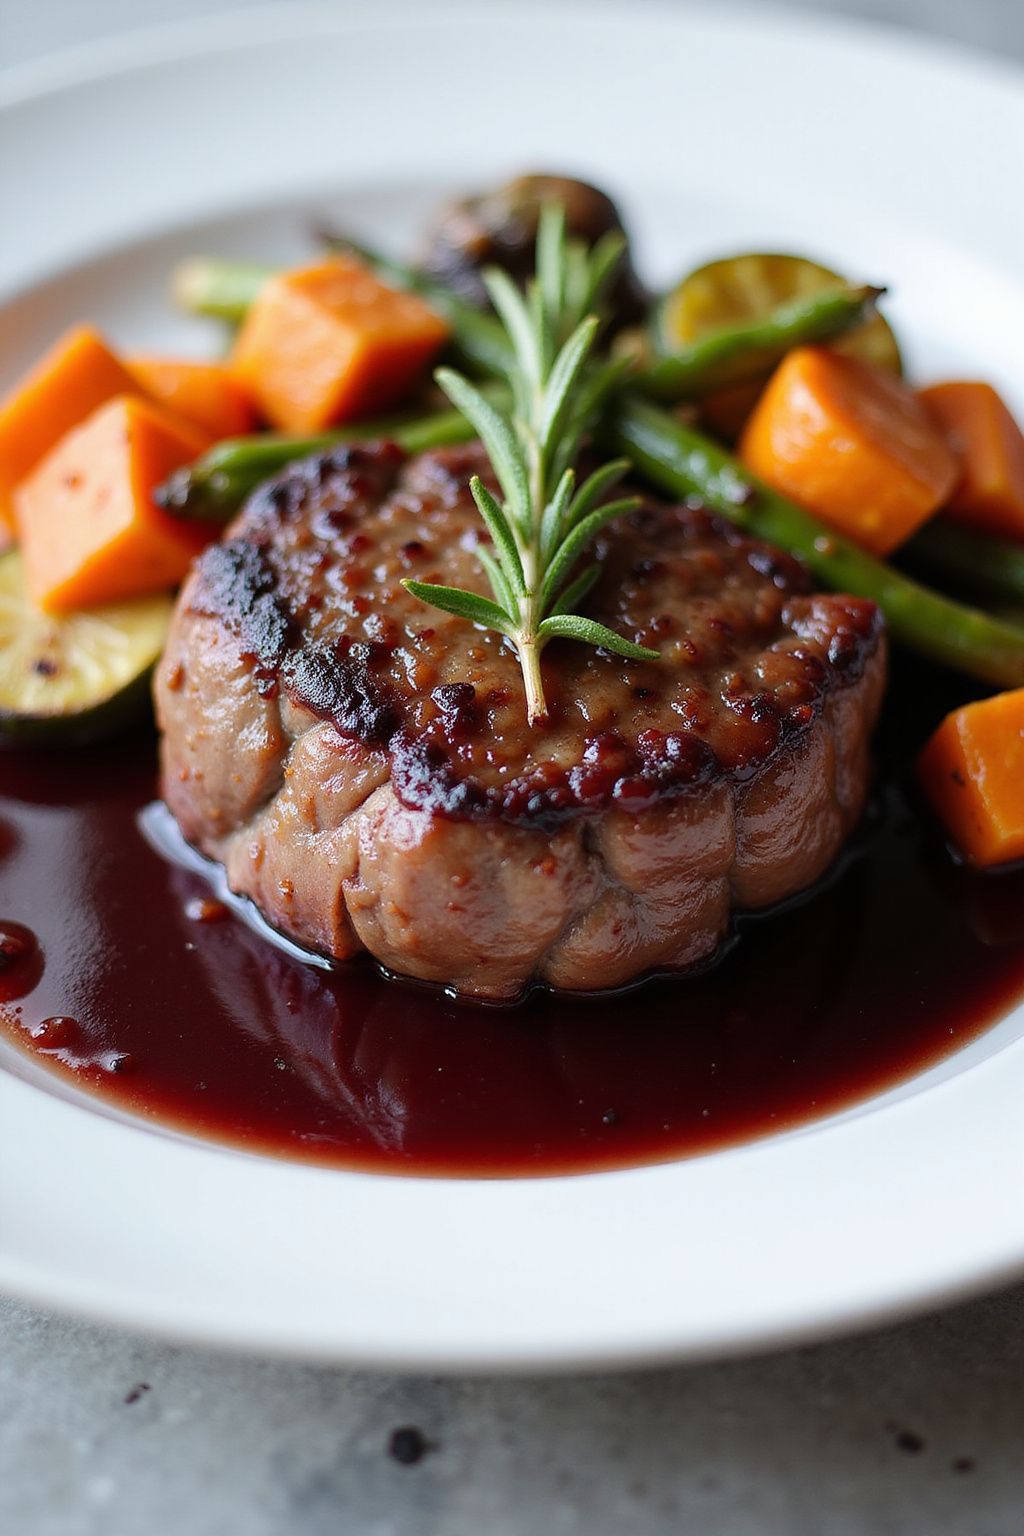
Filet Mignon with Red Wine Reduction is a simple yet elegant dish that will impress your guests. The tender beef pairs perfectly with a rich, flavorful sauce made from red wine. This dish is great for special occasions or a cozy dinner at home.
Prep Time: 15 minutes
Cook Time: 20 minutes
Additional Time: 5 minutes
Total Time: 40 minutes
Servings: 2
Ingredients:
- 2 filet mignon steaks (about 6-8 ounces each)
- Salt and pepper, to taste
- 2 tablespoons olive oil
- 1/2 cup red wine (like Cabernet Sauvignon)
- 1/2 cup beef broth
- 2 tablespoons unsalted butter
- 2 cloves garlic, minced
- 1 sprig fresh rosemary (optional)
Instructions:
Start by seasoning the filet mignon steaks generously with salt and pepper on both sides. Let them sit at room temperature for about 15 minutes to enhance the flavor.
In a skillet, heat 2 tablespoons of olive oil over medium-high heat. Once the oil is hot, carefully add the seasoned steaks to the skillet. Cook for about 4-5 minutes on each side for medium-rare, or adjust cooking time for your preferred doneness. After cooking, remove the steaks from the skillet and let them rest on a plate.
In the same skillet, add 2 cloves of minced garlic and sauté for about 30 seconds until fragrant. Be sure to stir to prevent burning. Next, pour in 1/2 cup of red wine and scrape the bottom of the skillet to lift the lovely bits of flavor. Let the wine boil and reduce by half, about 2-3 minutes.
Then, add 1/2 cup of beef broth and continue to boil until the sauce thickens slightly, about 5 minutes. Remove the skillet from heat and stir in 2 tablespoons of unsalted butter until melted and smooth. If you like, add a sprig of fresh rosemary for extra flavor.
Serve the steaks on plates and drizzle the rich red wine reduction over the top. Enjoy your elegant meal!
Tips:
- For best results, use a meat thermometer to check the internal temperature of the steaks: 130°F for medium-rare.
- Let the steaks rest for a few minutes after cooking to keep them juicy.
- Pair this dish with a side of roasted vegetables or creamy mashed potatoes for a complete meal.
Nutrition Facts:
- Calories: 550
- Protein: 45g
- Total Fat: 36g
- Carbohydrates: 5g
- Fiber: 0g
- Sugar: 0g
3 Lobster Risotto with Parmesan Crisp
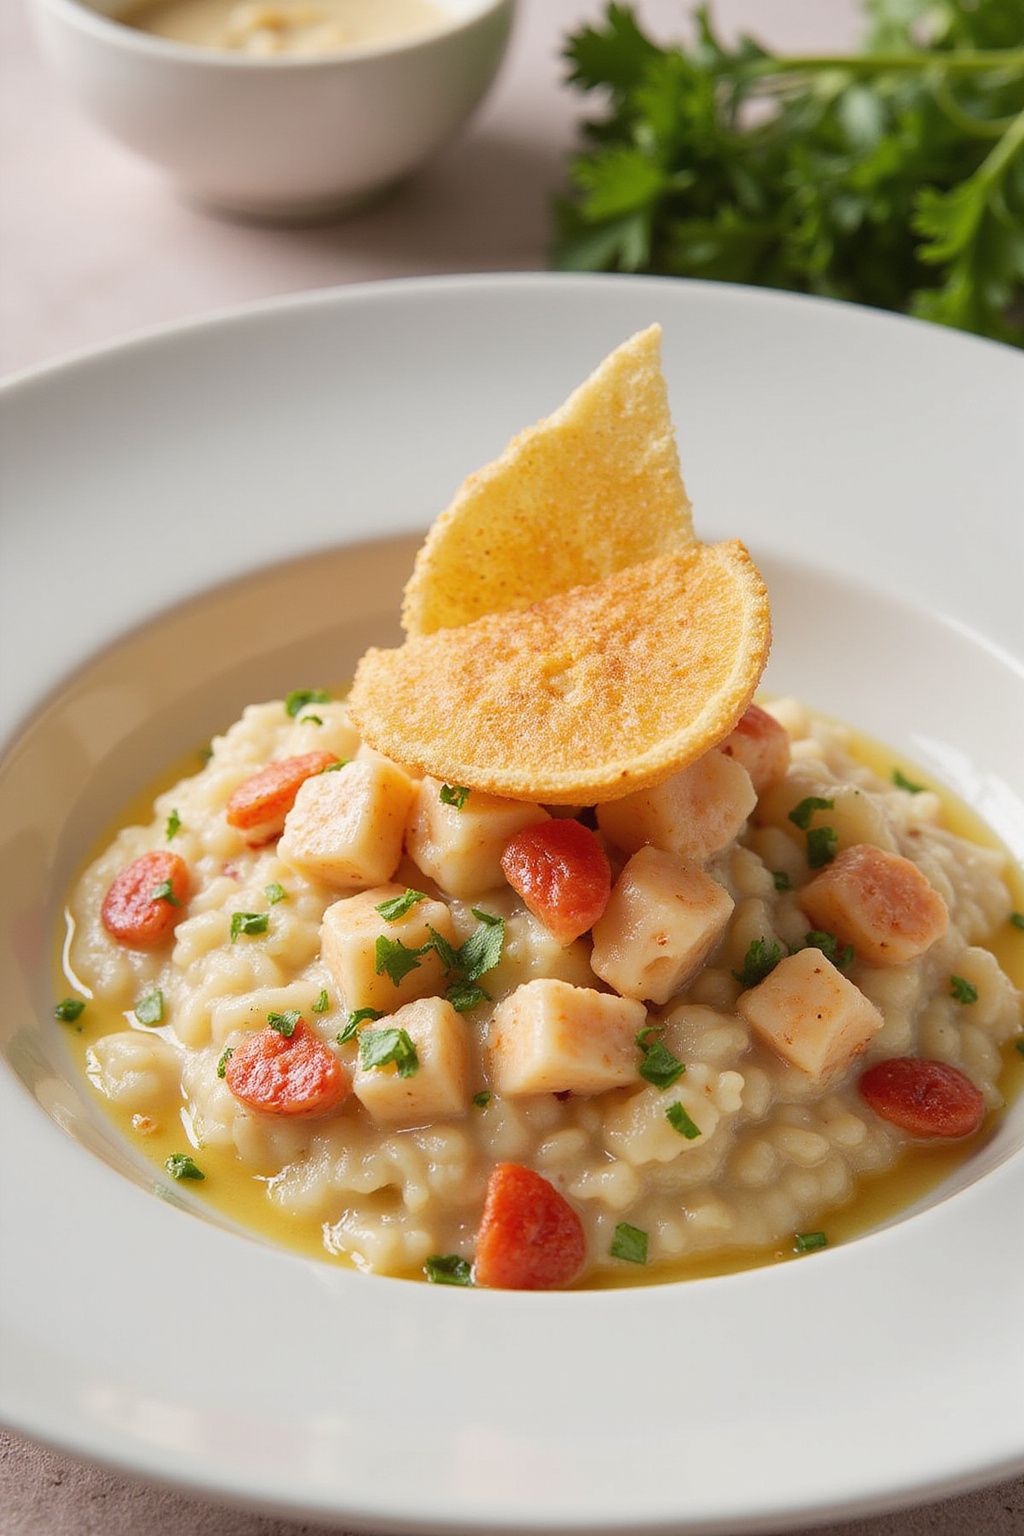
Lobster Risotto with Parmesan Crisp is a delicious and elegant dish that brings a taste of the sea to your dinner table. The creamy risotto combined with tender lobster and topped with a crunchy Parmesan crisp makes for a meal that feels fancy yet is easy to make at home. Get ready to impress your guests!
Prep Time: 15 minutes
Cook Time: 30 minutes
Additional Time: 10 minutes
Total Time: 55 minutes
Servings: 4
Ingredients:
- 1 cup Arborio rice
- 4 cups chicken or seafood broth
- 1 cup white wine
- 1 tablespoon olive oil
- 1 small onion, finely chopped
- 2 cloves garlic, minced
- 1 cup lobster meat, cooked and chopped
- 1/2 cup grated Parmesan cheese
- 2 tablespoons butter
- Salt and pepper, to taste
- Fresh parsley, for garnish
- 1/2 cup grated Parmesan for crisps
Instructions:
Start by heating the broth in a pot over medium heat. You want it warm but not boiling. In another large pan, heat the olive oil over medium heat. Add the chopped onion and cook until it’s softened, about 5 minutes.
Stir in the garlic and cook for another minute. Add the Arborio rice to the pan. Stir it well, allowing the rice to toast for about 2 minutes. This helps to add flavor and gives the risotto its creamy texture.
Pour in the white wine and let it cook down, stirring often, until it’s mostly absorbed. Next, gradually add the warm broth, one ladle at a time. Stir continuously and let each ladleful absorb before adding the next. This should take about 20 minutes.
When the rice is creamy and al dente, stir in the cooked lobster meat, butter, and Parmesan cheese. Season with salt and pepper to taste. Remove from heat and cover the pan to keep it warm.
For the Parmesan crisps, preheat your oven to 400°F (200°C). Line a baking sheet with parchment paper. Place small mounds of the grated Parmesan on the sheet, about 2 tablespoons each, and flatten them slightly. Bake for 5-7 minutes until they are golden and crisp. Let them cool before removing.
To serve, spoon the lobster risotto into bowls and top with the crispy Parmesan. Garnish with freshly chopped parsley for added color and flavor.
Tips:
- For an extra touch of flavor, you can add a squeeze of lemon juice to the risotto just before serving.
- Adding a splash of cream can make the risotto even richer and creamier.
- Feel free to substitute lobster with shrimp or scallops if desired.
Nutrition Facts:
- Calories: 600
- Protein: 25g
- Fat: 25g
- Carbohydrates: 65g
- Fiber: 2g
- Cholesterol: 75mg
4 Stuffed Chicken Breast with Spinach and Feta
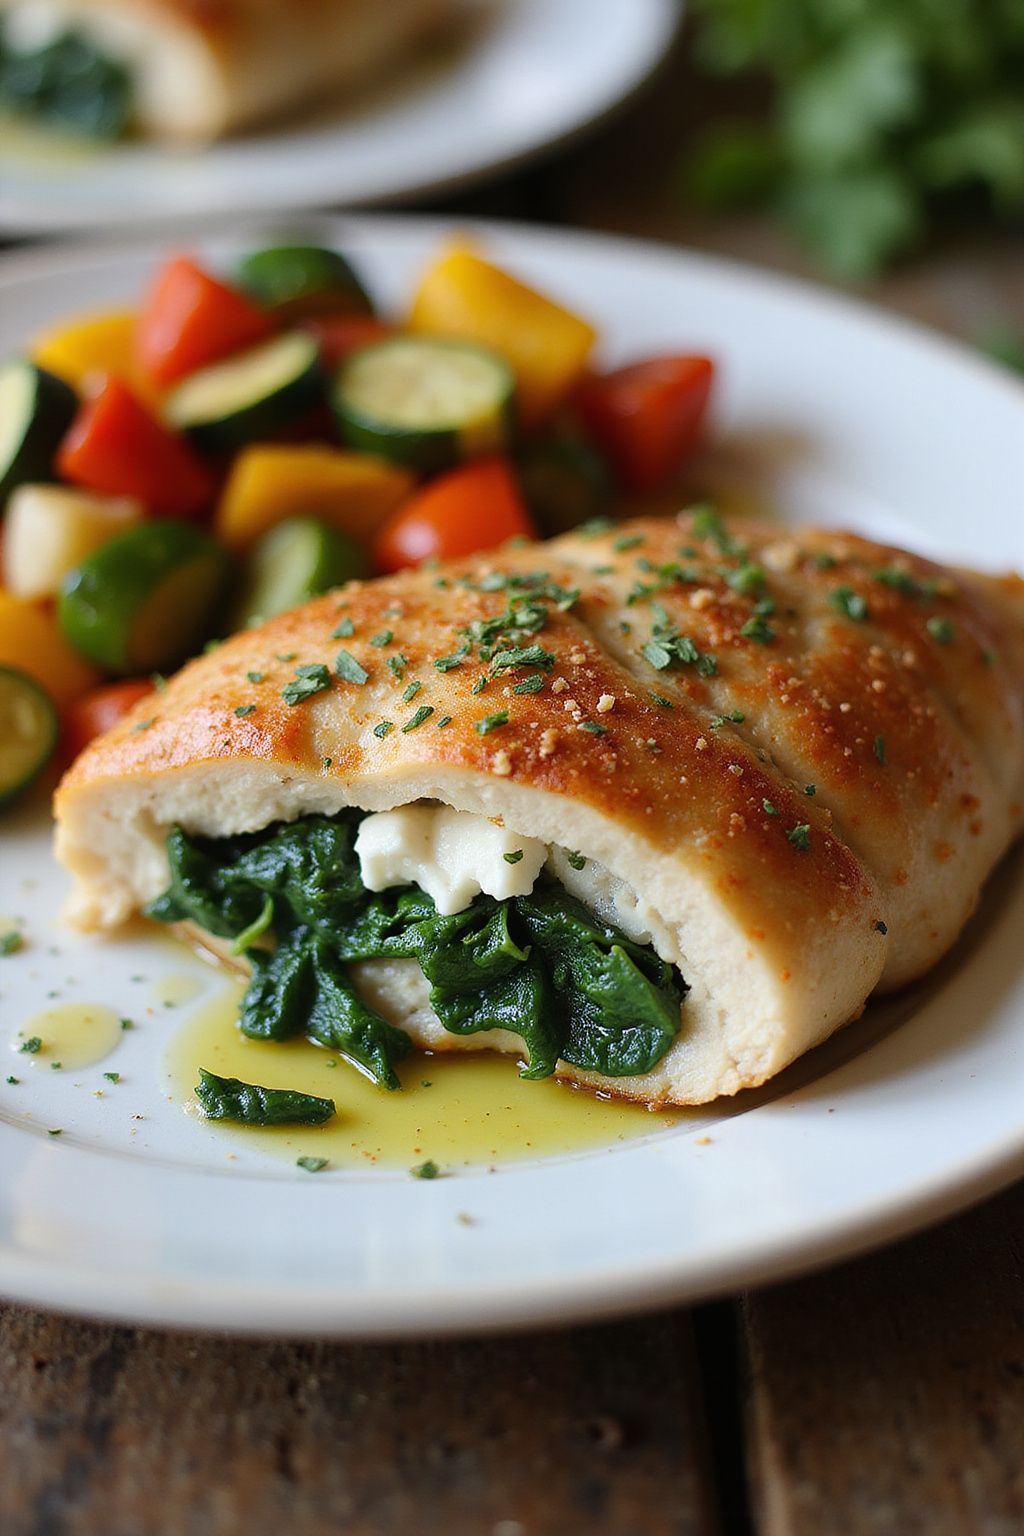
This Stuffed Chicken Breast with Spinach and Feta recipe is a delicious and healthy dish that packs a flavor punch. It’s perfect for a special dinner or a family meal. Let’s get started on making this delightful dish!
Prep Time: 15 minutes
Cook Time: 30 minutes
Additional Time: 5 minutes
Total Time: 50 minutes
Servings: 4
Ingredients:
- 4 large chicken breasts
- 2 cups fresh spinach, chopped
- 1 cup feta cheese, crumbled
- 1/4 cup cream cheese, softened
- 2 tablespoons olive oil
- 2 cloves garlic, minced
- 1 teaspoon dried oregano
- Salt and pepper to taste
- Toothpicks or kitchen twine for closing the chicken
Instructions:
Begin by preheating your oven to 375°F (190°C). This will help cook the chicken evenly.
Next, in a skillet, heat olive oil over medium heat. Add the minced garlic and sauté for about 1-2 minutes until fragrant. Then, add the chopped spinach and cook until wilted, which should take another 2-3 minutes.
In a bowl, mix together the cooked spinach, feta cheese, and cream cheese. Stir well until everything is combined. Season the mixture with dried oregano, salt, and pepper.
Now, take each chicken breast and make a pocket in the side by slicing it gently but not all the way through. Stuff each pocket with the spinach and feta mixture. Secure the opening with toothpicks or tie them closed using kitchen twine.
Place the stuffed chicken breasts on a baking sheet lined with parchment paper. Drizzle some more olive oil on top and season with additional salt and pepper if desired.
Bake in the preheated oven for 25-30 minutes, or until the chicken is fully cooked and the juices run clear. Once done, let the chicken rest for 5 minutes before removing the toothpicks or twine.
Tips:
- For extra flavor, you can add some red pepper flakes to the spinach filling.
- Serve the stuffed chicken with a side of grilled vegetables or a fresh salad for a complete meal.
- Make sure not to overstuff the chicken breasts to avoid the filling spilling out while baking.
Nutrition Facts:
- Calories: 360 per serving
- Protein: 42g
- Fat: 20g
- Carbohydrates: 3g
- Fiber: 1g
- Sugar: 1g
5 Wild Mushroom and Truffle Oil Pasta
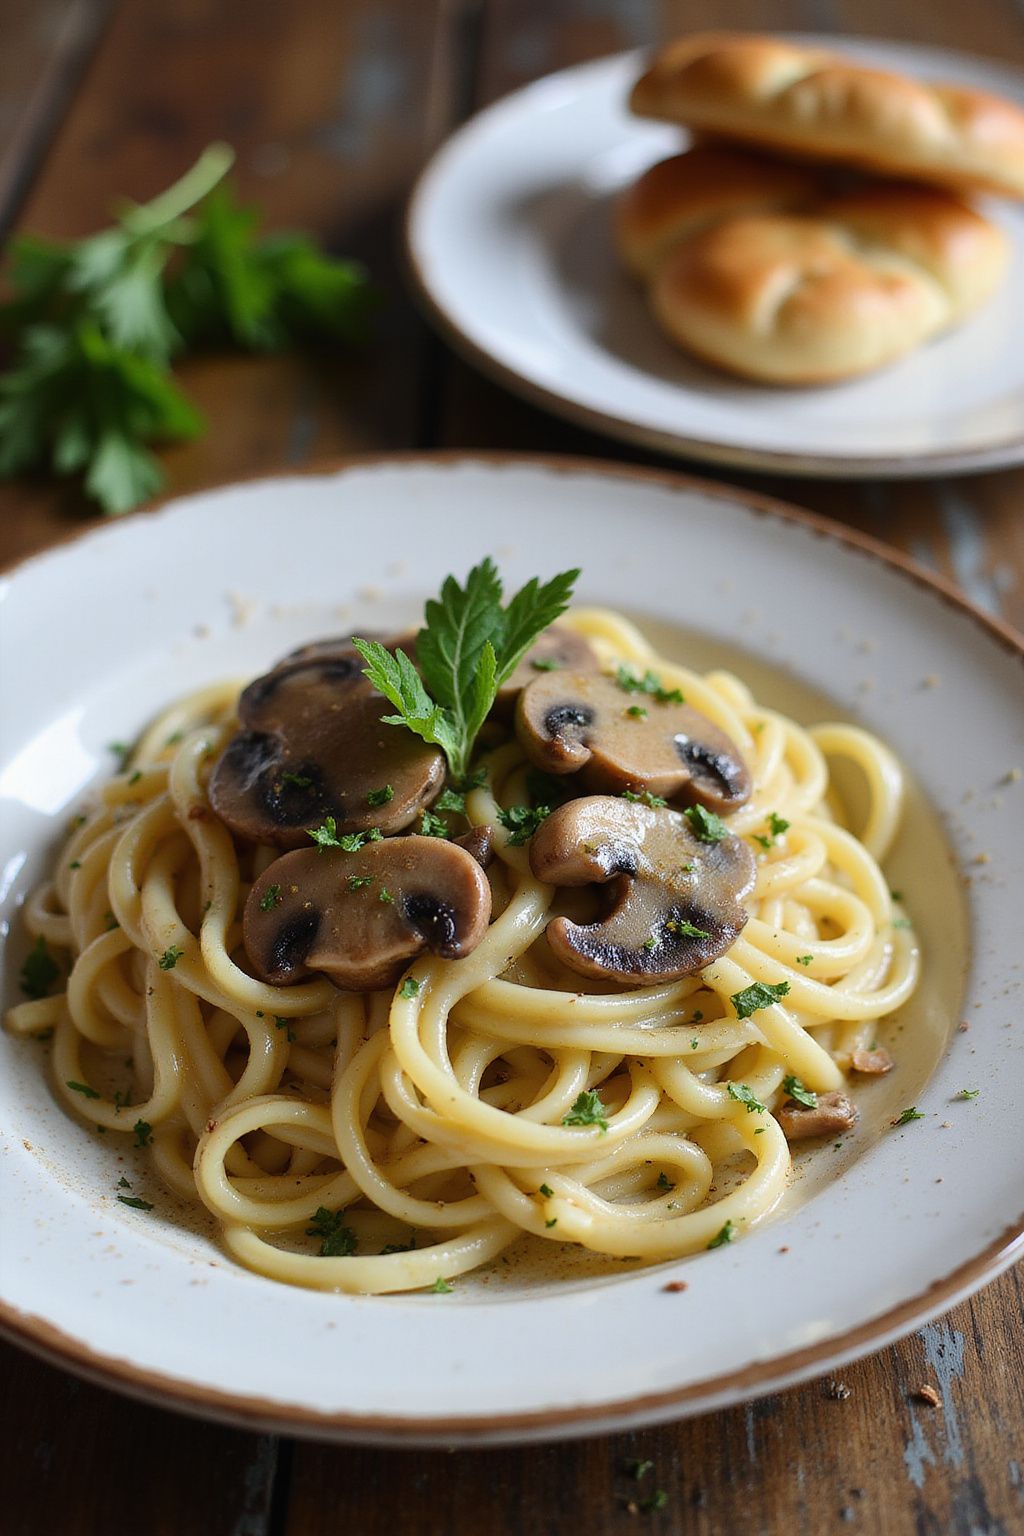
Wild Mushroom and Truffle Oil Pasta is a delicious and easy-to-make dish that will impress anyone at your dinner table. The earthy flavors of wild mushrooms combined with the luxurious touch of truffle oil create a perfect balance in this pasta dish!
Prep Time: 10 minutes
Cook Time: 15 minutes
Total Time: 25 minutes
Servings: 4
Ingredients:
- 8 oz spaghetti or fettuccine
- 2 tbsp olive oil
- 2 cups mixed wild mushrooms (like shiitake, cremini, and oyster), chopped
- 3 cloves garlic, minced
- 1/2 cup heavy cream
- 1/4 cup grated Parmesan cheese
- 2 tbsp truffle oil
- Salt and pepper to taste
- Fresh parsley, chopped, for garnish
Instructions:
Start by bringing a large pot of salted water to a boil. Add the spaghetti or fettuccine and cook according to package instructions until al dente. Drain the pasta, reserving a cup of the pasta water.
In a large skillet, heat olive oil over medium heat. Add the chopped wild mushrooms and sauté them until they are golden brown and tender. This should take about 5-7 minutes.
Next, add the minced garlic to the skillet and cook for another minute, until it becomes fragrant. Then pour in the heavy cream and let it simmer for a couple of minutes.
Add the reserved pasta water gradually, along with the Parmesan cheese, stirring to combine. Then, mix in the cooked pasta and truffle oil. Toss everything together until the pasta is well coated and creamy.
Season with salt and pepper to your liking. Finally, garnish with fresh parsley before serving hot.
Tips:
- You can use any type of pasta you prefer, such as penne or linguine.
- For extra flavor, consider adding a splash of white wine when cooking the mushrooms.
- If you can’t find wild mushrooms, regular mushrooms will work just fine!
Nutrition Facts:
- Calories: 450 per serving
- Protein: 12g
- Carbohydrates: 50g
- Fat: 22g
- Saturated Fat: 10g
- Cholesterol: 50mg
- Sodium: 250mg
6 Beef Wellington with Seasonal Vegetables
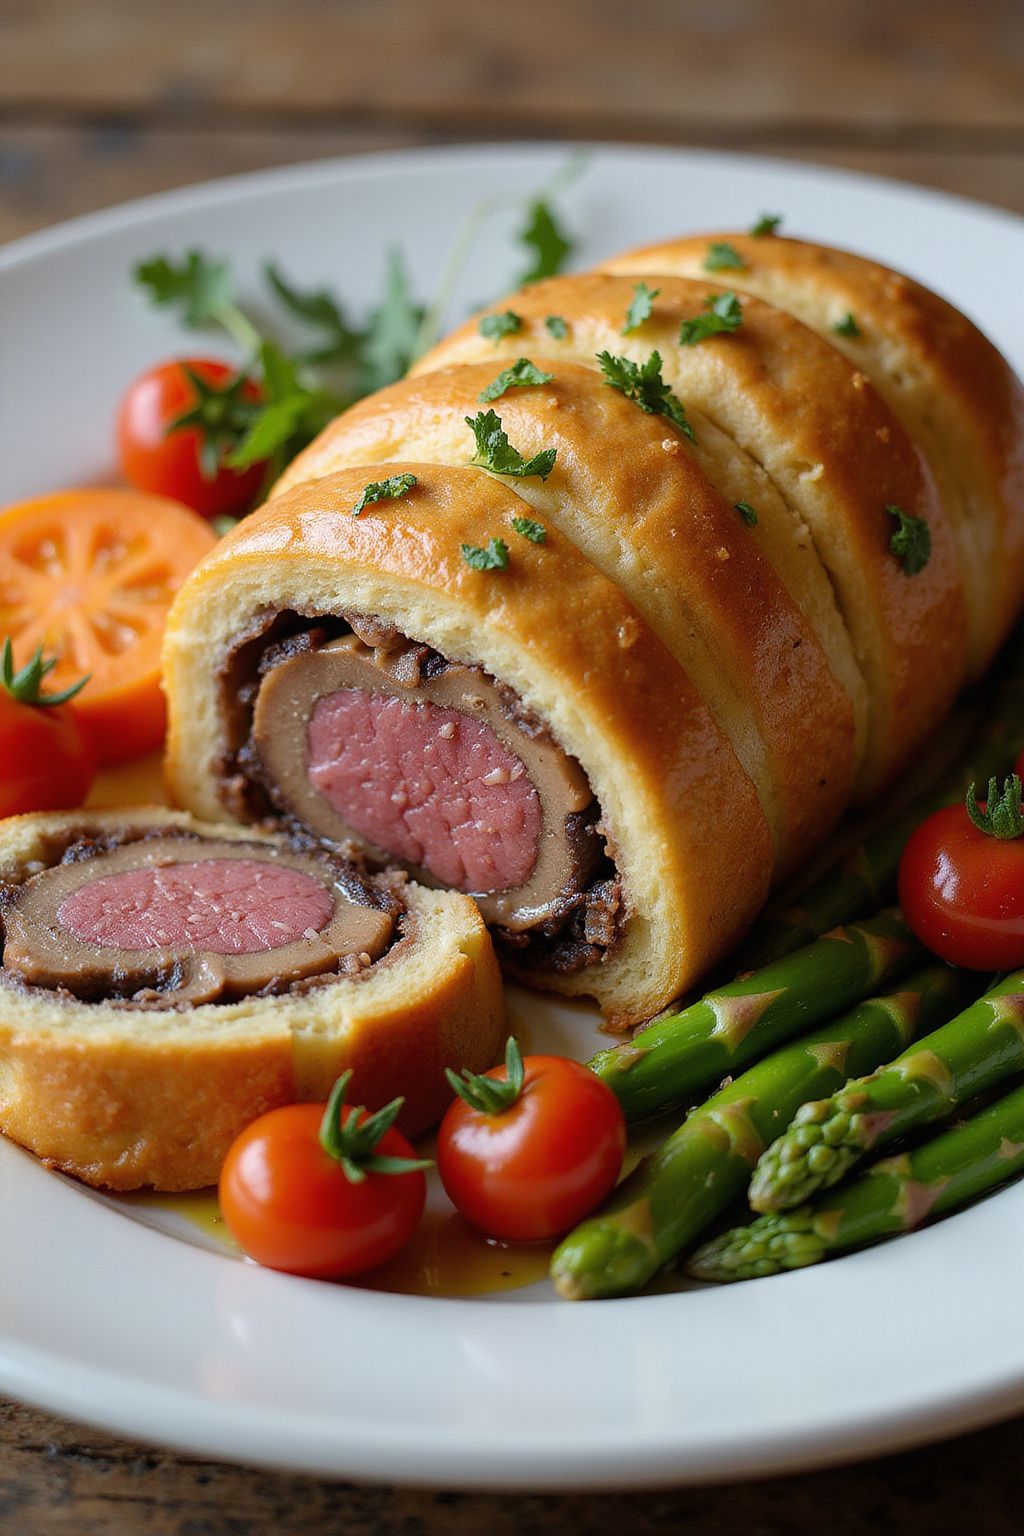
The Beef Wellington with Seasonal Vegetables is a show-stopping dish that is perfect for special occasions or a fancy weekend dinner. This dish features a juicy beef tenderloin wrapped in flaky puff pastry, accompanied by colorful seasonal vegetables. Impress your friends and family with this flavorful meal!
Prep Time: 30 minutes
Cook Time: 45 minutes
Additional Time: 15 minutes
Total Time: 1 hour 30 minutes
Servings: 4
Ingredients:
- 1.5 lbs beef tenderloin
- 8 oz mushrooms, finely chopped
- 4 slices prosciutto
- 2 tbsp Dijon mustard
- 1 sheet puff pastry, thawed
- 1 egg, beaten (for egg wash)
- Salt and pepper to taste
- 1 tbsp olive oil
- 1 bunch asparagus, trimmed
- 2 carrots, sliced
- 1 cup cherry tomatoes
- Fresh herbs (like thyme or rosemary) for garnish
Instructions:
First, preheat your oven to 400°F (200°C). Season the beef tenderloin with salt and pepper. Heat olive oil in a skillet over high heat and sear the beef on all sides for about 2-3 minutes per side until browned.
In the same skillet, add the chopped mushrooms and cook until they release their moisture and become dry. This should take about 5-7 minutes. Remove from heat and let it cool slightly. Once cooled, spread Dijon mustard over the beef.
Lay out the slices of prosciutto on a sheet of plastic wrap, overlapping them slightly. Spread the mushroom mixture over the prosciutto and place the beef in the center. Roll it tightly using the plastic wrap and refrigerate for about 10 minutes.
On a floured surface, roll out the puff pastry to fit around the beef. Unwrap the beef and place it in the center of the pastry. Fold the pastry over the beef, sealing the edges well. Brush the top with the beaten egg for a golden color.
Place the wrapped beef on a baking sheet and bake for 25-30 minutes until the pastry is golden brown. While the beef is baking, prepare the seasonal vegetables. Toss the asparagus, carrots, and cherry tomatoes with olive oil, salt, and pepper. Roast them in the oven for about 15 minutes or until they are tender.
Once the Beef Wellington is done, let it rest for 15 minutes before slicing. Serve slices of the beef with a side of roasted seasonal vegetables, garnished with fresh herbs. Enjoy your elegant meal!
Tips:
- For extra flavor, add garlic to the mushroom mixture or herbs to the vegetables.
- Make sure to cook the vegetables until they are just tender; they should still have a bit of crunch.
- If you have leftovers, store them in an airtight container in the fridge for up to 3 days.
Nutrition Facts:
- Calories: 600
- Protein: 40g
- Carbohydrates: 30g
- Fat: 35g
- Fiber: 4g
- Sodium: 800mg
7 Herb-Crusted Rack of Lamb with Mint Chimichurri
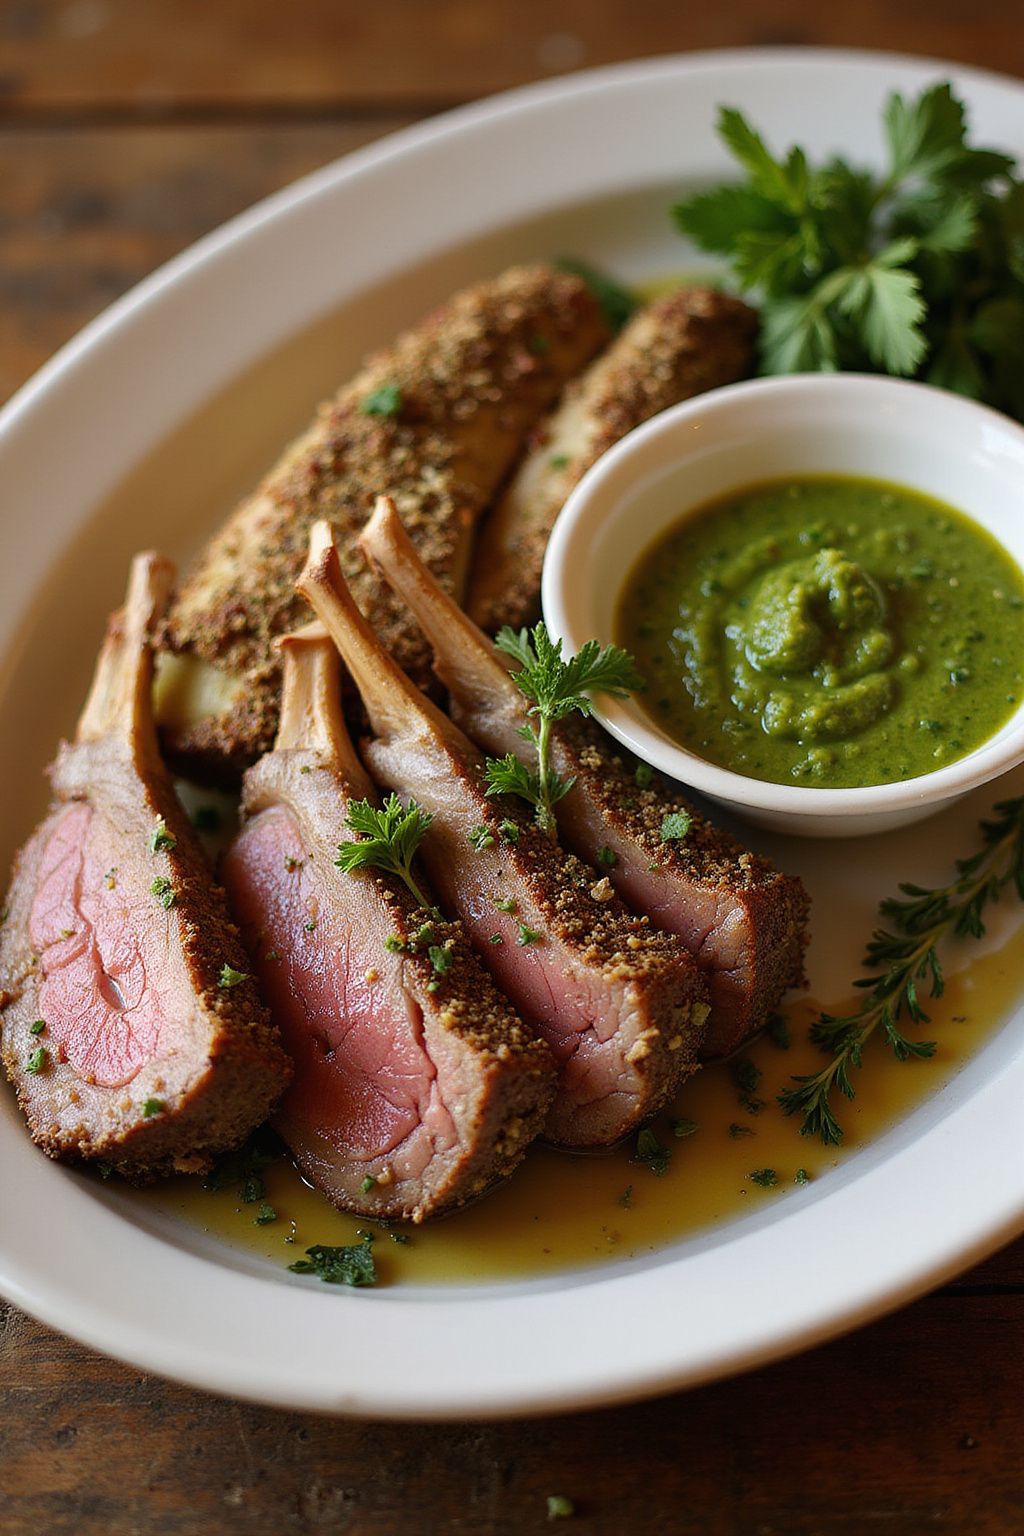
This Herb-Crusted Rack of Lamb with Mint Chimichurri is perfect for a special dinner. The juicy lamb, coated with fresh herbs, pairs beautifully with the refreshing mint sauce. Your guests will be impressed by the flavors!
Prep Time: 20 minutes
Cook Time: 25 minutes
Additional Time: 10 minutes
Total Time: 55 minutes
Servings: 4
Ingredients:
- 1 rack of lamb (about 1.5 pounds)
- 2 tablespoons olive oil
- 2 teaspoons garlic powder
- 1 tablespoon fresh rosemary, chopped
- 1 tablespoon fresh thyme, chopped
- 1 tablespoon fresh parsley, chopped
- **Salt and pepper to taste
For Mint Chimichurri:
- 1/2 cup fresh mint leaves, chopped
- 1/2 cup fresh parsley, chopped
- 1 garlic clove, minced
- 1/4 teaspoon red pepper flakes
- 1/4 cup olive oil
- 2 tablespoons red wine vinegar
- **Salt to taste
Instructions:
Start by preheating your oven to 400°F (200°C). While the oven heats, trim any excess fat from the rack of lamb. Rinse and pat it dry with paper towels.
Next, season the lamb with salt and pepper. In a small bowl, mix olive oil, garlic powder, rosemary, thyme, and parsley. Rub this herb mixture all over the lamb, making sure to coat it evenly.
Now, heat an oven-safe skillet over medium-high heat. Once hot, place the lamb in the skillet and sear it for about 2-3 minutes on each side, until it is nicely browned. This helps lock in all the flavors.
Transfer the skillet to the preheated oven. Roast the lamb for 15-20 minutes or until a meat thermometer reads 135°F (57°C) for medium-rare. Once done, take it out of the oven and let it rest for 10 minutes before slicing.
While the lamb rests, prepare the mint chimichurri. In a mixing bowl, combine the chopped mint, parsley, minced garlic, and red pepper flakes. Stir in olive oil and red wine vinegar, then add salt to taste. This bright sauce will complement the rich lamb perfectly.
Slice the rack into individual chops and serve it with the mint chimichurri on the side. Enjoy your elegant meal!
Tips:
- For extra flavor, marinate the lamb in the herb mixture for a few hours or overnight.
- Serve with sides like roasted vegetables or mashed potatoes for a complete meal.
- Leftovers can be stored in the refrigerator and are great in salads or sandwiches.
Nutrition Facts:
- Calories: 350 per serving
- Protein: 24g
- Carbohydrates: 2g
- Fat: 28g
- Saturated Fat: 10g
- Fiber: 1g
- Sugar: 1g
8 Seared Scallops with Cauliflower Purée
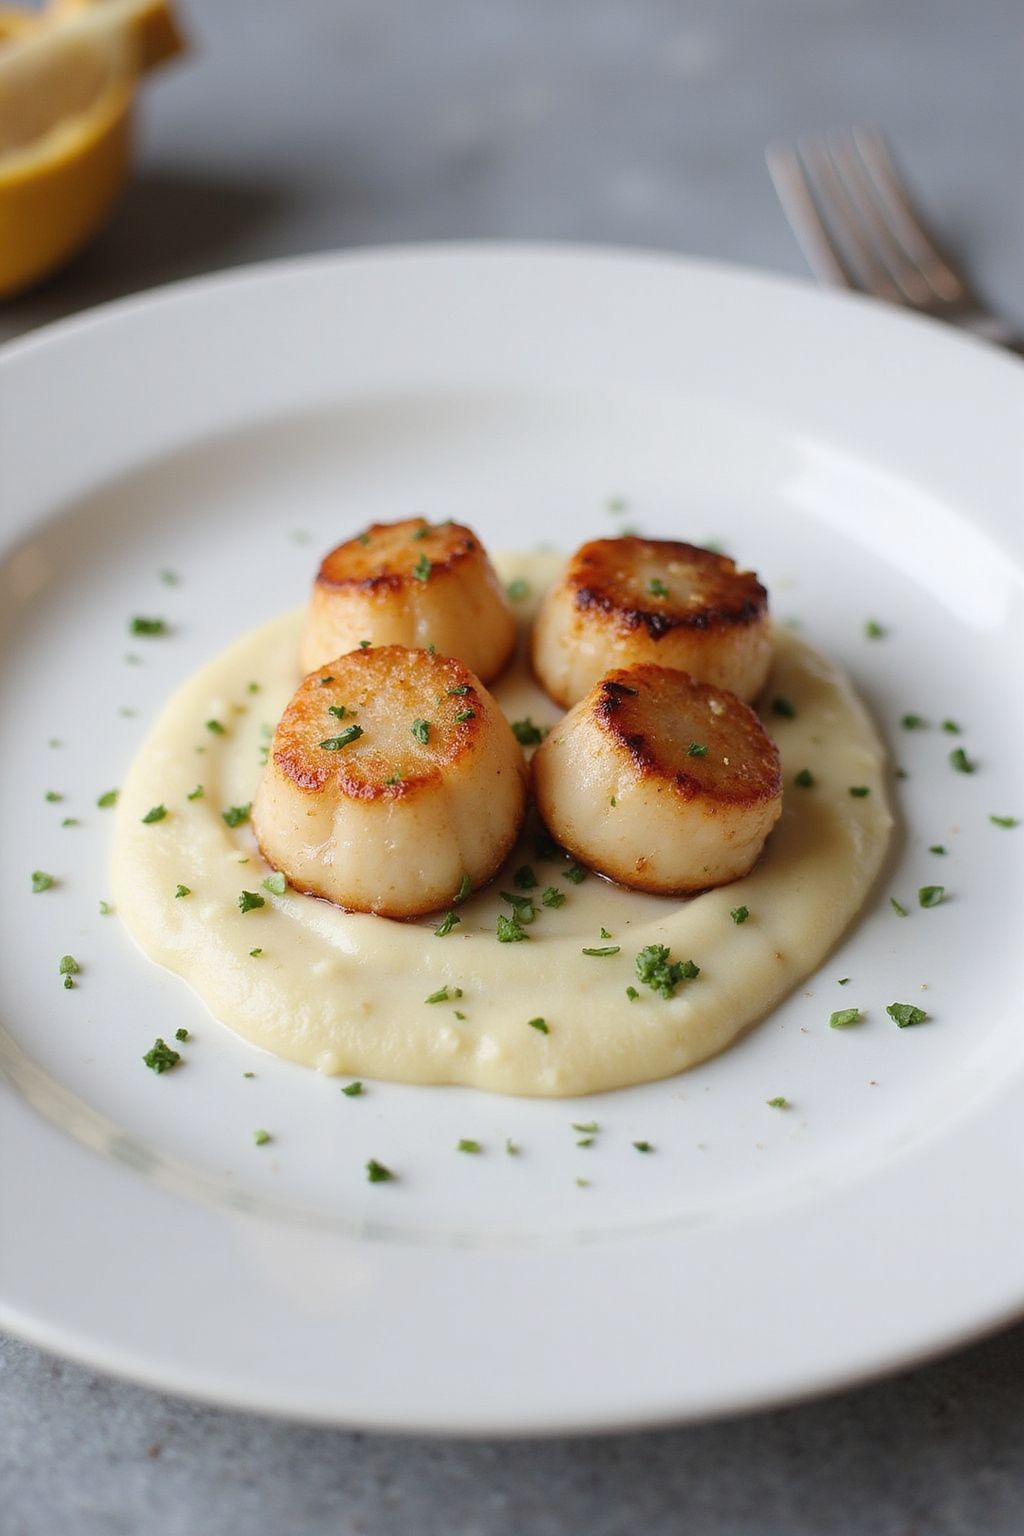
Seared Scallops with Cauliflower Purée is a delicious and elegant dish that will impress anyone at the dinner table. The rich, smooth cauliflower purée perfectly complements the sweet, golden seared scallops. It’s not only tasty but also quite easy to prepare!
Prep Time: 15 minutes
Cook Time: 10 minutes
Total Time: 25 minutes
Servings: 4
Ingredients:
- 1 head of cauliflower, chopped into florets
- 2 tablespoons of olive oil
- 1 garlic clove, minced
- 1/2 cup of heavy cream
- Salt and pepper to taste
- 1 pound of scallops, patted dry
- 2 tablespoons of butter
- Fresh herbs (like parsley or chives) for garnish
Instructions:
Start by bringing a large pot of salted water to a boil. Add the cauliflower florets and cook until they are tender, which should take about 8-10 minutes. Once cooked, drain the cauliflower and transfer it to a blender.
In the blender, combine the cauliflower with the olive oil, minced garlic, and heavy cream. Blend until the mixture is smooth and creamy. Add salt and pepper to taste and set aside.
Next, prepare the scallops. Pat them dry with a paper towel to ensure a good sear. Heat a large skillet over medium-high heat, and add the butter. Once melted and sizzling, carefully place the scallops in the skillet.
Cook the scallops for about 2-3 minutes on each side, or until they are golden brown and opaque. Avoid overcrowding the skillet to achieve a perfect sear. Once done, remove the scallops from the pan and set them aside.
To serve, spoon a generous amount of the cauliflower purée onto each plate. Place the seared scallops on top and sprinkle with fresh herbs for an added touch of flavor and color.
Tips:
- Choose scallops that are dry (not treated with preservatives) for the best flavor.
- Make sure the skillet is hot before adding the scallops to achieve that perfect golden crust.
- Feel free to add a splash of lemon juice to the purée for a zesty twist.
Nutrition Facts:
- Calories: 350
- Protein: 28g
- Carbohydrates: 15g
- Fat: 20g
- Fiber: 4g
9 Duck à l’Orange with Honey Glazed Carrots
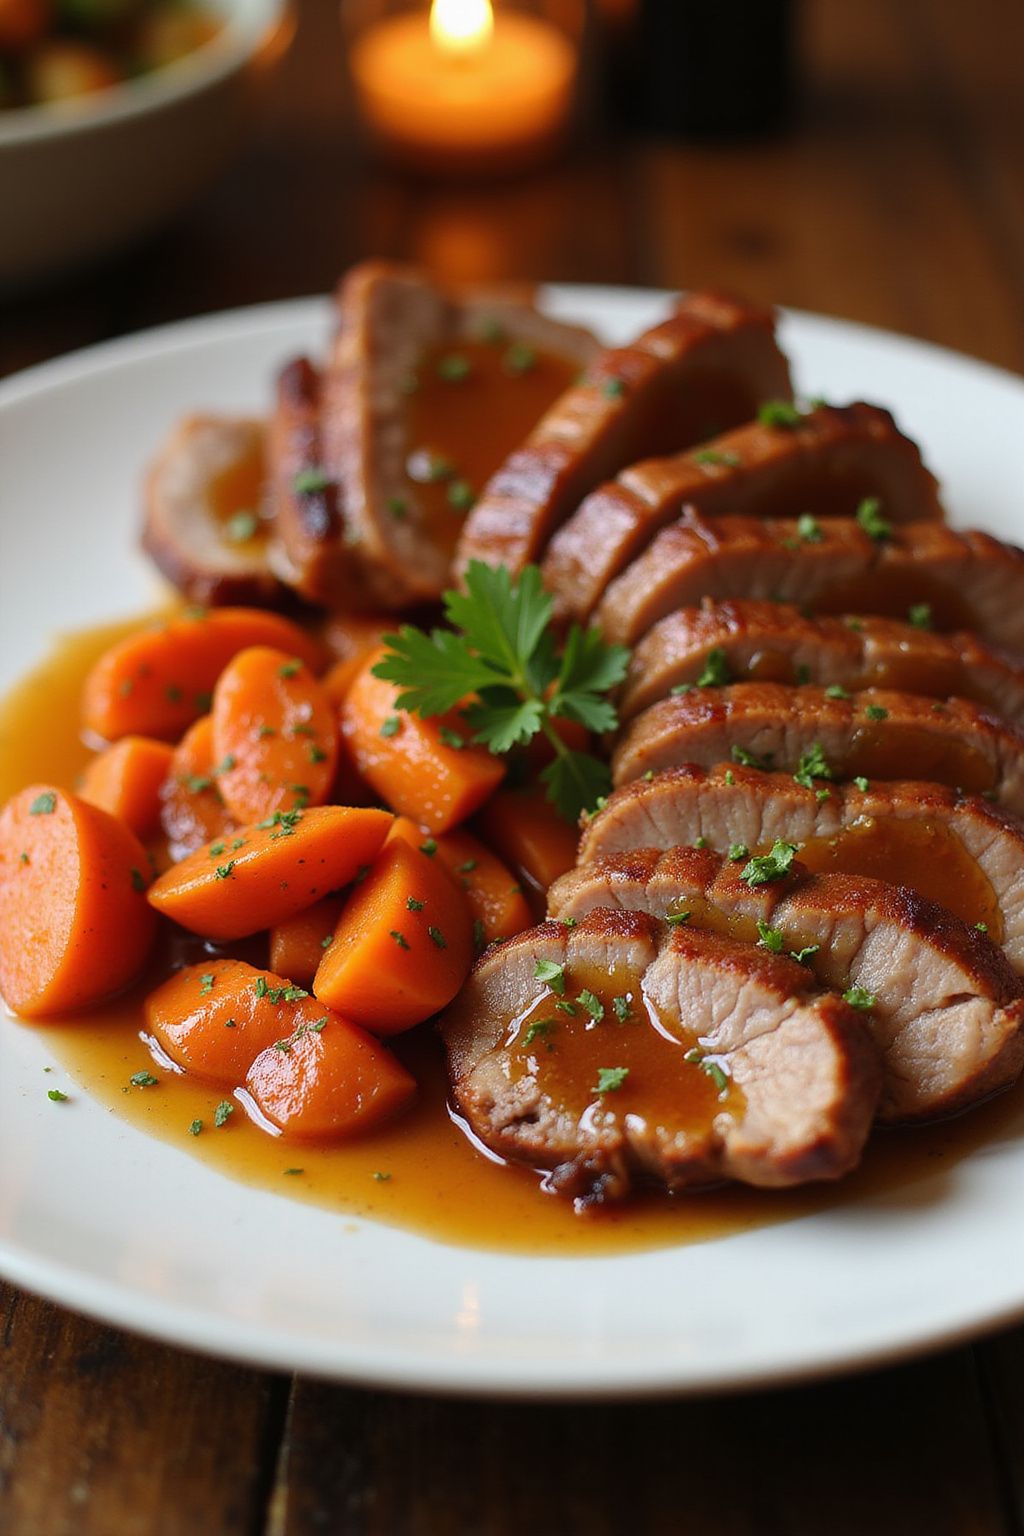
Duck à l’Orange is a classic French dish that brings together the rich flavor of duck with a bright orange sauce. Paired with honey-glazed carrots, this recipe is perfect for an elegant dinner. Impress your friends and family with this delicious meal!
Prep Time: 30 minutes
Cook Time: 1 hour
Additional Time: 10 minutes
Total Time: 1 hour 40 minutes
Servings: 4
Ingredients:
- 4 duck breasts
- Salt and pepper, to taste
- 1 cup orange juice
- 1/2 cup chicken stock
- 1 tablespoon honey
- 1 tablespoon olive oil
- 1 tablespoon butter
- 1 pound carrots, peeled and cut into sticks
- Zest of 1 orange
- 1 tablespoon red wine vinegar
- Fresh parsley, chopped (for garnish)
Instructions:
Start by preheating your oven to 375°F (190°C). Score the skin of the duck breasts in a diamond pattern, being careful not to cut into the meat. Season both sides with salt and pepper.
In a large oven-proof skillet, heat olive oil over medium-high heat. Once the oil is hot, place the duck breasts skin-side down in the skillet. Sear for about 6-8 minutes until the skin is crispy. Flip the duck over and sear for another 2 minutes.
Transfer the skillet to the preheated oven and roast the duck for about 15-20 minutes for medium-rare. Once done, remove the duck from the oven and let it rest for 10 minutes before slicing.
While the duck is resting, prepare the honey-glazed carrots. In a separate pot, melt butter over medium heat. Add the carrots and sauté for about 5 minutes. Pour in the honey and toss the carrots to coat. Sauté until the carrots are tender and glazed, about 5 more minutes.
In the same skillet used for the duck, pour in orange juice, chicken stock, and red wine vinegar. Scrape up any brown bits from the bottom of the pan and let the sauce simmer for about 10 minutes until it thickens slightly. Stir in the orange zest before serving.
Slice the duck breast and serve it alongside the honey-glazed carrots. Drizzle the orange sauce over the duck and garnish with chopped fresh parsley.
Tips:
- For extra flavor, marinate the duck breasts in orange juice and spices for a few hours before cooking.
- If you prefer sweeter carrots, add more honey while sautéing.
- Serve with a side of rice or crusty bread to soak up the delicious sauce.
Nutrition Facts:
- Calories: 550
- Protein: 35g
- Carbohydrates: 34g
- Fat: 35g
- Sodium: 150mg
10 Grilled Vegetable Platter with Balsamic Drizzle
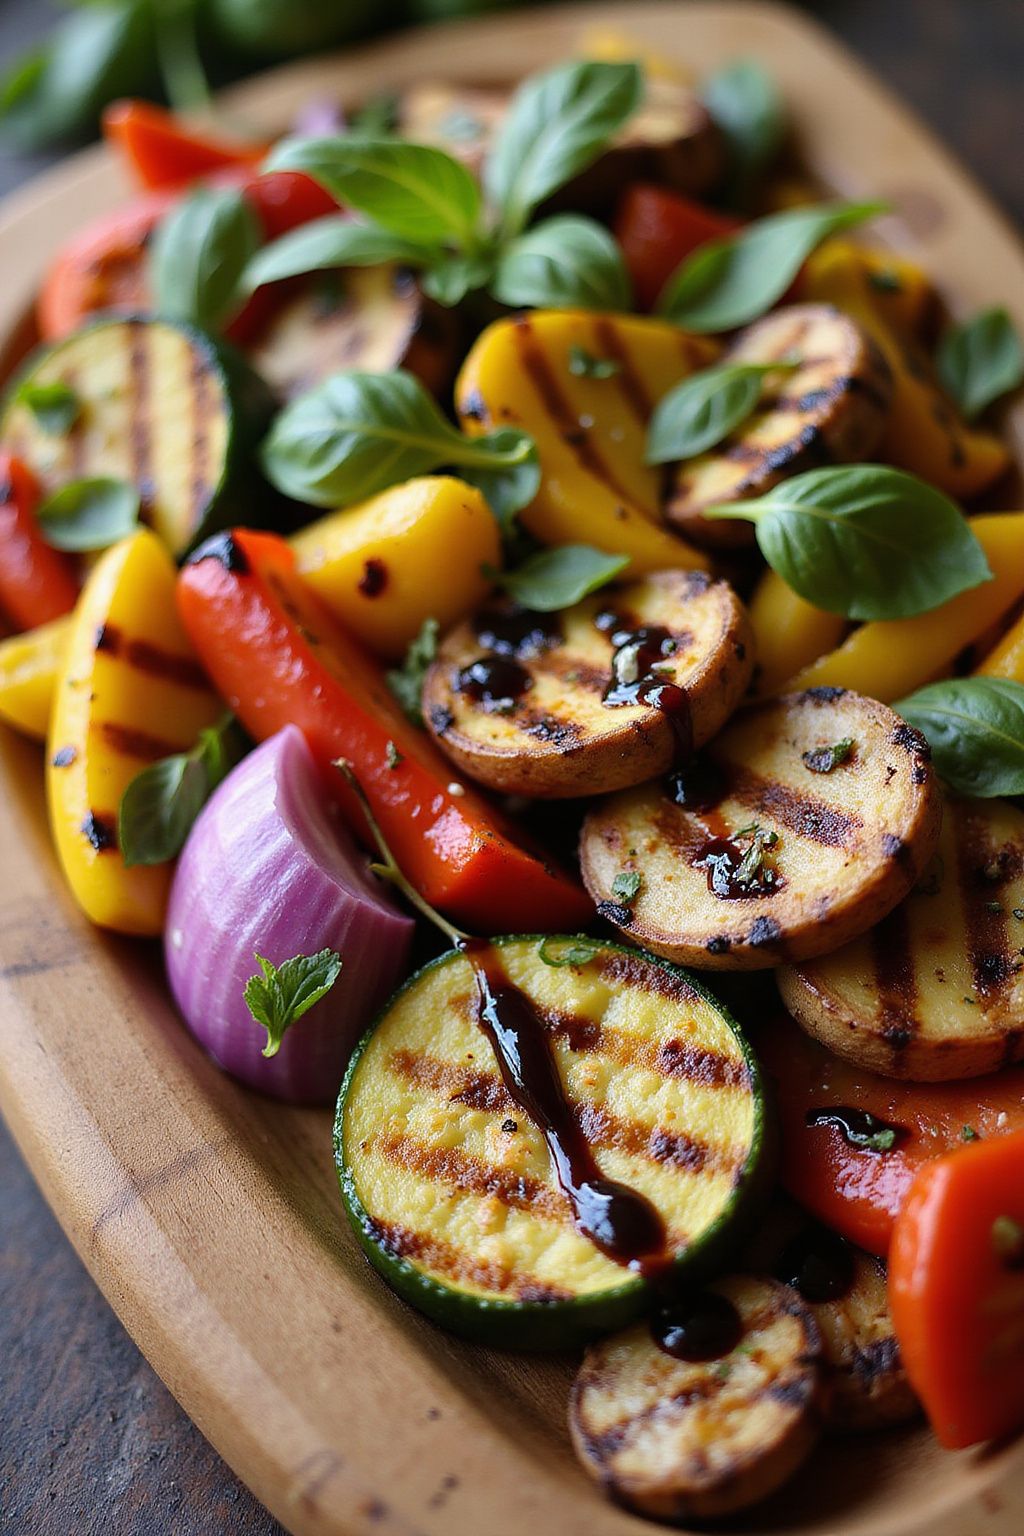
Grilled Vegetable Platter with Balsamic Drizzle is a colorful and healthy dish that’s perfect for any occasion. The smoky flavor of the grilled veggies, combined with a sweet and tangy balsamic drizzle, makes it a delightful addition to your table. It’s easy to prepare, and you can customize it with your favorite vegetables!
Prep Time: 15 minutes
Cook Time: 15 minutes
Total Time: 30 minutes
Servings: 4
Ingredients:
- 2 medium zucchini, sliced
- 1 red bell pepper, cut into strips
- 1 yellow bell pepper, cut into strips
- 1 red onion, cut into wedges
- 8 ounces of mushrooms, cleaned and halved
- 2 tablespoons of olive oil
- Salt and pepper, to taste
- 1/4 cup balsamic vinegar
- 1 tablespoon honey or maple syrup
- Fresh basil leaves, for garnish
Instructions:
Begin by preheating your grill to medium heat. While the grill is heating up, wash and prepare the vegetables. Slice the zucchini, cut the bell peppers, and wedge the red onion. Halve the mushrooms for a perfect bite-sized piece.
In a large bowl, toss the prepared vegetables with olive oil, adding salt and pepper to taste. Ensure each piece is well-coated with oil for a nice char and flavor.
Once the grill is ready, place the vegetables on the grill grates. Cook them for about 10-15 minutes, turning occasionally until they are tender and have nice grill marks. Keep an eye on them to prevent burning.
While the vegetables are grilling, make the balsamic drizzle. In a small saucepan, combine the balsamic vinegar and honey. Bring it to a gentle simmer over low heat, allowing it to reduce for about 5-7 minutes until it thickens slightly.
When the vegetables are done, remove them from the grill and arrange them on a serving platter. Drizzle the balsamic reduction over the top. Finally, garnish with fresh basil leaves for a pop of color and flavor.
Tips:
- You can add other vegetables like asparagus or eggplant for variety.
- For extra flavor, marinate the vegetables in the olive oil and seasoning for 30 minutes before grilling.
- Serve with crusty bread or over quinoa for a complete meal.
Nutrition Facts:
- Calories: 150 per serving
- Fat: 7g
- Carbohydrates: 20g
- Protein: 4g
- Fiber: 5g
11 Elegant Quinoa Salad with Pomegranate and Feta
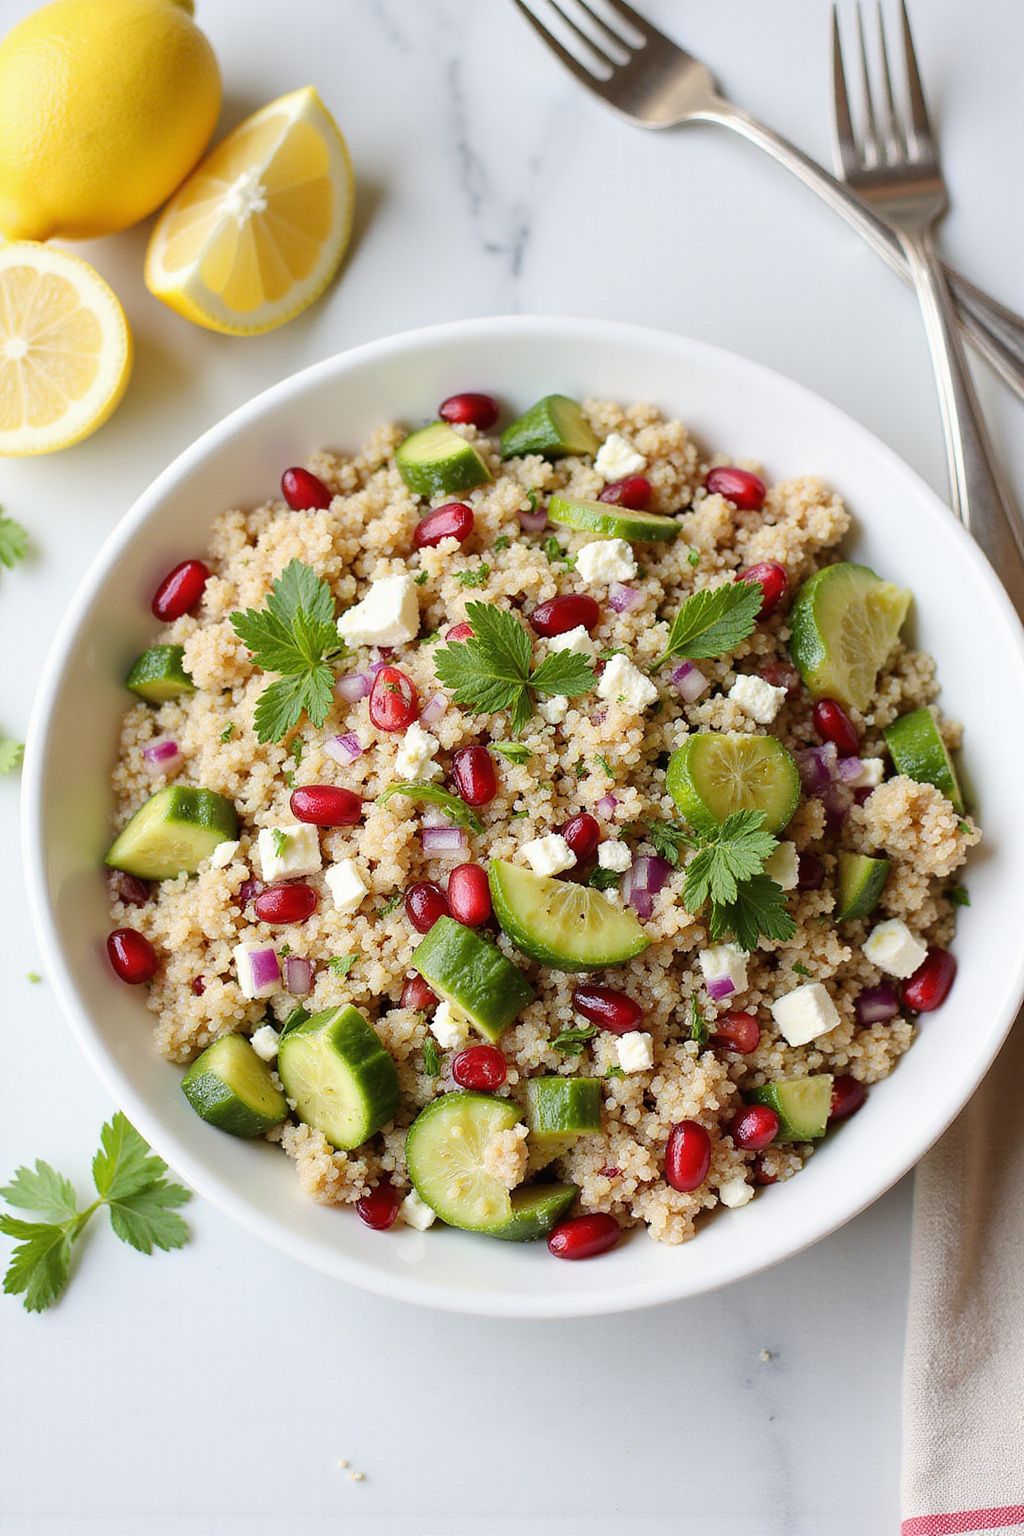
This Elegant Quinoa Salad with Pomegranate and Feta is the perfect dish for any occasion. It’s colorful, tasty, and packed with nutrients. You can serve it as a main dish or a side, and it’s sure to impress your guests!
Prep Time: 15 minutes
Total Time: 15 minutes
Servings: 4
Ingredients:
- 1 cup quinoa, rinsed
- 2 cups water or vegetable broth
- 1 cup pomegranate seeds
- 1/2 cup feta cheese, crumbled
- 1/2 cup cucumber, diced
- 1/4 cup red onion, finely chopped
- 1/4 cup fresh parsley or mint, chopped
- 3 tablespoons olive oil
- 2 tablespoons lemon juice
- Salt and pepper to taste
Instructions:
First, cook the quinoa. In a medium saucepan, combine 1 cup of rinsed quinoa with 2 cups of water or vegetable broth. Bring it to a boil, then reduce heat to low, cover, and simmer for about 15 minutes or until the quinoa is fluffy and the liquid is absorbed. Remove from heat and let it cool.
While the quinoa is cooling, prepare the other ingredients. In a large bowl, add the pomegranate seeds, feta cheese, cucumber, red onion, and fresh herbs.
Next, make the dressing. In a small bowl, whisk together 3 tablespoons of olive oil, 2 tablespoons of lemon juice, and a sprinkle of salt and pepper.
Once the quinoa is cool, fluff it with a fork and add it to the bowl with the other ingredients. Pour the dressing over the salad and mix it gently to combine all the flavors.
Now, your quinoa salad is ready! Serve it fresh or let it chill for about 30 minutes in the refrigerator for the flavors to meld.
Tips:
- To save time, cook the quinoa a day ahead and store it in the fridge.
- For extra crunch, add 1/4 cup of chopped nuts like walnuts or almonds.
- Feel free to substitute the feta for goat cheese or omit it for a vegan version.
Nutrition Facts:
- Calories: 220
- Protein: 8g
- Fat: 12g
- Carbohydrates: 24g
- Fiber: 5g
- Sugar: 2g
12 Poached Pears in Wine with Mascarpone
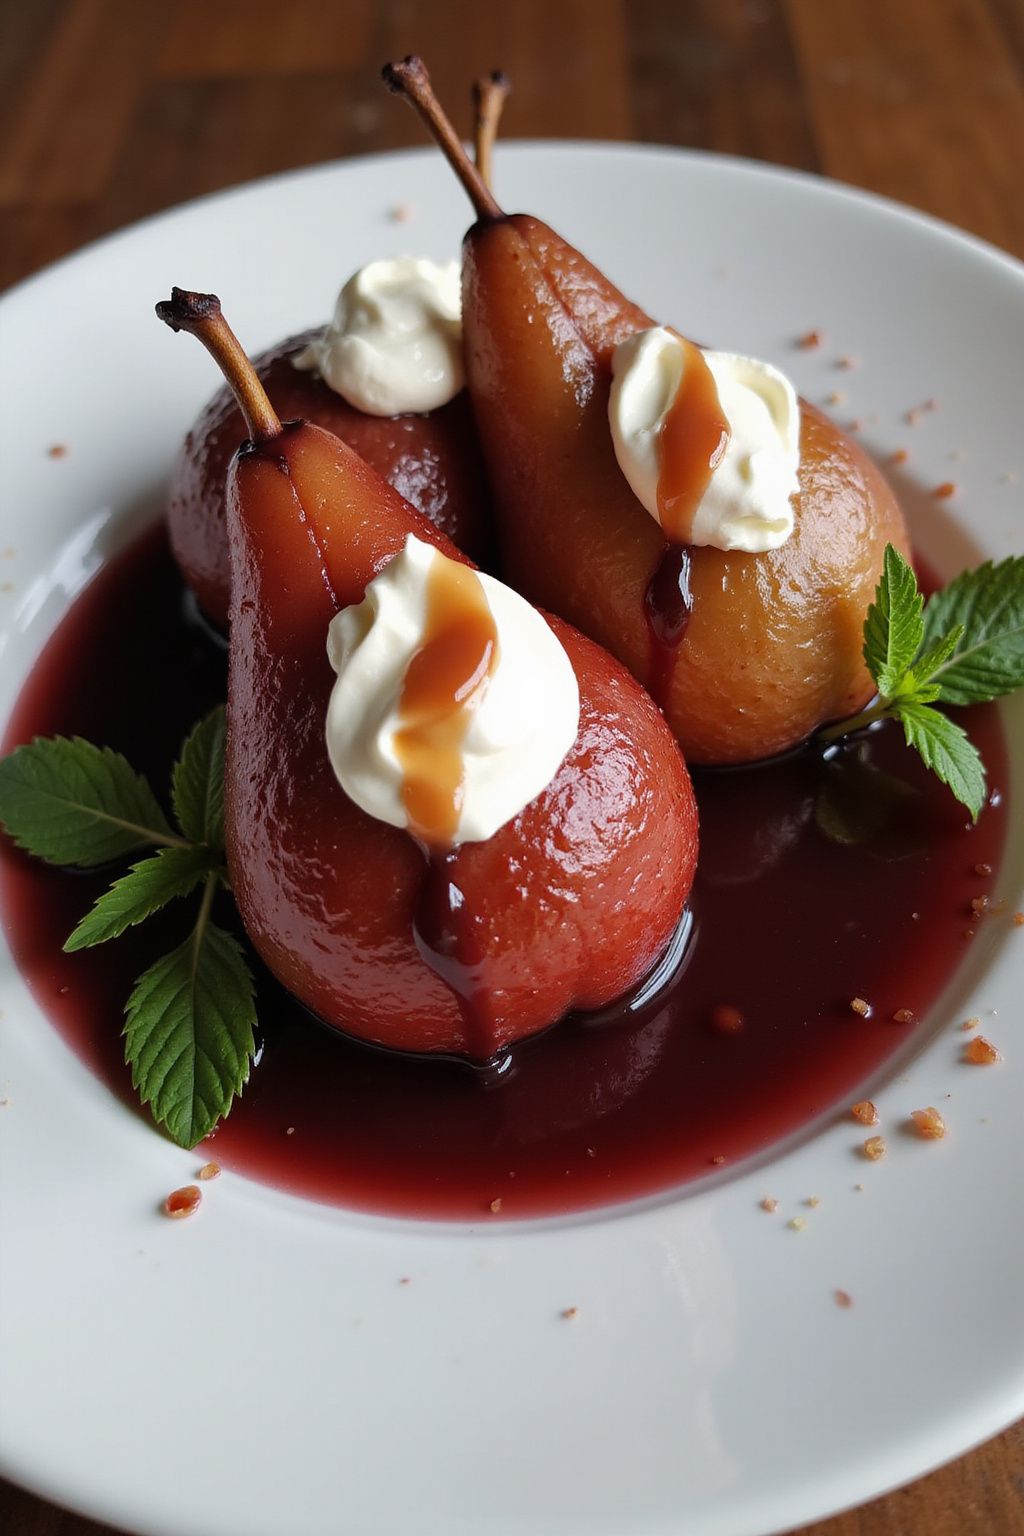
Poached pears in wine with mascarpone is a delightful dessert that brings elegance to any dinner table. The sweet, soft pears soak up the rich flavors of the wine, while the creamy mascarpone adds a luxurious touch. This recipe is simple yet impressive, perfect for impressing your guests or enjoying a special night.
Prep Time: 15 minutes
Cook Time: 20 minutes
Additional Time: 1 hour (for cooling)
Total Time: 1 hour 35 minutes
Servings: 4
Ingredients:
- 4 medium-sized Bosc pears, peeled and stemmed
- 2 cups red wine (such as Merlot or Cabernet Sauvignon)
- 1 cup sugar
- 1 cup water
- 1 cinnamon stick
- 2-3 whole cloves
- Zest of 1 orange
- 1 cup mascarpone cheese
- 1 tablespoon honey (optional, for sweetening mascarpone)
- Fresh mint leaves for garnish (optional)
Instructions:
Start by preparing the poaching liquid. In a medium saucepan, combine red wine, sugar, water, cinnamon stick, whole cloves, and orange zest. Stir the mixture and bring it to a gentle boil over medium heat.
Once it’s boiling, reduce the heat to low and let the liquid simmer for about 5 minutes. This will allow the flavors to combine beautifully. While the mixture is simmering, prepare your pears.
Carefully add the peeled pears to the pot. Make sure they are submerged in the wine liquid. Cook the pears for about 15-20 minutes, or until they are tender. You can test their doneness by inserting a knife; they should be soft but not mushy.
When the pears are ready, remove the saucepan from heat. Carefully transfer the pears to a serving dish using a slotted spoon. Allow the poaching liquid to cool for about 10 minutes. Then, strain the liquid to remove the spices and zest, and pour it back over the pears. Let everything cool at room temperature for about 1 hour.
Meanwhile, in a small bowl, mix the mascarpone cheese with honey if you prefer a sweeter taste. Once the pears have cooled, serve them alongside a generous dollop of mascarpone and a drizzle of the wine liquid. Garnish with fresh mint leaves if desired.
Tips:
- You can serve the pears warm or chilled, depending on your preference.
- Feel free to experiment with different spices like star anise or nutmeg for added flavor.
- For a fun twist, try serving the poached pears with vanilla ice cream instead of mascarpone.
Nutrition Facts:
- Serving Size: 1 pear with mascarpone
- Calories: 250
- Total Fat: 8g
- Saturated Fat: 5g
- Cholesterol: 30mg
- Sodium: 70mg
- Total Carbohydrates: 42g
- Dietary Fiber: 3g
- Sugars: 30g
- Protein: 2g
13 Chocolate Lava Cake with Raspberry Coulis
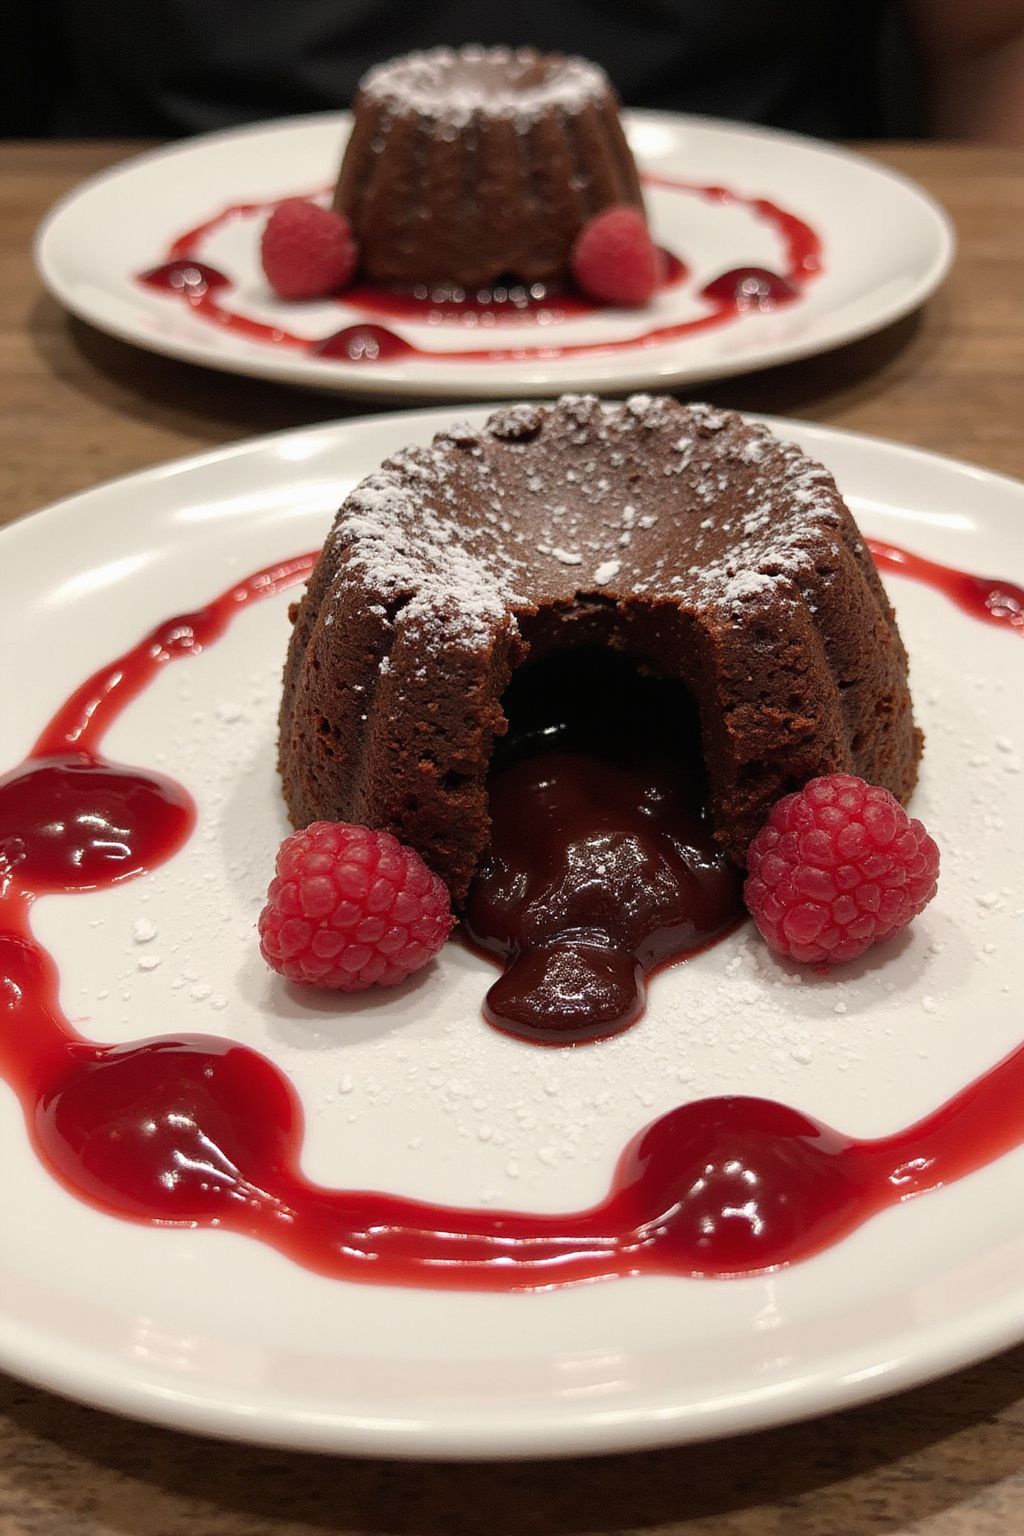
Get ready to delight your taste buds with this rich and gooey Chocolate Lava Cake paired with the tangy sweetness of Raspberry Coulis. This dessert is perfect for a special occasion or just a treat for yourself. It’s easier to make than you think and will impress everyone at your table!
Prep Time: 15 minutes
Cook Time: 12 minutes
Additional Time: 5 minutes
Total Time: 32 minutes
Servings: 4
Ingredients:
- 1/2 cup unsalted butter
- 1 cup semi-sweet chocolate chips
- 2 large eggs
- 2 large egg yolks
- 1/2 cup granulated sugar
- 1 teaspoon vanilla extract
- 1/4 cup all-purpose flour
- Pinch of salt
Instructions:
Start by preheating your oven to 425°F (220°C). This will ensure your cakes bake evenly.
Next, prepare your ramekins by greasing them with some butter and lightly dusting them with cocoa powder. This helps the cakes release easily after baking.
In a microwave-safe bowl, melt the butter and chocolate chips together. Heat them in 30-second intervals, stirring in between until the mixture is completely smooth.
In another bowl, whisk together the eggs, egg yolks, and granulated sugar until it becomes light and fluffy. Stir in the melted chocolate mixture and vanilla extract until well combined.
Gently fold in the all-purpose flour and a pinch of salt into the chocolate mixture. Be careful not to overmix, as you want to keep the batter light and airy.
Pour the batter evenly into your prepared ramekins. Place them on a baking sheet and bake for 12 minutes. The edges should be firm, but the center should still be soft and jiggly.
While the cakes are baking, prepare the raspberry coulis. In a small saucepan, combine 1 cup of fresh raspberries and 1/4 cup of sugar over medium heat. Cook for about 5 minutes, stirring gently, until the raspberries break down. Strain the mixture through a fine sieve to remove the seeds, and set it aside to cool.
Once the cakes are done, let them sit for 5 minutes. Carefully invert them onto plates. Serve with raspberry coulis drizzled over the top.
Tips:
- Make sure to prepare the ramekins properly to prevent sticking.
- For a richer flavor, try using dark chocolate instead of semi-sweet.
- You can prepare the coulis a day in advance and store it in the refrigerator.
Nutrition Facts:
- Calories: 300
- Total Fat: 20g
- Saturated Fat: 12g
- Cholesterol: 120mg
- Sodium: 150mg
- Total Carbohydrates: 34g
- Dietary Fiber: 2g
- Sugars: 20g
- Protein: 4g
14 Vanilla Bean Crème Brûlée with Fresh Berries

This Vanilla Bean Crème Brûlée with Fresh Berries is a delicious treat that’s sure to impress your guests. The creamy custard paired with a crunchy caramelized top and fresh berries makes it a perfect dessert for any special occasion.
Prep Time: 20 minutes
Cook Time: 30 minutes
Additional Time: 2 hours (chilling)
Total Time: 2 hours 50 minutes
Servings: 4
Ingredients:
- 2 cups heavy cream
- 1 vanilla bean (or 1 teaspoon vanilla extract)
- 5 large egg yolks
- 1/2 cup granulated sugar (plus more for topping)
- 1/4 teaspoon salt
- Fresh berries (such as strawberries, raspberries, or blueberries) for serving
Instructions:
Preheat your oven to 325°F (160°C). Start by pouring the heavy cream into a saucepan. If you’re using a vanilla bean, split it in half lengthwise and scrape out the seeds. Add both the seeds and the pod to the cream. Heat the mixture over medium heat until it just begins to bubble, then remove it from the heat.
In a separate bowl, whisk together the egg yolks, granulated sugar, and salt until the mixture becomes pale and thick. Slowly pour the warm cream mixture into the egg yolk mixture while whisking constantly. This helps to temper the yolks. Remove the vanilla pod if you used one.
Next, pour the custard mixture into ramekins (small oven-safe dishes). Place these ramekins in a baking dish and fill the dish with hot water until it reaches halfway up the sides of the ramekins. Bake in the oven for about 30 minutes or until the custards are set but still slightly jiggly in the center.
Remove the ramekins from the water and let them cool down to room temperature. Once cool, cover them with plastic wrap and chill in the refrigerator for at least 2 hours.
When you’re ready to serve, sprinkle a thin layer of granulated sugar on top of each custard. Use a kitchen torch to caramelize the sugar until it forms a crunchy crust. If you don’t have a torch, you can place them under the broiler for a few minutes, but watch carefully to avoid burning.
Top the crème brûlée with fresh berries, and enjoy!
Tips:
- For extra flavor, add a pinch of cinnamon or orange zest to the custard mixture.
- Make sure to chill the custards properly to achieve a creamy texture.
- Don’t add too much sugar on top; a thin layer will caramelize better.
Nutrition Facts:
- Calories: 400
- Total Fat: 32g
- Saturated Fat: 19g
- Cholesterol: 200mg
- Sodium: 150mg
- Total Carbohydrates: 30g
- Sugars: 20g
- Protein: 6g
15 Classic Bouillabaisse with Garlic Bread

Bouillabaisse is a delicious fish stew from the South of France that brings a taste of the sea right to your table. It’s packed with fresh seafood and flavored with herbs and spices. Paired with crispy garlic bread, it makes for an impressive dish to serve at dinner!
Prep Time: 30 minutes
Cook Time: 40 minutes
Additional Time: 10 minutes
Total Time: 1 hour 20 minutes
Servings: 4
Ingredients:
- 2 tablespoons olive oil
- 1 onion, chopped
- 2 cloves garlic, minced
- 1 fennel bulb, chopped
- 1 teaspoon saffron threads
- 1 teaspoon orange zest
- 1 can (14 oz) crushed tomatoes
- 4 cups fish stock
- 1/2 cup white wine
- 1 pound assorted seafood (like shrimp, mussels, and white fish)
- Salt and pepper to taste
- Fresh parsley, chopped, for garnish
Garlic Bread:
- 1 loaf of French bread
- 4 tablespoons butter, softened
- 3 cloves garlic, minced
- 1 tablespoon fresh parsley, chopped
Instructions:
Start by heating olive oil in a large pot over medium heat. Add the chopped onion and sauté until it becomes soft, about 5 minutes. Next, mix in the minced garlic and fennel, cooking for another 3 minutes until fragrant.
Now, it’s time to add the saffron threads and orange zest. Stir everything together and let the flavors blend for about a minute. Then, pour in the crushed tomatoes, fish stock, and white wine. Bring this mixture to a gentle boil, and reduce the heat. Let it simmer for 20 minutes to develop the flavors.
While the bouillabaisse simmers, prepare the garlic bread. Preheat your oven to 375°F (190°C). In a bowl, combine softened butter, minced garlic, and chopped parsley. Slice the French bread in half lengthwise and spread the garlic butter mixture evenly on both halves. Bake the bread for 10 minutes or until golden and crispy.
Once the bouillabaisse has simmered, add your assorted seafood to the pot. Cook for another 5-7 minutes, or until the seafood is fully cooked. Season with salt and pepper to taste.
Serve the bouillabaisse hot, garnished with fresh parsley, alongside your warm garlic bread.
Tips:
- Feel free to use any combination of seafood that you enjoy. Just make sure it’s fresh!
- For extra flavor, add a pinch of red pepper flakes to the broth for a little heat.
- Squeeze some fresh lemon juice over the bouillabaisse before serving for an added zing!
Nutrition Facts:
- Calories: 450 per serving
- Protein: 30g
- Fat: 15g
- Carbohydrates: 50g
- Fiber: 3g
- Sugar: 5g