My New Cookbook is Out! Check Out Now!
15 Homemade Spring Bread Recipes
This page contains affiliate links and I earn a commission if you make a purchase through one of the links, at no cost to you.
Spring is finally here, and that means it’s time to bake up some delightful breads bursting with fresh flavors! If you’re tired of the same old loaves and want to bring a little life to your table, you’re in the right place. Get ready to explore 15 homemade spring bread recipes that are not only easy to make but will also impress your family and friends. Let’s dive into the world of aromatic herbs and fruity delights that celebrate this beautiful season!
Shop Our Must-Haves
No products found.
1 Lavender Lemon Spring Bread

Lavender Lemon Spring Bread is a delightful treat that captures the essence of spring. Its zesty lemon flavor combined with floral lavender makes it perfect for a sunny day. Enjoy a slice with tea or as a sweet snack!
Prep Time: 15 minutes
Cook Time: 30 minutes
Additional Time: 10 minutes
Total Time: 55 minutes
Servings: 8
Ingredients:
- 2 cups all-purpose flour
- 1 cup granulated sugar
- 1 tablespoon dried culinary lavender
- 1 tablespoon baking powder
- ½ teaspoon salt
- 2 large eggs
- 1 cup milk
- ½ cup vegetable oil
- Zest of 1 lemon
- ¼ cup fresh lemon juice
- 1 teaspoon vanilla extract
Instructions:
Start by preheating your oven to 350°F (175°C). Grease a 9×5-inch loaf pan with cooking spray or butter.
In a large mixing bowl, combine flour, sugar, lavender, baking powder, and salt. Whisk these dry ingredients together until they are evenly mixed.
In another bowl, beat the eggs. Then add milk, vegetable oil, lemon zest, lemon juice, and vanilla extract. Mix everything well until smooth.
Now, pour the wet ingredients into the dry ingredients. Stir gently until just combined. Be careful not to overmix; a few lumps are okay!
Pour the batter into the greased loaf pan. Use a spatula to level the top if needed. Bake in the preheated oven for about 30 minutes or until a toothpick inserted in the center comes out clean.
Once done, take the bread out of the oven and let it cool in the pan for about 10 minutes. Then, transfer it to a wire rack to cool completely before slicing.
Tips:
- For a stronger lavender flavor, you can increase the amount of dried lavender to 1.5 tablespoons.
- Serve the bread with lemon glaze for extra sweetness. Just mix powdered sugar and lemon juice!
- Store any leftovers in an airtight container to keep it fresh for up to 3 days.
Nutrition Facts:
- Calories: 200 per slice
- Total Fat: 8g
- Saturated Fat: 1g
- Cholesterol: 38mg
- Sodium: 150mg
- Total Carbohydrates: 30g
- Dietary Fiber: 1g
- Sugars: 10g
- Protein: 3g
2 Fresh Herb Focaccia

Fresh Herb Focaccia is a delicious and fragrant Italian bread that’s perfect for any occasion. The fresh herbs add a burst of flavor, making this focaccia a favorite for gatherings or a simple meal at home. It’s easy to make, and the process fills your kitchen with wonderful aromas!
Prep Time: 20 minutes
Additional Time: 1 hour and 30 minutes
Total Time: 1 hour and 50 minutes
Servings: 12
Ingredients:
- 2 cups warm water (110°F to 115°F)
- 1 packet (2 ¼ teaspoons) active dry yeast
- 4 cups all-purpose flour
- 2 teaspoons salt
- ¼ cup olive oil, plus more for drizzling
- 2 tablespoons fresh rosemary, chopped
- 2 tablespoons fresh thyme, chopped
- 2 tablespoons fresh basil, chopped
- Coarse sea salt for sprinkling
Instructions:
Start by pouring the warm water into a large mixing bowl. Sprinkle the yeast over the water and let it sit for about 5 minutes until foamy. This means the yeast is active and ready to go.
Next, add the flour, salt, and olive oil to the bowl. Mix everything together with a wooden spoon or spatula until the dough begins to come together. It will be a bit sticky, and that’s okay!
Once mixed, transfer the dough onto a floured surface. Knead the dough for about 5-7 minutes until it becomes smooth and elastic. If it’s too sticky, sprinkle a little extra flour as needed.
Shape the kneaded dough into a ball and place it in a greased bowl. Cover the bowl with a clean kitchen towel or plastic wrap, and let the dough rise in a warm place for about 1 hour, or until it doubles in size.
After the dough has risen, preheat your oven to 425°F. Grease a baking sheet with olive oil. Punch down the risen dough gently and turn it out onto the prepared baking sheet. Spread the dough out with your fingers to fit the sheet.
Use your fingers to create dimples all over the surface of the dough. Drizzle a bit more olive oil on top and sprinkle the fresh herbs and coarse sea salt evenly over the dough.
Bake the focaccia in the oven for about 20-25 minutes, until it’s golden brown and sounds hollow when tapped on the bottom. Once done, take it out and let it cool slightly on a wire rack before slicing and serving.
Tips:
- Feel free to mix and match fresh herbs according to your taste. Oregano and parsley also work great!
- Serve your focaccia with olive oil for dipping or slice it for sandwiches.
- Store any leftovers in an airtight container for up to 3 days or freeze for longer storage.
Nutrition Facts:
- Calories: 180
- Protein: 4g
- Carbohydrates: 28g
- Fat: 6g
- Sodium: 200mg
- Fiber: 1g
3 Raspberry Rose Garden Loaf

This Raspberry Rose Garden Loaf is a delightful blend of fruity raspberry and fragrant rose flavors, perfect for a cheerful spring treat. It’s simple to make and will fill your kitchen with a lovely aroma. Enjoy a slice with your afternoon tea or serve it at a garden party!
Prep Time: 20 minutes
Cook Time: 45 minutes
Additional Time: 10 minutes
Total Time: 1 hour 15 minutes
Servings: 8 slices
Ingredients:
- 1 ½ cups all-purpose flour
- 1 teaspoon baking powder
- ½ teaspoon baking soda
- ¼ teaspoon salt
- ½ cup unsalted butter, softened
- 1 cup granulated sugar
- 2 large eggs
- 1 teaspoon vanilla extract
- ½ cup buttermilk
- 1 cup fresh raspberries, gently washed and dried
- 3 tablespoons rose water
- Powdered sugar for dusting (optional)
Instructions:
Preheat your oven to 350°F (175°C) and grease a loaf pan. This will help your bread release easily once it’s baked.
In a mixing bowl, combine the flour, baking powder, baking soda, and salt. Whisk these ingredients together to ensure they are evenly mixed.
In another bowl, cream the softened butter and sugar. Use an electric mixer on medium speed until the mix is light and fluffy. This should take about 3 to 5 minutes.
Add the eggs one at a time, mixing well after each addition. Then add the vanilla extract and rose water to the butter and sugar mixture.
Next, add the dry ingredients gradually, alternating with the buttermilk. Start and end with the flour mixture, mixing just until combined. Be careful not to overmix!
Gently fold in the raspberries. This adds a burst of flavor and color to your loaf.
Pour the batter into the prepared loaf pan and spread it out evenly. Bake in the preheated oven for about 45 minutes, or until a toothpick inserted into the center comes out clean.
Once done, remove the loaf from the oven and let it cool in the pan for 10 minutes. Then, transfer it to a wire rack to cool completely.
When cool, dust with powdered sugar if you like, for an extra touch of sweetness and elegance.
Tips:
- Use fresh raspberries for the best flavor, but frozen ones will work if that’s what you have.
- For a stronger rose flavor, you can add a little more rose water, but do it in small increments to avoid overpowering the loaf.
- Serve the loaf with a dollop of whipped cream or a scoop of vanilla ice cream for a delicious dessert.
Nutrition Facts:
- Calories: 210
- Total Fat: 9g
- Saturated Fat: 5g
- Cholesterol: 50mg
- Sodium: 130mg
- Total Carbohydrates: 30g
- Dietary Fiber: 1g
- Sugars: 15g
- Protein: 3g
4 Honey Almond Blossom Bread

Honey Almond Blossom Bread is a delightful treat that combines the sweetness of honey with the nutty flavor of almonds. This bread is perfect for breakfast or as a snack with tea. With its beautiful blossom shape, it’s sure to impress your family and friends!
Prep Time: 20 minutes
Additional Time: 1 hour 30 minutes
Total Time: 1 hour 50 minutes
Servings: 10
Ingredients:
- 3 cups all-purpose flour
- 1 packet (2 ¼ teaspoons) active dry yeast
- ½ cup warm milk (about 110°F or 43°C)
- ½ cup honey
- ½ cup almond flour
- 1 teaspoon salt
- 1 large egg
- 2 tablespoons unsalted butter (melted)
- ½ teaspoon almond extract
- Sliced almonds for topping
- Honey glaze (optional for serving)
Instructions:
In a large mixing bowl, combine warm milk and active dry yeast. Let it sit for about 5 minutes until it becomes foamy. This step shows that the yeast is active.
Next, add honey, almond flour, salt, egg, melted butter, and almond extract to the yeast mixture. Stir until the mixture is well combined. Then, slowly add all-purpose flour while mixing until a dough forms.
Transfer the dough onto a floured surface and knead it for about 5-7 minutes until it feels smooth and elastic. Place the kneaded dough in a greased bowl, cover it with a damp cloth, and let it rise in a warm place for about 1 hour or until it doubles in size.
Once the dough has risen, punch it down gently to release the air. Divide the dough into smaller portions and shape each into rounds. Then, arrange the rounds in a greased baking dish to form a flower shape. Allow the shaped dough to rise again for 30 minutes.
Preheat your oven to 350°F (175°C). Before baking, sprinkle sliced almonds on top of the dough for a nice crunch. Bake in the preheated oven for about 25-30 minutes, or until the bread is golden brown.
Once done, let the bread cool slightly before serving. Drizzle with honey glaze if desired for extra sweetness.
Tips:
- For an extra almond flavor, you can add chopped almonds into the dough.
- If you prefer a sweeter bread, increase the honey to ¾ cup.
- Serve warm with butter for a delicious treat.
Nutrition Facts:
- Calories: 180 per serving
- Total Fat: 5g
- Saturated Fat: 1g
- Cholesterol: 25mg
- Sodium: 160mg
- Total Carbohydrates: 32g
- Dietary Fiber: 1g
- Sugars: 6g
- Protein: 5g
5 Zesty Citrus Olive Oil Bread

This Zesty Citrus Olive Oil Bread is the perfect blend of flavors that will brighten up your day! With the refreshing notes of citrus and the richness of olive oil, this bread is both delicious and easy to make. Enjoy it warm, with butter or as a base for your favorite toppings.
Prep Time: 15 minutes
Cook Time: 30 minutes
Additional Time: 10 minutes
Total Time: 55 minutes
Servings: 8
Ingredients:
- 2 cups all-purpose flour
- 1 tablespoon baking powder
- 1/2 teaspoon salt
- 1/2 cup extra virgin olive oil
- 1 cup buttermilk
- Zest of 1 large lemon
- Zest of 1 large orange
- 1/4 cup fresh lemon juice
- 1/4 cup fresh orange juice
- 1/4 cup sugar
- 2 large eggs
Instructions:
Start by preheating your oven to 350°F (175°C). Grease a 9×5 inch loaf pan with a little olive oil or non-stick spray so your bread doesn’t stick.
In a large bowl, mix together the flour, baking powder, and salt. Stir them well so the ingredients are evenly combined.
In another bowl, whisk together the olive oil, buttermilk, lemon zest, orange zest, lemon juice, orange juice, sugar, and eggs. It’s important that all the wet ingredients are mixed well to bring out the zesty flavors.
Now, pour the wet mixture into the dry ingredients. Stir gently until just combined; be careful not to overmix. You want the dough to be slightly lumpy.
Pour the batter into the greased loaf pan and smooth the top. Place it in the oven and bake for about 30 minutes, or until the top is golden brown and a toothpick inserted in the center comes out clean.
Once baked, take the bread out of the oven and let it cool in the pan for 10 minutes. Then, transfer the bread to a wire rack to cool completely before slicing.
Tips:
- For an extra burst of flavor, add some chopped walnuts or cranberries to the batter.
- Store the bread in an airtight container to keep it fresh for longer.
- You can serve this bread with honey or jam for a delightful treat.
Nutrition Facts:
- Calories: 180 per slice
- Total Fat: 8g
- Saturated Fat: 1g
- Cholesterol: 30mg
- Carbohydrates: 24g
- Dietary Fiber: 1g
- Sugars: 5g
- Protein: 3g
6 Chive and Cheddar Spring Roll

Chive and Cheddar Spring Rolls are a delightful snack that combines the fresh taste of chives with the rich flavor of cheddar cheese. These crispy rolls are perfect for appetizers or as a fun side dish. Let’s get started on making these tasty treats!
Prep Time: 15 minutes
Total Time: 15 minutes
Servings: 10 spring rolls
Ingredients:
- 10 spring roll wrappers
- 1 cup of shredded cheddar cheese
- 1/2 cup of fresh chives, chopped
- 1 tablespoon of soy sauce
- 1 tablespoon of olive oil (for brushing)
- Cooking oil (for frying)
Instructions:
Begin by gathering all your ingredients on your kitchen counter. This makes it easier to see what you need. Take a bowl and mix the cheddar cheese, chopped chives, and soy sauce together. Make sure everything is well combined.
Next, lay out the spring roll wrappers on a clean, flat surface. It’s best to work with one wrapper at a time. Place a generous spoonful of the cheese and chive mixture in the center of each wrapper.
Now, it’s time to roll. Fold the bottom part of the wrapper over the filling, then fold in the sides, and roll it up tightly. You can use a little water to seal the edge of the wrapper. Repeat this process for all the wrappers until your mixture is gone.
In a frying pan, heat up the cooking oil over medium heat. You’ll want enough oil to cover the bottom of the pan. Once the oil is hot, carefully add the spring rolls in batches. Fry them until they are golden brown and crispy, about 3-4 minutes on each side.
Once cooked, place the spring rolls on a paper towel to drain excess oil. Brush them lightly with olive oil for extra flavor. Serve warm and enjoy your delicious Chive and Cheddar Spring Rolls!
Tips:
- For extra crunch, consider baking the spring rolls instead of frying. Just brush with oil and bake at 400°F for about 15-20 minutes.
- Try adding other herbs like parsley or cilantro for different flavors!
- Serve with a dipping sauce like sweet chili sauce or soy sauce to enhance the taste.
Nutrition Facts:
- Calories: 150 per spring roll
- Protein: 5g
- Total Fat: 9g
- Saturated Fat: 4g
- Carbohydrates: 12g
- Fiber: 1g
- Sugars: 1g
7 Strawberry Basil Sweet Bread

The Strawberry Basil Sweet Bread is a delightful combination of fresh strawberries and fragrant basil. This unique treat is perfect for breakfast or as a sweet snack anytime. The soft, sweet bread will fill your home with an amazing aroma!
Prep Time: 15 minutes
Cook Time: 50 minutes
Additional Time: 15 minutes
Total Time: 1 hour 20 minutes
Servings: 10
Ingredients:
- 2 cups fresh strawberries, chopped
- 1/4 cup fresh basil, chopped
- 1/2 cup unsalted butter, softened
- 1 cup granulated sugar
- 2 large eggs
- 1 teaspoon vanilla extract
- 2 cups all-purpose flour
- 1 tablespoon baking powder
- 1/2 teaspoon salt
- 1/2 cup milk
Instructions:
Start by preheating your oven to 350°F (175°C). Grease a 9×5-inch loaf pan to prepare for the batter.
In a large mixing bowl, cream together the softened butter and granulated sugar until it becomes light and fluffy. This should take about 3 minutes. Next, add the eggs one at a time, mixing well after each addition. Stir in the vanilla extract.
In another bowl, combine the flour, baking powder, and salt. Gradually add this dry mixture to the wet mixture, alternating with the milk, starting and ending with the dry ingredients. Mix until just combined.
Fold in the chopped strawberries and basil gently to ensure they are evenly distributed throughout the batter. Be careful not to overmix as this can make the bread tough.
Pour the batter into your prepared loaf pan and spread it evenly. Bake in the preheated oven for about 50 minutes or until a toothpick inserted in the center comes out clean.
Once baked, remove the bread from the oven and allow it to cool in the pan for 15 minutes. After that, carefully turn it out onto a wire rack to cool completely.
Tips:
- For a sweeter touch, sprinkle a bit of sugar on top of the batter before baking.
- You can substitute dried basil if fresh is not available; however, fresh basil gives the best flavor.
- Serve slices with a bit of butter or cream cheese for an extra treat!
Nutrition Facts:
- Calories: 230 per slice
- Total Fat: 10g
- Saturated Fat: 6g
- Cholesterol: 50mg
- Sodium: 150mg
- Total Carbohydrates: 32g
- Dietary Fiber: 1g
- Sugars: 10g
- Protein: 3g
8 Orange Poppy Seed Loaf

This Orange Poppy Seed Loaf is a delightful treat perfect for spring days. It combines the zesty flavor of oranges with crunchy poppy seeds to create a moist and flavorful bread that everyone will love. Enjoy a slice with tea or coffee for a refreshing snack!
Prep Time: 15 minutes
Cook Time: 50 minutes
Additional Time: 10 minutes (for cooling)
Total Time: 1 hour 15 minutes
Servings: 10
Ingredients:
- 1 ½ cups all-purpose flour
- 1 cup granulated sugar
- 2 teaspoons poppy seeds
- 1 teaspoon baking powder
- ½ teaspoon baking soda
- ¼ teaspoon salt
- ½ cup unsalted butter, softened
- 2 large eggs
- ½ cup plain yogurt
- 1 tablespoon grated orange zest
- ¼ cup fresh orange juice
- 1 teaspoon vanilla extract
Instructions:
Start by preheating your oven to 350°F (175°C). Grease a 9×5 inch loaf pan or line it with parchment paper for easy removal.
In a large mixing bowl, combine the flour, sugar, poppy seeds, baking powder, baking soda, and salt. Stir well to mix all the dry ingredients together.
In another bowl, cream together the butter and the remaining sugar until it becomes light and fluffy. This usually takes about 3-4 minutes.
Next, add in the eggs, yogurt, orange zest, orange juice, and vanilla extract. Mix until everything is well incorporated.
Gradually add the dry ingredients to the wet mixture, stirring gently. Be careful not to overmix; just blend until you see no dry flour lumps.
Pour the batter into the prepared loaf pan. Use a spatula to spread it evenly, making sure to fill the corners of the pan.
Bake the loaf in the preheated oven for about 50 minutes or until a toothpick inserted into the center comes out clean. If the top begins to brown too quickly, you can cover it loosely with aluminum foil.
Once baked, let the loaf cool in the pan for about 10 minutes before transferring it to a wire rack to cool completely. Slice and serve when ready!
Tips:
- For extra orange flavor, drizzle an orange glaze made of powdered sugar and orange juice over the top once cooled.
- You can substitute Greek yogurt for the plain yogurt for a creamier texture.
- Store any leftovers in an airtight container to keep the loaf fresh for several days.
Nutrition Facts:
- Calories: 230 per slice
- Total Fat: 10g
- Saturated Fat: 6g
- Cholesterol: 50mg
- Sodium: 150mg
- Total Carbohydrates: 32g
- Dietary Fiber: 1g
- Sugars: 15g
- Protein: 3g
9 Pea and Mint Whole Wheat Bread
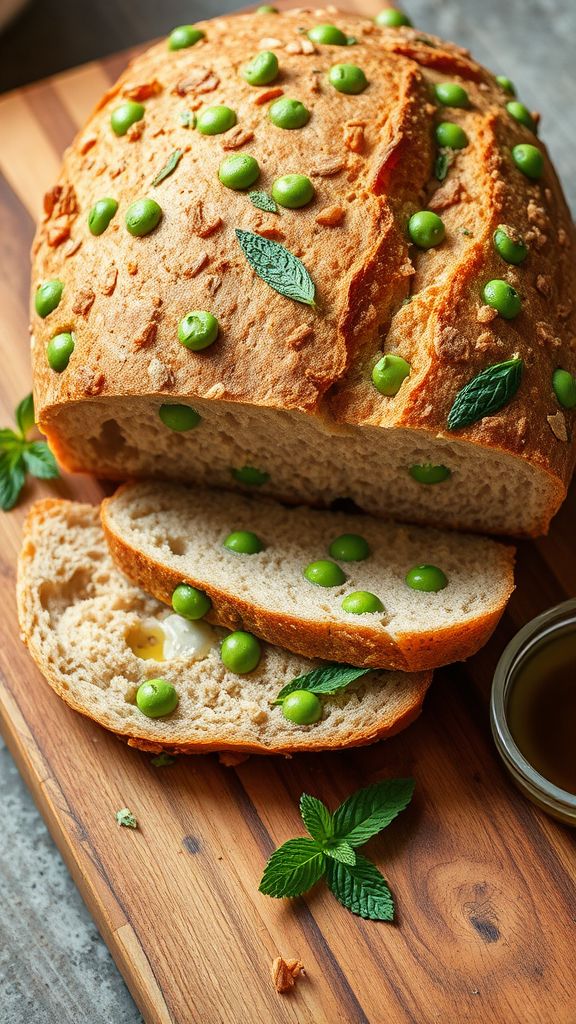
This Pea and Mint Whole Wheat Bread is a delightful blend of flavors that celebrate the freshness of spring. The sweet peas and fragrant mint create a unique taste that pairs perfectly with any meal. This bread is not only delicious but also packed with nutrients, making it a great addition to your family’s table.
Prep Time: 15 minutes
Cook Time: 30 minutes
Additional Time: 1 hour (for rising)
Total Time: 1 hour 45 minutes
Servings: 10 slices
Ingredients:
- 2 cups whole wheat flour
- 1 cup fresh or frozen peas, thawed
- 1/4 cup fresh mint leaves, chopped
- 1 packet (2 1/4 teaspoons) instant yeast
- 1 teaspoon salt
- 1 tablespoon honey or sugar
- 3/4 cup warm water (about 110°F)
- 1 tablespoon olive oil (plus extra for greasing)
Instructions:
Start by mixing the warm water, honey, and yeast in a bowl. Let it sit for about 5 minutes until it’s bubbly. This step activates the yeast, helping your bread rise.
In a separate large mixing bowl, combine the whole wheat flour and salt. Slowly pour the yeast mixture into the flour, followed by the olive oil. Stir until everything is well combined.
Next, add the peas and mint to the dough. It will be a little sticky, so don’t worry! Knead the dough on a floured surface for about 5-7 minutes, until it becomes smooth and elastic.
Once you’re done kneading, shape the dough into a ball and place it in a greased bowl. Cover it with a clean kitchen towel and let it rise in a warm place for about 1 hour, or until it doubles in size.
After the dough has risen, punch it down gently to release any air. Shape it into a loaf and place it in a greased loaf pan. Cover it again with the kitchen towel and let it rise for another 30 minutes.
While the dough is rising, preheat your oven to 375°F (190°C). Once the dough has risen, bake it in the oven for about 30 minutes, or until the bread is golden brown and sounds hollow when tapped.
Finally, remove the bread from the oven and allow it to cool in the pan for 5 minutes, then transfer it to a wire rack to cool completely before slicing.
Tips:
- For a richer flavor, consider adding 1/4 cup of grated Parmesan cheese to the dough.
- Make sure to use fresh mint for the best taste. If you can’t find it, dried mint is a good substitute.
- This bread can also be frozen. Wrap individual slices tightly in plastic wrap and store in an airtight container for up to 3 months.
Nutrition Facts:
- Calories: 140 per slice
- Total Fat: 3g
- Saturated Fat: 0.5g
- Cholesterol: 0mg
- Sodium: 130mg
- Total Carbohydrates: 24g
- Dietary Fiber: 4g
- Sugars: 1g
- Protein: 5g
10 Lavender Honey Brioche

Lavender Honey Brioche is a delightful way to welcome spring with its soft, buttery texture and floral sweetness. This delicious bread is perfect for breakfast or a lovely afternoon tea. With the lovely essence of lavender and the sweetness of honey, every bite will remind you of blooming gardens.
Prep Time: 20 minutes
Additional Time: 2 hours
Total Time: 2 hours 20 minutes
Servings: 12 slices
Ingredients:
- 3 cups all-purpose flour
- 1/4 cup honey
- 1/4 cup unsalted butter, softened
- 1/2 cup warm milk (about 110°F)
- 2 teaspoons active dry yeast
- 1 teaspoon dried lavender buds
- 1/2 teaspoon salt
- 3 large eggs, at room temperature
- 1 tablespoon milk (for egg wash)
- 1 tablespoon sugar (optional, for sweetness)
Instructions:
Start by activating the yeast. In a small bowl, combine the warm milk and honey, then sprinkle the yeast on top. Let it sit for about 5 minutes until it becomes frothy. This means your yeast is active and ready to go!
In a large mixing bowl, combine the flour, lavender buds, and salt. Mix well to ensure the lavender is evenly distributed. Add in the butter, the frothy yeast mixture, and eggs into the dry ingredients.
Mix everything together using a wooden spoon until a sticky dough forms. Once combined, knead the dough on a floured surface for about 5-7 minutes. You want it to be smooth and elastic.
Place the dough in a greased bowl, cover it with a clean kitchen towel, and let it rise in a warm place for about 1-2 hours or until doubled in size. This step is essential for fluffy brioche!
After the dough has risen, punch it down to release the air. Shape it into a loaf and place it in a greased 9×5 inch loaf pan. Cover it again and let it rise for another 30-45 minutes. Meanwhile, preheat your oven to 350°F.
For a lovely golden color, mix the milk with the optional sugar and brush it over the top of your dough before baking. Bake the brioche in the oven for about 30-35 minutes or until it’s golden brown and sounds hollow when tapped.
Let it cool for a few minutes before removing it from the pan. Enjoy your warm Lavender Honey Brioche plain or with a spread of butter!
Tips:
- Make sure the milk is just warm, not hot, to avoid killing the yeast.
- For a stronger lavender flavor, you may steep the dried lavender in warm milk before adding it to the dough.
- Brioche can be frozen in slices for later! Just wrap them tightly in plastic wrap.
Nutrition Facts:
- Calories: 210 per slice
- Fat: 8g
- Carbohydrates: 30g
- Protein: 5g
- Sugar: 6g
- Fiber: 1g
11 Lemon Thyme Artisan Bread
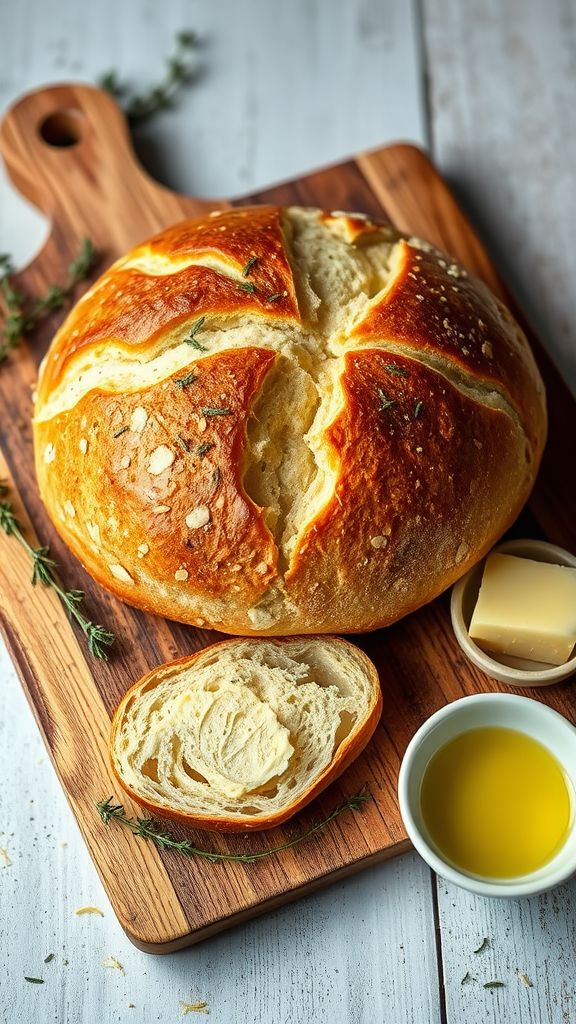
Lemon Thyme Artisan Bread is a delightful blend of tangy lemon and aromatic thyme. This bread is easy to make, and it will fill your kitchen with a wonderful scent that makes everyone hungry. Perfect for a spring picnic or as a side for dinner!
Prep Time: 15 minutes
Additional Time: 2 hours
Total Time: 2 hours 15 minutes
Servings: 10
Ingredients:
- 3 cups all-purpose flour
- 1 ½ teaspoons salt
- 1 teaspoon sugar
- 1 teaspoon active dry yeast
- 1 tablespoon fresh thyme, chopped
- Zest of 1 medium lemon
- 1 ¼ cups warm water (about 110°F)
- 1 tablespoon olive oil
Instructions:
In a large mixing bowl, combine the flour, salt, sugar, and yeast. Stir well to mix the dry ingredients evenly. Next, add in the chopped thyme and lemon zest for an added burst of flavor.
Pour the warm water and olive oil into the bowl. Mix everything together with a wooden spoon or spatula until it forms a shaggy dough. Make sure all the flour is incorporated.
Cover the bowl with a clean kitchen towel or plastic wrap. Let the dough rise in a warm place for about 2 hours or until it has doubled in size. This helps the bread develop its flavor and texture.
Before baking, preheat your oven to 450°F. Once the dough has risen, turn it out onto a floured surface. Gently shape the dough into a round loaf. Place it on a baking sheet lined with parchment paper.
Using a sharp knife, make a few shallow slashes on the top of the dough. This allows steam to escape while baking. Then, bake the bread in the preheated oven for 25-30 minutes or until the crust is golden brown and the loaf sounds hollow when tapped on the bottom.
Remove the bread from the oven and let it cool for a few minutes on a wire rack. Once it’s cool enough to handle, slice it up and enjoy the fresh flavors!
Tips:
- Serve this bread warm with butter for an extra treat.
- You can substitute dried thyme if fresh thyme is not available, but use a smaller amount (about half).
- Experiment by adding some other herbs like rosemary or oregano for different flavors.
Nutrition Facts:
- Calories: 150 per slice
- Total Fat: 3g
- Sodium: 220mg
- Total Carbohydrates: 30g
- Dietary Fiber: 1g
- Sugars: 0g
- Protein: 4g
12 Garden Vegetable Quick Bread
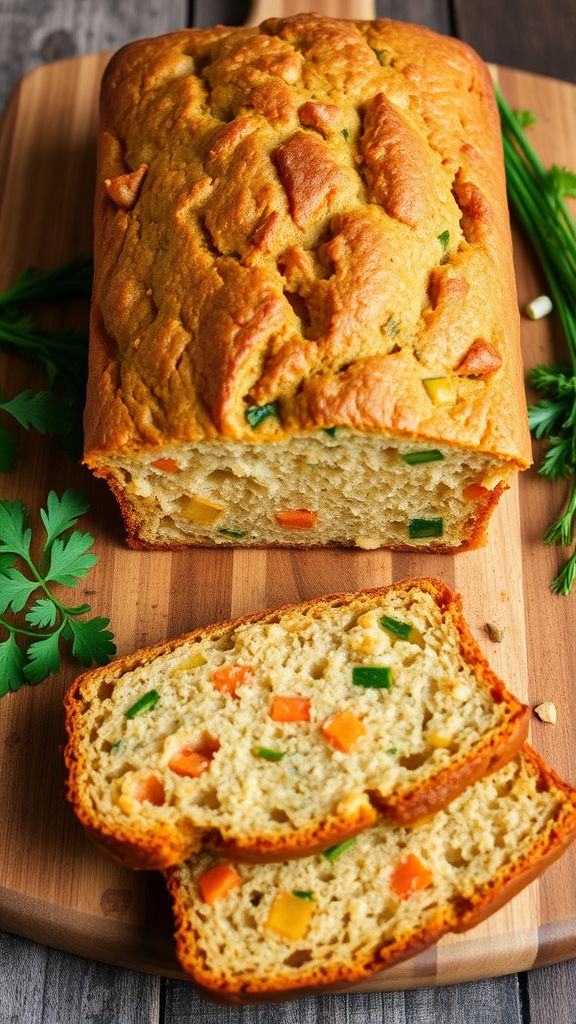
This Garden Vegetable Quick Bread is a delicious and healthy way to enjoy fresh veggies. It’s easy to make and perfect for breakfast, lunch, or a snack. You’ll love how moist and flavorful this bread is!
Prep Time: 15 minutes
Cook Time: 50 minutes
Total Time: 1 hour 5 minutes
Servings: 8 slices
Ingredients:
- 1 cup all-purpose flour
- 1 cup whole wheat flour
- 1 tablespoon baking powder
- 1 teaspoon salt
- 1/2 teaspoon black pepper
- 1/2 teaspoon garlic powder
- 1/2 teaspoon onion powder
- 2 large eggs
- 1 cup buttermilk
- 1/4 cup vegetable oil
- 1 cup mixed grated vegetables (zucchini, carrots, and bell peppers)
- 1/2 cup corn (fresh, canned, or frozen)
- 1/4 cup chopped fresh herbs (like parsley or chives)
Instructions:
Start by preheating your oven to 350°F (175°C). Grease a 9×5 inch loaf pan or line it with parchment paper for easy removal later.
In a large bowl, combine the all-purpose flour, whole wheat flour, baking powder, salt, black pepper, garlic powder, and onion powder. Mix these dry ingredients well to ensure everything is evenly distributed.
In another bowl, beat the eggs. Add the buttermilk and vegetable oil to the eggs and whisk them together until combined. Slowly pour this wet mixture into the bowl of dry ingredients. Stir gently until just mixed; it’s okay if there are a few lumps.
Now, fold in the grated vegetables, corn, and chopped herbs. Be careful not to over-mix; you want to keep your bread light and fluffy.
Pour the batter into the prepared loaf pan. Make sure to spread it evenly, then place it in the oven. Bake for 50 minutes, or until a toothpick inserted into the center comes out clean.
Once it’s baked, let it cool in the pan for about 10 minutes before transferring it to a wire rack to cool completely. Enjoy sliced warm or at room temperature!
Tips:
- You can use any combination of vegetables you have on hand. This is a great way to use up leftovers!
- For extra flavor, consider adding shredded cheese or spices like cumin or paprika to the batter.
- Store leftover bread in an airtight container at room temperature for up to 3 days or freeze it for up to 3 months.
Nutrition Facts:
- Calories: 150
- Total Fat: 5g
- Saturated Fat: 0.5g
- Cholesterol: 30mg
- Sodium: 200mg
- Total Carbohydrates: 22g
- Dietary Fiber: 3g
- Sugars: 2g
- Protein: 5g
13 Pistachio and Apricot Spring Bread
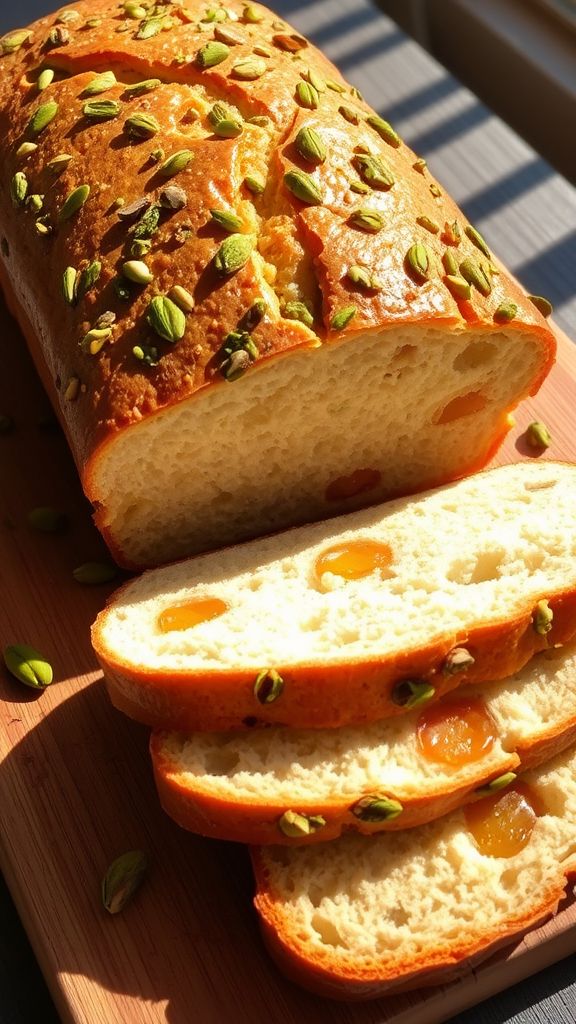
Pistachio and Apricot Spring Bread is a delightful treat that’s perfect for welcoming the warmer weather. With its nutty crunch and fruity sweetness, this bread will make your kitchen smell amazing. It’s easy to make and is great for breakfast or as a snack!
Prep Time: 20 minutes
Additional Time: 1 hour 30 minutes
Total Time: 1 hour 50 minutes
Servings: 10 slices
Ingredients:
- 2 cups all-purpose flour
- 1/2 cup granulated sugar
- 1/4 cup brown sugar, packed
- 1 tablespoon baking powder
- 1/2 teaspoon salt
- 1/2 cup unsalted butter, melted
- 2 large eggs
- 1 cup milk
- 1 teaspoon vanilla extract
- 1 cup chopped dried apricots
- 1/2 cup shelled pistachios, roughly chopped
- Zest of 1 lemon
Instructions:
Start by preheating your oven to 350°F (175°C). Grease a loaf pan with butter or line it with parchment paper for easy removal later.
In a large mixing bowl, combine all-purpose flour, granulated sugar, brown sugar, baking powder, and salt. Mix these dry ingredients until they are well blended.
In a separate bowl, whisk together the melted butter, eggs, milk, and vanilla extract. Make sure everything is mixed together smoothly.
Pour the wet ingredients into the bowl with the dry ingredients. Stir gently until just combined, being careful not to overmix.
Next, fold in the chopped dried apricots, pistachios, and lemon zest. This will add lots of flavor and texture to your bread.
Pour the batter into the prepared loaf pan. Smooth the top with a spatula to make it even. Then, let the batter rest for about 30 minutes to allow the flavors to develop.
After resting, place the pan in the preheated oven. Bake for 45-55 minutes or until a toothpick inserted into the center comes out clean.
Once baked, remove the bread from the oven and let it cool in the pan for about 10 minutes. Then, transfer it to a wire rack to cool completely.
Tips:
- For an extra crunch, you can toast the pistachios lightly before adding them to the batter.
- Serve with a smear of cream cheese or butter for a delicious treat.
- Store any leftovers in an airtight container at room temperature for up to 3 days.
Nutrition Facts:
- Calories: 190 per slice
- Total Fat: 8g
- Saturated Fat: 4g
- Cholesterol: 50mg
- Sodium: 200mg
- Total Carbohydrates: 26g
- Dietary Fiber: 1g
- Sugars: 10g
- Protein: 4g
14 Spring Green Spinach Bread

Spring Green Spinach Bread is a delightful way to enjoy the fresh flavors of spring. This vibrant bread is packed with nutritious spinach and herbs, making it not only delicious but also healthy. It’s perfect for sandwiches, toasting, or simply enjoying with some butter.
Prep Time: 15 minutes
Cook Time: 30 minutes
Additional Time: 1 hour
Total Time: 1 hour 45 minutes
Servings: 8 slices
Ingredients:
- 2 cups fresh spinach, chopped
- 1 ½ cups all-purpose flour
- 1 packet instant yeast (about 2 ¼ teaspoons)
- ½ teaspoon salt
- 1 tablespoon sugar
- ¾ cup warm water (about 110°F)
- 2 tablespoons olive oil
- ½ teaspoon garlic powder (optional)
- ¼ cup grated Parmesan cheese (optional)
- Fresh herbs (like basil and parsley, chopped, optional)
Instructions:
Start by washing the fresh spinach thoroughly. Once cleaned, chop it into small pieces and set it aside. In a large mixing bowl, combine the warm water with the sugar and yeast. Stir gently and let it sit for about 5 minutes until it becomes frothy.
Next, add the chopped spinach, salt, olive oil, and optional garlic powder to the yeast mixture. Mix well. Slowly incorporate the all-purpose flour, a little at a time, until a dough starts to form. If you’re using herbs and cheese, add them in now for extra flavor.
Knead the dough on a floured surface for about 5-7 minutes until it’s smooth and elastic. Place the dough in a lightly greased bowl, cover it with a clean kitchen towel, and allow it to rise in a warm area for about 1 hour or until it doubles in size.
Once the dough has risen, punch it down to release the air. Shape it into a loaf and place it in a greased loaf pan. Cover it again and let it rise for another 30 minutes. Preheat your oven to 375°F (190°C) during this time.
Bake the dough in the preheated oven for about 30 minutes or until the bread is golden brown and sounds hollow when tapped. Let it cool for a few minutes in the pan, then transfer it to a wire rack to cool completely before slicing.
Tips:
- For a tastier loaf, try experimenting with different cheeses like mozzarella or feta.
- If you want a sweeter bread, add 1-2 tablespoons of honey to the dough mixture.
- Feel free to add your favorite nuts or seeds for added texture and nutrients.
Nutrition Facts:
- Calories: 120 per slice
- Total Fat: 3g
- Saturated Fat: 1g
- Cholesterol: 0mg
- Sodium: 150mg
- Total Carbohydrates: 20g
- Dietary Fiber: 2g
- Sugars: 1g
- Protein: 4g
15 Blueberry Mint Dutch Oven Bread

This Blueberry Mint Dutch Oven Bread is a delightful way to welcome spring! It combines juicy blueberries and refreshing mint, creating a perfect blend of flavors. Baking this bread in a Dutch oven makes it crusty on the outside and soft on the inside.
Prep Time: 15 minutes
Cook Time: 45 minutes
Additional Time: 30 minutes
Total Time: 1 hour 30 minutes
Servings: 8
Ingredients:
- 3 cups all-purpose flour
- 1 cup fresh blueberries
- 1 tablespoon fresh mint, chopped
- 2 teaspoons baking powder
- 1 teaspoon baking soda
- 1 teaspoon salt
- 1 tablespoon sugar
- 1 cup buttermilk (or regular milk with a splash of vinegar)
- 1/4 cup olive oil
- 1 large egg
Instructions:
In a large bowl, mix flour, baking powder, baking soda, salt, and sugar together. Stir until everything is well combined. Gently fold in the blueberries and mint, making sure not to crush the berries.
In another bowl, whisk together the buttermilk, olive oil, and egg until smooth. Pour the wet ingredients into the dry ingredients. Mix just until everything is combined; do not overmix.
Transfer the dough to a floured surface. Knead it gently about 5 times just to bring it together. Shape the dough into a round loaf, making sure it holds together.
Preheat your oven to 375°F. Place your Dutch oven with the lid inside to warm up for about 30 minutes. Once hot, carefully take it out and put your loaf inside. Cover the Dutch oven with the lid and bake for 30 minutes.
After 30 minutes, take off the lid to let the bread brown. Continue baking for another 15 minutes or until the bread is golden brown and sounds hollow when tapped. Remove from the oven and let it cool on a wire rack.
Tips:
- For an extra burst of flavor, try adding a teaspoon of lemon zest to the batter.
- If you can’t find fresh mint, dried mint works as a substitute; just use half the amount.
- Serve the bread warm with a spread of butter or cream cheese for the best taste.
Nutrition Facts:
- Calories: 190
- Protein: 5g
- Fat: 6g
- Carbohydrates: 30g
- Fiber: 2g
- Sugar: 3g