My New Cookbook is Out! Check Out Now!
15 Best Easter Sweets for a Delicious Celebration
This page contains affiliate links and I earn a commission if you make a purchase through one of the links, at no cost to you.
Did you know that over 90 million chocolate bunnies are manufactured each Easter? If you’re looking to add a little magic to your celebrations, you’ve come to the right place! In this collection of the 15 Best Easter Sweets, you’ll discover a treasure trove of delightful recipes, from Chocolate Caramel Easter Eggs to Lavender Honey Cheesecake Bars, perfect for impressing your loved ones and indulging your sweet tooth.
Shop Our Must-Haves


1. Chocolate Caramel Easter Eggs

Chocolate Caramel Easter Eggs are a delightful treat that brings joy to any Easter celebration. These rich chocolate eggs, filled with gooey caramel, are sure to impress your family and friends.
Prep Time: 30 minutes
Additional Time: 1 hour
Total Time: 1 hour 30 minutes
Servings: 12
Ingredients:
- 1 cup semisweet chocolate chips
- 1/2 cup heavy cream
- 1/4 cup unsalted butter
- 1 cup granulated sugar
- 1/4 cup corn syrup
- 1/4 tsp salt
- 1 tsp vanilla extract
- 1/2 cup powdered sugar
- Lollipop sticks or egg molds (optional)
Instructions:
- Prepare the chocolate: In a microwave-safe bowl, melt 1 cup of semisweet chocolate chips in 30-second intervals, stirring between each until smooth.
- Mold the eggs: Using a spoon, coat the inside of the egg molds or desired shape with melted chocolate, ensuring an even layer. Allow the chocolate to harden in the fridge for about 30 minutes.
- Make the caramel filling: In a saucepan, combine 1 cup of granulated sugar, 1/4 cup of corn syrup, and 1/4 tsp of salt over medium heat. Stir until the sugar dissolves.
- Add cream and butter: Once the sugar mixture is bubbling, carefully stir in 1/2 cup of heavy cream and 1/4 cup of unsalted butter. Stir continuously until the mixture caramelizes and reaches a golden color, about 5-7 minutes. Remove from heat and add 1 tsp of vanilla extract.
- Cool the caramel: Allow the caramel to cool slightly, then transfer it to a piping bag or a small bowl.
- Fill the molds: Once the chocolate in the molds is set, pipe the caramel into each egg until almost full, then reserve some space for more chocolate.
- Seal the eggs: Melt the remaining chocolate and pour or spoon it on top of the caramel-filled molds, sealing the eggs.
- Chill: Place the filled molds back in the fridge for 30 minutes to allow the chocolate to set completely.
- Remove and enjoy: Carefully remove the eggs from the molds. Optionally, stick a lollipop stick into each egg for easy handling.
Tips:
For a more decadent treat, drizzle additional melted chocolate on top of the eggs after they have set. You can also experiment by adding a pinch of sea salt to the caramel for a salted caramel flavor.
Nutrition Facts:
- Calories: 200 per egg
- Total Fat: 12g
- Saturated Fat: 7g
- Cholesterol: 20mg
- Sodium: 50mg
- Carbohydrates: 25g
- Fiber: 1g
- Sugar: 15g
- Protein: 1g
2. Bunny Paw Cupcakes

Bunny Paw Cupcakes are a delightful treat perfect for celebrating Easter! These whimsical cupcakes are sure to impress your family and friends with their adorable bunny paw design and delicious flavor.
Prep Time: 20 minutes
Cook Time: 20 minutes
Additional Time: 30 minutes
Total Time: 1 hour 10 minutes
Servings: 12 cupcakes
Ingredients:
- 1 ¾ cups all-purpose flour
- 1 ½ cups granulated sugar
- ½ cup unsalted butter, softened
- 2 large eggs
- 1 cup whole milk
- 2 teaspoons vanilla extract
- 1 tablespoon baking powder
- ½ teaspoon salt
- 1 cup white frosting
- ½ cup pink fondant
- ½ cup chocolate chips
- 12 chocolate-covered marshmallows
- 12 mini cupcake liners
Instructions:
- Preheat your oven to 350°F (175°C). Line a muffin tin with 12 mini cupcake liners.
- In a large mixing bowl, cream together butter and granulated sugar until light and fluffy.
- Add in the eggs, vanilla extract, and milk. Mix until well combined.
- In another bowl, whisk together flour, baking powder, and salt. Gradually add the dry mixture to the wet ingredients, mixing until smooth.
- Divide the batter evenly among the lined cupcake tins, filling each about 2/3 full.
- Bake in the preheated oven for about 20 minutes or until a toothpick inserted into the center comes out clean. Let cool completely.
- Once cooled, frost the top of each cupcake with white frosting.
- For the bunny paws, take chocolate-covered marshmallows and place them on top of the frosting.
- Roll the pink fondant into small ovals to create the paw pads and place them on the marshmallows.
- Finally, add chocolate chips around the paw pads to resemble claws.
Tips:
To add extra flavor, consider incorporating almond extract into the batter for a delicious twist! You can also sprinkle some edible glitter on top for a festive touch.
Nutrition Facts:
- Calories: 250 per cupcake
- Total Fat: 10g
- Saturated Fat: 5g
- Cholesterol: 40mg
- Sodium: 90mg
- Total Carbohydrates: 37g
- Dietary Fiber: 1g
- Sugars: 18g
- Protein: 3g
3. Lemon Lavender Cookie Blossoms
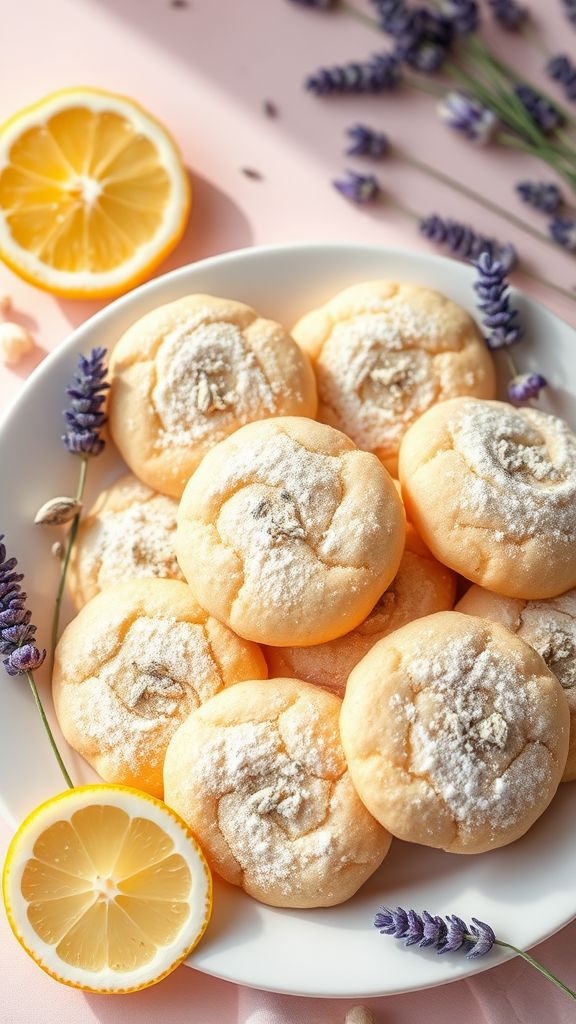
Delight in the unique flavors of these Lemon Lavender Cookie Blossoms, a perfect treat for springtime gatherings and Easter festivities. The zesty lemon combined with the floral hint of lavender creates a refreshing cookie that will impress your guests.
Prep Time: 15 minutes
Cook Time: 10 minutes
Additional Time: 30 minutes
Total Time: 55 minutes
Servings: 24 cookies
Ingredients:
- 1 cup unsalted butter, softened
- 1 cup granulated sugar
- 1 large egg
- 2 tablespoons fresh lemon juice
- 1 tablespoon lemon zest
- 2 teaspoons dried culinary lavender
- 2 ½ cups all-purpose flour
- 1 teaspoon baking powder
- ½ teaspoon salt
- Powdered sugar, for dusting
Instructions:
- In a large mixing bowl, cream together the softened butter and granulated sugar until light and fluffy, about 3-5 minutes.
- Beat in the egg, lemon juice, lemon zest, and dried lavender until well combined.
- In a separate bowl, whisk together the flour, baking powder, and salt. Gradually add the dry ingredients to the wet mixture, mixing until just combined.
- Cover the dough with plastic wrap and refrigerate for at least 30 minutes for easier handling.
- Preheat the oven to 350°F (175°C) and line a baking sheet with parchment paper.
- Once chilled, scoop tablespoon-sized balls of dough and roll them into smooth balls. Place them on the prepared baking sheet, leaving space for spreading.
- Bake in the preheated oven for 10 minutes or until the edges are lightly golden.
- Allow the cookies to cool on the baking sheet for a few minutes before transferring them to a wire rack to cool completely.
- Once cooled, lightly dust the cookies with powdered sugar.
Tips:
Add a few extra lavender buds on top of the cookies before baking for a more appealing presentation. For a brighter flavor, consider adding an extra tablespoon of lemon zest or using a lemon glaze for drizzling after baking.
Nutrition Facts:
- Calories: 110
- Total Fat: 5g
- Saturated Fat: 3g
- Cholesterol: 15mg
- Sodium: 30mg
- Total Carbohydrates: 15g
- Dietary Fiber: 0g
- Sugars: 6g
- Protein: 1g
4. Miniature Berry Mousse Cups
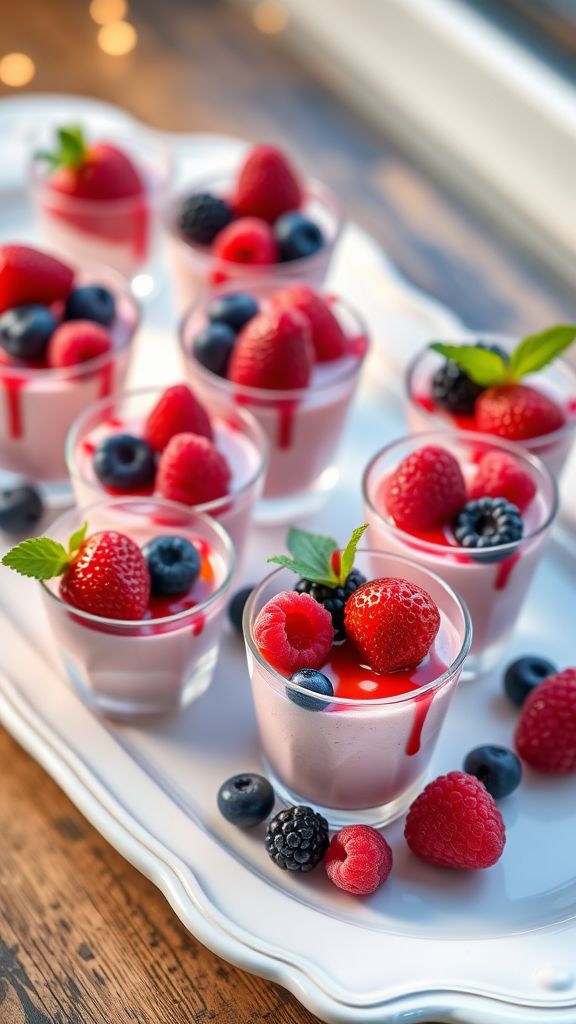
Indulge in these delightful Miniature Berry Mousse Cups that bring a burst of flavor and elegance to any gathering. Perfect for Easter celebrations or any festive occasion, these charming little desserts are as delightful to look at as they are to eat.
Prep Time: 15 minutes
Additional Time: 2 hours
Total Time: 2 hours 15 minutes
Servings: 12 miniature cups
Ingredients:
- 1 cup mixed berries (strawberries, blueberries, and raspberries)
- 1 cup heavy whipping cream
- 1/4 cup granulated sugar
- 1 teaspoon vanilla extract
- 2 tablespoons gelatin powder
- 1/4 cup warm water
- 2 tablespoons berry syrup or puree (optional for drizzling)
- Fresh mint leaves for garnish (optional)
Instructions:
- In a small bowl, dissolve 2 tablespoons of gelatin powder in 1/4 cup of warm water and let it sit for about 5 minutes to bloom.
- In a blender, combine the mixed berries and blend until smooth. You can strain the mixture if you prefer a seedless puree.
- In a large mixing bowl, whisk the heavy whipping cream, granulated sugar, and vanilla extract until soft peaks form.
- Gently fold the berry puree into the whipped cream until well combined.
- Slowly add the bloomed gelatin to the mousse mixture and fold gently until fully incorporated.
- Spoon or pipe the mousse into miniature cups and refrigerate for at least 2 hours to set.
- Before serving, drizzle some berry syrup or puree on top and garnish with fresh mint leaves if desired.
Tips:
For an added layer of flavor, consider adding a splash of lemon juice to the berry puree. You can also mix different types of berries for a more complex taste! If you want to enhance sweetness, feel free to adjust the sugar to your preference.
Nutrition Facts:
- Calories: 120
- Total Fat: 9g
- Saturated Fat: 5g
- Cholesterol: 30mg
- Sodium: 30mg
- Total Carbohydrates: 9g
- Dietary Fiber: 1g
- Sugars: 7g
- Protein: 1g
5. Coconut Cream Easter Nests
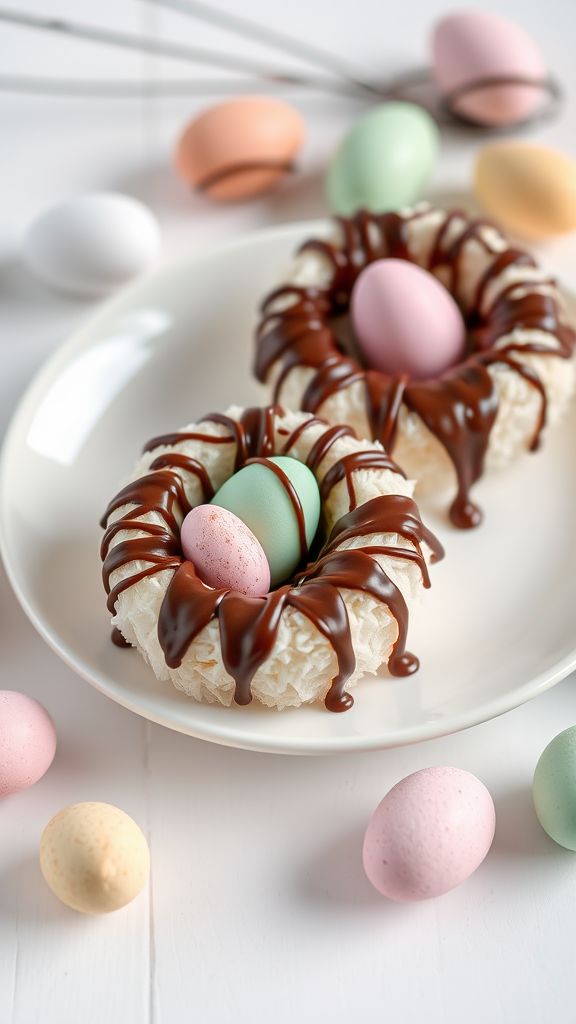
Coconut Cream Easter Nests are delightful treats that combine the rich flavors of coconut with the festive spirit of Easter. These charming nests are perfect for celebrating the holiday while satisfying your sweet tooth!
Prep Time: 20 minutes
Additional Time: 30 minutes
Total Time: 50 minutes
Servings: 12 nests
Ingredients:
- 2 cups sweetened shredded coconut
- 1/2 cup sweetened condensed milk
- 1 teaspoon vanilla extract
- 1/4 teaspoon salt
- 1 cup chocolate chips (milk or dark)
- 12 mini chocolate eggs (or jelly beans for a twist)
Instructions:
- In a mixing bowl, combine 2 cups of sweetened shredded coconut, 1/2 cup of sweetened condensed milk, 1 teaspoon of vanilla extract, and 1/4 teaspoon of salt. Stir until well combined.
- Preheat your oven to 350°F (175°C). Line a baking sheet with parchment paper.
- Use your hands to shape the coconut mixture into small nests (about 2 inches in diameter) on the prepared baking sheet, making a small indent in the center of each to hold the chocolate eggs.
- Bake in the preheated oven for 10-12 minutes, or until the edges begin to turn golden brown. Remove from the oven and let them cool completely on the baking sheet.
- While the nests cool, melt 1 cup of chocolate chips in a microwave-safe bowl in 30-second intervals, stirring in between, until smooth and creamy.
- Once the nests are cooled, drizzle or spoon the melted chocolate over each nest, allowing it to drizzle down the sides for extra flair.
- Gently press 1 mini chocolate egg into the center of each nest. Let the chocolate set for about 30 minutes at room temperature.
Tips:
For an extra pop of flavor, consider adding a pinch of coconut extract to the mixture for a more intense coconut flavor. You can also sprinkle some toasted coconut flakes on top for added texture and taste.
Nutrition Facts:
- Calories: 150 per nest
- Total Fat: 8g
- Saturated Fat: 6g
- Cholesterol: 5mg
- Sodium: 50mg
- Total Carbohydrates: 18g
- Dietary Fiber: 1g
- Sugars: 10g
- Protein: 2g
6. Carrot Cake Truffles
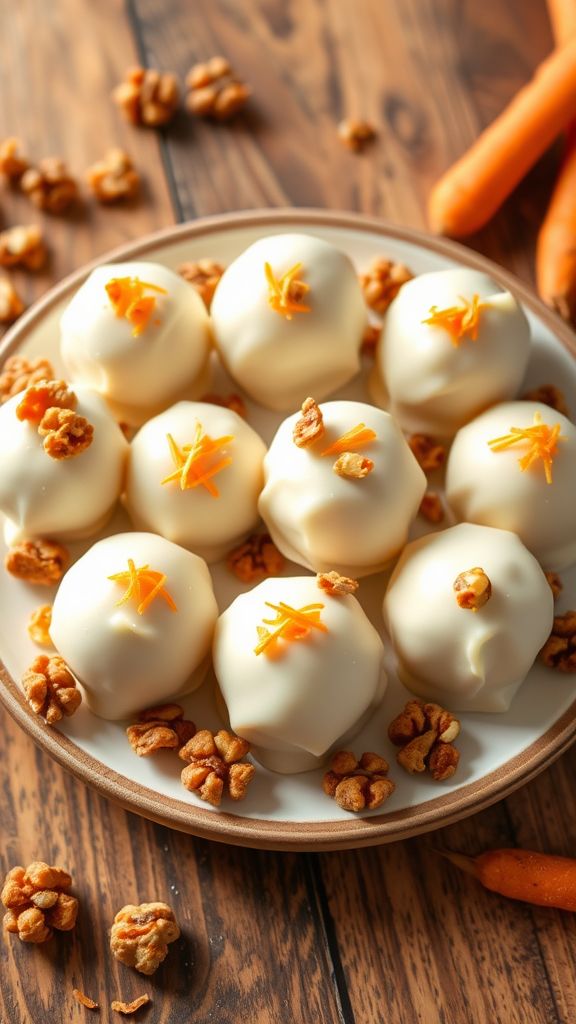
Indulge in these delightful Carrot Cake Truffles that capture the essence of traditional carrot cake in a fun, bite-sized treat. Perfect for Easter celebrations or any festive occasion, these truffles are creamy, flavorful, and make for a wonderful treat to share with family and friends.
Prep Time: 20 minutes
Additional Time: 1 hour
Total Time: 1 hour 20 minutes
Servings: 20 truffles
Ingredients:
- 1 cup finely grated carrots
- 1 cup crushed graham crackers
- 1/2 cup cream cheese, softened
- 1/4 cup powdered sugar
- 1 teaspoon ground cinnamon
- 1/2 teaspoon nutmeg
- 1/4 teaspoon vanilla extract
- 1 cup white chocolate chips, melted
- 1/2 cup chopped walnuts (optional)
Instructions:
- In a large bowl, combine the finely grated carrots, crushed graham crackers, cream cheese, powdered sugar, ground cinnamon, nutmeg, and vanilla extract. Mix until all ingredients are well combined.
- Using your hands, form the mixture into small balls about 1 inch in diameter, and place them on a parchment-lined baking sheet.
- Once all the mixture is rolled into truffles, refrigerate for about 30 minutes to firm up.
- While the truffles are chilling, melt the white chocolate chips in a microwave-safe bowl in 30-second intervals, stirring until smooth.
- Dip each chilled truffle in the melted white chocolate, using a fork to allow excess chocolate to drip off.
- Place the coated truffles back on the parchment-lined baking sheet. If desired, sprinkle with chopped walnuts before the chocolate sets.
- Refrigerate the truffles again for about 30 minutes until the chocolate is firm.
Tips:
- For extra flavor, add a pinch of salt to balance the sweetness.
- Swap the white chocolate for dark or milk chocolate for a different taste.
- Roll the truffles in toasted coconut or extra crushed graham crackers for an added texture.
Nutrition Facts:
- Calories: 90 per truffle
- Total Fat: 5g
- Saturated Fat: 2g
- Cholesterol: 10mg
- Sodium: 30mg
- Total Carbohydrates: 10g
- Dietary Fiber: 1g
- Sugars: 5g
- Protein: 1g
7. Vanilla Bean Peeps Marshmallows
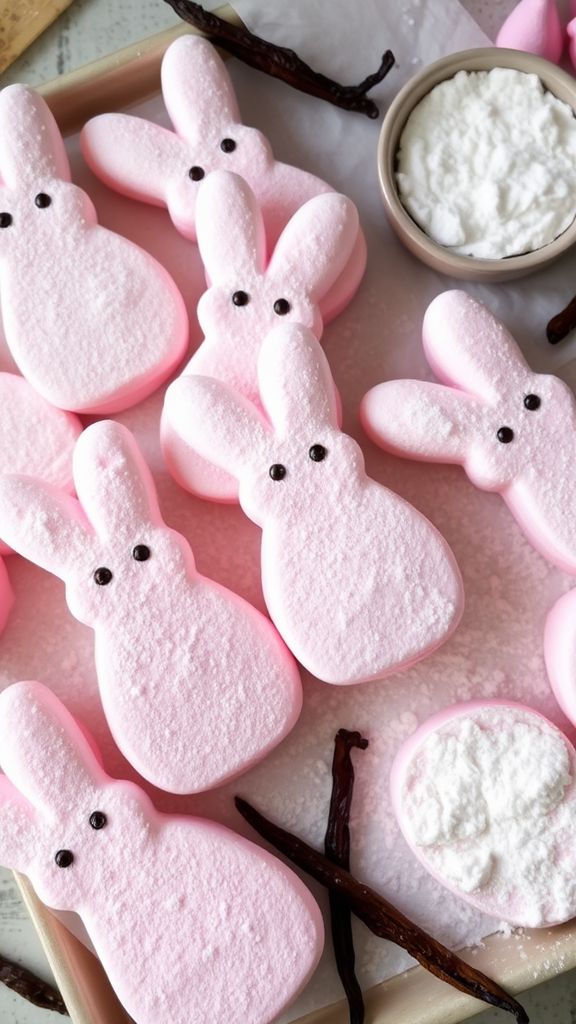
Experience the delightful combination of fluffy marshmallows and the enchanting flavor of vanilla beans with these Vanilla Bean Peeps Marshmallows. Perfectly sweetened and fun to make, they’re a great treat for Easter celebrations or a cozy night in.
Prep Time: 15 minutes
Additional Time: 4 hours
Total Time: 4 hours 15 minutes
Servings: 12 large marshmallows
Ingredients:
- 1 cup granulated sugar
- 1/2 cup light corn syrup
- 1/4 cup water
- 1/2 teaspoon salt
- 2 teaspoons pure vanilla extract
- 1 vanilla bean (seeds scraped)
- 2 tablespoons powdered gelatin
- 1/2 cup cold water (for gelatin)
- 1 cup powdered sugar (for dusting)
- 1/2 cup cornstarch (for dusting)
- Food coloring (optional, for decorating)
Instructions:
- In a small bowl, combine 2 tablespoons of powdered gelatin with 1/2 cup of cold water and let it sit to bloom for about 5 minutes.
- In a medium saucepan, combine 1 cup of granulated sugar, 1/2 cup of light corn syrup, 1/4 cup of water, and 1/2 teaspoon of salt. Stir over medium heat until the sugar dissolves.
- Raise the heat to high and bring the mixture to a boil without stirring. You can use a candy thermometer; it should reach 240°F (soft-ball stage).
- Once the syrup reaches the desired temperature, remove it from heat.
- In a stand mixer, combine the bloomed gelatin and the hot sugar syrup while the mixer is on low speed. Gradually increase the speed to high and whip for about 10-12 minutes, until the mixture is thick and fluffy.
- Add 2 teaspoons of pure vanilla extract and the scraped seeds of 1 vanilla bean to the marshmallow mixture. Mix until well incorporated.
- Prepare a baking dish (9×9 inches works well) by greasing it lightly and dusting with a mix of 1 cup of powdered sugar and 1/2 cup of cornstarch.
- Pour the marshmallow mixture into the prepared dish and smooth the top with a spatula. Dust the top with more powdered sugar and cornstarch mixture.
- Allow the marshmallows to set for at least 4 hours or until firm.
- Once set, lift the marshmallows out of the dish and cut them into desired shapes (you can use cookie cutters for fun shapes!).
- Coat the cut marshmallows in the remaining powdered sugar and cornstarch mixture to prevent sticking.
- If desired, use food coloring to decorate the marshmallows to look like Peeps.
Tips:
- For extra flavor, you can substitute some of the vanilla extract with your favorite extract, like almond or coconut.
- Consider dipping the marshmallows in melted chocolate for a richer taste and texture.
Nutrition Facts:
- Calories: 90 per marshmallow
- Total Fat: 0g
- Sodium: 10mg
- Total Carbohydrates: 23g
- Sugars: 19g
- Protein: 0g
8. Colorful Spring Sugar Cookies

These Colorful Spring Sugar Cookies are a delightful treat that celebrates the vibrant colors of spring. Perfect for Easter gatherings or simply to brighten up your day, these cookies are soft, sweet, and decorated with cheerful icing.
Prep Time: 20 minutes
Cook Time: 10 minutes
Additional Time: 30 minutes (for cooling and decorating)
Total Time: 1 hour
Servings: 24 cookies
Ingredients:
- 2 ¾ cups all-purpose flour
- 1 teaspoon baking powder
- ½ teaspoon salt
- 1 cup unsalted butter, softened
- 1 ½ cups granulated sugar
- 1 large egg
- 1 teaspoon vanilla extract
- 1 teaspoon almond extract
- Food coloring (various colors)
- Royal icing (for decorating)
- Sprinkles (optional)
Instructions:
- In a medium bowl, combine flour, baking powder, and salt. Set aside.
- In a large mixing bowl, cream together the butter and sugar until light and fluffy.
- Add the egg, vanilla extract, and almond extract to the butter mixture and mix until well combined.
- Gradually add the flour mixture to the wet ingredients, mixing until a soft dough forms.
- Divide the dough into equal parts and add different food coloring to each portion to create your desired colors. Mix until the color is evenly distributed.
- Wrap each colored dough in plastic wrap and refrigerate for 30 minutes to allow it to firm up.
- Preheat your oven to 350°F (175°C) and line baking sheets with parchment paper.
- Roll out each colored dough on a lightly floured surface to about ¼ inch thickness. Use cookie cutters to cut out desired shapes.
- Place the cookies on the prepared baking sheets and bake for 8-10 minutes, or until the edges are lightly golden.
- Remove the cookies from the oven and allow them to cool on the baking sheets for a few minutes before transferring them to a wire rack to cool completely.
- Once completely cool, decorate the cookies with royal icing and rainbow sprinkles as desired.
Tips:
For an extra burst of flavor, consider adding zest from a lemon or orange to the dough. You can also experiment with different extract flavors, such as coconut or mint, to create unique varieties.
Nutrition Facts:
- Calories: 120 per cookie
- Total Fat: 6g
- Saturated Fat: 4g
- Cholesterol: 25mg
- Sodium: 30mg
- Total Carbohydrates: 16g
- Dietary Fiber: 0g
- Sugars: 6g
- Protein: 1g
9. Pistachio and Raspberry Tart
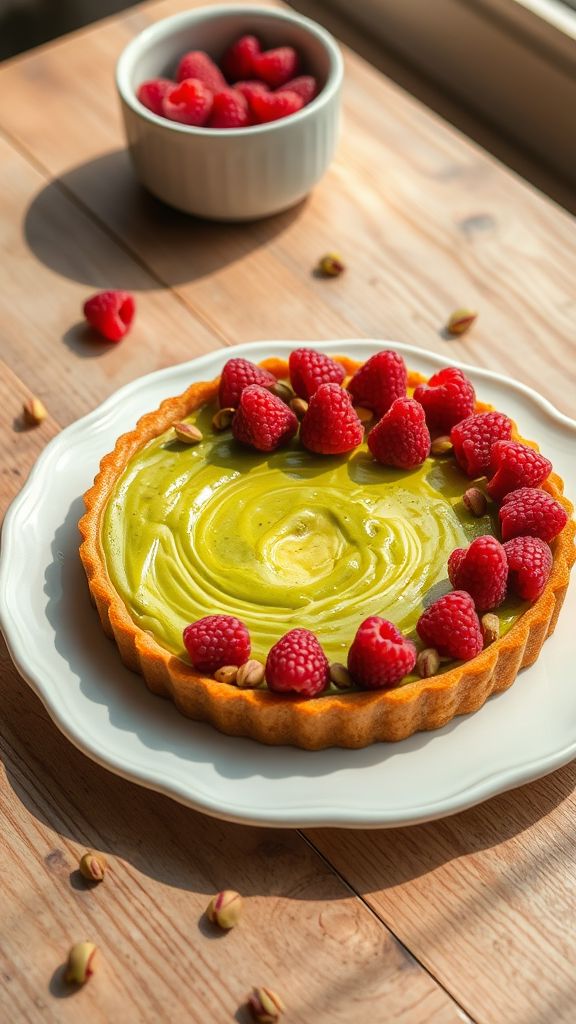
Indulge in the delightful combination of pistachios and raspberries with this stunning tart, perfect for any occasion! The creamy filling paired with the tartness of raspberries creates a balance that will impress your guests and your taste buds.
Prep Time: 30 minutes
Additional Time: 2 hours
Total Time: 2 hours 30 minutes
Servings: 8
Ingredients:
- 1 pre-made tart shell
- 1 cup shelled pistachios
- 1 cup heavy cream
- 1 cup fresh raspberries
- 1/2 cup granulated sugar
- 1/4 cup unsalted butter
- 2 large eggs
- 1 teaspoon vanilla extract
- 1 tablespoon lemon juice
- A pinch of salt
Instructions:
- Preheat your oven to 350°F (175°C).
- In a food processor, blend the shelled pistachios until finely ground.
- In a saucepan, melt the butter over medium heat. Once melted, stir in the ground pistachios and sugar, cooking for 2-3 minutes to enhance flavor.
- Remove the saucepan from heat and let it cool slightly.
- In a large mixing bowl, whisk together the eggs, heavy cream, vanilla extract, lemon juice, and a pinch of salt until well combined.
- Gradually mix in the cooled pistachio mixture until smooth.
- Pour the filling into the pre-made tart shell and smooth the top.
- Bake in the preheated oven for 25-30 minutes or until the filling is set and lightly golden.
- Remove the tart from the oven and allow it to cool to room temperature before refrigerating for at least 2 hours.
- Once chilled, garnish the tart with fresh raspberries on top before serving.
Tips:
For an extra flavor boost, consider adding a teaspoon of almond extract to the filling. You can also drizzle some honey over the tart before serving for a touch of sweetness. Don’t hesitate to pair it with whipped cream for a richer experience!
Nutrition Facts:
- Calories: 320 per serving
- Total Fat: 22g
- Saturated Fat: 10g
- Cholesterol: 95mg
- Sodium: 150mg
- Total Carbohydrates: 29g
- Dietary Fiber: 2g
- Sugars: 15g
- Protein: 6g
10. Maple Walnut Fudge Bites
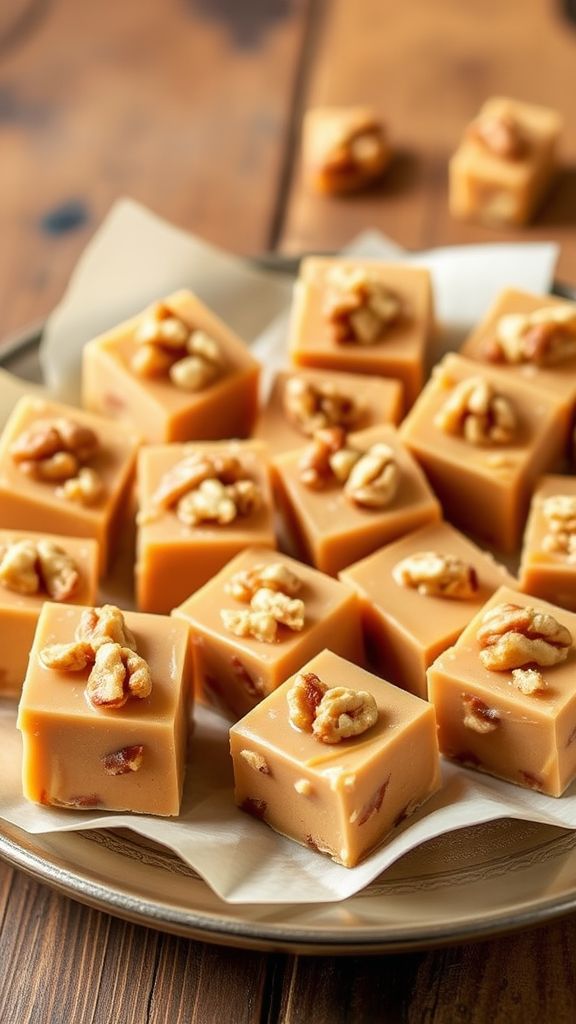
Maple Walnut Fudge Bites are a delightful treat that combine the rich flavors of maple syrup and crunchy walnuts. These fudge bites are perfect for satisfying your sweet tooth while offering a unique twist on traditional fudge!
Prep Time: 15 minutes
Additional Time: 2 hours
Total Time: 2 hours 15 minutes
Servings: 24 bites
Ingredients:
- 2 cups maple syrup
- 1 cup heavy cream
- 2 cups crushed walnuts
- 1 teaspoon vanilla extract
- 1/4 teaspoon salt
- 2 tablespoons unsalted butter
Instructions:
- In a medium saucepan over medium heat, combine maple syrup and heavy cream. Stir until the mixture is well combined.
- Bring the mixture to a gentle boil, then reduce the heat to low and simmer for about 10 minutes, stirring occasionally.
- Remove the pan from heat and stir in the vanilla extract, salt, and unsalted butter until the butter is fully melted and incorporated.
- Add the crushed walnuts to the mixture and stir until evenly distributed.
- Line an 8×8 inch baking dish with parchment paper. Pour the fudge mixture into the prepared dish, spreading it evenly.
- Allow the fudge to cool to room temperature before covering it with plastic wrap.
- Refrigerate the fudge for at least 2 hours or until it is firm.
- Once set, lift the fudge out of the dish using the parchment paper and cut it into 24 bite-sized pieces.
Tips:
Enhance the flavor by adding a pinch of cinnamon or nutmeg to the fudge mixture. For an extra crunch, sprinkle some additional chopped walnuts on top before chilling. These bites can also be drizzled with melted chocolate for an extra decadent touch!
Nutrition Facts:
- Calories: 150
- Total Fat: 7g
- Saturated Fat: 3g
- Cholesterol: 15mg
- Sodium: 50mg
- Total Carbohydrates: 22g
- Dietary Fiber: 1g
- Sugars: 18g
- Protein: 2g
11. Chocolate-Dipped Fruit Baskets
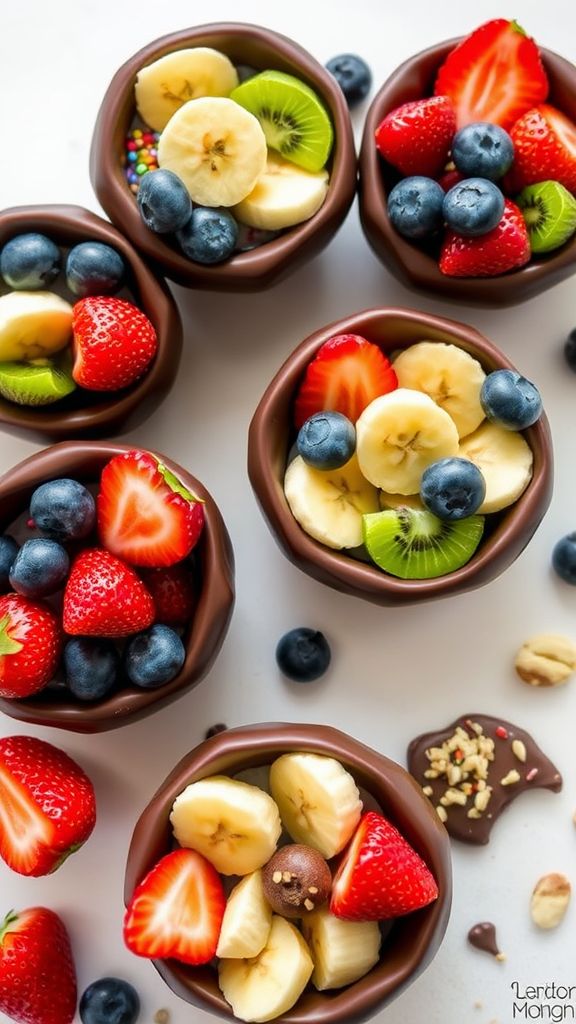
Chocolate-Dipped Fruit Baskets are an elegant and delightful treat that brings together indulgent chocolate and fresh, juicy fruit. Perfect for special occasions or festive gatherings, these baskets can be filled with your favorite fruits and made to look stunning.
Prep Time: 20 minutes
Additional Time: 30 minutes
Total Time: 50 minutes
Servings: 6
Ingredients:
- 6 small edible bowls (like mini tart shells)
- 1 cup semi-sweet chocolate chips
- Fresh fruits (such as strawberries, blueberries, kiwi, and banana)
- 1 tablespoon coconut oil (optional, for smoother chocolate coating)
- Sprinkles or crushed nuts (for decoration, optional)
Instructions:
- Begin by washing and drying the fresh fruits. Slice larger fruits like kiwi and bananas into bite-sized pieces.
- In a microwave-safe bowl, combine the semi-sweet chocolate chips and coconut oil (if using). Microwave in 30-second intervals, stirring in between, until smooth and fully melted.
- Dip each edible bowl into the melted chocolate, coating the inside generously. Allow any excess chocolate to drip off, and place the bowls upside down on a parchment-lined baking sheet.
- Once all bowls are coated, place the baking sheet in the refrigerator for about 30 minutes until the chocolate hardens.
- After the chocolate has set, gently remove the chocolate-dipped bowls from the parchment paper.
- Fill each chocolate-dipped bowl with an assortment of the prepared fresh fruits.
- For an added touch, sprinkle with sprinkles or crushed nuts before serving.
Tips:
- For an extra layer of flavor, consider drizzling some white chocolate over the dark chocolate after it has set.
- Using a mix of different colored fruits will make your baskets look even more appealing and festive.
- Ensure the fruit is fresh to maintain the best flavor and texture in your delightful baskets.
Nutrition Facts:
- Calories: Approximately 150 per serving
- Total Fat: 7g
- Saturated Fat: 4g
- Carbohydrates: 20g
- Sugars: 12g
- Protein: 2g
12. Lavender Honey Cheesecake Bars
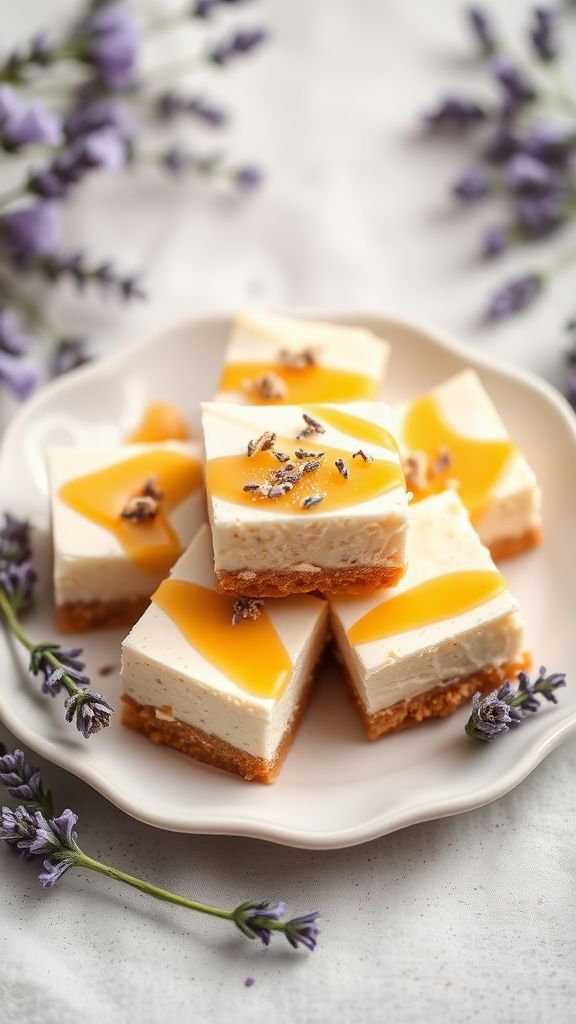
Indulge in the delicate floral notes and creamy texture of these Lavender Honey Cheesecake Bars. Perfect for spring gatherings or a delightful dessert to enjoy at home, these bars are sure to impress your taste buds with their unique flavor combination.
Prep Time: 20 minutes
Additional Time: 4 hours chill time
Total Time: 4 hours 20 minutes
Servings: 12
Ingredients:
- 1 ½ cups graham cracker crumbs
- ½ cup unsalted butter, melted
- ¼ cup granulated sugar
- 2 (8-ounce) packages cream cheese, softened
- ½ cup honey
- 2 large eggs
- 1 teaspoon vanilla extract
- 1 teaspoon dried culinary lavender
- ¼ cup sour cream
- Pinch of salt
Instructions:
- Preheat your oven to 325°F (163°C). Line an 8×8 inch baking pan with parchment paper, leaving a bit of an overhang for easy removal.
- In a mixing bowl, combine the graham cracker crumbs, melted butter, and granulated sugar. Mix until the mixture resembles wet sand.
- Press the crumb mixture firmly into the bottom of the prepared baking pan to form an even layer. Bake for 10 minutes and then remove from the oven to cool slightly.
- In a large mixing bowl, beat the cream cheese until smooth and creamy. Gradually add in the honey, continuing to mix until fully incorporated.
- Add the eggs, one at a time, mixing until just combined after each addition. Incorporate the vanilla extract, sour cream, dried lavender, and a pinch of salt. Mix until everything is smooth.
- Pour the cheesecake filling over the cooled crust, spreading it out evenly.
- Bake for an additional 30-35 minutes, or until the edges are set and the center has a slight jiggle.
- Allow the bars to cool to room temperature, then transfer them to the refrigerator and chill for at least 4 hours before slicing.
- Once chilled, lift the bars out using the parchment overhang, slice, and serve!
Tips:
For an extra touch of flavor, consider adding a zest of lemon or orange into the cheesecake mixture. You can also drizzle extra honey on top before serving for a beautiful presentation and added sweetness.
Nutrition Facts:
- Calories: 230
- Total Fat: 15g
- Saturated Fat: 9g
- Cholesterol: 75mg
- Sodium: 150mg
- Total Carbohydrates: 20g
- Dietary Fiber: 1g
- Sugars: 10g
- Protein: 4g
13. Almond Joy Easter Bark
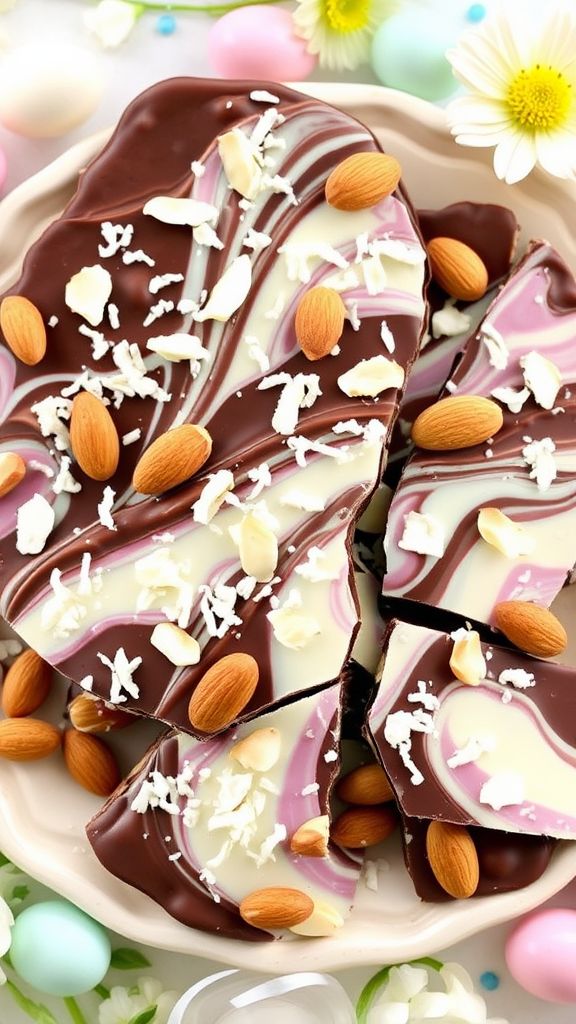
Get ready to indulge in a delightful Easter treat with this Almond Joy Easter Bark! Combining rich chocolate, crunchy almonds, and sweet coconut, this no-fuss recipe brings a burst of flavor to your holiday celebrations.
Prep Time: 15 minutes
Additional Time: 30 minutes
Total Time: 45 minutes
Servings: 12
Ingredients:
- 8 oz dark chocolate, chopped
- 8 oz milk chocolate, chopped
- 1 cup sweetened shredded coconut
- 1 cup whole almonds
- 1 teaspoon coconut extract
Instructions:
- Line a baking sheet with parchment paper and set aside.
- In a microwave-safe bowl, melt the dark chocolate in 30-second intervals, stirring after each until smooth.
- Pour melted dark chocolate onto the prepared baking sheet and spread it evenly with a spatula, creating a thin layer.
- In a separate bowl, melt the milk chocolate using the same method as the dark chocolate.
- Once the dark chocolate layer is set but still slightly warm, drizzle the melted milk chocolate over the top, swirling with a toothpick or knife to create a marbled effect.
- Evenly sprinkle the sweetened shredded coconut over the chocolate layers.
- Gently press the whole almonds into the bark, spacing them evenly.
- Drizzle the coconut extract over the top for an added flavor boost.
- Allow the bark to cool and set at room temperature for about 30 minutes, or until fully firm.
- Once set, break the bark into pieces and serve!
Tips:
- For an extra decadent twist, sprinkle a little sea salt over the top before it sets to enhance the chocolate flavor.
- You can replace almonds with other nuts like cashews or pistachios for a different taste profile.
- Try adding a layer of white chocolate for a colorful variation that’s perfect for Easter!
Nutrition Facts:
- Calories: 185
- Total Fat: 12g
- Saturated Fat: 7g
- Cholesterol: 2mg
- Sodium: 50mg
- Total Carbohydrates: 18g
- Dietary Fiber: 1g
- Sugars: 14g
- Protein: 3g
14. Fruity Easter Jello Eggs
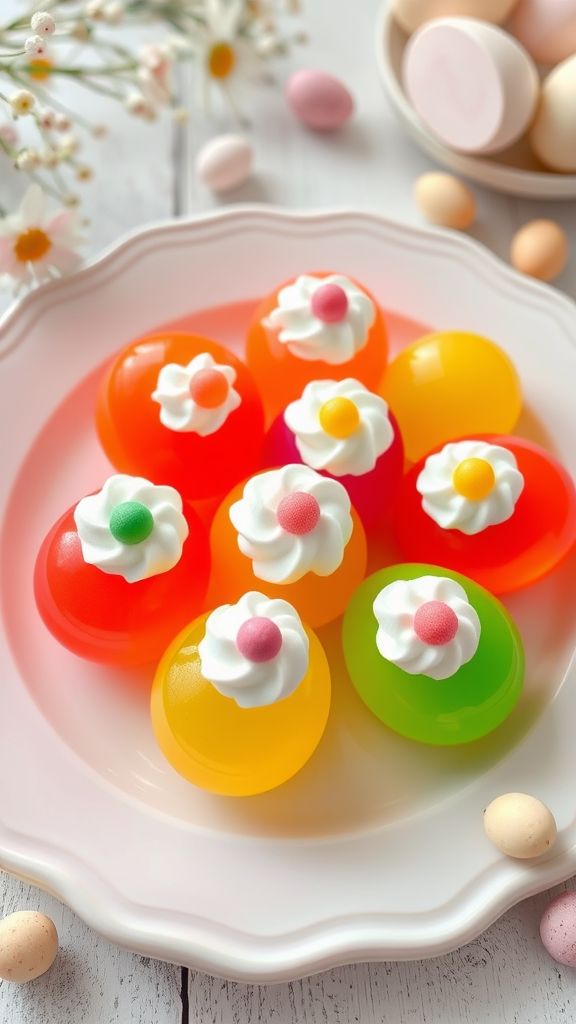
Celebrate Easter with these delightful Fruity Easter Jello Eggs! Perfect for kids and adults alike, these colorful gelatin treats are not only fun to make but also bursting with fruity flavors.
Prep Time: 15 minutes
Additional Time: 4 hours
Total Time: 4 hours 15 minutes
Servings: 12
Ingredients:
- 2 packets of Jello (any fruity flavors)
- 2 cups of boiling water
- 1 cup of cold water
- 1 cup of whipped cream
- Egg-shaped gelatin molds (or silicone mold)
- Non-stick cooking spray (optional for easy release)
Instructions:
- In a mixing bowl, combine the Jello packets with 2 cups of boiling water. Stir until fully dissolved.
- Add 1 cup of cold water to the mixture and stir thoroughly.
- If using non-stick cooking spray, lightly coat the inside of the egg-shaped molds for easier removal.
- Carefully pour the Jello mixture into the molds, filling them about three-quarters full.
- Place the molds in the refrigerator and allow the Jello to set for at least 4 hours or until fully firm.
- Once set, gently press the Jello eggs out of the molds. If they stick, you can dip the mold briefly in warm water to loosen them.
- To serve, top each Jello egg with a dollop of whipped cream for a delightful creamy finish.
Tips:
- Combine different Jello flavors for a vibrant multi-colored egg effect.
- For added fun, include small fruity candies inside the eggs before they set!
Nutrition Facts:
- Calories: 80 per egg
- Total Fat: 0g
- Sodium: 30mg
- Total Carbohydrates: 20g
- Sugars: 16g
- Protein: 1g
15. Creamy Peanut Butter Cadbury Pie
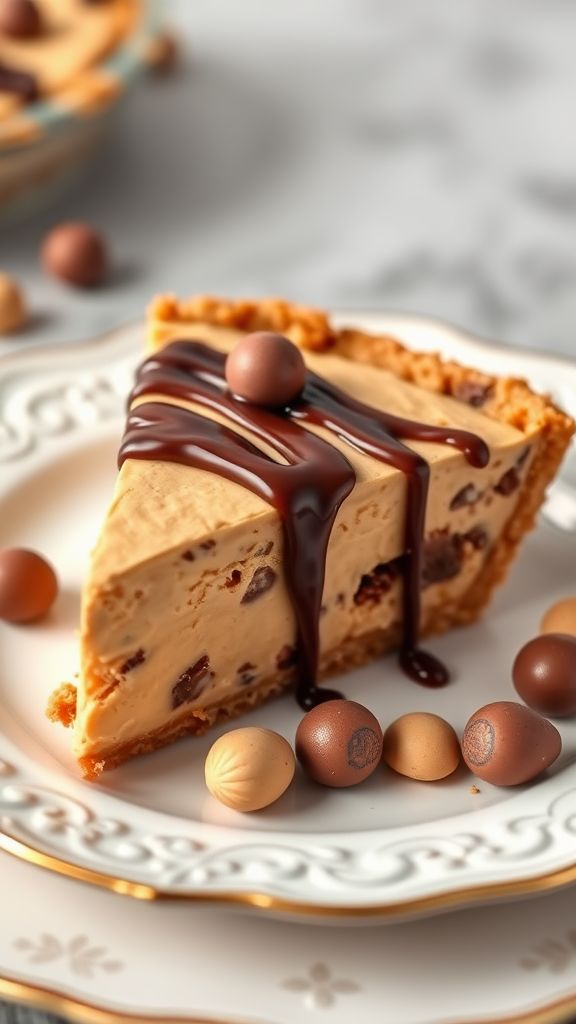
Indulge in the rich flavors of the Creamy Peanut Butter Cadbury Pie! This delightful dessert brings together the creaminess of peanut butter and the sweetness of Cadbury chocolate, making it a perfect treat for any occasion. Your loved ones will be asking for seconds!
Prep Time: 15 minutes
Total Time: 15 minutes
Servings: 8
Ingredients:
- 1 pre-made graham cracker pie crust
- 1 cup creamy peanut butter
- 1 cup powdered sugar
- 1 cup heavy whipping cream
- 1 teaspoon vanilla extract
- 1 cup chopped Cadbury chocolate or mini eggs
- Chocolate sauce for drizzling (optional)
Instructions:
- In a large mixing bowl, combine creamy peanut butter and powdered sugar. Mix until smooth and well combined.
- In a separate bowl, whip the heavy whipping cream and vanilla extract until stiff peaks form.
- Gently fold the whipped cream into the peanut butter mixture until fully incorporated. Be careful not to deflate the whipped cream.
- Stir in the chopped Cadbury chocolate or mini eggs until evenly distributed.
- Pour the peanut butter filling into the pre-made graham cracker pie crust and spread it evenly.
- Refrigerate the pie for at least 2 hours to allow it to set.
- Before serving, drizzle with chocolate sauce if desired, and add extra Cadbury pieces for garnish.
Tips:
- For an extra crunch, mix in some crushed peanuts or chopped nuts into the filling.
- Letting the pie sit overnight enhances the flavors, making it even more delicious!
Nutrition Facts:
- Calories: 350 per slice
- Total Fat: 20g
- Saturated Fat: 10g
- Cholesterol: 30mg
- Sodium: 150mg
- Total Carbohydrates: 35g
- Dietary Fiber: 2g
- Sugars: 16g
- Protein: 6g