My New Cookbook is Out! Check Out Now!
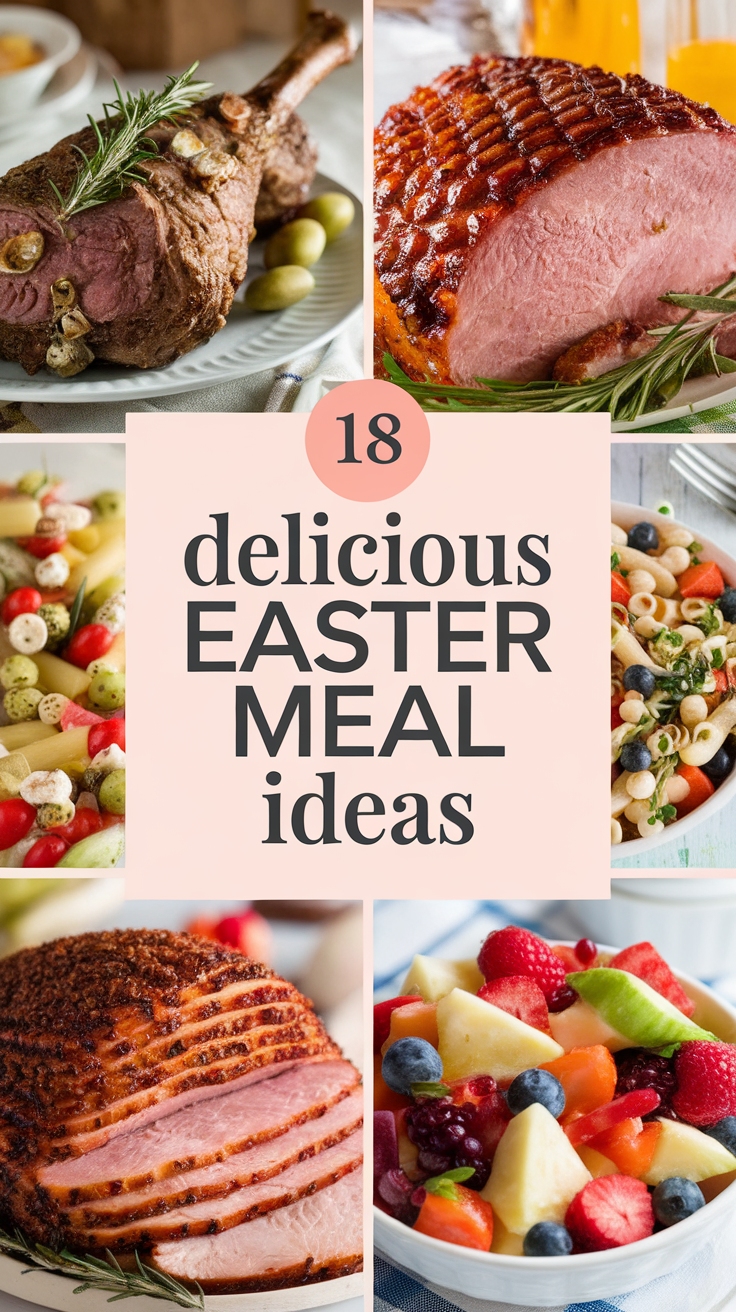
18 Must-Try Easter Meal Ideas with Tasty Side Dishes
This page contains affiliate links and I earn a commission if you make a purchase through one of the links, at no cost to you.
Did you know that Easter is the second-largest holiday in the United States for food consumption, right after Thanksgiving? This year, let’s make your Easter celebration unforgettable with 18 must-try meal ideas that will delight your family and friends! From honey-glazed ham to a luscious chocolate bunny cake, this collection serves up tasty side dishes that will enhance your festive feast and make your meal planning hassle-free!
Shop Our Must-Haves


1. Honey-Glazed Ham with Roasted Asparagus
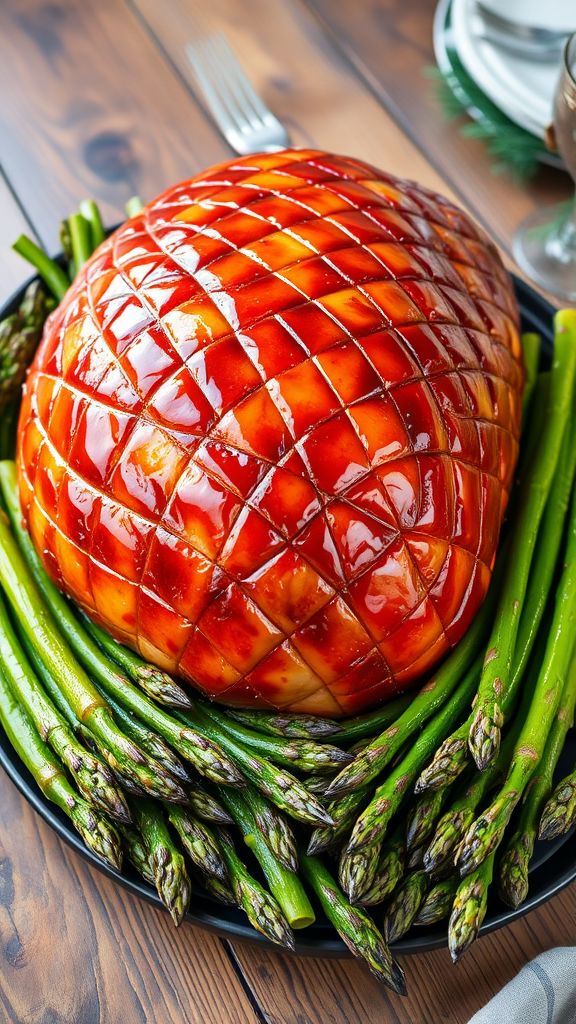
For a delightful centerpiece at your holiday table, this Honey-Glazed Ham with Roasted Asparagus is both flavorful and easy to prepare. The sweet and savory glaze pairs perfectly with tender, roasted asparagus for a wholesome side.
Prep Time: 15 minutes
Cook Time: 1 hour
Additional Time: 10 minutes
Total Time: 1 hour 25 minutes
Servings: 10
Ingredients:
- 1 (8-10 pounds) fully cooked ham
- 1 cup honey
- 1/2 cup brown sugar
- 1 tablespoon Dijon mustard
- 1 teaspoon ground cinnamon
- 1 teaspoon ground cloves
- 1 pound fresh asparagus, trimmed
- 2 tablespoons olive oil
- Salt and pepper to taste
Instructions:
- Preheat your oven to 325°F (163°C).
- In a small saucepan, combine honey, brown sugar, Dijon mustard, cinnamon, and cloves, then bring to a simmer over medium heat, stirring until smooth.
- Place the ham in a large roasting pan, score the surface in a diamond pattern, and pour half of the glaze over the ham.
- Cover the ham with foil and bake in the preheated oven for 1 hour.
- While the ham is baking, prepare the asparagus by placing it in a mixing bowl, drizzling with olive oil, and seasoning with salt and pepper.
- After the ham has baked for 1 hour, remove the foil and brush the remaining glaze over the ham.
- Add the asparagus to the oven, placing it around the ham, and roast for an additional 15 minutes until the asparagus is tender and the ham is heated through.
- Once the ham and asparagus are done, remove them from the oven and let the ham rest for 10 minutes before slicing.
- Serve slices of ham with roasted asparagus on the side.
Tips:
For an extra layer of flavor, consider adding some fresh herbs such as rosemary or thyme to the glaze. You can also experiment with different mustards for added complexity. Roasting the asparagus until slightly crispy will enhance its natural sweetness!
Nutrition Facts:
- Serving Size: 1 slice of ham with asparagus
- Calories: 320
- Total Fat: 12g
- Saturated Fat: 3g
- Cholesterol: 60mg
- Sodium: 800mg
- Total Carbohydrates: 34g
- Dietary Fiber: 2g
- Sugars: 20g
- Protein: 20g
2. Lemon Herb Roasted Chicken with Garlic Mashed Potatoes
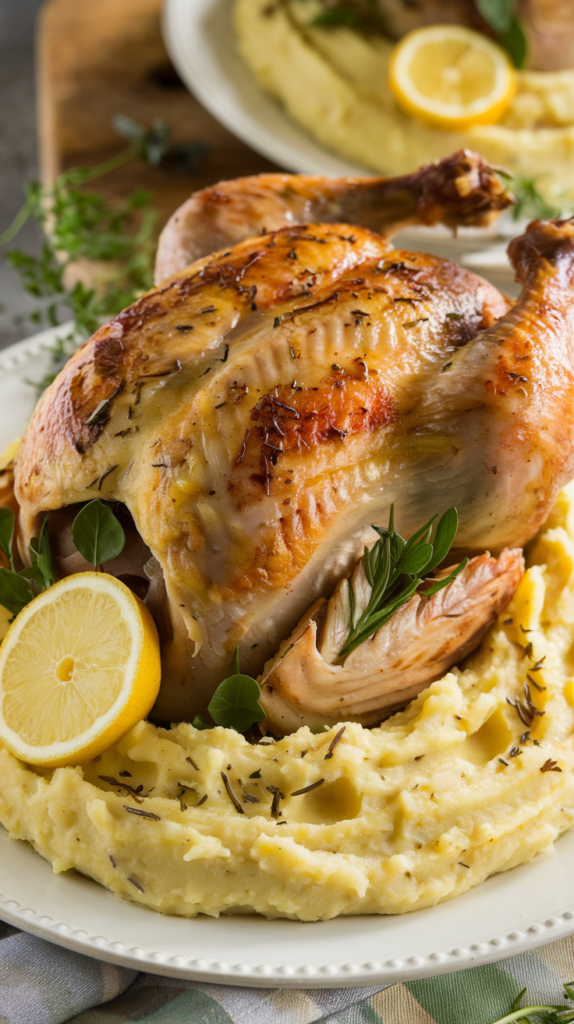
Indulge in a deliciously flavorful Lemon Herb Roasted Chicken accompanied by creamy Garlic Mashed Potatoes. This combination is perfect for a hearty meal that will impress your family and friends!
Prep Time: 20 minutes
Cook Time: 1 hour 15 minutes
Total Time: 1 hour 35 minutes
Servings: 4
Ingredients:
- 1 whole chicken (about 4-5 lbs)
- 2 tablespoons olive oil
- 1 lemon, zested and juiced
- 4 cloves garlic, minced
- 2 teaspoons dried thyme
- 2 teaspoons dried rosemary
- 1 teaspoon salt
- 1/2 teaspoon black pepper
- 1/2 cup chicken broth
- 2 pounds potatoes, peeled and cubed
- 1/2 cup milk
- 4 tablespoons butter
- 2 cloves garlic, minced (for the mashed potatoes)
Instructions:
- Preheat your oven to 425°F (220°C).
- In a small bowl, mix the olive oil, lemon juice, lemon zest, minced garlic, thyme, rosemary, salt, and black pepper to create the marinade.
- Pat the chicken dry with paper towels and place it in a roasting pan. Rub the marinade all over the chicken, making sure to get it underneath the skin for added flavor.
- Pour the chicken broth around the chicken in the roasting pan. This will help keep it moist while roasting.
- Roast the chicken in the preheated oven for about 1 hour and 15 minutes, or until the internal temperature reaches 165°F (75°C) and the juices run clear.
- While the chicken is roasting, prepare the garlic mashed potatoes. In a large pot, boil the cubed potatoes in salted water until soft, about 15-20 minutes.
- Drain the potatoes and return them to the pot. Add the milk, butter, and minced garlic. Mash until smooth and creamy. Season with salt and pepper to taste.
- Once the chicken is done, let it rest for about 10 minutes before carving. Serve with garlic mashed potatoes on the side.
Tips:
- For an extra zesty flavor, consider adding some fresh herbs like parsley or basil when serving.
- To enhance the garlic flavor in the mashed potatoes, try roasting the garlic before mixing it in.
Nutrition Facts:
- Calories: 680
- Protein: 60g
- Fat: 35g
- Carbohydrates: 40g
- Fiber: 5g
- Sugar: 2g
- Sodium: 850mg
3. Baked Salmon with Dill Sauce and Quinoa Salad

Baked Salmon with Dill Sauce and Quinoa Salad is a delightful dish that combines the flavors of the sea with fresh herbs and a nutritious grain. This easy-to-make recipe is perfect for a special occasion like Easter or just a wholesome family dinner.
Prep Time: 15 minutes
Cook Time: 20 minutes
Additional Time: 5 minutes
Total Time: 40 minutes
Servings: 4
Ingredients:
- 4 salmon fillets
- 2 tablespoons olive oil
- Salt and pepper to taste
- 1 lemon, zested and juiced
- 1 cup quinoa
- 2 cups vegetable broth or water
- 1 cup cherry tomatoes, halved
- 1/2 cucumber, diced
- 1/4 red onion, finely chopped
- 1/4 cup fresh parsley, chopped
For the Dill Sauce:
- 1/2 cup Greek yogurt
- 1 tablespoon fresh dill, chopped
- 1 tablespoon lemon juice
- 1 teaspoon Dijon mustard
- Salt and pepper to taste
Instructions:
- Preheat your oven to 400°F (200°C).
- In a baking dish, place the salmon fillets and drizzle with olive oil. Season with salt, pepper, and lemon zest.
- Bake the salmon in the preheated oven for 15-20 minutes, until cooked through and flakes easily with a fork.
- While the salmon is baking, rinse the quinoa under cold water. In a medium saucepan, combine the quinoa and vegetable broth or water.
- Bring the mixture to a boil, then reduce the heat to low, cover, and simmer for about 15 minutes until the quinoa is fluffy.
- Remove the quinoa from heat, and let it rest for 5 minutes, then fluff with a fork.
- In a large bowl, combine the cooked quinoa, cherry tomatoes, cucumber, red onion, and parsley.
- In a small bowl, mix together the ingredients for the dill sauce: Greek yogurt, dill, lemon juice, and Dijon mustard; season with salt and pepper.
- Serve the baked salmon topped with dill sauce alongside the quinoa salad.
Tips:
For an extra burst of flavor, marinate the salmon in olive oil, lemon juice, and herbs for up to 30 minutes before baking. You can also add avocado or bell peppers to the quinoa salad for additional freshness and color.
Nutrition Facts:
- Calories: 420
- Protein: 35g
- Fat: 18g
- Carbohydrates: 32g
- Fiber: 6g
- Sugar: 3g
4. Spring Vegetable Risotto with Parmesan Crisps

Spring is the perfect time to enjoy fresh, vibrant vegetables, and this Spring Vegetable Risotto with Parmesan Crisps is a delicious way to celebrate the season. Creamy risotto paired with crunchy parmesan crisps makes for a delightful dish that’s sure to impress at any gathering.
Prep Time: 15 minutes
Cook Time: 30 minutes
Additional Time: 10 minutes
Total Time: 55 minutes
Servings: 4
Ingredients:
- 1 cup arborio rice
- 4 cups vegetable broth
- 1 cup white wine (optional)
- 1 small onion, finely chopped
- 2 cloves garlic, minced
- 1 cup asparagus, trimmed and cut into 1-inch pieces
- 1 cup peas (fresh or frozen)
- 1 cup zucchini, diced
- 1/2 cup parmesan cheese, grated
- 2 tablespoons olive oil
- Salt and pepper, to taste
- Fresh herbs (such as parsley or basil) for garnish
Instructions:
- In a saucepan, bring the vegetable broth to a simmer and keep it warm over low heat.
- In a large skillet, heat olive oil over medium heat. Add the onion and cook until translucent, about 5 minutes. Stir in the garlic and cook for an additional minute.
- Add the arborio rice to the skillet, stirring to coat the rice with the oil and cook for about 2 minutes until slightly translucent.
- Pour in the white wine (if using) and cook until it has mostly evaporated, stirring frequently.
- Begin adding the warm vegetable broth, one ladle at a time, stirring frequently. Wait until the liquid is mostly absorbed before adding the next ladle. Continue this process for about 18-20 minutes until the rice is creamy and al dente.
- In the last 5 minutes of cooking, add the asparagus, peas, and zucchini to the risotto, stirring to combine.
- Once the risotto is cooked, remove it from heat and stir in the parmesan cheese. Season with salt and pepper to taste.
- For the parmesan crisps, preheat the oven to 400°F (200°C). On a parchment-lined baking sheet, place small mounds of grated parmesan cheese and flatten them slightly. Bake for about 5-7 minutes until the edges are golden brown. Remove from the oven and let cool.
- Serve the risotto topped with fresh herbs and crispy parmesan crisps.
Tips:
- For added flavor, consider adding a squeeze of lemon juice or some lemon zest to the risotto just before serving.
- Feel free to mix and match vegetables based on what’s in season or available. Spinach, spring onions, or arugula would also be great additions.
Nutrition Facts:
- Calories: 450 per serving
- Protein: 12g
- Carbohydrates: 65g
- Fat: 15g
- Fiber: 4g
- Sodium: 700mg
5. Stuffed Leg of Lamb with Mint Yogurt Sauce

Succulent and flavorful, this Stuffed Leg of Lamb with Mint Yogurt Sauce is a show-stopping dish perfect for any festive gathering. The tender lamb is stuffed with aromatic herbs and spices, paired harmoniously with a refreshing mint yogurt sauce.
Prep Time: 20 minutes
Cook Time: 1 hour 30 minutes
Additional Time: 15 minutes
Total Time: 2 hours 5 minutes
Servings: 6
Ingredients:
- 1 (4-5 lb) leg of lamb, bone-in
- 2 cups spinach, chopped
- 1 cup breadcrumbs
- 1/2 cup feta cheese, crumbled
- 1/4 cup pine nuts, toasted
- 3 cloves garlic, minced
- 1/4 cup fresh parsley, chopped
- 1 tsp dried oregano
- 1 tsp salt
- 1/2 tsp black pepper
- 2 tbsp olive oil
- For the mint yogurt sauce:
- 1 cup plain yogurt
- 1/4 cup fresh mint, chopped
- 1 tbsp lemon juice
- Salt and pepper to taste
Instructions:
- Preheat your oven to 350°F (175°C).
- Begin by preparing the stuffing. In a bowl, combine spinach, breadcrumbs, feta cheese, pine nuts, garlic, parsley, oregano, salt, and black pepper. Mix well and set aside.
- Place the leg of lamb on a clean surface and make a long cut along the inside of the leg to create a pocket for the stuffing. Carefully open it up to form a large cavity.
- Carefully stuff the lamb with the prepared stuffing mixture, pressing it down to fill the pocket evenly.
- Use kitchen twine to tie the stuffed leg of lamb at several intervals to secure the stuffing inside. Rub the outside with olive oil, and season with additional salt and pepper.
- Place the stuffed lamb in a roasting pan and roast in the preheated oven for about 1 hour 30 minutes, or until it reaches an internal temperature of 145°F (63°C) for medium-rare.
- While the lamb is roasting, prepare the mint yogurt sauce. In a bowl, mix together yogurt, mint, lemon juice, and season with salt and pepper to taste. Chill until ready to serve.
- Once the lamb is cooked, remove it from the oven and let it rest for 15 minutes before slicing.
- Serve the sliced lamb with a generous drizzle of mint yogurt sauce on top.
Tips:
- For added flavor, marinate the lamb with garlic, olive oil, and herbs for a few hours or overnight.
- Experiment with different nuts or dried fruits in the stuffing to tailor it to your taste preferences.
Nutrition Facts:
- Calories: 450 per serving
- Protein: 40g
- Fat: 30g
- Carbohydrates: 10g
- Fiber: 2g
- Sodium: 600mg
6. Easter Egg Frittata with Spinach and Feta

Celebrate Easter with this delightful Easter Egg Frittata with Spinach and Feta! Packed with fresh spinach and creamy feta, this frittata is not only delicious but also a great way to use up those colorful Easter eggs.
Prep Time: 10 minutes
Cook Time: 20 minutes
Total Time: 30 minutes
Servings: 4
Ingredients:
- 6 large eggs
- 1 cup fresh spinach, chopped
- 1/2 cup feta cheese, crumbled
- 1/4 cup milk
- 1/4 tsp salt
- 1/4 tsp black pepper
- 1 tbsp olive oil
- 1/4 cup onion, diced
- 1/4 cup bell pepper, diced
Instructions:
- Preheat your oven to 375°F (190°C).
- In a large bowl, whisk together the eggs, milk, salt, and black pepper until well combined.
- Heat the olive oil in an oven-safe skillet over medium heat. Add the diced onion and bell pepper, cooking until they are soft, about 3-4 minutes.
- Add the chopped spinach to the skillet and sauté for another 2 minutes until wilted.
- Stir in the feta cheese evenly throughout the mixture.
- Pour the egg mixture into the skillet, ensuring it’s spread evenly over the vegetables.
- Cook for about 5 minutes, gently lifting the edges to allow uncooked egg to flow underneath.
- Transfer the skillet to the preheated oven and bake for an additional 15 minutes, or until the eggs are set and the top is slightly golden.
- Remove from the oven and let it cool for a few minutes before slicing.
Tips:
For added flavor, consider mixing in some fresh herbs like basil or parsley. You can also substitute the spinach with other greens like kale or arugula for a different twist!
Nutrition Facts:
- Calories: 220
- Protein: 14g
- Fat: 16g
- Carbohydrates: 6g
- Fiber: 1g
- Sugar: 1g
7. Glazed Carrots and Peas with Fresh Thyme
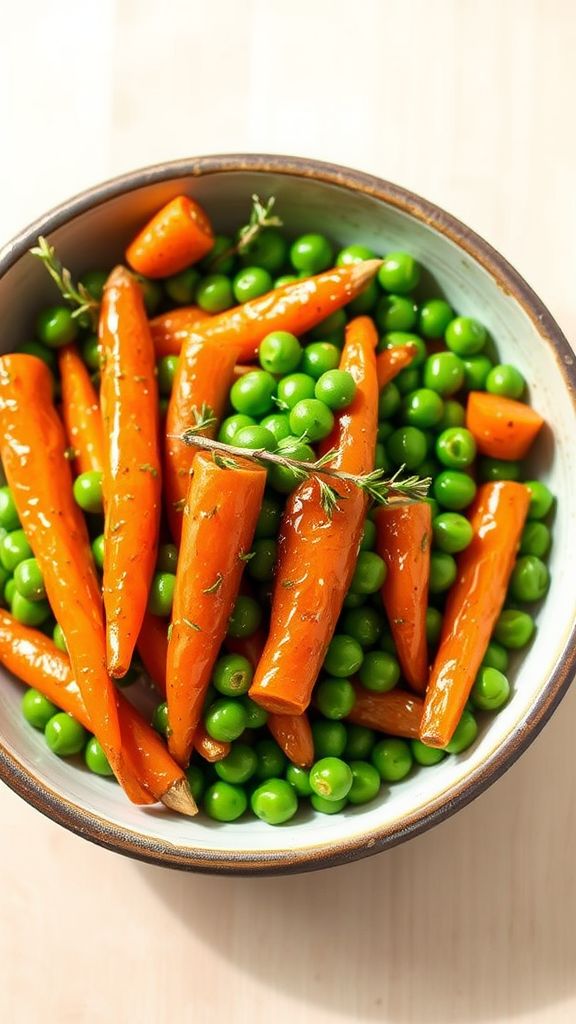
Delight your taste buds this Easter with Glazed Carrots and Peas with Fresh Thyme. This vibrant side dish combines the sweetness of carrots with the freshness of peas, all beautifully elevated by aromatic thyme. Perfect for brightening up your holiday table!
Prep Time: 10 minutes
Cook Time: 15 minutes
Total Time: 25 minutes
Servings: 4
Ingredients:
- 1 lb baby carrots, peeled and trimmed
- 1 cup fresh peas (or frozen peas, thawed)
- 2 tbsp unsalted butter
- 2 tbsp brown sugar
- 1/4 cup vegetable broth (or chicken broth)
- 1 tsp fresh thyme leaves, chopped
- Salt and pepper to taste
Instructions:
- In a large skillet, melt the butter over medium heat.
- Add the baby carrots to the skillet and sauté for about 5 minutes, stirring occasionally, until they begin to soften.
- Sprinkle in the brown sugar and stir to coat the carrots well. Cook for another 2 minutes until the sugar has melted.
- Pour in the vegetable broth and bring to a gentle simmer. Cover and cook for 8 minutes, or until the carrots are tender.
- Add the peas and fresh thyme to the skillet. Stir well and cook for an additional 2-3 minutes until the peas are heated through.
- Season with salt and pepper to taste, give everything one last gentle stir, and then serve warm.
Tips:
- For an extra burst of flavor, add a squeeze of fresh lemon juice just before serving.
- Garnish with additional fresh thyme leaves for a beautiful presentation and enhanced aroma.
Nutrition Facts:
- Calories: 150
- Protein: 2g
- Fat: 7g
- Carbohydrates: 22g
- Fiber: 4g
- Sugar: 6g
8. Creamy Mushroom Stroganoff over Egg Noodles
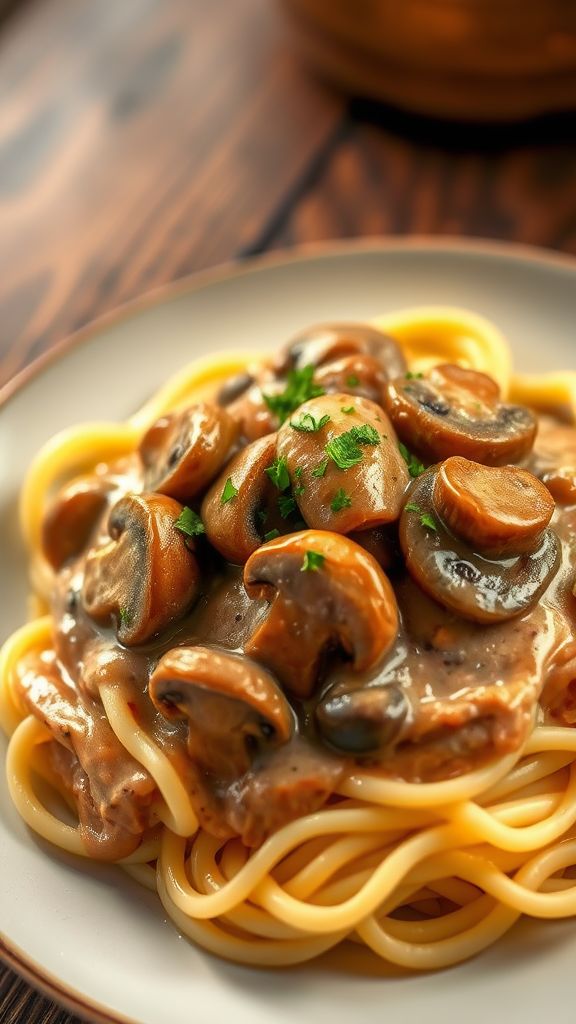
Creamy Mushroom Stroganoff over Egg Noodles is a delightful vegetarian twist on the classic dish that satisfies your comfort food cravings. Packed with rich flavors and creamy texture, this meal is perfect for any occasion.
Prep Time: 10 minutes
Cook Time: 20 minutes
Total Time: 30 minutes
Servings: 4
Ingredients:
- 8 ounces egg noodles
- 2 tablespoons olive oil
- 1 medium onion, diced
- 3 cloves garlic, minced
- 16 ounces mushrooms, sliced (such as cremini or button)
- 1 teaspoon dried thyme
- 1 tablespoon soy sauce
- 1 cup vegetable broth
- 1 tablespoon cornstarch mixed with 2 tablespoons water
- 1 cup sour cream or Greek yogurt
- Salt and pepper to taste
- Fresh parsley, chopped (for garnish)
Instructions:
- Cook the egg noodles according to package instructions in salted water. Drain and set aside.
- In a large skillet, heat olive oil over medium heat. Add diced onion and sauté for about 5 minutes until translucent.
- Stir in the minced garlic and cook for 1 minute until fragrant.
- Add the sliced mushrooms to the skillet. Cook for about 7-10 minutes, stirring occasionally, until they are browned and tender.
- Season the mushroom mixture with dried thyme and soy sauce. Stir to combine.
- Pour in the vegetable broth and bring to a simmer. Gradually stir in the cornstarch mixture to thicken the sauce.
- Once the sauce has thickened, reduce the heat to low and add the sour cream. Stir until well combined. Season with salt and pepper to taste.
- Serve the creamy mushroom sauce over the cooked egg noodles and garnish with fresh parsley.
Tips:
For extra flavor, add a splash of white wine to the mushroom mixture after cooking the onions. If you prefer a bit of heat, consider incorporating some red pepper flakes.
Nutrition Facts:
- Calories: 450
- Protein: 12g
- Fat: 18g
- Carbohydrates: 59g
- Fiber: 3g
- Sugar: 3g
9. Sweet Potato Casserole with Marshmallow Topping
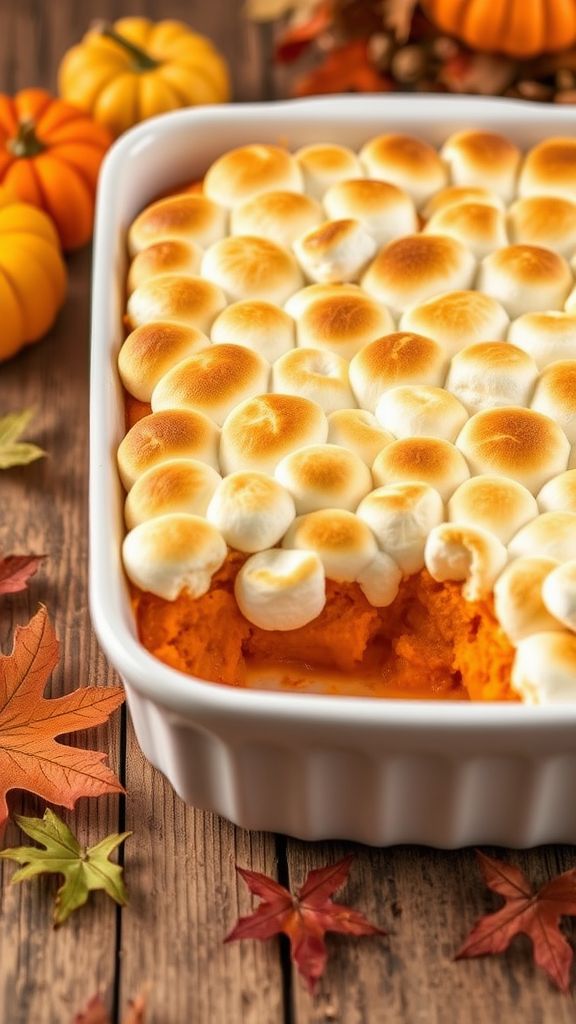
Sweet Potato Casserole with Marshmallow Topping is a delightful dish that combines the creamy, sweet flavor of sweet potatoes with a luscious, fluffy marshmallow topping. Perfect for any holiday gathering, this casserole will be the star of your Easter meal!
Prep Time: 15 minutes
Cook Time: 30 minutes
Additional Time: 10 minutes
Total Time: 55 minutes
Servings: 8
Ingredients:
- 3 cups mashed sweet potatoes (about 4-5 medium sweet potatoes)
- 1/2 cup granulated sugar
- 1/2 cup milk
- 1/2 cup unsalted butter, softened
- 2 large eggs
- 1 teaspoon vanilla extract
- 1 teaspoon ground cinnamon
- 1/2 teaspoon salt
- 2 cups mini marshmallows
Instructions:
- Preheat your oven to 350°F (175°C). Grease a 2-quart baking dish with butter or cooking spray.
- In a large mixing bowl, combine the mashed sweet potatoes, granulated sugar, milk, unsalted butter, eggs, vanilla extract, ground cinnamon, and salt. Mix well until the mixture is smooth and well combined.
- Transfer the sweet potato mixture to the prepared baking dish and spread it evenly.
- Bake in the preheated oven for about 30 minutes, or until the mixture is heated through and the edges are slightly golden.
- Remove the casserole from the oven and carefully sprinkle the mini marshmallows over the top.
- Return the casserole to the oven and bake for an additional 10 minutes, or until the marshmallows are golden brown and toasted.
- Allow the casserole to cool for about 10 minutes before serving.
Tips:
For an extra burst of flavor, consider adding a pinch of nutmeg or maple syrup to the sweet potato mixture. You can also substitute half of the granulated sugar with brown sugar for a richer taste.
Nutrition Facts:
- Calories: 300 per serving
- Total Fat: 10g
- Saturated Fat: 5g
- Cholesterol: 70mg
- Sodium: 180mg
- Total Carbohydrates: 50g
- Dietary Fiber: 4g
- Sugars: 20g
- Protein: 3g
10. Herb-Crusted Pork Tenderloin with Apple Chutney
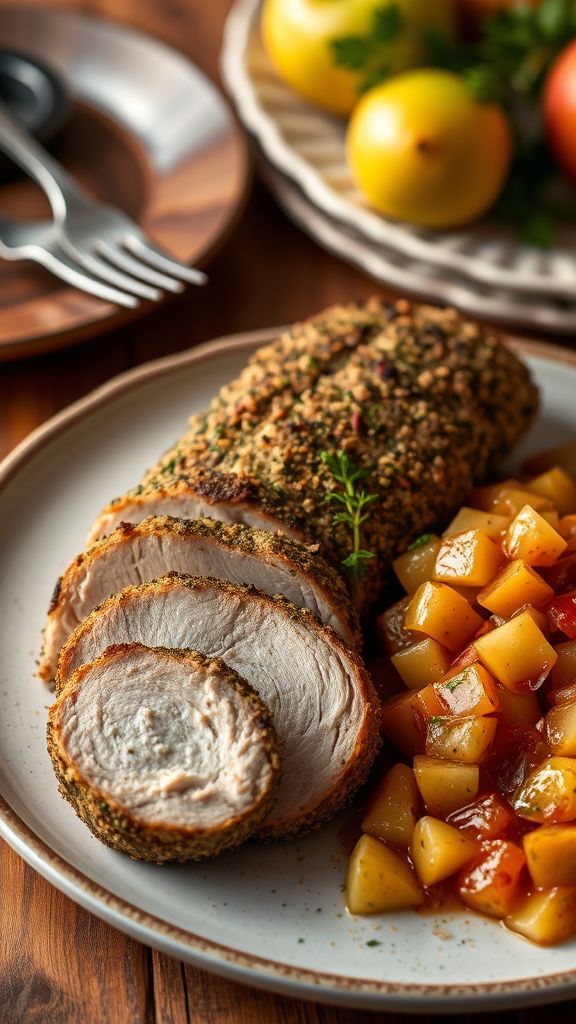
Indulge in the succulent flavors of Herb-Crusted Pork Tenderloin paired with a sweet and tangy Apple Chutney. This dish is perfect for any festive occasion, bringing together earthy herbs and luscious apples for a delightful dining experience.
Prep Time: 20 minutes
Cook Time: 25 minutes
Additional Time: 10 minutes
Total Time: 55 minutes
Servings: 6
Ingredients:
- 1.5 lbs pork tenderloin
- 2 tbsp olive oil
- 2 tbsp Dijon mustard
- 1 tsp garlic powder
- 1 tsp onion powder
- 1 tsp dried thyme
- 1 tsp dried rosemary
- 1/2 tsp salt
- 1/2 tsp black pepper
- 1 cup diced apples (such as Granny Smith)
- 1/2 cup onion, diced
- 1/2 cup brown sugar
- 1/4 cup apple cider vinegar
- 1/4 tsp cinnamon
Instructions:
- Preheat your oven to 400°F (200°C).
- In a small bowl, mix together the olive oil, Dijon mustard, garlic powder, onion powder, thyme, rosemary, salt, and black pepper to create the herb crust.
- Rub the herb mixture evenly over the pork tenderloin, ensuring it’s fully coated.
- Heat a large oven-safe skillet over medium-high heat and sear the tenderloin on all sides for about 3-4 minutes per side until browned.
- Transfer the skillet to the preheated oven and roast for 20-25 minutes, or until the internal temperature reaches 145°F (63°C).
- While the pork is roasting, prepare the apple chutney. In a saucepan, combine the diced apples, onion, brown sugar, apple cider vinegar, and cinnamon.
- Cook over medium heat, stirring occasionally, for about 10 minutes or until the apples are tender and the mixture has thickened slightly.
- Once the pork is done, remove it from the oven and let it rest for 10 minutes before slicing.
- Serve the sliced pork tenderloin drizzled with warm apple chutney.
Tips:
For an extra burst of flavor, consider marinating the pork in the herb mixture for a few hours before cooking. Adding a splash of white wine to the chutney can also elevate the dish with added depth.
Nutrition Facts:
- Calories: 320
- Protein: 36g
- Fat: 15g
- Carbohydrates: 22g
- Fiber: 2g
- Sugar: 14g
11. Spinach and Ricotta Stuffed Shells with Marinara

Warm, cheesy, and comforting, Spinach and Ricotta Stuffed Shells with Marinara is a delightful dish that enchants everyone at the dinner table. This classic Italian recipe is not only hearty but also incredibly satisfying, perfect for any occasion.
Prep Time: 20 minutes
Cook Time: 30 minutes
Additional Time: 10 minutes
Total Time: 1 hour
Servings: 4
Ingredients:
- 12 large pasta shells
- 1 cup ricotta cheese
- 1 cup fresh spinach, chopped
- 1/2 cup shredded mozzarella cheese
- 1/4 cup grated Parmesan cheese
- 1 egg, beaten
- 1 teaspoon garlic powder
- 1 teaspoon Italian seasoning
- Salt and pepper, to taste
- 2 cups marinara sauce
- Extra mozzarella cheese for topping
Instructions:
- Preheat your oven to 375°F (190°C).
- Cook the pasta shells according to package instructions until al dente. Drain and set aside to cool.
- In a large bowl, combine ricotta cheese, chopped spinach, shredded mozzarella cheese, grated Parmesan cheese, beaten egg, garlic powder, Italian seasoning, salt, and pepper. Mix well to ensure all ingredients are evenly incorporated.
- Spread 1 cup of marinara sauce evenly across the bottom of a 9×13 inch baking dish.
- Carefully stuff each pasta shell with the spinach and ricotta filling and place the shells open-side-up in the baking dish.
- Pour the remaining marinara sauce over the stuffed shells, ensuring they are adequately covered.
- Sprinkle some extra mozzarella cheese over the top for a bubbly finish.
- Cover the baking dish with aluminum foil and bake in the preheated oven for 20 minutes.
- Remove the foil and bake for an additional 10 minutes, or until the cheese is melted and bubbly.
- Allow the dish to cool for about 10 minutes before serving.
Tips:
For an added depth of flavor, sauté some minced garlic and onions in olive oil before adding them to the ricotta mixture. Top with fresh basil or oregano before serving for an extra burst of freshness.
Nutrition Facts:
- Calories: 400
- Protein: 20g
- Carbohydrates: 45g
- Fat: 18g
- Fiber: 3g
- Sodium: 600mg
12. Grilled Vegetable Platter with Balsamic Glaze
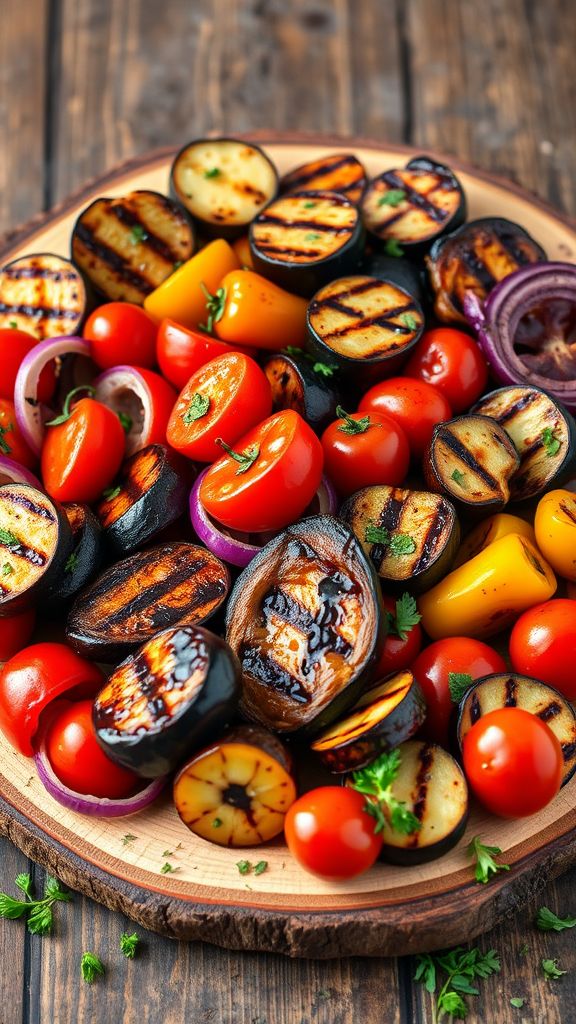
Grilled Vegetable Platter with Balsamic Glaze is a vibrant, healthy dish perfect for any gathering, especially during the Easter celebration. The smoky flavor of the grilled vegetables pairs beautifully with the rich, sweet tang of the balsamic glaze, creating a dish that’s both visually stunning and deliciously satisfying.
Prep Time: 15 minutes
Cook Time: 15 minutes
Additional Time: 10 minutes
Total Time: 40 minutes
Servings: 4
Ingredients:
- 2 zucchinis, sliced
- 1 bell pepper (red or yellow), cut into strips
- 1 red onion, cut into wedges
- 1 eggplant, sliced
- 1 cup cherry tomatoes
- 3 tablespoons olive oil
- 1 teaspoon garlic powder
- 1 teaspoon dried oregano
- Salt and pepper to taste
- 1/4 cup balsamic glaze
Instructions:
- Preheat the grill to medium-high heat.
- In a large bowl, combine the sliced zucchinis, bell pepper, red onion, eggplant, and cherry tomatoes.
- Drizzle the olive oil over the vegetables and sprinkle with garlic powder, dried oregano, salt, and pepper. Toss everything to ensure the vegetables are evenly coated.
- Place the vegetables in a grill basket or directly on the grill grates.
- Grill the vegetables for about 15 minutes, turning occasionally, until they are tender and have nice grill marks.
- Once cooked, transfer the vegetables to a serving platter and drizzle with the balsamic glaze.
- Let the platter sit for 10 minutes to allow flavors to meld before serving.
Tips:
- For extra flavor, marinate the vegetables in the olive oil and seasonings for 30 minutes before grilling.
- Add some fresh herbs, such as basil or parsley, after grilling for a burst of freshness.
Nutrition Facts:
- Calories: 120
- Total Fat: 8g
- Saturated Fat: 1g
- Cholesterol: 0mg
- Sodium: 5mg
- Carbohydrates: 12g
- Fiber: 4g
- Sugars: 4g
- Protein: 2g
13. Pistachio-Crusted Cod with Lemon Butter Sauce
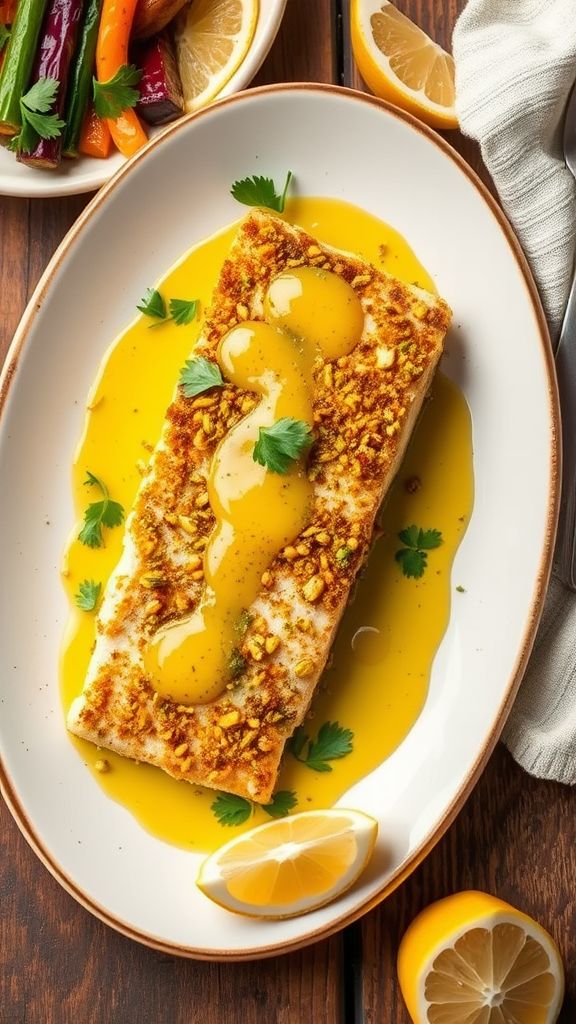
Indulge in the delightful flavors of Pistachio-Crusted Cod with Lemon Butter Sauce. This dish is not only visually appealing but also packed with taste that will impress your family and friends at any gathering.
Prep Time: 15 minutes
Cook Time: 20 minutes
Total Time: 35 minutes
Servings: 4
Ingredients:
- 4 cod fillets (about 6 ounces each)
- 1 cup pistachios, shelled and finely chopped
- 1/2 cup Panko breadcrumbs
- 1/4 cup parmesan cheese, grated
- 1 teaspoon garlic powder
- 1 teaspoon salt
- 1/2 teaspoon black pepper
- 2 tablespoons olive oil
- 1/4 cup unsalted butter
- 2 tablespoons fresh lemon juice
- Zest of 1 lemon
- Fresh parsley for garnish (optional)
Instructions:
- Preheat your oven to 400°F (200°C). Line a baking sheet with parchment paper.
- In a bowl, mix together the finely chopped pistachios, Panko breadcrumbs, parmesan cheese, garlic powder, salt, and black pepper.
- Pat the cod fillets dry with paper towels. Brush each fillet with olive oil on both sides.
- Press the pistachio mixture onto the top of each cod fillet to create a crust. Ensure it is well adhered.
- Place the coated fillets on the prepared baking sheet and bake in the preheated oven for 15-20 minutes, or until the cod flakes easily with a fork.
- While the cod is baking, prepare the lemon butter sauce. In a small saucepan over medium heat, melt the unsalted butter.
- Once the butter is melted, stir in the fresh lemon juice and lemon zest. Remove from heat as soon as it’s well combined.
- Serve the pistachio-crusted cod drizzled with the lemon butter sauce, garnished with fresh parsley if desired.
Tips:
- For an extra kick, add a pinch of red pepper flakes to the pistachio mixture.
- Pair this dish with a fresh garden salad or steamed vegetables for a complete meal.
Nutrition Facts:
- Calories: 430
- Protein: 37g
- Total Fat: 28g
- Saturated Fat: 7g
- Carbohydrates: 13g
- Fiber: 3g
- Sugar: 1g
- Cholesterol: 90mg
14. Shrimp and Grits with Andouille Sausage

Experience the rich and savory flavors of the South with this delightful Shrimp and Grits with Andouille Sausage recipe. It’s a perfect dish for any occasion, combining succulent shrimp, zesty sausage, and creamy grits for a comforting meal.
Prep Time: 15 minutes
Cook Time: 30 minutes
Additional Time: 5 minutes
Total Time: 50 minutes
Servings: 4
Ingredients:
- 1 cup grits
- 4 cups water or chicken broth
- 1 cup shredded sharp cheddar cheese
- 1 pound large shrimp, peeled and deveined
- 8 ounces Andouille sausage, sliced
- 4 tablespoons butter
- 2 cloves garlic, minced
- 1/2 cup green onions, chopped (plus extra for garnish)
- 1 teaspoon Cajun seasoning
- Salt and black pepper to taste
- Optional: hot sauce for serving
Instructions:
- In a medium saucepan, bring water or chicken broth to a boil. Slowly whisk in the grits and reduce heat to low. Cook for about 20-25 minutes, stirring occasionally until thickened and creamy.
- Stir in shredded cheddar cheese and 2 tablespoons of butter into the grits until melted and well incorporated. Keep warm.
- In a large skillet over medium heat, melt 2 tablespoons of butter. Add the Andouille sausage and cook until browned, about 5 minutes.
- Add the garlic and green onions to the skillet and sauté for an additional 2-3 minutes until fragrant.
- Add the shrimp to the skillet and season with Cajun seasoning, salt, and black pepper. Cook until the shrimp turn pink and opaque, approximately 3-5 minutes.
- To serve, spoon the grits onto plates and top with the shrimp and sausage mixture. Garnish with additional green onions and a dash of hot sauce if desired.
Tips:
For an even more flavorful dish, marinate the shrimp in Cajun seasoning for an hour before cooking. You can also add a splash of lemon juice for brightness or some chopped red bell pepper for extra sweetness and color.
Nutrition Facts:
- Calories: 600 per serving
- Protein: 32g
- Fat: 30g
- Carbohydrates: 52g
- Fiber: 3g
- Sugar: 2g
- Sodium: 850mg
15. Mediterranean Pasta Salad with Feta and Olives
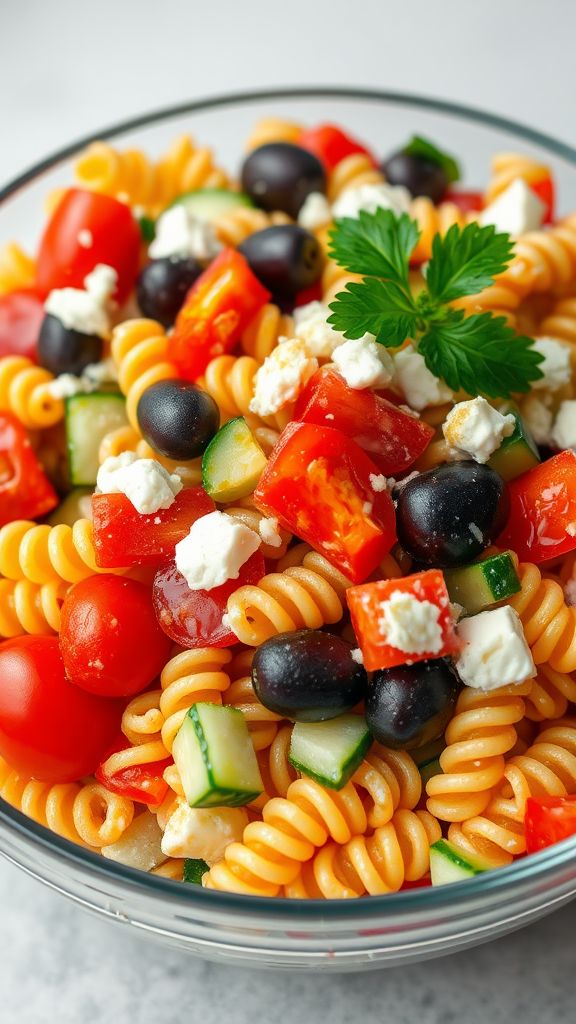
Mediterranean Pasta Salad with Feta and Olives is a vibrant, refreshing dish that’s perfect for any gathering. Bursting with Mediterranean flavors, this salad combines tender pasta with crunchy vegetables, tangy feta, and briny olives for a delightful taste experience.
Prep Time: 15 minutes
Additional Time: 30 minutes
Total Time: 45 minutes
Servings: 6
Ingredients:
- 8 oz fusilli or rotini pasta
- 1 cup cherry tomatoes, halved
- 1 cucumber, diced
- 1 bell pepper, diced (any color)
- 1/2 red onion, finely chopped
- 1/2 cup Kalamata olives, pitted and sliced
- 1/2 cup feta cheese, crumbled
- 1/4 cup extra virgin olive oil
- 2 tbsp red wine vinegar
- 1 tsp dried oregano
- 1/2 tsp salt
- 1/4 tsp black pepper
- Fresh parsley, chopped (for garnish)
Instructions:
- Cook the pasta according to package instructions until al dente. Drain and rinse under cold water to cool.
- In a large mixing bowl, combine the cooled pasta, cherry tomatoes, cucumber, bell pepper, red onion, Kalamata olives, and feta cheese.
- In a small bowl, whisk together the extra virgin olive oil, red wine vinegar, dried oregano, salt, and black pepper to create the dressing.
- Pour the dressing over the pasta salad and gently toss until well combined.
- Cover the salad and refrigerate for at least 30 minutes to allow the flavors to meld.
- Before serving, give the salad a final toss and garnish with fresh parsley.
Tips:
- For extra flavor, consider adding fresh basil or arugula to the salad.
- You can also include grilled chicken or chickpeas for added protein.
- Feel free to adjust the amount of feta and olives according to your taste preferences.
Nutrition Facts:
- Calories: 290 per serving
- Total Fat: 18g
- Saturated Fat: 4g
- Cholesterol: 15mg
- Sodium: 410mg
- Carbohydrates: 29g
- Fiber: 3g
- Sugar: 3g
- Protein: 7g
16. Quiche Lorraine with a Side of Mixed Greens

Quiche Lorraine is a classic French dish that combines a rich, custardy filling with crispy bacon and aromatic cheese, all nestled in a flaky crust. Serve it alongside a refreshing mixed greens salad for a perfect balance of flavors and textures.
Prep Time: 15 minutes
Cook Time: 35 minutes
Additional Time: 10 minutes
Total Time: 60 minutes
Servings: 6
Ingredients:
- 1 pre-made pie crust
- 6 large eggs
- 1 cup heavy cream
- 1 cup milk
- 1 cup grated Gruyère cheese
- ½ cup cooked and crumbled bacon
- 1/4 cup chopped green onions
- 1/4 teaspoon nutmeg
- Salt and pepper to taste
Instructions:
- Preheat your oven to 375°F (190°C).
- Roll out the pre-made pie crust and fit it into a 9-inch pie dish. Trim any excess dough hanging over the edges.
- In a large mixing bowl, whisk together the eggs, heavy cream, and milk until smooth.
- Stir in the Gruyère cheese, cooked bacon, and green onions. Add nutmeg, salt, and pepper, mixing well.
- Pour the egg mixture into the prepared pie crust.
- Bake in the preheated oven for 30-35 minutes, or until the quiche is set and the top is golden brown.
- Remove from the oven and let it cool for 10 minutes before slicing.
- While the quiche is cooling, prepare the mixed greens salad with any desired dressing and toppings. Serve the quiche warm alongside the salad.
Tips:
- For added flavor, try mixing in some shredded cheddar or using smoked bacon for a deeper taste.
- You can also add herbs like thyme or parsley for a fresh element.
Nutrition Facts:
- Calories: 350
- Protein: 13g
- Fat: 28g
- Carbohydrates: 20g
- Fiber: 1g
- Cholesterol: 150mg
17. Beet and Goat Cheese Salad with Candied Walnuts
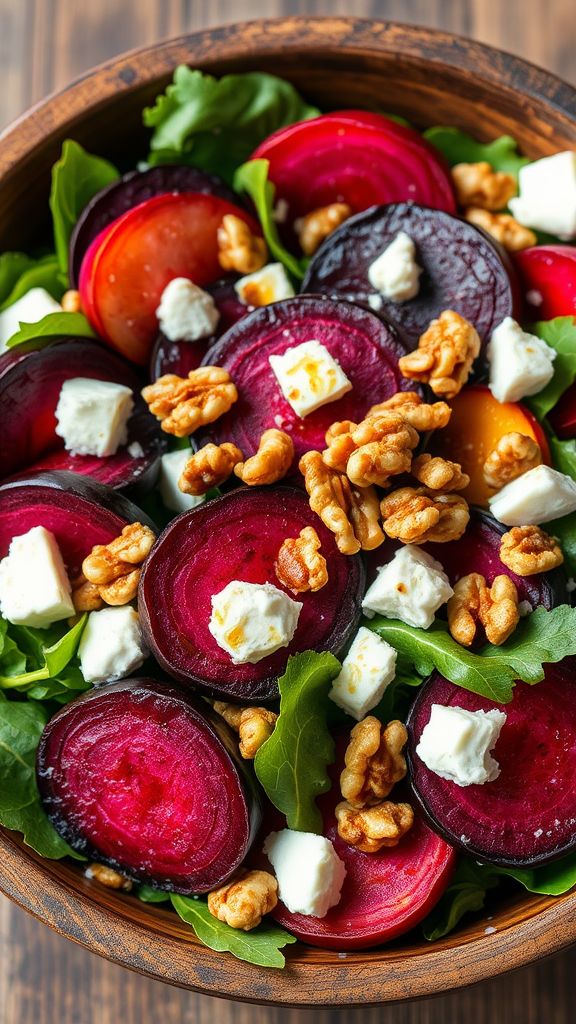
Indulge in the vibrant flavors of spring with this Beet and Goat Cheese Salad with Candied Walnuts. This salad features earthy roasted beets paired with creamy goat cheese, topped with crunchy, sweet candied walnuts that bring a delightful contrast to every bite.
Prep Time: 15 minutes
Additional Time: 30 minutes
Total Time: 45 minutes
Servings: 4
Ingredients:
- 4 medium beets, roasted and sliced
- 4 oz goat cheese, crumbled
- 1 cup mixed greens (such as arugula and spinach)
- 1/2 cup walnuts, roughly chopped
- 1/3 cup sugar
- 2 tablespoons unsalted butter
- 1/4 teaspoon cinnamon
- 2 tablespoons balsamic vinegar
- 2 tablespoons olive oil
- Salt and pepper, to taste
Instructions:
- Preheat your oven to 350°F (175°C). Spread the chopped walnuts on a baking sheet and toast them in the oven for 5-7 minutes or until they are fragrant and slightly golden. Remove and let cool.
- In a small saucepan, melt the butter over medium heat. Add the sugar and cinnamon, stirring until the sugar is dissolved and bubbling.
- Add the cooled walnuts to the saucepan and stir to coat them in the sugar mixture. Spread the coated walnuts back on the baking sheet and let them cool until hardened.
- In a large salad bowl, combine the mixed greens and sliced beets.
- Drizzle with olive oil and balsamic vinegar. Season with salt and pepper to taste, and toss gently to combine.
- Top the salad with crumbled goat cheese and candied walnuts. Serve immediately.
Tips:
- For added flavor, consider roasting the beets with a bit of olive oil, salt, and pepper at 400°F (200°C) for 30-40 minutes instead of boiling.
- Drizzle with a bit of honey or add sliced apples for an extra layer of sweetness and crunch.
Nutrition Facts:
- Calories: 250
- Total Fat: 20g
- Saturated Fat: 5g
- Cholesterol: 15mg
- Sodium: 100mg
- Total Carbohydrate: 17g
- Dietary Fiber: 4g
- Sugars: 8g
- Protein: 6g
18. Chocolate Bunny Cake with Vanilla Frosting

Indulge in a delightful Chocolate Bunny Cake with Vanilla Frosting that’s perfect for Easter celebrations! This charming cake not only looks festive but also tastes divine, making it a hit at any gathering. Follow this simple recipe to create a whimsical dessert that everyone will love.
Prep Time: 25 minutes
Cook Time: 30 minutes
Additional Time: 1 hour (cooling and frosting)
Total Time: 1 hour 55 minutes
Servings: 12
Ingredients:
- 2 cups all-purpose flour
- 1 ¾ cups granulated sugar
- ¾ cup unsweetened cocoa powder
- 1 ½ teaspoons baking powder
- 1 ½ teaspoons baking soda
- 1 teaspoon salt
- 2 large eggs
- 1 cup whole milk
- ½ cup vegetable oil
- 2 teaspoons vanilla extract
- 1 cup boiling water
- 2 cups unsalted butter, softened (for frosting)
- 4 cups powdered sugar
- 2 teaspoons vanilla extract (for frosting)
- 3-4 tablespoons heavy cream (as needed for frosting consistency)
- Colored sprinkles (for decoration)
Instructions:
- Preheat your oven to 350°F (175°C). Grease and flour two 9-inch round cake pans and set aside.
- In a large mixing bowl, sift together the flour, sugar, cocoa powder, baking powder, baking soda, and salt until well combined.
- Add the eggs, milk, vegetable oil, and vanilla extract to the dry ingredients. Beat on medium speed for about 2 minutes until the mixture is smooth.
- Carefully stir in the boiling water. The batter will be thin, but this gives the cake its moist texture.
- Pour the batter evenly into the prepared cake pans. Bake in the preheated oven for 30-35 minutes or until a toothpick inserted into the center comes out clean.
- Allow the cakes to cool in the pans for 10 minutes, then transfer them to a wire rack to cool completely.
- While the cakes are cooling, prepare the vanilla frosting. In a large bowl, beat the butter on medium speed until creamy. Gradually add the powdered sugar and beat until smooth.
- Add the vanilla extract and enough heavy cream to reach your desired frosting consistency. Beat on high speed for an additional 3 minutes until fluffy.
- Once the cakes are completely cooled, place one layer on a serving platter. Spread a generous layer of frosting on top, then add the second layer.
- Frost the top and sides of the cake with the remaining vanilla frosting. Decorate with colored sprinkles to give it an Easter-themed look.
- For added cuteness, use a small bunny-shaped cutter to make bunny shapes from leftover cake scraps, then place them on the top of the cake.
Tips:
For an extra chocolatey flavor, consider adding chocolate chips to the batter before baking. You can also infuse the frosting with some almond extract for a unique twist.
Nutrition Facts:
- Calories: 540 per serving
- Fat: 25g
- Carbohydrates: 73g
- Protein: 5g
- Sugar: 52g
- Sodium: 250mg